
Importing/Exporting Data
DataArts Architecture allows you to import and export processes, subjects, lookup tables, data standards, ER modeling tables (physical tables), logical entities, dimensions and fact tables in dimensional modeling, business metrics, technical metrics, and summary tables in data mart. You cannot import or export time filters or data in the configuration center and review center.
This section describes how to import and export an ER modeling table. The operations for importing and exporting other data are similar. For details about how to import and export other data, see DataArts Architecture Data Migration.
Constraints
- Before importing tables and logical entities in ER modeling, dimensions and fact tables in dimensional modeling, and summary tables in Data Mart, ensure that a data connection has been created in Management Center and is available.
- Time filters, and data in the Review Center and Configuration Center cannot be imported or exported. You must synchronize them manually before migrating other data.
- The maximum size of a file to be imported is 4 MB. A maximum of 3,000 metrics can be imported. A maximum of 500 tables can be exported at a time.
Importing a Table to a Logical Model
- On the DataArts Architecture page, choose Logical Models in the left navigation pane.
- On the displayed page, click the card of the target logical model, select an object in the subject directory, and choose .
- In the dialog box displayed, click ER Modeling Template. Figure 1 Import Table dialog box

Table 1 Parameters for importing a table Parameter
Description
Update Table
Whether to update the existing table if the table to be imported already exists in the ER model. The system determines whether the table to import exists in the ER model based on the table code. The import operation can be used to create a table or update an existing table. It does not delete a table. The options are as follows:
- No: If you select this option, the existing tables will not be updated.
- Yes: If you select this option, the existing tables will be updated. If a table is in the Published state, you must publish the table again after updating it so that the updated table can take effect.
Upload File
Select the file to import. You can use either of the following methods to obtain the file to import:
- Downloading the ER modeling template and fill in the template
In the Import Table dialog box, click ER Modeling Template to download the template, fill in the template, and save the settings.
- Exporting tables to files
You can export the lookup tables created in DataArts Architecture of a DataArts Studio instance to an Excel file. Then, import the Excel file. See Exporting a Table or DDL for details.
- Open the downloaded template, set the parameters in the template, and save the template. The Description sheet in the template is for reference only.
Parameters whose names start with an asterisk (*) are mandatory, and other parameters are optional.
The table below describes the parameters in the Tables sheet.
Table 2 Parameters in the Tables sheet Parameter
Description
Subject
Enter the encoding paths of existing subjects, which are separated by slashes (/). If no subject is available, create one by referring to Designing Subjects.
*Logical Entity Name
Table name. Newline characters and the following characters are not allowed: \ < > % " ' ;
*Table Name
Name of the table. Table codes cannot start with numbers. Only letters, numbers, and the following special characters are allowed: _${}
Table Alias
Alias of a table. This parameter is displayed when you have enabled Table Alias on the Configuration Center page.
Table Tags
Tags to be added to the table. Enter an existing or a new tag. You can add a tag on the Tags page of DataArts Catalog and go back to this page to select the tag. For details on how to add a tag, see Managing Asset Tags.
*Table Description
A description of the table.
Owner
You can enter an owner name or select an existing owner in the current workspace of the DataArts Studio instance.
Parent Table
You can enter only the names of other tables in this template.
DWS DISTRIBUTE BY
This field is required only for DWS data connections. The HASH and REPLICATION modes are supported.
*Field Name
The name of a field in the table. Newline characters and the following characters are not allowed: \ < > % " ' ;
Field Code
The code of the field in the table. It must start with letters. Only letters, digits, and underscores (_) are allowed.
Code
Code of an attribute field in a table, which is automatically generated by the system
Field Alias
Alias of a field. This parameter is displayed when you have enabled Field Alias on the Configuration Center page.
Field Ordinal
Sequence number of the field in the table. The value starts from 1. This parameter is optional. If this parameter is left blank, fields are sorted in the sequence in the template by default.
Field Description
A description of the field.
*Field Data Type
Data type of the logical model. For details, see the DEFAULT group in Field Types.
Field Data Length
Data length. For a variable-length data type, specify the data length if a data connection type supports the data length.
For example, for the DWS data connection type, if the field type is CHAR(10), set Field Data Type to CHAR and Field Data Length to 10.
Partition
The value Y indicates that the field is a partition field, and the value N indicates that the field is not a partition field.
Primary Key
The value Y indicates that the field is a primary key, and the value N indicates that the field is not a primary key.
Not Null
The value Y indicates that the field is not empty, and the value N indicates that the field can be empty.
Associate Data Standard
The code of the data standard to be associated. If no data standard is available, create one. See Creating Data Standards for details.
Field Tags
Tags to add to the field. Enter an existing tag or a new tag. You can add a tag on the Tags page of DataArts Catalog and go back to this page to select the tag. For details on how to add a tag, see Managing Asset Tags.
configs
Enter the name and value of the custom item in Advanced Settings.
- The table below describes the parameters in the Relations sheet.
Table 3 Parameters in the Relations sheet Parameter
Description
Relation Name
Name of the relation. It must start with letters. Only letters, digits, and the following special characters are allowed: ()-_
*Child Table
Name of the child table in the relationship
*Child Table Field
Name of a field in the child table in the relationship. The field must be a foreign key of the child table and mapped to the primary key of the parent table.
*Child to Parent
Mapping of a child table to a parent table. The following values are available:
- 1: Each piece of data in the child table corresponds to only one piece of data in the parent table.
- 0,1: Each piece of data in the child table corresponds to at most one piece of data in the parent table.
- 0..n: One piece of data in the child table corresponds to multiple pieces of data in the parent table.
- 1..n: Each piece of data in the child table corresponds to at least one piece of data in the parent table.
*Parent to Child
Mapping of a parent table to a child table. The following values are available:
- 1: Each piece of data in the parent table corresponds to only one piece of data in the child table.
- 0,1: Each piece of data in the parent table corresponds to at most one piece of data in the child table.
- 0..n: One piece of data in the parent table corresponds to multiple pieces of data in the child table.
- 1..n: One piece of data in the parent table corresponds to at least one piece of data in the child table.
*Parent Table
Name of the parent table in the relationship
*Parent Table Field
Name of a field in the parent table in the relationship. The field must be a primary key of the parent table and mapped to the foreign key of the child table.
Role Name
Name of a custom role that identifies the relationship. It must start with letters. Only letters, digits, and the following special characters are allowed: ()-_
- Enter the names of the associated tables and fields in the Associated Rules sheet.
The table below describes the parameters in the Associated Rules sheet.
Table 4 Parameters in the Associated Rules sheet Parameter
Description
*Table Name
Name of the table. It cannot start with digits. Only letters, digits, and the following special characters are allowed: _${}
*Field Name
The code of the field in the table. It must start with letters. Only letters, digits, and underscores (_) are allowed.
Rule Name
Enter an existing rule name. In the upper left corner of the DataArts Studio console, select DataArts Quality from the drop-down list box. Then, you can view the existing rule names on the Rule Templates page.
Alarm Triggering Condition
An alarm condition expression consists of alarm parameters and logical operators. When a quality job is running, the system calculates the result of the alarm condition expression and determines whether to trigger the alarm based on the result of the expression. If the expression result is true, the alarm will be triggered. Otherwise, no quality alarm will be triggered.
In the alarm condition expression, alarm parameters are represented by variables such as ${1}, ${2}, and ${3}. The variable name indicates the alarm parameter of the specified quality rule. The variable $1 indicates the first alarm parameter, $2 indicates the second alarm parameter, and so on. In the upper left corner of the DataArts Studio console, select DataArts Quality from the drop-down list box. Access the Rule Templates page and view the alarm parameters supported by the data quality rule in the Result Description column.
Example: ${1} > 100
Expression
This parameter must be configured when Rule Name is set to Expression or Validity Verification.
- View the result on the Last Import tab page. If the import is successful, click Close. If the import fails, you can view the failure cause, correct the template file, and upload it again. Figure 2 Last Import tab page


- If the standard code associated with the imported logical entity does not exist or is not published, the system displays an error and the code name. In this case, change the code and try again.
- If the data to be imported does not exist, an error message in the format of Table name:Field name is displayed in the Remarks column on the Last Import tab page.
Importing a Table to a Physical Model
- On the DataArts Architecture page, choose in the left navigation pane.
- In the middle of the page, find the required physical model from the drop-down list box on the top, or click a physical model in data warehouse planning to access the physical model page. Select an object in the subject directory and click Import.
- In the dialog box displayed, click ER Modeling Template. Figure 3 Import Table dialog box
Table 5 Parameters for importing a table Parameter
Description
Update Table
Whether to update the existing table if the table to be imported already exists in the ER model. The system determines whether the table to import exists in the ER model based on the table code. The import operation can be used to create a table or update an existing table. It does not delete a table. The options are as follows:
- No: If you select this option, the existing tables will not be updated.
- Yes: If you select this option, the existing tables will be updated. If a table is in the Published state, you must publish the table again after updating it so that the updated table can take effect.
Upload File
Select the file to import. You can use either of the following methods to obtain the file to import:
- Downloading the ER modeling template and fill in the template
In the Import Table dialog box, click ER Modeling Template to download the template, fill in the template, and save the settings.
- Exporting tables to files
You can export the lookup tables created in DataArts Architecture of a DataArts Studio instance to an Excel file. Then, import the Excel file. See Exporting a Table or DDL for details.
- Open the downloaded template, set the parameters in the template, and save the template. The Description sheet in the template is for reference only.
Parameters whose names start with an asterisk (*) are mandatory, and other parameters are optional.
The table below describes the parameters in the Tables sheet.
Table 6 Parameters in the Tables sheet Parameter
Description (Importing DLI/POSTGRESQL/DWS/MRS Hive Tables)
Subject
Enter the encoding paths of existing subjects, which are separated by slashes (/). If no subject is available, create one. For details, see Designing Subjects.
*Logical Entity Name
Table name. Newline characters and the following characters are not allowed: \ < > % " ' ;
*Table Name
Name of the table. Table codes cannot start with numbers. Only letters, numbers, and the following special characters are allowed: _${}
Table Alias
Alias of a table. This parameter is displayed when you have enabled Table Alias on the Configuration Center page.
Table Tags
Tags to be added to the table. Enter an existing or a new tag. You can add a tag on the Tags page of DataArts Catalog and go back to this page to select the tag. For details on how to add a tag, see Managing Asset Tags.
*Table Description
A description of the table.
Asset Owner
Enter the username for entering the current workspace. Only the workspace admin, developer, or O&M personnel can be set as the designer.
Data Connection Type
The following connection types are supported: DWS, DLI, POSTGRESQL, and MRS Hive.
*Table Type
DLI models support the following table types:- DLI_MANAGED: Data is stored in a DLI table.
- DLI_EXTERNAL: Data is stored in an OBS table. When Table Type is set to DLI_EXTERNAL, you must set OBS Path.
- DLI_VIEW is available for import only.
DWS models support the following table types:
- DWS_ROW: row type
- DWS_COLUMN: column type
- DWS_VIEW: view type
This parameter is unavailable for the tables created in MRS Hive models.
OBS Path
Enter an OBS path for storing the source data associated with the table if Table Type is set to DLI_EXTERNAL. The OBS path format is bucket_name/filepath.
Data Format
This parameter is available only for tables created in DLI models.
If the table type is DLI_MANAGED, the options of the data format are Parquet and Carbon.
If the table type is DLI_EXTERNAL, the options of the data format are Parquet, Carbon, CSV, ORC, JSON, and Avro.
Data Connection
Enter the name of a created data connection.
Database
Enter the name of a created database.
Connection Extra
If Data Connection Type is DLI, enter a DLI queue name. If Data Connection Type is DWS or POSTGRESQL, enter a schema name.
DWS DISTRIBUTE BY
This field is required only for DWS data connections. The HASH (attribute name) and REPLICATION modes are supported.
HUDI PreCombineField
Version field. This field is mandatory only for the Hudi table.
*Field Name
The name of a field in the table. Newline characters and the following characters are not allowed: \ < > % " ' ;
*Field Code
The code of the field in the table. It must start with letters. Only letters, digits, and underscores (_) are allowed.
Field Alias
Alias of a field. This parameter is displayed when you have enabled Field Alias on the Configuration Center page.
Field Ordinal
Sequence number of the field in the table. The value starts from 1. This parameter is optional. If this parameter is left blank, fields are sorted in the sequence in the template by default.
Field Description
A description of the field.
*Field Data Type
The supported data types vary depending on the data connection types. For details, see Field Types.
Field Data Length
For a variable-length data type, specify the data length if a data connection type supports the data length.
For example, for the DWS data connection type, if the field type is CHAR(10), set Field Data Type to CHAR and Field Data Length to 10.
Partition
The value Y indicates that the field is a partition field, and the value N indicates that the field is not a partition field.
Primary Key
The value Y indicates that the field is a primary key, and the value N indicates that the field is not a primary key.
Not Null
The value Y indicates that the field is not empty, and the value N indicates that the field can be empty.
Associate Data Standard
The code of the data standard to be associated. This field can be left blank. If no data standard is available, create one. For details, see Creating Data Standards.
Field Tags
Tags to add to the field. Enter an existing tag or a new tag. You can add a tag on the Tags page of DataArts Catalog and go back to this page to select the tag. For details on how to add a tag, see Managing Asset Tags.
configs
Additional table configuration details stored in JSON format. The format is as follows:
{
"option_name1": "value",
"option_name2": "value"
......
}
Example:
{
"a1": "100",
"a2": "30"
}
Version
This parameter is optional.
configs
Enter the name and value of the custom item in Advanced Settings.
- The table below describes the parameters in the Relations sheet.
Table 7 Parameters in the Relations sheet Parameter
Description
Relation Name
Name of the relation. It must start with letters. Only letters, digits, and the following special characters are allowed: ()-_
*Child Table
Name of the child table in the relationship
Child Table Database
Name of the database to which the child table in the relationship belongs.
*Child Table Field
Name of a field in the child table in the relationship. The field must be a foreign key of the child table and mapped to the primary key of the parent table.
*Child to Parent
Mapping of a child table to a parent table. The following values are available:
- 1: Each piece of data in the child table corresponds to only one piece of data in the parent table.
- 0,1: Each piece of data in the child table corresponds to at most one piece of data in the parent table.
- 0..n: One piece of data in the child table corresponds to multiple pieces of data in the parent table.
- 1..n: Each piece of data in the child table corresponds to at least one piece of data in the parent table.
*Parent to Child
Mapping of a parent table to a child table. The following values are available:
- 1: Each piece of data in the parent table corresponds to only one piece of data in the child table.
- 0,1: Each piece of data in the parent table corresponds to at most one piece of data in the child table.
- 0..n: One piece of data in the parent table corresponds to multiple pieces of data in the child table.
- 1..n: One piece of data in the parent table corresponds to at least one piece of data in the child table.
*Parent Table
Name of the parent table in the relationship
Parent Table Database
Name of the database to which the parent table in the relationship belongs.
*Parent Table Field
Name of a field in the parent table in the relationship. The field must be a primary key of the parent table and mapped to the foreign key of the child table.
Role Name
Name of a custom role that identifies the relationship. It must start with letters. Only letters, digits, and the following special characters are allowed: ()-_
- Enter the names of the associated tables and fields in the Associated Rules sheet.
The table below describes the parameters in the Associated Rules sheet.
Table 8 Parameters in the Associated Rules sheet Parameter
Description
*Table Name
Name of the table. It cannot start with digits. Only letters, digits, and the following special characters are allowed: _${}
*Field Name
The code of the field in the table. It must start with letters. Only letters, digits, and underscores (_) are allowed.
Rule Name
Enter an existing rule name. In the upper left corner of the DataArts Studio console, select DataArts Quality from the drop-down list box. Then, you can view the existing rule names on the Rule Templates page.
Alarm Triggering Condition
An alarm condition expression consists of alarm parameters and logical operators. When a quality job is running, the system calculates the result of the alarm condition expression and determines whether to trigger the alarm based on the result of the expression. If the expression result is true, the alarm will be triggered. Otherwise, no quality alarm will be triggered.
In the alarm condition expression, alarm parameters are represented by variables such as ${1}, ${2}, and ${3}. The variable name indicates the alarm parameter of the specified quality rule. The variable $1 indicates the first alarm parameter, $2 indicates the second alarm parameter, and so on. In the upper left corner of the DataArts Studio console, select DataArts Quality from the drop-down list box. Access the Rule Templates page and view the alarm parameters supported by the data quality rule in the Result Description column.
Example: ${1} > 100
Expression
This parameter must be configured when Rule Name is set to Expression or Validity Verification.
- View the import result on the Last Import tab page. If the import is successful, click Close. If the import fails, you can view the failure cause, correct the template file, and upload it again.
- If the standard code associated with the imported relational model does not exist or is not published, the system displays an error and the code name. In this case, change the code and try again.
- If the data to be imported does not exist, an error message in the format of Table name:Field name is displayed in the Remarks column on the Last Import tab page.
Exporting a Table or DDL
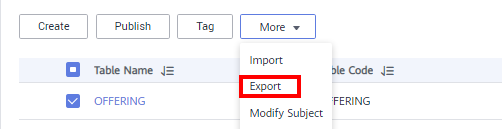
- On the DataArts Architecture page, choose Logical Models in the left navigation pane.
- On the displayed page, click the card of the target logical model, select an object in the subject directory, and choose . Figure 4 Exporting a table or DDL
- In the dialog box displayed, select the objects to export. The exported Excel file can be imported.Figure 5 Exporting a table

When a DDL is exported, the DDL statements of the selected table are exported to TXT files.
Figure 6 Exporting a DDL
- Click OK.
Importing/Exporting Dimensions
- Importing dimensions
You can import dimensions to the system quickly.
- Above the dimension list, choose More > Import. Figure 7 Import Table dialog box

- Download the dimension template, and edit and save it.
- Choose whether to update existing data.
If a code in the template already exists in the system, the data is considered duplicate.
- No: If the data to be imported already exists in the system, the existing data in the system will not be replaced.
- Yes: If the data to be imported already exists in the system:
- If the existing data in the system is in draft state, the data will be replaced and new draft data will be generated.
- If the existing data in the system is in published state, expanded data will be generated.
- Click Select File and select the edited template to import.
- Click Upload. When the template is uploaded, the Last Import page is displayed. You can view the imported data.
- Click Close.
If the standard code associated with the imported dimension does not exist or is not published, the system displays an error and the code name. In this case, change the code and try again.
- Above the dimension list, choose More > Import.
- Exporting dimensions
You can export dimensions to a local file.
Above the dimension list, choose More > Export.
Importing/Exporting Fact Tables
- Importing fact tables
You can import fact tables to the system quickly.
- Above the fact table list, choose More > Import. Figure 8 Import Table dialog box

- Download the fact table template, and edit and save it.
- Choose whether to update existing data.
If a code in the template already exists in the system, the data is considered duplicate.
- No: If the data to be imported already exists in the system, the existing data in the system will not be replaced.
- Yes: If the data to be imported already exists in the system:
- If the existing data in the system is in draft state, the data will be replaced and new draft data will be generated.
- If the existing data in the system is in published state, expanded data will be generated.
- Click Select File and select the edited template to import.
- Click Upload. When the template is uploaded, the Last Import page is displayed. You can view the imported data.
- Click Close.
If the standard code associated with the imported fact table does not exist or is not published, the system displays an error and the code name. In this case, change the code and try again.
- Above the fact table list, choose More > Import.
- Exporting fact tables
You can export fact tables to a local file.
Above the fact table list, choose More > Export.
Feedback
Was this page helpful?
Provide feedbackThank you very much for your feedback. We will continue working to improve the documentation.


