Managing the Configuration Center
Constraints
- Custom subjects: 10
- Custom tables: 30
- Custom attributes: 10
- Custom business metrics: 50
Subject Processes
You can customize the subject levels and attributes in the subject design. By default, there are three levels in the system, which are named Subject Area Group (L1), Subject Area (L2), and Business Object (L3) from top to bottom. You can define a maximum of seven levels and a minimum of two levels. You can configure a maximum of 10 custom attributes.
- On the DataArts Studio console, locate a workspace and click DataArts Architecture.
- In the navigation pane, choose Configuration Center. On the displayed page, click the Subject Processes tab.
- In the Subject Level area, you can add, delete, and edit subject levels.
- Click
 in the Operation column to add a custom subject level and click Update.
 - Click
 in the Operation column to delete a subject level and click Update.
 - Except the business object at the last level, you can click the names of other levels to edit them.
- Click
- In the Custom Field area, you can create, delete, and edit fields.
- Click Create next to Custom Field to create a custom attribute. You can enter multiple optional values for a custom attribute at a time. Each optional value must be unique.
- Click
 in the Operation column to delete a custom attribute.
 - Edit Field (Local), Field (Eng), Optional Value, Mandatory, and Description.
- Set Process Levels. Enter a value from 3 to 7.
Standard Templates
You can customize the default options of data standards. When you access the Standard Templates page for the first time, the page for creating a data standard template is also displayed.
- On the DataArts Studio console, locate a workspace and click DataArts Architecture.
- In the navigation pane, choose Configuration Center. On the displayed page, click the Standard Templates tab.
- In the Optional area, select the parameters as required. Click Create next to Custom to add custom properties. After the configuration is complete, click Update.

- A standard template contains the following custom fields: Searchable, Mandatory, and Optional Value.
- After saving the template, you must set values for the options selected in the template when creating a data standard.
- When you access the Standard Templates page for the first time, Data length and Description are selected by default. You can select other options as needed.
- When adding a customized item, you can add both Chinese and English items.
Figure 1 Standard Templates tab page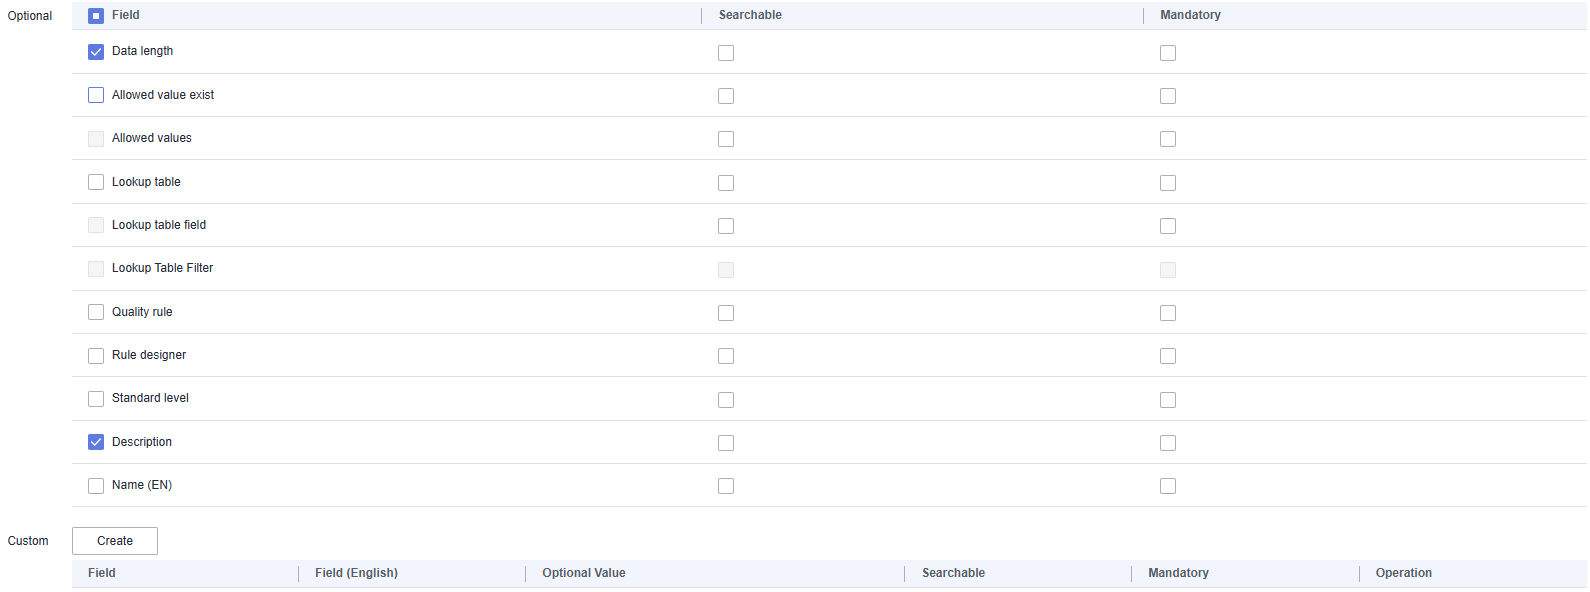
Functions
You customize functions for DataArts Architecture.
- On the DataArts Studio console, locate a workspace and click DataArts Architecture.
- In the navigation pane, choose Configuration Center. On the displayed page, click the Functions tab.
- On the page displayed, set the parameters and click OK. Click Reset to restore the default settings.
Figure 2 Functions
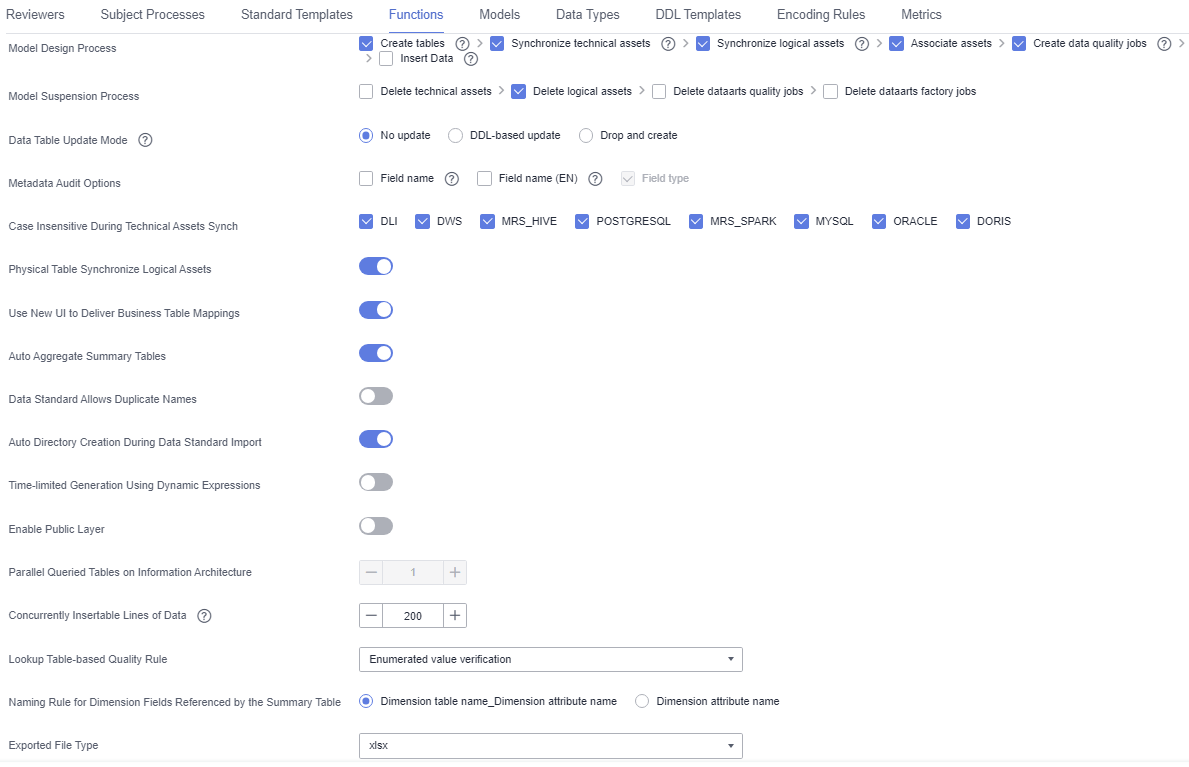
- Model Design Process: The selected processes are automatically executed progressively when a table created in an ER or dimension model is published and suspended. You are advised to select all the options.
- Create tables: After a table publishing application is approved in DataArts Architecture, the system creates a physical table in the corresponding data source. When a table is deleted, the system deletes the corresponding physical table.
- Synchronize technical assets: After a table in ER Modeling or Dimensional Modeling is published, the table is synchronized to the DataArts Catalog module as a technical asset, and the tag is synchronized to the corresponding technical asset.

To enable Synchronize Technical Assets, you must create a data asset collection task for the database to which the table belongs in DataArts Catalog. Otherwise, the technical asset synchronization will fail.
- Synchronize logical assets: The system synchronizes logical models to DataArts Catalog as logical assets. After that, the system tags the logical assets accordingly.
- Associate assets: Associate logical assets with technical assets. After the logical assets and technical assets are synchronized, you can view the associated technical or logical asset when viewing the details of a logical or technical asset on the DataArts Catalog page. This function requires that the table information contains the data source information.
- Create data quality jobs: After a table in ER Modeling or Dimensional Modeling is published and approved, the system automatically creates a quality job in the DataArts Quality module of DataArts Studio for a table that is associated with a data standard (including the data length or allowed value) or associated with a quality rule.
- Create data development jobs: After a summary table is published, the system generates an E2E data development job.
- Publish DataArts DataService APIs: After a summary table is published, a DataArts DataService API is automatically generated. This function takes effect only DataArts DataService supports data connections of the summary table.
- Insert data: After a lookup table is published, values in the table are automatically written to the dimensional table.
- Model Suspension Process: Select whether to delete technical assets, logical assets, data quality jobs, and data development jobs when suspending the job.
- Data Table Update Mode: If a table in DataArts Architecture is modified after being published, you can choose whether to update the table in the database and how to update the table. By default, the table is not updated. However, you can set the update operation in the configuration center as required. To be more specific, configure the corresponding update statements in the DDL templates.
- No update: The system does not update tables in a database.
- DDL-based update: The system updates tables in the database based on the DDL update template configured in DDL Templates. The underlying data warehouse engine determines whether the update is successful. Different types of data warehouses support different table update modes. If the data warehouse does not support table update operations on the DataArts Architecture page, the tables in the database may be inconsistent with those in DataArts Architecture. For example, table fields cannot be deleted when DLI tables are updated. If table fields are deleted from the tables in DataArts Architecture, the corresponding table fields cannot be deleted from the database.
If the offline database supports the syntax for updating the table architecture, you can configure the syntax in the DDL template. Then, the update operation can be performed. Otherwise, update the table by rebuilding it.
- Drop and create: The system deletes an existing table in a database and then creates a table. This option ensures that the tables in the database are the same as those in DataArts Architecture. However, since the table is deleted first, you are advised to select this option only in the development and design phase or test phase. After the product is brought online, you are advised not to select this option.
- Case Insensitive During Technical Assets Synch: When a table, whose type is the same as the data connection, is published, the data connection name is case insensitive during technology asset synchronization. If the name is the same as an existing one, the connection exists.
- Physical Table Synchronize Logical Assets: If Synchronize logical assets is selected and no logical asset is available, you can disable this option to prevent physical tables from overwriting logical tables which have the same names as them. In this case, physical tables will only be associated with, but not synchronized to logical assets. If no logical asset is found, the association fails and an error is reported.
- Use New UI to Deliver Business Table Mappings: This function is enabled by default. The mapping function of the new version supports operations such as join. You are advised to use the mapping function of the new version.
- Auto Aggregate Summary Tables: When publishing a derivative or compound metric, the system automatically generates a summary table. A statistical dimension corresponds to a summary table. You can click the Automatic Aggregation tab on the summary table page to view the automatically generated summary tables.
- Data Standard Allows Duplicate Names: This function is disabled by default. If it is enabled, duplicate data standard names are allowed.
- Auto Directory Creation During Data Standard Import: This function is enabled by default.
- Enable Public Layer: If this option is enabled, the current workspace can be converted into a public workspace. The lookup tables and data standards of the public workspace are shared with all common workspaces. In a common workspace, you can query or reference the lookup tables and data standards of the public workspace, but cannot add, modify, or delete them.

- After the current workspace is converted to a public workspace, it cannot be rolled back to a common workspace, and no other common workspaces can be converted to a public workspace. Exercise caution when selecting your public workspace.
- You cannot query, reference, or operate the data of a common workspace from a public workspace.
- Time-limited Generation Using Dynamic Expressions: If you enable this function, dynamic time expressions will be used; otherwise, the default static time expressions will be used. The dynamic expression automatically updates the generated time, while the static expression does not. For example, if the current month is September and a static expression is used, data generated for the last 30 days is the data in August. Even when the current month changes to October, data generated for the last 30 days is still the data in August. However, if a dynamic expression is used, data generated for the last 30 days will automatically change to the data in September if the current month has changed to October. The following figure shows an example time function using a dynamic expression.
Figure 3 Dynamic expression
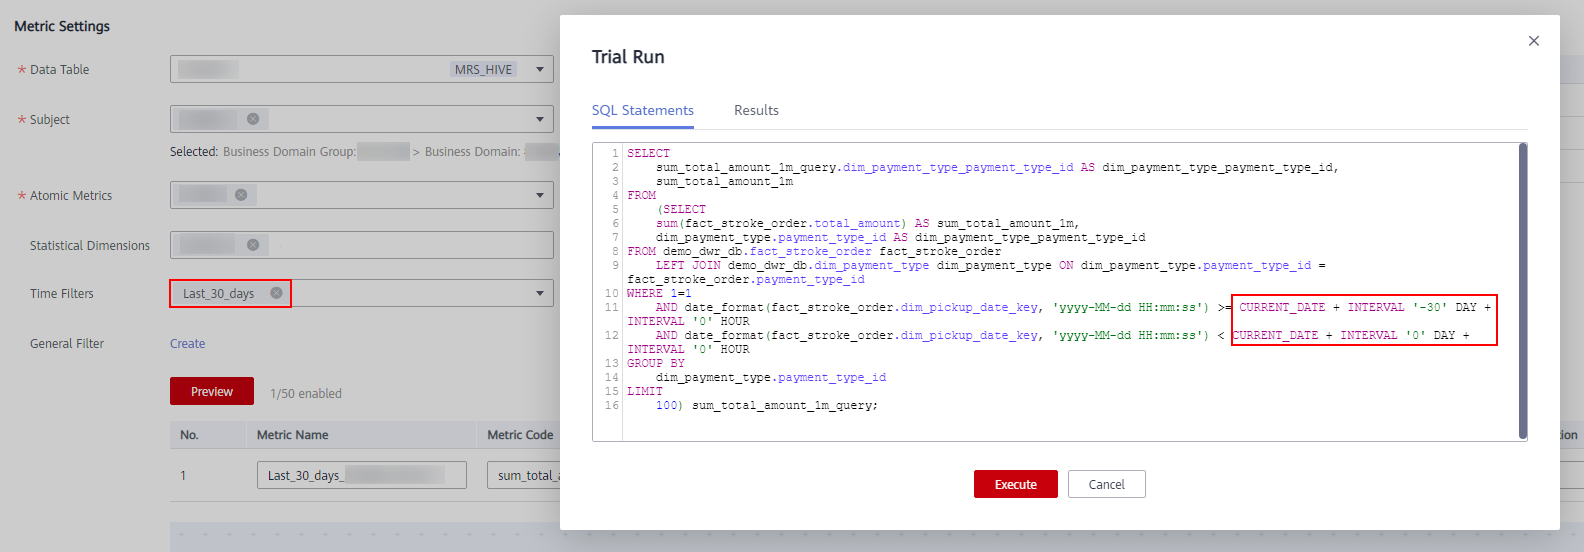

If you enable this function for the first time, you need to reset the derivative metrics in the DDL template. If you have made any change to the DDL template, back up the template before resetting it. Resetting the template will overwrite any change that has been made. After the template is reset, you must make the changes again.
- Parallel Queried Tables on Information Architecture: The default value is 1. Currently, you cannot change the value.
- Concurrently Insertable Lines of Data: The value determines the number of lines of the dimensional table into which data of the lookup table is inserted. If the lookup table contains a large amount of data, the data may fail to be inserted into the dimensional table. In this case, you can reduce the value of this parameter.
- Lookup Table-based Quality Rule: Select a value from the drop-down list box. If the data volume of the lookup table is small, select Enumerated value verification; otherwise, select Field value consistency verification.

You can select Field value consistency verification only if the database contains a lookup table. The following lookup tables are contained in the database:
- Lookup tables obtained by database reversion
- Lookup tables published during dimension creation
- Naming Rule for Dimension Fields Referenced by the Summary Table: Set the naming rule for a summary table during creation, editing, import, and generation. Select Dimension table name_Dimension attribute name or Dimension attribute name.
- Exported File Type: Two options are available: xlsx and et. Logical models, physical models, dimensions (dimension tables), fact tables, summary tables, and other data can be exported in both formats.
- Generate DataArts DataService APIs: Two options are available: Table API and Metric APIs.
- Model Design Process: The selected processes are automatically executed progressively when a table created in an ER or dimension model is published and suspended. You are advised to select all the options.
Model Settings
You can perform the following operations during subject design and model design on the Model Settings page.
- Add the subject alias, table model alias, and field alias.
- Enable Security Level.
- Set the length.
- Add custom fields to a table.
- Add custom fields to an attribute.
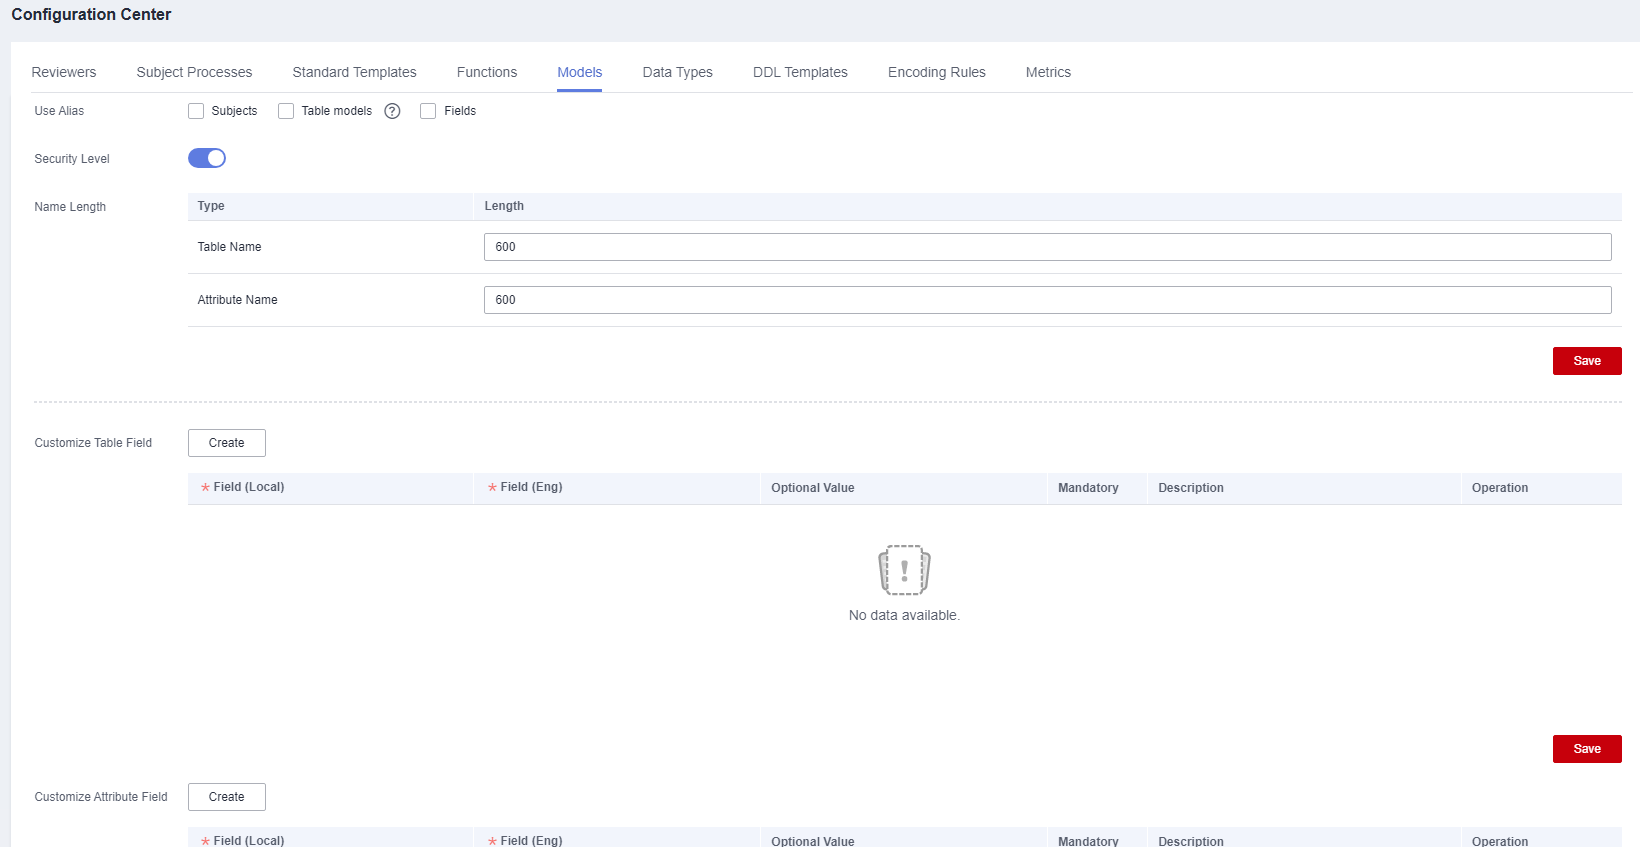
In the navigation pane, choose Configuration Center. On the displayed page, click the Models tab.
- Use Alias: You can enable or disable alias.
- The options are as follows:
- If you select Subjects, you must enter an alias when creating or editing subject.
- If you select Table models, you must enter an alias when creating or editing a table. Business tables, dimension tables, fact tables, and summary tables are affected when the Table models option is selected.
- If you select Fields, you must enter an alias when creating or editing a table field.
- The options are as follows:
- Security Level: Enable it. It is enabled by default.
- Name Length: Set the length of the table name and attribute name.
- Customize Table Property: When creating or editing a table, you can set custom fields in the basic settings of the table. Business tables, dimension tables, fact tables, and summary tables are affected.
- Customize Attribute Field: When creating or editing a table field, you can set custom attributes in the table field. Business tables, dimension tables, fact tables, and summary tables are affected.
Field Types
When you create a table, reverse a database, or convert a model, if the default data type or the data type mappings between different data sources cannot meet your requirements, you can add, delete, or modify data types. The default data type cannot be deleted.
- In the navigation pane, choose Configuration Center. On the displayed page, click the Data Types tab.
- On the page displayed, you can view the data type and the data type mappings between different data sources. The type whose creator is SYSTEM is the default field type.
The types are described as follows:
- DEFAULT indicates the common data type which is used for creating a table when the data source type is not specified. For example, when you create a table of a logical model, the data type in the DEFAULT group is used.
- DLI indicates the data type of the table with the DLI data connection.
- DWS indicates the data type of the table with the DWS data connection.
- MRS_HIVE indicates the data type of the table with the MRS_HIVE data connection.
- MRS_SPARK: indicates the data type of the Hudi table with the MRS_SPARK connection.
- POSTGRESQL: indicates the data type of the table with the PostgreSQL connection.
- CLICKHOUSE: indicates the data type of the table with the ClickHouse connection.
- MYSQL: indicates the data type of the table with the MySQL connection.
- ORACLE: indicates the data type of the table with the Oracle connection.
- DORIS: indicates the data type of the table with the Doris connection.
Figure 5 Data Types tab page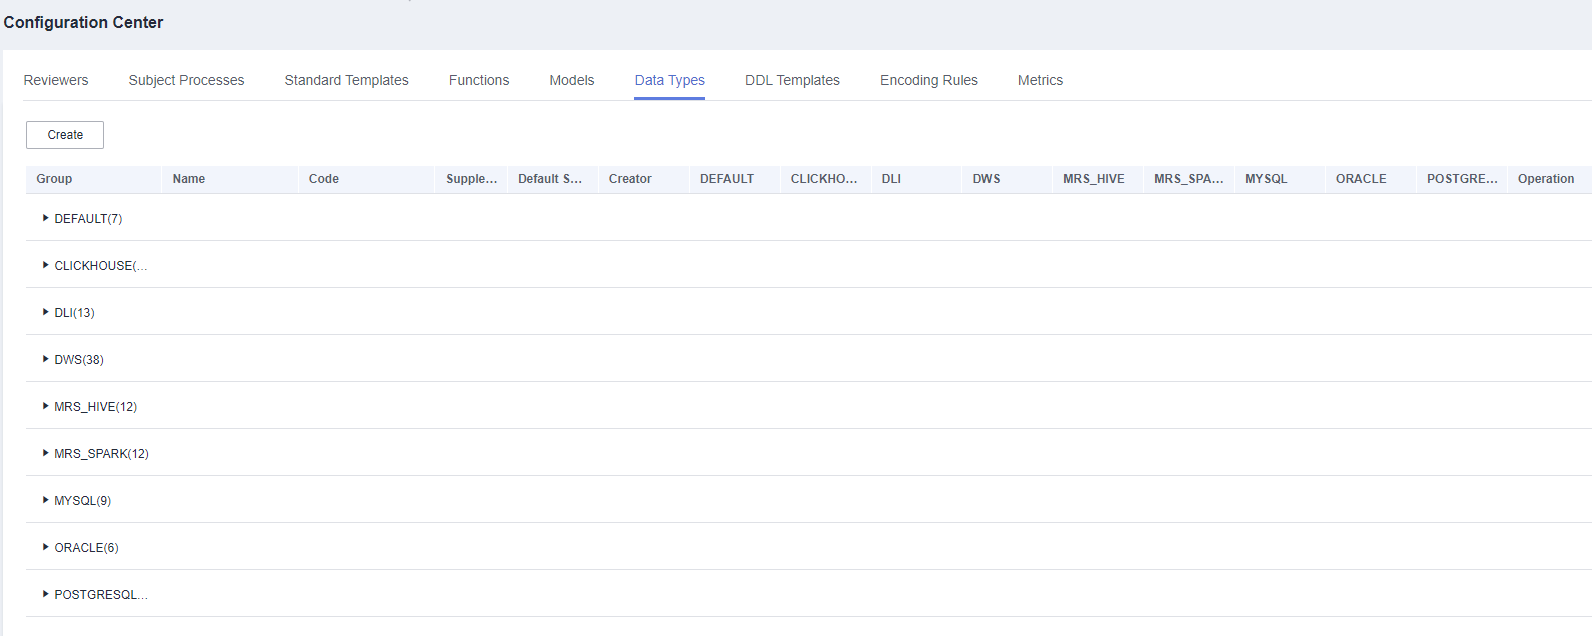
- Manage field types.
- Create
To add a field type, click Create. In the dialog box displayed, set the parameters and click OK.Figure 6 Creating a field type

Table 1 Parameters for creating a field type Parameter
Description
Group
Group that the new field type belongs to.
Name
Name of the field type to create. Field type names must start with letters. Only letters, numbers, brackets, spaces, and underscores (_) are allowed.
Code
Data type code, which must be supported by the data warehouse. The code can contain uppercase letters, underscores (_), and digits, and must start with an uppercase letter or underscore (_).
Parent Domain
Select the domain that the new field type belongs to.
Supplementary Info
You can enable this function if you want to set the data length range for some data types.
For example, you can enter (10,2) for the DECIMAL(p,s) data type, indicating that the total number of digits in the value is 10, and the number of digits after the decimal point is 2. You can also enter 10 for the VACHAR data type, indicating that the maximum number of characters is 10.
Data Types in Data Sources
Select the data type of the mapping connection of the new field type.
DEFAULT
Data type of the default data connection that the new field type is mapped to.
CLICKHOUSE
Data type of the ClickHouse data connection that the new field type is mapped to.
DLI
Data type of the DLI data connection that the new field type is mapped to.
GaussDB(DWS)
Data type of the DWS data connection that the new field type is mapped to.
MRS_HIVE
Data type of the MRS Hive data connection that the new field type is mapped to.
MRS_SPARK
Data type of the MRS Spark data connection that the new field type is mapped to.
MYSQL
Data type of the MySQL data connection that the new field type is mapped to.
ORACLE
Data type of the Oracle data connection that the new field type is mapped to.
POSTGRESQL
Data type of the PostgreSQL data connection that the new field type is mapped to.
DORIS
Data type of the Doris data connection that the new field type is mapped to.
- Edit
In the field type list, specify a field type and click
 to edit the field type. For details on the parameters, see Table 1.
 - Delete
You can delete new field types. The field type whose creator is SYSTEM is the default field type and cannot be deleted.
In the field type list, specify a field type and click
 to delete it. Then click OK.
 - Reset
Click Reset at the bottom of the Field Type tab page to restore the default settings.
- Create
DDL Templates
On the DataArts Architecture page, you can modify diversified types of tables (such as DWS, DLI, POSTGRESQL, Hive, Doris, and Spark). If you need to generate DDL statements of other data sources for a created table of a certain type, you can modify the DDL template of the table based on the DDL syntax of the target data source.
- In the navigation pane, choose Configuration Center. On the displayed page, click the DDL Templates tab.
- On the page displayed, you can configure DDL templates for DLI views or diversified types of tables. You can modify the DDL templates by referring to the parameter description on this page. After the modification is complete, click OK. Click Reset All to restore the default settings.
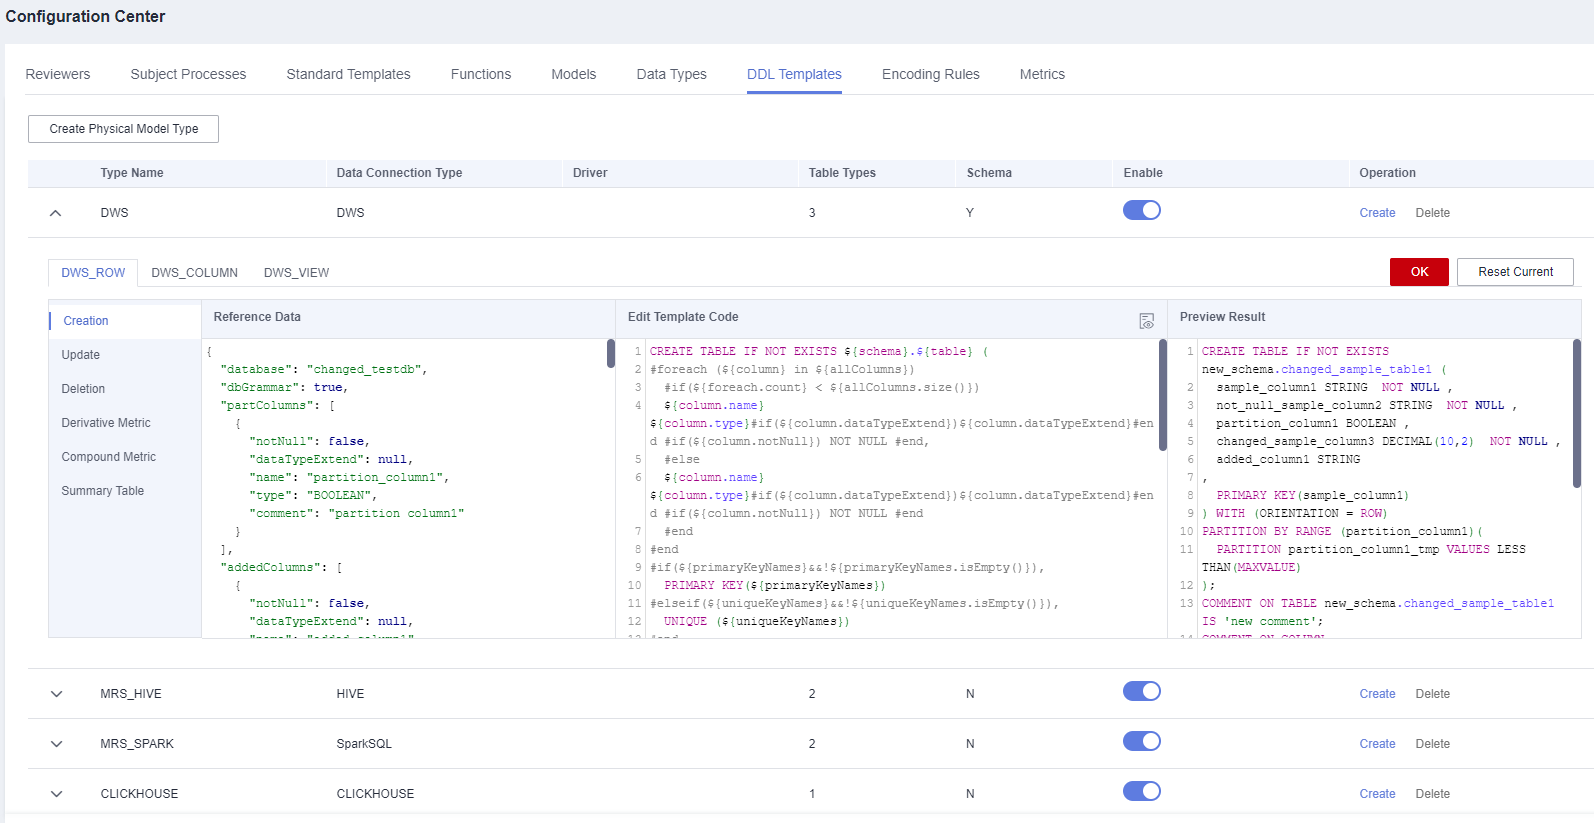
As shown in Figure 7, the process is described as follows:
- Creation allows you to view or edit a new table or a DDL template of a DLI view.
- Update allows you to view or edit an updated table or a DDL template of a DLI view.
- Deletion allows you to view or edit a deleted table or a DDL template of a DLI view.
- Derivative Metric allows you to view or edit the SQL template of a derivative metric.
- Compound Metric allows you to view or edit the SQL template of a compound metric.
- Summary Table allows you to view or edit the SQL template of a summary table.
- The Reference Data area shows an example of table details. Variables in the example define table details.
- The Edit Code Template area allows you to edit DDL templates. If you need to generate DDL statements for other types of databases, you can modify the DDL template based on the DDL syntax of the target data source.
- The Preview Result area allows you can preview the DDL statements generated based on the edited template.
Encoding Rules
- In the navigation pane, choose Configuration Center. On the displayed page, click the Encoding Rules tab.
- Manage encoding rules.
- Add an encoding rule.
Click Add above the encoding rule list. In the displayed dialog box, set required parameters, and click OK.Figure 8 Adding an encoding rule
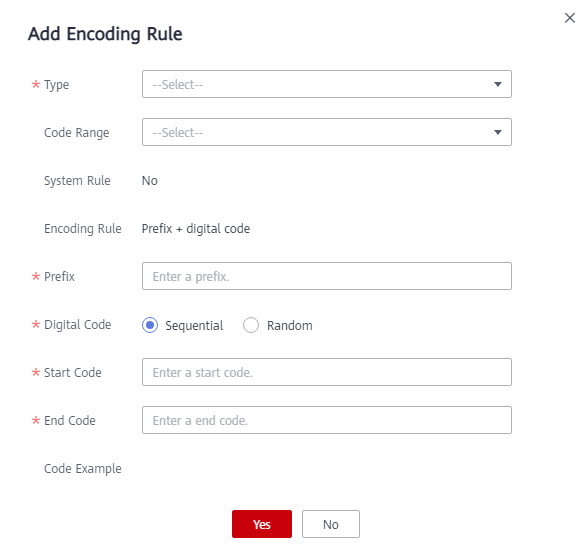
Table 2 Parameters for adding an encoding rule Parameter
Description
Type
Encoding rule type. The following options are available:
Business metric, Logical entity, Logical property, Data standard, and Code Table, and Business Object.
Code Range
By default, the encoding rule takes effect globally. You can select subjects, processes, lookup tables, or data standards.
System Rule
Whether this rule is a system rule. The value is No and cannot be changed.
Encoding Rule
The value consists of a prefix and a digit code and cannot be changed.
Prefix
The value can contain characters and digits but cannot end with a digit. It cannot be changed.
Digital Code
You can select Sequential or Random.
Start Code
Start value of the digital code range
End code
End value of the digital code range
Code Example
The configured encoding rule is displayed.
- Deleting an Encoding Rule
Select an encoding rule and click Delete above the list. In the displayed dialog box, click Yes.

The six preset encoding rules cannot be deleted, including the logical entity, data standard, logical property, business metric, code table, and business object rules.
- Editing an Encoding Rule
Locate an encoding rule, click Edit in the Operation column, modify parameters, and click OK.
- Add an encoding rule.
Metric Settings
- In the navigation pane on the DataArts Architecture console, choose Configuration Center. On the displayed page, click the Metrics tab.
- Manage business metrics.
- Create a metric.
Click Create next to Business Metric Customize Field or
 in the Operation column of an existing metric. Set the following parameters and click Save.Figure 9 Creating a metric
Table 3 Parameters for creating a metric Parameter
Description
Field (Local)
Metric name. Enter a maximum of 100 characters.
Field (Eng)
Metric name in English. Enter a maximum of 100 characters.
Optional Value
Optional values of the custom metric for creating a business metric
Mandatory
Whether the custom metric is mandatory for creating a business metric
Description
Description of the custom metric Enter a maximum of 200 characters.
- Adjust the metric sequence.
You can adjust the sequence of metrics by clicking the up or down arrow in the Operation column. You can also double-click the up or down arrow and enter a No. to move a metric to a specified row.
Figure 10 Adjusting the metric sequence Figure 11 Moving a metric to a specified row
- Delete a metric.
To delete a custom metric, click
 in the Operation column.Figure 12 Delete a metric.
- Create a metric.
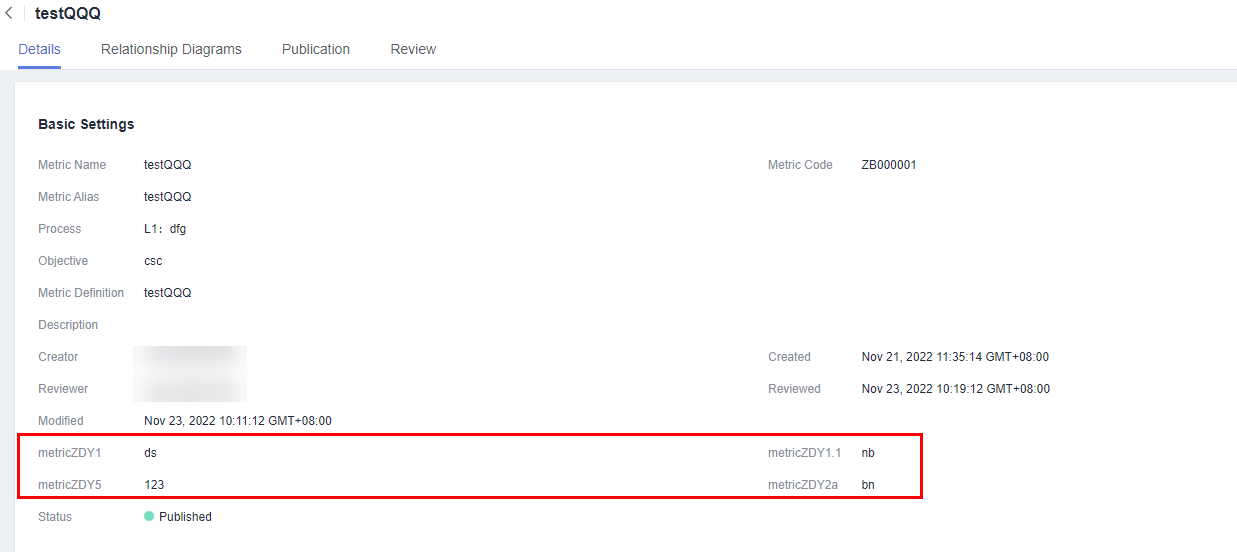
- After a custom metric is set, the metric is displayed on the page for creating a business metric and the Basic Settings page of the business metric.
Figure 13 Page for creating a business metric
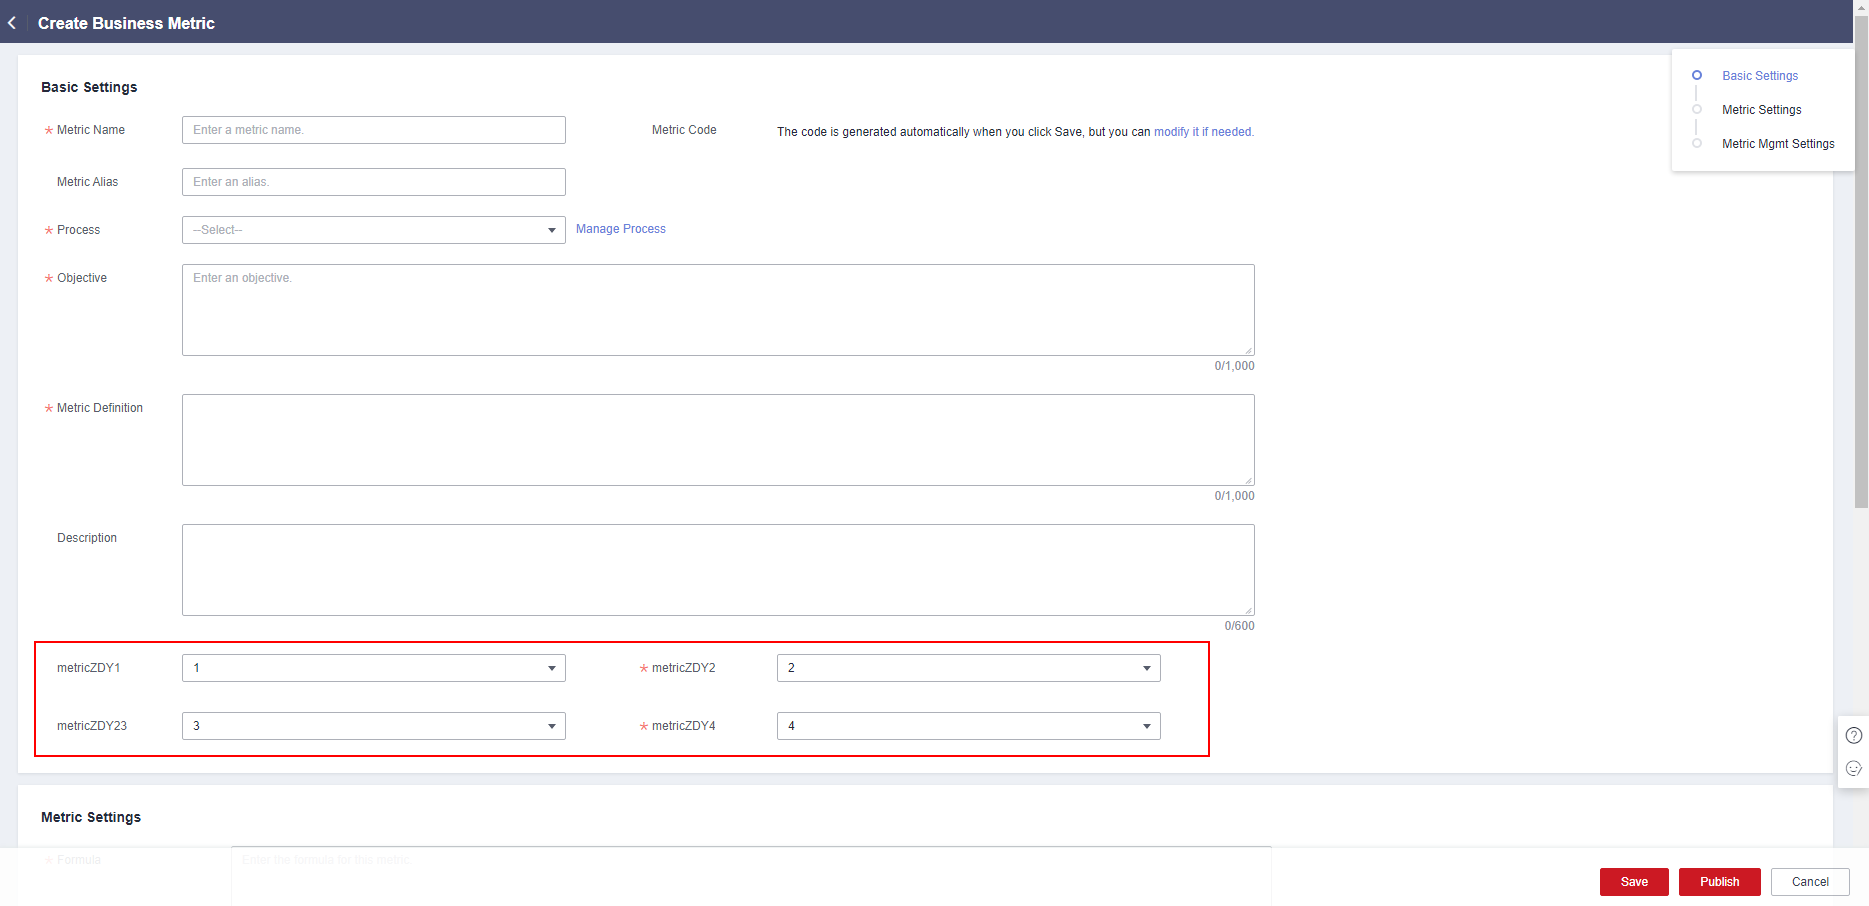 Figure 14 Basic Settings page of a business metric
Feedback
Was this page helpful?
Provide feedbackThank you very much for your feedback. We will continue working to improve the documentation.


