Creating an HTTP Function
To use a popular web application framework to compile function code and build an AI project, you can create an HTTP function and configure the function code, network, and triggers based on service requirements. This section describes how to create an HTTP function and provides an example of how to use it.
For details about the comparison between event functions and HTTP functions, see Table 1.
|
Item |
Event Function |
HTTP Function |
|---|---|---|
|
Usage |
It is used to process files and data flows, which can be triggered by events of various cloud products. It is also used to process asynchronous requests and track and save the status of each asynchronous invocation. |
It supports popular web application frameworks and AI projects. You can access the functions using a browser or by calling a URL. |
|
Scenario |
|
|
HTTP Function Overview
HTTP functions focus on optimizing web service scenarios. You can directly send HTTP requests to URLs to trigger function execution and use your own web services. HTTP/1.1 is supported.
HTTP functions have the following advantages:
- Support for multiple frameworks
You can use common web frameworks, such as Node.js Express and Koa, to write HTTP functions, and migrate your local web framework services to the cloud with least modifications.
- Fewer request processing steps
Functions can directly receive and process HTTP requests, eliminating the need for API Gateway to convert the JSON format. This accelerates request processing and improves web service performance.
- Premium writing experience
Writing HTTP functions is similar to writing native web services. You can also use native Node.js APIs to enjoy local development-like experience.
Common Request Headers of HTTP Functions
HTTP request headers are an important part of the HTTP protocol for passing metadata. When a function is invoked, specific metadata or configuration information can be passed. Table 2 describes the common request headers carried by functions by default.
The key information of HTTP functions can be transferred only through request headers. For details about how to obtain the AK, SK, and token of HTTP functions, see Transferring Secret Keys Through the Request Header.
|
Field |
Description |
|---|---|
|
X-CFF-Request-Id |
ID of the current request. |
|
X-CFF-Memory |
Memory allocated to the function. |
|
X-CFF-Timeout |
Function timeout. |
|
X-CFF-Func-Version |
Function version. |
|
X-CFF-Func-Name |
Function name. |
|
X-CFF-Project-Id |
Project ID of the function. |
|
X-CFF-Package |
App to which the function belongs. |
|
X-CFF-Region |
Region where the function is located. |
Notes and Constraints
|
Item |
Description |
|---|---|
|
Function quantity |
By default, an account can create a maximum of 400 functions. To increase the quota, submit a service ticket. |
|
HTTP function |
|
|
Other |
|
Prerequisites
- To perform the operations described in this section, ensure that you have the FunctionGraph Administrator permissions, that is, the full permissions for FunctionGraph. For more information, see Permissions Management.
- To access other cloud services such as Log Tank Service (LTS) and Virtual Private Cloud (VPC), create an agency by referring to Creating a Function Agency. If FunctionGraph does not need to access other cloud services, you do not need to create or select an agency.
- To enable FunctionGraph to access resources in a VPC, create a VPC and subnet by referring to Creating a VPC and a Subnet.
Creating an HTTP Function
- Log in to the FunctionGraph console. In the navigation pane, choose Functions > Function List.
- On the Function List page, click Create Function in the upper right corner.
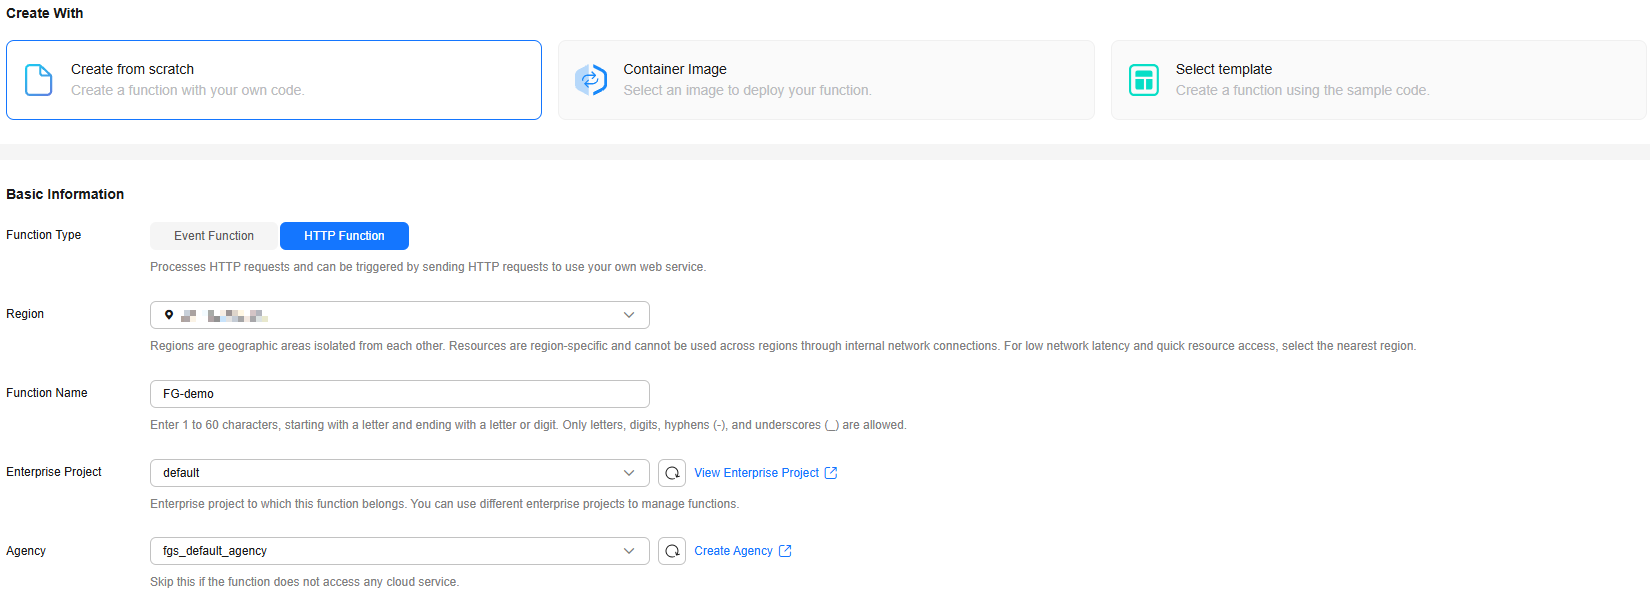
- Select Create from scratch and configure basic information by referring to Table 4 and advanced settings by referring to Table 3 as shown in Figure 1.
Table 4 Basic function information Parameter
Description
Example Value
Function Type
Select HTTP Function.
The HTTP functions process HTTP requests. You can send an HTTP request to a URL to trigger the function and use your web services.
HTTP Function
Region
Select the region where the function is located.
Regions are geographic areas isolated from each other. Resources are region-specific and cannot be used across regions through internal network connections. Select a region near you to ensure the lowest latency possible.
CN East-Shanghai1
Function Name
Enter a function name. The naming rules are as follows:
- Consists of 1 to 60 characters, and can contain letters, digits, hyphens (-), and underscores (_).
- Starts with a letter and ends with a letter or digit.
FG-demo
Enterprise Project
Select the enterprise project to which the function belongs. Enterprise projects let you manage cloud resources and users by project.
The default value is default. You can select the created enterprise project.
If the Enterprise Management service is not enabled, this parameter is unavailable. For details, see Enabling and Accessing Enterprise Management.
default
Agency
Select an agency for the function. An agency is used to authorize FunctionGraph to access other cloud services. If FunctionGraph does not access any cloud service, you do not need to select an agency.
By default, Use no agency is used. You can select an existing agency.
If no default agency is available, FunctionGraph allows you to quickly create a default agency named fgs_default_agency. For details, see Default Agency.
fgs_default_agency
Permission Policies
This parameter is displayed only when an agency is selected.
After an agency is selected, the permission policies associated with the agency are displayed. For details about how to adjust them, see Modifying a Function Agency.
DIS User; SWR Admin; fgs_default_region_role; fgs_default_global_role
Figure 2 Advanced setting parameters
Table 5 Advanced setting parameters Parameter
Description
Example Value
Public Access
If this feature is enabled, functions can access services on the public network through the default NIC. The public network access bandwidth is shared among users and applies only to test scenarios.
Enabled
VPC Access
To enable this feature, you need to configure an agency with VPC management permissions. If you select Use no agency in the Basic Information area, this feature cannot be enabled.
If this feature is enabled, functions will use the NIC bound to the configured VPC for network access, and the default NIC of FunctionGraph will be disabled. That is, the Public Access parameter does not take effect.
After this feature is enabled, you can select the VPC and subnet that the function needs to access.
Disabled
Collect Logs
After it is enabled, logs generated during function execution will be reported to LTS.
CAUTION:LTS will be billed on a pay-per-use basis. For details, see LTS Pricing Details.
Configure the following parameters:
- Log Configuration
- Auto: Use the default log group and log stream.
- Custom: Select the log group and log stream you created.
- Log Tag
You can filter function logs on the LTS console by tag. For details, see Log Management.
A tag key or value can contain a maximum of 64 characters, including only digits, letters, underscores (_), and hyphens (-). A maximum of 10 tags can be added.
Disabled
Tags
Add tags to identify and categorize functions.
Tags enable quick search and management in the function list.
Each function supports up to 20 tags with a many-to-many relationship.
-
Static Encryption with KMS
This parameter can be configured only in the LA-Sao Paulo1 region.
Determine whether to use KMS-based static encryption for function code.
CAUTION:DEW charges you on a pay-per-use basis. For details, see DEW Billing.
You can select the following encryption types:
- functiongraph/default (default): The function automatically creates a default key in DEW under your account.
If you use the default key for encryption and decryption for the first time, ensure that the function agency has the following permissions: kms:dek:decrypt, kms:dek:create, kms:cmk:create, kms:cmk:get, and kms:cmk:list.
- Customer master key (CMK): You can select a created key to encrypt the function code. For details about how to create a customer master key, see Creating a Custom Key. To use customer master key, ensure that the function agency has the following permissions: kms:dek:decrypt, kms:dek:create, kms:cmk:get and kms:cmk:list.
CAUTION:
If you select Customer master key (CMK), do not delete the CMK used for function encryption in DEW. Otherwise, the function execution will fail because encrypted data cannot be decrypted.
Configure the agency permission policy on the IAM console by referring to Creating a Custom Policy in JSON View.
functiongraph/default (default)
- After the configuration is complete, click Create Function. The function details page is displayed, and a message is displayed in the upper part of the page, indicating that the function is created.
- After the function is created, configure it based on service requirements by referring to Configuring Functions.
HTTP Function Usage Example
The following uses an example to describe how to create and configure an HTTP function.
Before calling an API, ensure that the network of your service system can communicate with the API access domain name or address.
- If the service system and the HTTP functions are in the same VPC, the API can be directly accessed.
- If the service system and the HTTP functions are in different VPCs of a region, connect them using a peering connection. For details, see .
- If the service system and the HTTP functions are in different VPCs of different regions, create a cloud connection and load the two VPCs to connect them. For details, see .
- If the service system and the HTTP functions are connected over the public network, ensure that the HTTP function has been bound with an EIP.
Helpful Links
- For details about how to build a FunctionGraph HTTP function using Go, see Building a FunctionGraph HTTP Function Using Go.
- For details about how to build an HTTP function using an existing Spring Boot project, see .
- FunctionGraph allows you to create event and HTTP functions by compiling code online, uploading code files, or using container images. And it supports GPU computing resources. For details about how to select a function type, see Function Type Selection.
- You can create functions using APIs. For details, see Creating a Function.
- For FAQs about function creation, see Function Creation FAQs.
Feedback
Was this page helpful?
Provide feedbackThank you very much for your feedback. We will continue working to improve the documentation.See the reply and handling status in My Cloud VOC.
For any further questions, feel free to contact us through the chatbot.
Chatbot

