
Adding and Authorizing Database Assets
To identify sensitive data, mask static data, or add/extract data watermarks for database assets, you must authorize DSC to access your databases.
- For self-built databases: Add the instance to DSC according to "Adding a Database Instance", then authorize access by referring to Authorizing Access to a Database Asset.
- For cloud databases: Instance addition is not required. Instead, authorize DSC's access by referring to Authorizing Access to a Database Asset.
Prerequisites
|
Type |
Prerequisites |
|---|---|
|
Self-built database |
|
|
DWS cross-account or cross-VPC instance |
|
Constraints
- The following DWS instance versions are supported: 9.1.0, 9.0, 8.3.0, 8.2.1, 8.2.0, 8.1.3, 8.1.1, 8.0.1, and 8.0.0.
- For user-built databases, only data sources and versions supported by DSC can be added. For details, see Table 2.
Table 2 Data sources and versions supported by DSC Data Source
Version
MySQL
5.6, 5.7, 5.8, and 8.0
SQL Server
2017_SE, 2017_EE, and 2017_WEB
2016_SE, 2016_EE, and 2016_WEB
2014_SE and 2014_EE
2012_SE, 2012_EE, and 2012_WEB
2008_R2_EE and 2008_R2_WEB
PostgreSQL
15, 14, 13, 12, 11, 10, 9.6, 9.5, 9.4, 9.1, and 1.0
TDSQL
10.3.X
Oracle
11 and 12
KingBase
V8
GaussDB
1.3, 1.4, and 2.7
DMDBMS
7 and 8
DWS
8.1.X
Adding and Authorizing Database Assets
This section describes how to add your database assets to DSC for data security management.
Adding a User-Built Database Instance
You can add and delete user-built database instances. For details about the database types and versions supported by DSC, see Table 2. This section describes how to add a user-built database on the cloud.
- Log in to the DSC console.
- Click
 in the upper left corner and select a region or project.
 - In the navigation pane on the left, choose .
- Choose . The Database Instances tab is displayed.
- Click the Database Instances tab.
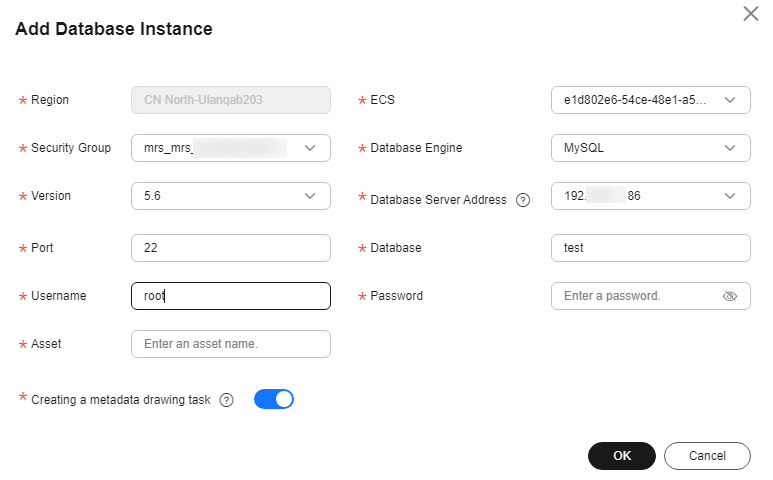
- Click Add Instance in the upper left corner of the database instance list. The Add Database Instance dialog box is displayed.
Figure 1 Adding a database instance

- Set related parameters based on Table 3 and click OK to add the self-built database instance.
Table 3 Configuring database instance information Parameter
Description
ECS
Select the ECS of the self-built database instance from the drop-down list.
Security group
Select a security group from the drop-down list.
Database Engine
Select a DB engine from the drop-down list. Currently, the following DB engines are supported:
- MySQL
- TDSQL
- KingBase
- DMDBMS
- PostgreSQL
- SQLServer
- Oracle
Version
Select a DB engine version from the drop-down list box.
Connection Method
This parameter is displayed when Database Engine is set to Oracle. Select a connection mode from the drop-down list.
- Service Name: Enter the service name.
- SID: Enter the SID.
Database Server Address
Select a server address from the drop-down list box.
If the database is deployed in the cluster mode and data masking is required, set this parameter to the IP address of the primary node.
Database Port
Enter an integer ranging from 0 to 65535.
Database Name
Enter a database name.
Username/Password
Enter the username and password of the database.
Asset
Enter 4 to 255 characters. Only letters, digits, hyphens (-), and "_" are allowed. The value must start with a letter.
Creating a metadata drawing task
Databases of a metadata task are supported. After this function is enabled, metadata tasks are automatically delivered based on the default database of the instance to obtain the database, table, and column information of the instance.
- After an instance is added, if you need to identify and mask sensitive data in the databases of the instance, authorize access to the databases first. For details, see Authorizing Access to a Database Asset.
Adding Instances and Databases in Batches
You can use Direct Connect to connect your on-premises assets to the proxy VPCs in the cloud, and subsequently add your on-premises databases to DSC in batches.
- Log in to the DSC console.
- Click
 in the upper left corner and select a region or project.
 - In the navigation pane on the left, choose .
- Choose . The Database Instances tab is displayed.
- Click the Database Instances tab.
- Click Adding DB Instances and Databases in Batches in the upper left corner. The Adding DB Instances and Databases in Batches dialog box is displayed.
- Click Download Template to download the Excel template and set parameters based on Table 4.
Table 4 Database Instance Information Parameter
Description
Asset
User-defined asset name displayed in the database instance list.
ECS Instance ID
You do not need to enter the ID for an external self-built database. However, if you purchase an ECS self-built database, you must enter the ID of the corresponding ECS instance.
Oracle SID
Enter the SID of the Oracle database.
Oracle Service Name
Enter the Oracle service name.
Proxy VPC
This parameter is optional for cloud databases and is mandatory for external self-built databases. It corresponds to the proxy VPC of the ECS.
Subnet
This parameter is optional for cloud databases and is mandatory for external ECSs. It corresponds to the ECS subnet ID.
Security Group
This parameter is optional for cloud databases and mandatory for external ESCs. It corresponds to the security group of the ECS.
Database Engine
If an ECS instance has been added, the engine of the added ECS will be used.
Version
If an ECS instance has been added, the version of the added ECS will be used.
Host IP Address
If an ECS has been added, the IP address of the added ECS will be used.
Database Port
If an ECS has been added, the port of the added ECS will be used.
Database Name
Database name
User Name
Database account
Password
Database password
- Click Select File, select the prepared template, and click OK.
- After an instance is added, if you need to identify and mask sensitive data in the databases of the instance, authorize access to the databases first. For details, see Authorizing Access to a Database Asset.
Adding a Cross-Account or Cross-VPC DWS Instance
- Log in to the DSC console.
- Click
 in the upper left corner and select a region or project.
 - In the navigation pane on the left, choose .
- Choose . The Database Instances tab is displayed.
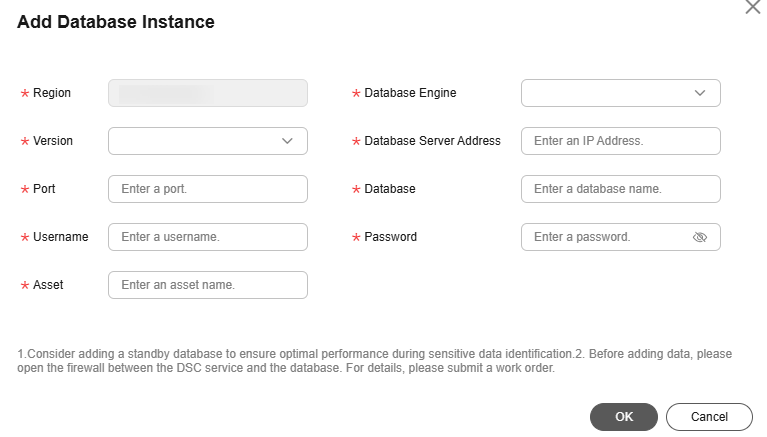
- Click the Database Instances tab. In the upper left corner of the instance list, click Add Cross-Account or Cross-VPC Instance. The Add Database Instance dialog box is displayed.
Figure 2 Adding a database instance
- Set parameters based on Table 5 and click OK.
Table 5 Parameters for configuring a cross-account/cross-VPC instance Parameter
Description
Proxy PC
Choose a proxy VPC from the dropdown list.
Subnet
Select a subnet from the drop-down list.
Security group
Select a security group from the drop-down list.
Instance Name
Enter the name of the instance to be added.
Version
Select a version from the drop-down list. Instances of the following versions can be added:
- 9.1.0
- 9.0
- 8.3.0
- 8.2.1
- 8.2.0
- 8.1.3
- 8.1.1
- 8.0.1
- 8.0.0
Database Server Address
Enter the obtained host IP address.
Database Port
Enter a database port.
Database Name
Enter a database name.
Username
Enter the username for connecting to the database.
Password
Enter the password for connecting to the database.
Asset
Enter an asset name. Enter 4 to 255 characters. Only letters, digits, hyphens (-), and "_" are allowed. The value must start with a letter.
Creating a metadata drawing task
After Creating a metadata drawing task is enabled, metadata tasks are automatically delivered based on the default database of the instance to obtain the database, table, and column information of the instance.
- After an instance is added, if you need to identify and mask sensitive data in the databases of the instance, authorize access to the databases first. For details, see Authorizing Access to a Database Asset.
Adding a CloudDB Database
To add a CloudDB database, you need to submit a service ticket to apply for configuring related parameters.
- Log in to the DSC console.
- Click
 in the upper left corner and select a region or project.
 - In the navigation pane on the left, choose .
- Click CloudDB under Database. The Databases tab is displayed.
- Click the Database Instances tab. On the displayed page, click Add above the list. The Add Database Instance dialog box is displayed.
Figure 3 Adding a CloudDB instance
- Set parameters based on Table 6 and click OK.
Table 6 Configuring a CloudDB instance Parameter
Description
Database Engine
MySQL and GaussDB are supported.
Version
Select a version from the drop-down list. Instances of the following versions can be added:
- MySQL: 5.7
- GaussDB: 1
Database Server Address
Enter the obtained host IP address.
Database Port
Enter a database port.
Database Name
Enter a database name.
Username
Enter the username for connecting to the database.
Password
Enter the password for connecting to the database.
Asset
Enter an asset name. The value can contain 4 to 255 characters and must start with a letter. Only letters, digits, hyphens (-), and underscores (_) are allowed.
- Click OK.
Authorizing Access to a Database Asset
Before authorizing a cloud database, verify that RDS, DWS, or GaussDB is enabled, assets are present, and the corresponding subnet has available IP addresses.
Ensure that the Status of the cloud database or self-built database instance is Normal.
The following uses the RDS database type as an example to describe how to authorize access to database assets in an RDS database instance. To authorize access to other types of database instance, click the corresponding database type (for example, DWS or Self-built databases) and perform the following steps:
- Log in to the DSC console.
- Click
 in the upper left corner and select a region or project.
 - In the navigation pane on the left, choose .
- Click RDS. The RDS Databases tab is displayed.
Figure 4 RDS database instances

- Click the Database Instances tab. Authorization can be performed in either of the following ways:
- Method 1: Click Authorize in the Operation column of the database instance list, and enter the database information for authorization.
Figure 5 Authorizing databases
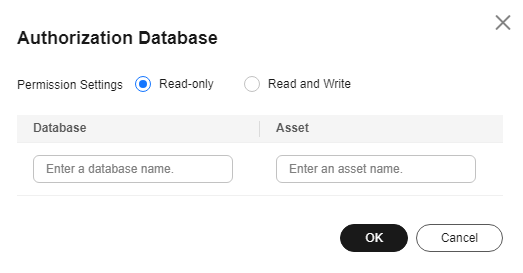
- Grant the read-only permission: Only the sensitive data identification function can be used.
- Grant the read and write permission: The sensitive data identification and data anonymization functions can be used.

- After the RDS read-only permission is authorized, DSC creates an account dsc_readonly in RDS.
- After the password of the dsc_readonly account is reset in RDS, it will not be automatically synchronized to DSC. As a result, the sensitive data identification task fails. Therefore, do not reset the password of this account.
- If you have reset the password of dsc_readonly in RDS, delete the authorized RDS DB instance in DSC and re-authorize the instance.
- DSC cannot scan and mask sensitive data in MySQL databases within RDS instances where SSL has been enabled.
- After the RDS read-only permission is authorized, DSC creates an account dsc_readonly in RDS.
- Method 2: Click an instance name to go to the instance details page. In the Operation column, click Authorize to authorize access to a database.
Figure 6 Instance details
- Method 1: Click Authorize in the Operation column of the database instance list, and enter the database information for authorization.
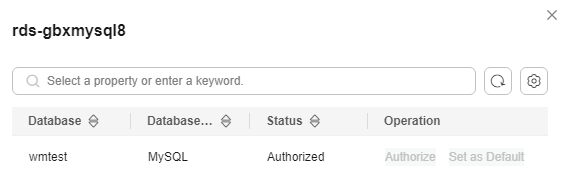
- After the authorization is complete, click the Databases tab to view the connection status of the authorized database.
After the asset authorization is complete, the Connection Status of the asset is Checking, which means DSC is checking the database connectivity.
- DSC can access the added database normally if the Connection Status of the database is Succeeded.
- DSC cannot access the added database normally if the Connection Status of the database is Failed. Hover the cursor over Failed to view the failure cause or rectify the fault by referring to How Do I Troubleshoot the Failure in Connecting to the Added Database?
Related Operations
- Deleting a DB instance
Only self-built DB instances can be deleted. You can delete an instance only when there are no authorized databases and metadata under it.
Select multiple self-built database instances and click Batch Delete in the upper left corner of the instance list to delete the instances. You can also click Delete in the Operation column of the instance list to delete a single DB instance.
- Drawing metadata of an instance
- If the number of authorized databases of a cloud database instance is greater than 0, click Refresh in the Operation column of the instance list to obtain the database, table, and column information of the instance.
Cloud databases that do not support metadata collection are excluded. For details, see Step 1: Scanning Metadata.
- If you enable the function of automatically creating a metadata task when adding a self-built database instance, the system automatically creates a metadata task to obtain all metadata of the instance after the instance is created.
User-built databases that do not support metadata collection, such as SQL Server, are excluded. For details, see Step 1: Scanning Metadata.
- You can manually create a metadata task by referring to section Step 1: Scanning Metadata.
- If the number of authorized databases of a cloud database instance is greater than 0, click Refresh in the Operation column of the instance list to obtain the database, table, and column information of the instance.
- Creating an identification task
In the Databases tab, locate the target asset and click Create Identification Task in the Operation column. For details, see Creating an Identification Task.
- Testing connectivity in batches
You can select multiple database instances and data instances to perform connectivity tests in batches.
Feedback
Was this page helpful?
Provide feedbackThank you very much for your feedback. We will continue working to improve the documentation.See the reply and handling status in My Cloud VOC.
For any further questions, feel free to contact us through the chatbot.
Chatbot


