Encrypting an OBS Volume
You can use server-side encryption to encrypt data uploaded to OBS, enhancing storage security and compliance. The OBS server encrypts objects before storing them and decrypts them when accessed, returning the decrypted data to the client. Available options are SSE-KMS, SSE-OBS, and SSE-C. CCE supports the creation of only OBS volumes encrypted with SSE-KMS.
For details about SSE-KMS, see Server-Side Encryption.
Prerequisites
- cce_cluster_agency must already exist in IAM. To check if it has been created, go to the IAM console and choose Agencies in the navigation pane.
- A cluster v1.25.9-r0, v1.27.6-r0, v1.28.4-r0, or later is available.
- CCE Container Storage (Everest) has been installed in the cluster, and its version is 2.4.153 or later.
- An available key has been created in DEW. For details, see Creating a Key.
- To create a cluster using commands, ensure kubectl is used. For details, see Accessing a Cluster Using kubectl.
Constraints
- This function is being rolled out. For details, see Server-Side Encryption.
- To use SSE-KMS server-side encryption to encrypt object storage volumes and enable storage bucket keys, ensure cce_cluster_agency has the following permissions: kms:cmk:get, kms:cmk:list, kms:dek:crypto, kms:cmk:create, and kms:dek:create. cce_cluster_agency is assigned kms:cmk:get, kms:cmk:list, and kms:dek:crypto by default. Manually assign the remaining permissions kms:cmk:create and kms:dek:create. For details, see Configuring KMS Permissions.
- To use a bucket or objects with SSE-KMS server-side encryption enabled, the requester must have the following IAM permissions: kms:cmk:get, kms:cmk:list, kms:cmk:create, kms:dek:create, and kms:dek:crypto. Additionally, an access key (AK/SK) must be configured for the target object storage volume to enable object uploads and downloads. For details, see Assigning Permissions to an IAM User and Using a Custom Access Key (AK/SK) to Mount an OBS Volume.
Using kubectl to Automatically Create an OBS Volume Encrypted with SSE-KMS
- Use kubectl to access the cluster.
- Create the pvc-obs-auto.yaml file. For more information about other parameters, see Using kubectl.
apiVersion: v1
kind: PersistentVolumeClaim
metadata:
  name: evs-encrypt-test1
  namespace: default
  annotations:
    everest.io/obs-volume-type: STANDARD
    csi.storage.k8s.io/fstype: s3fs
    everest.io/csi.sse: "kms"                        # Fixed at kms
    everest.io/csi.data-encryption-algorithm: "xxx"  # The data encryption algorithm
    everest.io/crypt-key-id: "xxx"                   # The KMS master key for SSE-KMS encryption
    everest.io/csi.sse-kms-key-project-id: "xxx"     # The project ID associated with the KMS master key for SSE-KMS encryption
    everest.io/csi.sse-bucket-key-enabled: 'true'    # (Optional) Whether to enable the bucket key
spec:
  accessModes:
    - ReadWriteMany
  resources:
    requests:
      storage: 1Gi
  storageClassName: csi-obs
Table 1 Parameters Parameter
Description
everest.io/csi.sse
Create object storage encrypted with SSE-KMS. The value is fixed at kms.
everest.io/csi.data-encryption-algorithm
The data encryption algorithm. Its value can be AES_256 or SM4.
- AES_256: An AES symmetric key is used.
- SM4: An SM4 symmetric key is used.
everest.io/crypt-key-id
The KMS master key used for SSE-KMS encryption. For details about how to obtain the key, see Viewing a Key.
everest.io/csi.sse-kms-key-project-id
The project ID (not the enterprise project ID) associated with the KMS master key for SSE-KMS encryption. For details, see Obtaining a Project ID.
everest.io/csi.sse-bucket-key-enabled
This parameter is optional and used to configure the bucket key status. The value can be true or false. If it is left blank, value false will be used by default.
- true: Bucket key is enabled. This can reduce the number of encryption requests and enhance access efficiency.
- false: Bucket key is not enabled.
This parameter is mandatory and must be set to true when the created underlying storage is a parallel file system.
NOTE:To enable storage bucket keys, ensure cce_cluster_agency has the following permissions: kms:cmk:get, kms:cmk:list, kms:dek:crypto, kms:cmk:create, and kms:dek:create. cce_cluster_agency is assigned kms:cmk:get, kms:cmk:list, and kms:dek:crypto by default. Manually assign the remaining permissions kms:cmk:create and kms:dek:create. For details, see Configuring KMS Permissions.
- Run the following command to create a PVC:
kubectl apply -f pvc-obs-auto.yaml
- Go to the PVCs tab and check whether the PVC of the encrypted OBS volume is created and whether the volume is encrypted.
Configuring KMS Permissions
- Log in to the IAM console. In the navigation pane, choose Agencies. Enter cce_cluster_agency in the search box on the right. In the search result, click cce_cluster_agency. Its basic information page is displayed.
- Switch to the Permissions tab, click Authorize, and click Create Policy in the upper right corner.
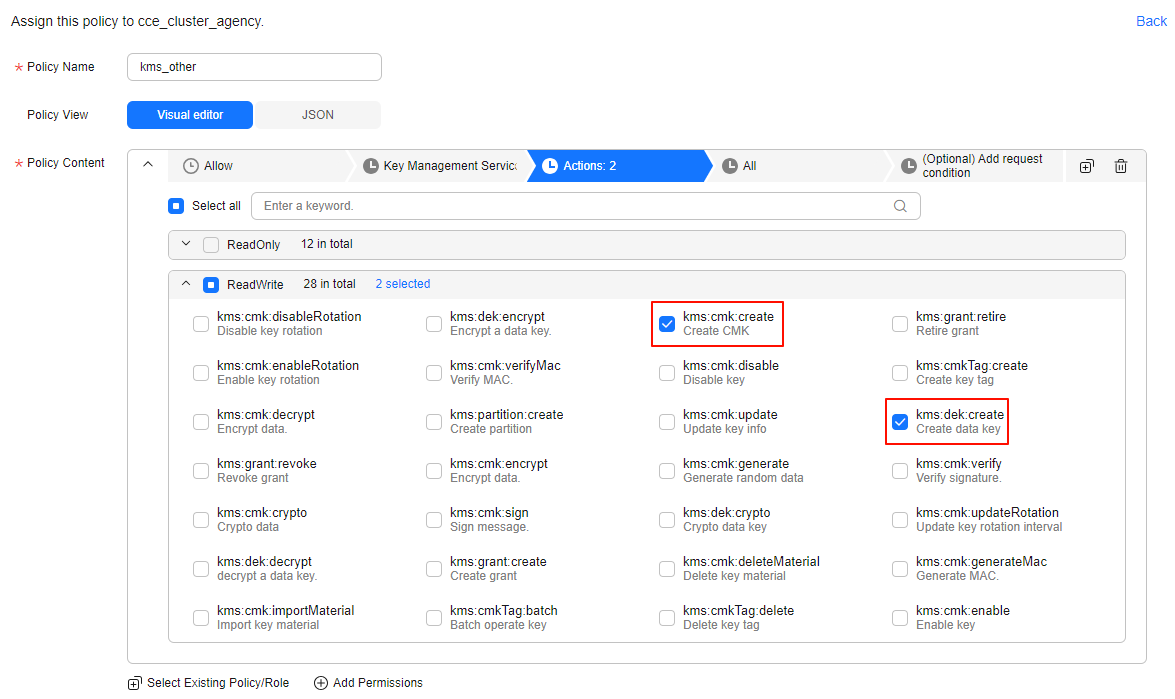
- Configure parameters. This section describes only mandatory parameters. For more parameters, see Creating a Custom Policy.
Figure 1 Configuring permissions

Table 2 Parameter
Description
Policy Name
Customize a policy name as needed.
Naming rules: Enter 1 to 128 characters. Only letters, digits, spaces, and special characters (-_.,) are allowed.
Policy Content
Configure the policy as follows:
- Allow: Select Allow.
- Cloud service: Select KMS.
- Select action: Select kms:cmk:create and kms:dek:create.
- Resources: Select All.
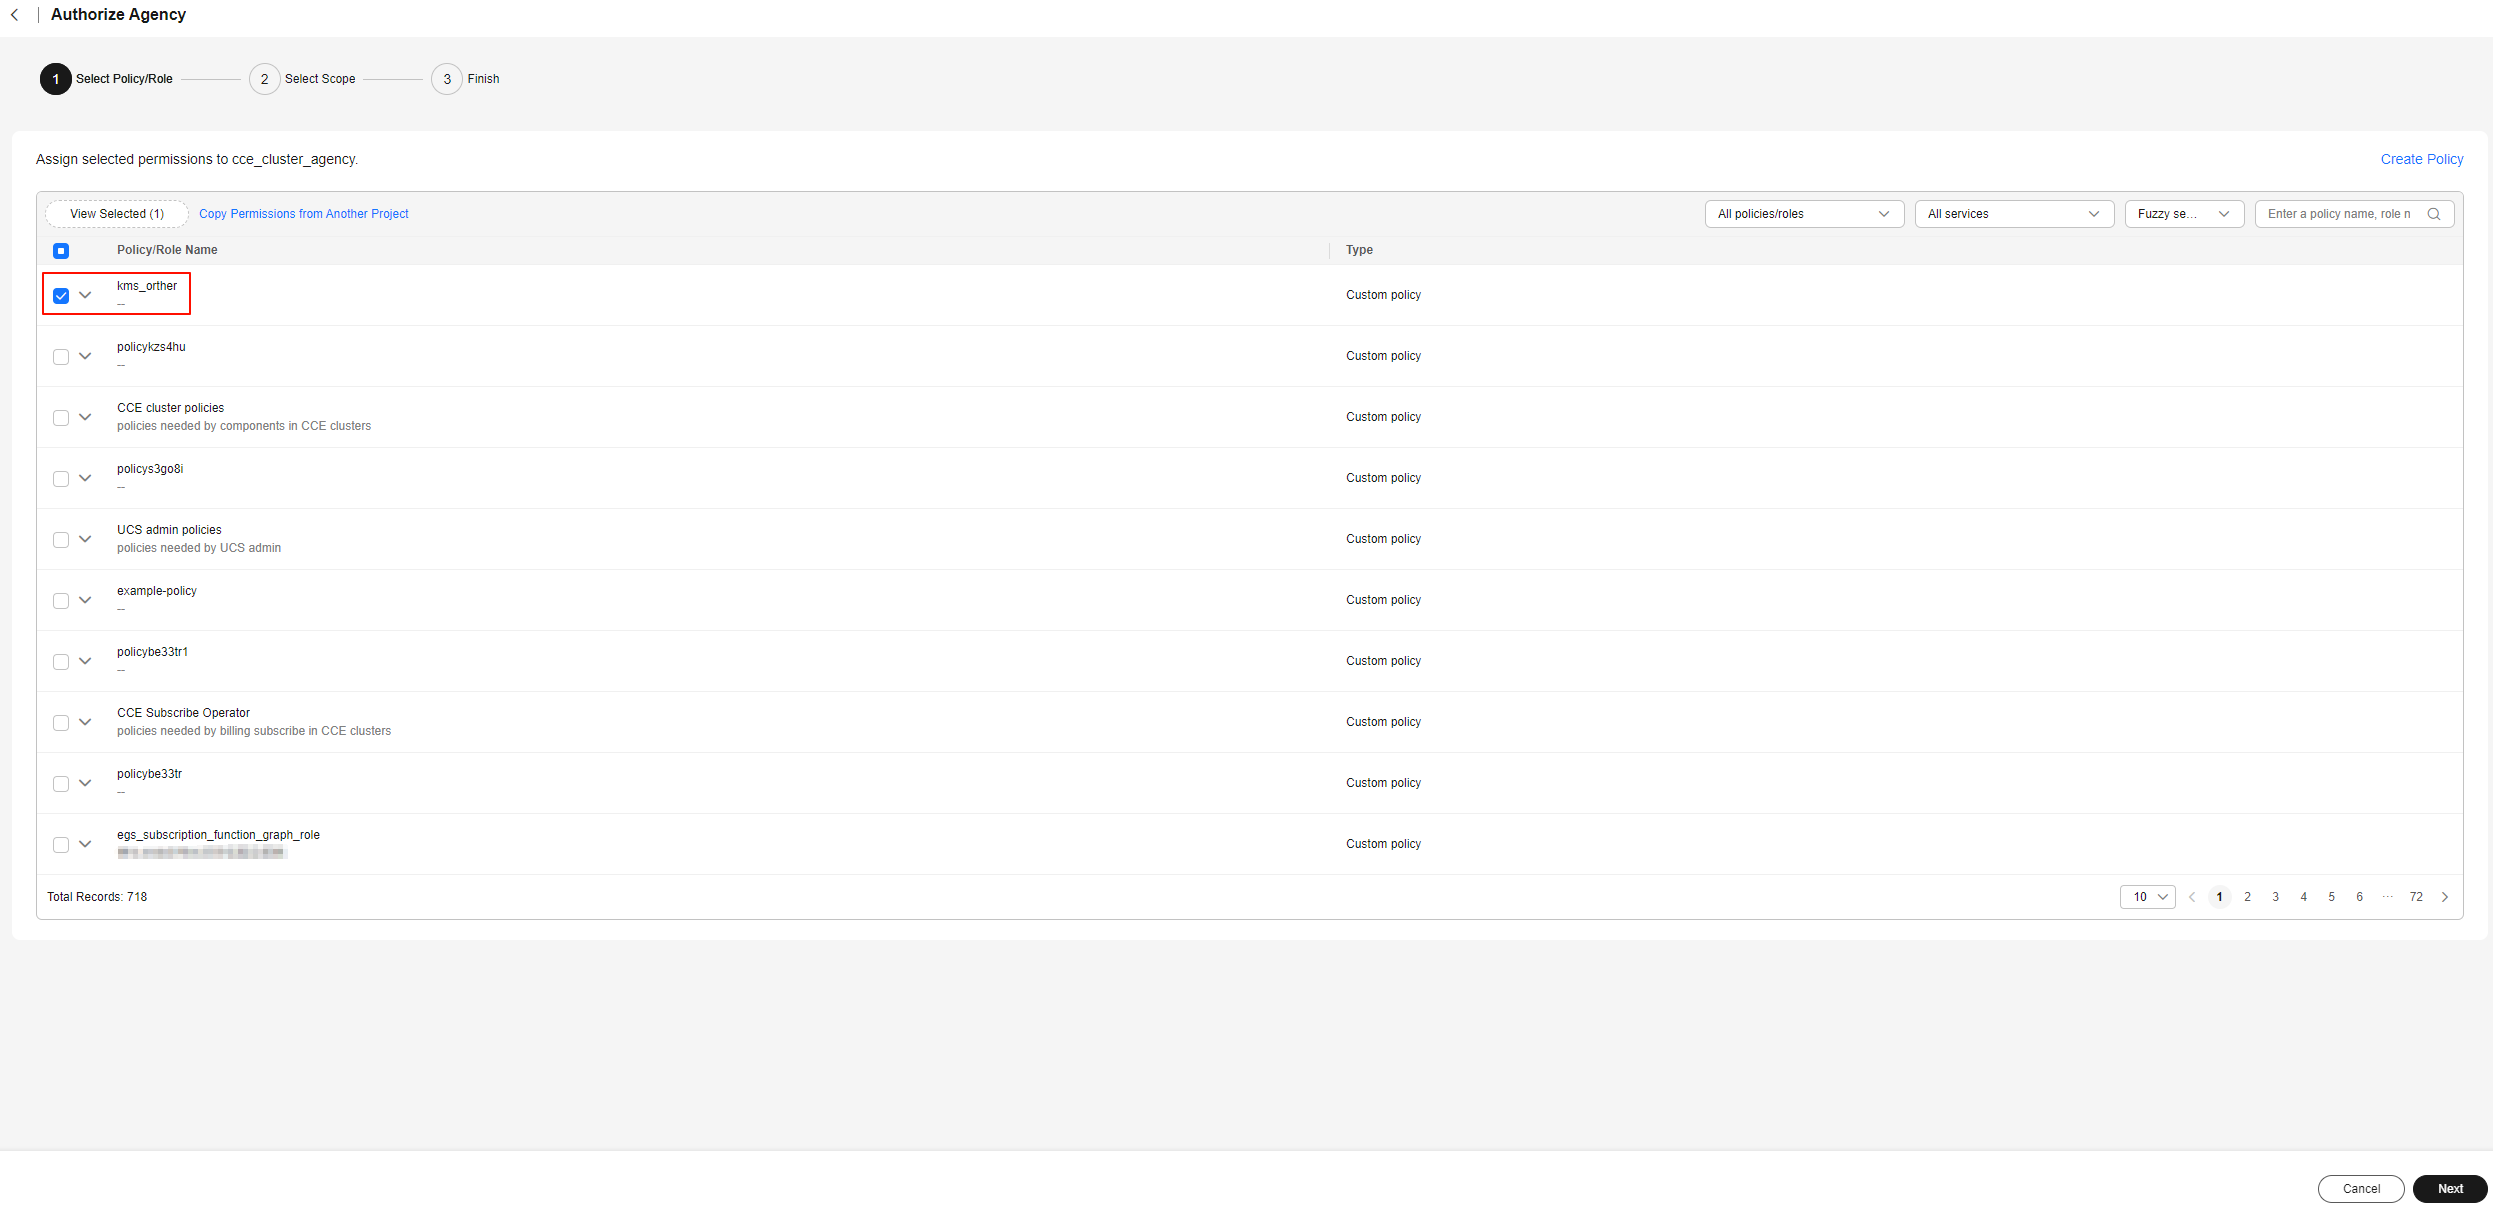
- Click Next in the lower right corner. In the displayed dialog box, click OK. If the new policy name appears in the policy list, the policy has been created.
- On the Authorize Agency page, in the Select Policy/Role step, select the new policy and click Next in the lower right corner.
Figure 2 Selecting a policy

- On the Authorize Agency page, in the Select Scope step, select All resources and click OK in the lower right corner. On the Authorize Agency page, in the Finish step, click Finish.
Feedback
Was this page helpful?
Provide feedbackThank you very much for your feedback. We will continue working to improve the documentation.See the reply and handling status in My Cloud VOC.
For any further questions, feel free to contact us through the chatbot.
Chatbot


