WebSocket
This section describes how to configure WebSocket connections on the FunctionGraph console.
Overview
In FunctionGraph, you can configure an APIG trigger to enable a function to respond to WebSocket requests. Once configured, the associated function can act as a web server to handle WebSocket connections and messages, returning results to clients. This solution is suitable for scenarios requiring persistent connections, real-time messaging, and live data monitoring, enabling efficient real-time communication and data interaction.
The billing of WebSocket is the same as that of HTTP. You can consider WebSocket as an HTTP call with a longer connection time. For details on billing, see FunctionGraph Billing Overview.
Notes and Constraints
- WebSocket connection is only supported by HTTP functions.
- Currently, WebSocket connection can be configured only in the CN East-Shanghai1 region.
- The configured execution timeout applies equally to both WebSocket and HTTP requests. If the WebSocket connection duration exceeds the execution timeout, the connection will be closed and the client will receive status code 1006.
Step 1: Creating an HTTP Function
- Log in to the FunctionGraph console. In the navigation pane, choose Functions > Function List.
- On the Function List page, click Create Function in the upper right corner.
- Click Create from scratch and configure the function information by referring to Table 1.
Table 1 Function configuration Parameter
Description
Example Value
Function Type
Select the function type. To configure WebSocket connection, you need to create an HTTP function.
The HTTP functions process HTTP requests. You can send an HTTP request to a URL to trigger the function and use your web services. This feature is supported only by FunctionGraph v2.
HTTP Function
Region
Select a region where you will deploy your code.
Currently, WebSocket connection can be configured only in the CN East-Shanghai1 region.
CN East-Shanghai1
Function Name
Name of the function, which must meet the following requirements:
Consists of 1 to 60 characters, and can contain letters, digits, hyphens (-), and underscores (_). Start with a letter and end with a letter or digit.
WebSocket-demo
Enterprise Project
Select the enterprise project to which the function belongs. Enterprise projects let you manage cloud resources and users by project.
The default value is default. You can select the created enterprise project. If you have not enabled the enterprise management service, this parameter is not displayed. For details, see Enabling and Accessing Enterprise Management.
default
Agency
Select an agency for the function. An agency is used to authorize FunctionGraph to access other cloud services. For example, if FunctionGraph needs to access LTS or VPC, you must select an agency with required service permissions. If FunctionGraph does not access any cloud services, you do not need to select an agency.
By default, Use no agency is used. You can select an existing agency.
If no default agency is available, FunctionGraph allows you to quickly create a default agency named fgs_default_agency. For details, see Default Agency.
Use no agency
Advanced Settings
- Public Access: When enabled, functions can access services on the public network. The public network access bandwidth is shared among users.
- VPC Access: When enabled, functions will use the NICs bound to the configured VPC for network access and the default FunctionGraph NIC will be disabled.
Public Access: Enabled.
VPC Access: Disabled.
- Click Create Function. The function details page is displayed.
Step 2: Configuring Function Code
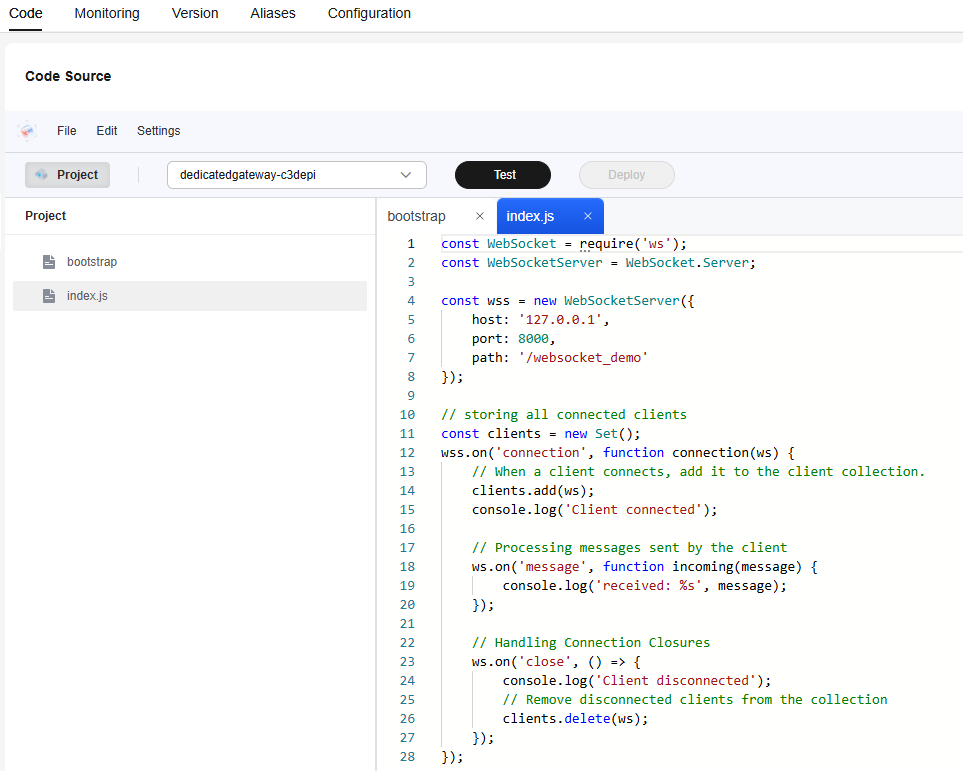
- On the Code tab page of the function details page, open the index.js file, copy and deploy the following code, as shown in Figure 1.
const WebSocket = require('ws');
const WebSocketServer = WebSocket.Server;

const wss = new WebSocketServer({
    host: '127.0.0.1',
    port: 8000,
    path: '/websocket_demo'
});

// Store all connected clients.
const clients = new Set();
wss.on('connection', function connection(ws) {
    //Add the connected client to the client set.
    clients.add(ws);
    console.log('Client connected');

    //Process messages sent by the client.
    ws.on('message', function incoming(message) {
        console.log('received: %s', message);
    });

    //Process the connection closure.
    ws.on('close', () => {
        console.log('Client disconnected');
        //Remove the disconnected client from the set.
        clients.delete(ws);
    });
});

// Send messages to all clients at a scheduled time.
setInterval(() => {
    // Traverse all clients and send messages.
    for (let ws of clients) {
        if (ws.readyState === WebSocket.OPEN) {
            ws.send('Server time: ' + new Date().toTimeString());
        }
    }
}, 2000); // Executed every 2 seconds.

console.log('WebSocket server is running on ws://127.0.0.1:8000/websocket_demo');
The listening IP address of the WebSocket server is 127.0.0.1, and the default listening port is 8000.
- Add the following content to the bootstrap file, as shown in Figure 2.
/opt/function/runtime/nodejs12.13/rtsp/nodejs/bin/node $RUNTIME_CODE_ROOT/index.js
- In the navigation pane, choose Functions > Dependencies, and click Create Dependency, as shown in Figure 3.
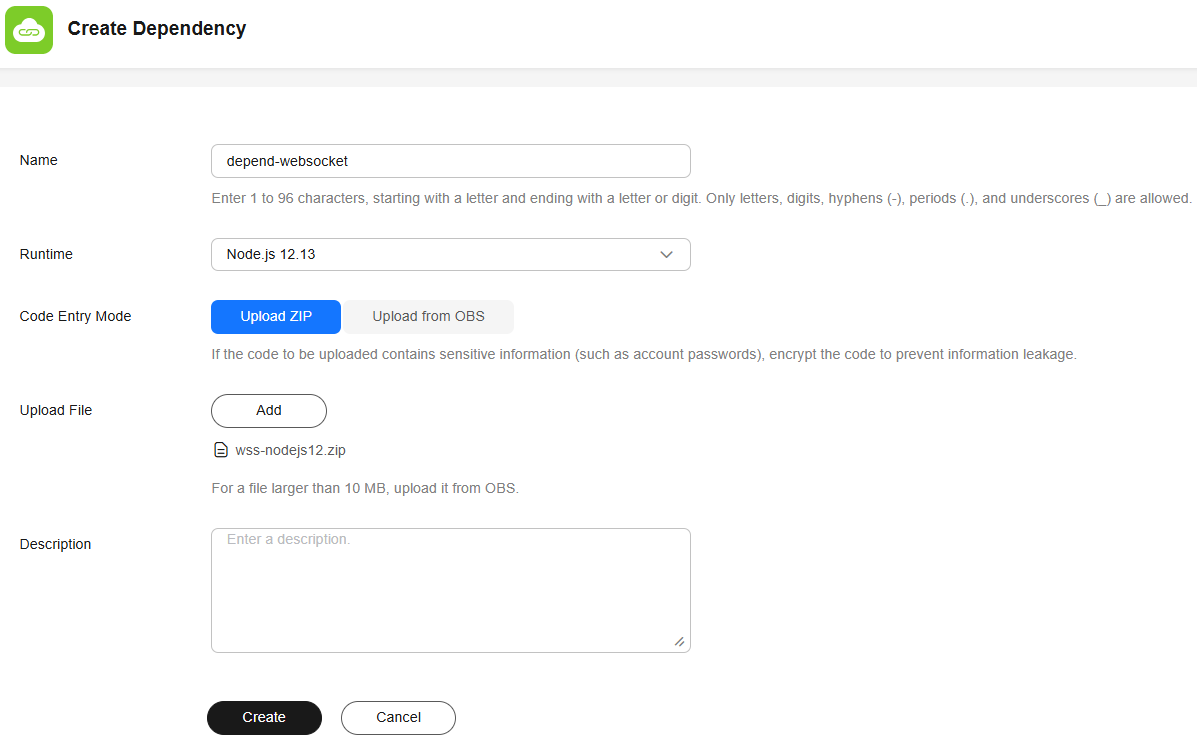
- Download the wss-nodejs12 file, upload and configure the WebSocket dependency package on the Create Dependency page, as shown in Figure 4, and click Create.
Table 2 Parameters for creating a dependency Parameter
Description
Example Value
Name
Enter a dependency name.
Start with a letter and end with a letter or digit.
The value can contain a maximum of 96 characters, including letters, digits, underscores (_), periods (.), and hyphens (-).
depend-websocket
Runtime
Select the runtime of the dependency.
Node.js 12.13
Code Entry Mode
Select a code upload mode. You can select Upload ZIP or Upload from OBS.
Upload ZIP
Upload File/OBS Link URL
- If Upload ZIP is selected, click Add to upload the dependency packaged in ZIP format. The size of the ZIP file to be uploaded cannot exceed 10 MB. If the file size exceeds 10 MB, upload it from OBS.
- If Upload from OBS is selected, enter the OBS object URL that points to the code file object. The object must be in ZIP format and must be stored in the OBS bucket in the same region as the function. Copy the URL of the code file object by referring to Sharing Objects with Anonymous Users Using URLs.
Add a file and upload the wss-nodejs12 file downloaded in 4.
Description
Enter the description of the dependency.
-
- Return to the WebSocket-demo function details page. On the Code tab, click Add in the Dependencies area at the bottom.
- In the displayed dialog box, set Type to Private, add the depend-websocket dependency created in 4, and click OK.
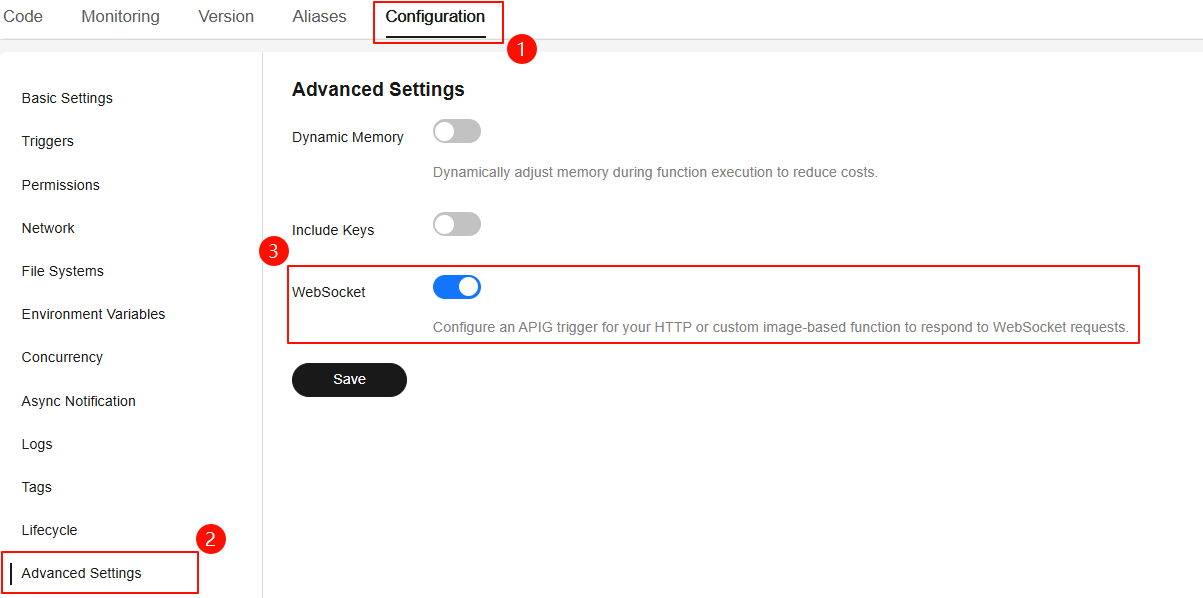
- Choose Configuration > Advanced Settings and enable WebSocket, as shown in Figure 5.
Step 3: Creating a Dedicated Gateway
Buy a dedicated gateway based on your service requirements. For details, see Creating a Gateway.
|
Parameter |
Description |
|---|---|
|
Region |
Select the region where the function is created. |
|
Public Inbound Access |
|
|
Network |
If you use the WebSocket feature in the production environment, you can configure VPC Access for the function and configure the same VPC and subnet for the gateway. |
Step 4: Creating an APIG Trigger
- Choose Configuration > Triggers, click Create Trigger, and create a dedicated APIG trigger by referring to Table 4.
Table 4 Parameters for creating a dedicated APIG trigger Parameter
Description
Example Value
Trigger Type
Mandatory.
Select API Gateway (Dedicated).
API Gateway (Dedicated)
API Instance
Mandatory.
Select an APIG dedicated gateway. If no gateway is available, click Create Instance.
apig-ws
API Name
Mandatory.
Name of a dedicated APIG trigger. Enter 3 to 64 characters, starting with a letter. Only letters, digits, and underscores (_) are allowed.
API_websocket_demo
API Group
Mandatory.
Select an API group. An API group is a collection of APIs. You can manage APIs by API group.
If no group is created, click Create API Group. After the group is created, click
 on the right.
APIGroup_ws
Environment
Mandatory.
The environment where the API is published. An API can be called in different environments, such as production, test, and development environments only when the parameter is set to RELEASE.
If no environment is available, click Create Environment.
RELEASE
Security Authentication
Mandatory.
API authentication modes are as follows:
- App: AppKey and AppSecret authentication. This mode is of high security and is recommended. For details, see App Authentication.
- IAM: IAM authentication. This mode grants access permissions to IAM users only and is of medium security. For details, see IAM Authentication
- None: No authentication. This mode grants access permissions to all users.
CAUTION:
In this example, None is selected. You are advised to select a high-security authentication mode for actual services.
None
Protocol
Mandatory.
When WebSocket is used, HTTPS corresponds to WSS, and HTTP corresponds to WS.
There are two types of API request protocols:
- HTTP: Data is not encrypted during transmission.
- HTTPS: Data is encrypted during transmission.
HTTPS
Method
Mandatory.
To use the WebSocket protocol, the request method must support at least GET.
Options: GET, POST, DELETE, PUT, PATCH, HEAD, OPTIONS, and ANY.
GET
Timeout (ms)
Mandatory.
API backend timeout in milliseconds. Range: 1–60,000.
The backend timeout indicates the maximum idle connection time of WebSocket. For example, if the timeout is set to 5000 ms, the connection is disconnected when WebSocket does not receive or send messages for more than 5000 ms.
5000
- After the trigger is created, click the trigger name to access the APIG console, as shown in Figure 6.

After the APIG trigger is created, its URL will not change.
- On the API details page, click Modify, as shown in Figure 7. The page for modifying an API is displayed.
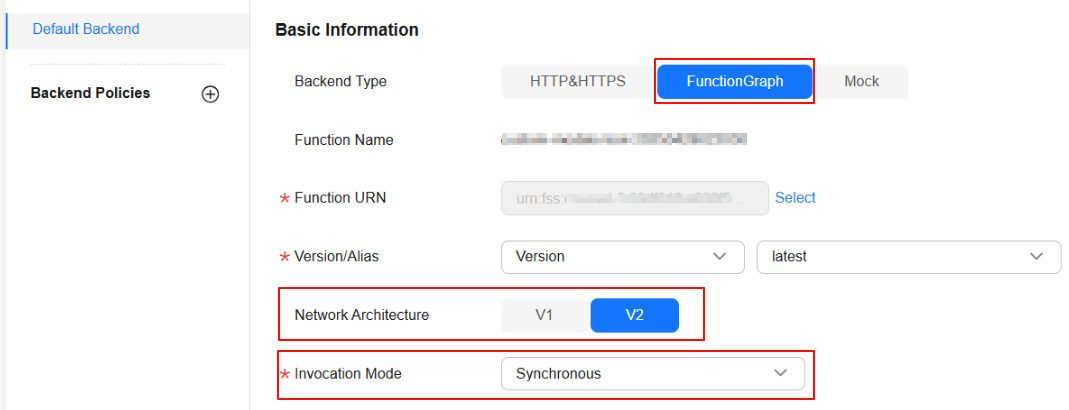
- Click Next to go to the Default Backend tab, as shown in Figure 8, set API parameters, and click Finish.
- Backend Type: Select FunctionGraph.
- Network Architecture: Select V2. (If this parameter is not available, submit a service ticket to enable the whitelist.)
- Invocation Mode: Select Synchronous. In WebSocket scenarios, only the synchronous invocation mode is supported.
- Return to the API details page and click Publish Latest Version, as shown in Figure 9.
Step 5: Testing the Function
- Return to the FunctionGraph console, go to the function details page, choose Configuration > Triggers, and copy the URL of the APIG trigger.
Figure 10 Copying the URL of the APIG trigger

- Use Postman to test the function.
- Create a WebSocket request in Postman. Copy the URL of the APIG trigger to Postman and change the scheme from HTTPS to WSS.
- Configure Params and Headers parameters as required.
- Connect to WebSocket. After the connection is successful, you can send messages and view the message receiving status.
- After the execution times out, the connection to the WebSocket server is disconnected.
WebSocket Description
- Connection Keepalive and Timeout Reconnection
After a WebSocket connection is established, FunctionGraph does not intervene in any logic unless the connection duration exceeds the specified execution timeout. If no data is transmitted through your WebSocket connection within a specified period, the connection may be closed by an intermediate network node (such as a NAT gateway). In this scenario, you need to use the ping and pong frames of the WebSocket protocol to keep the connection active or verify the validity of the WebSocket connection.
If the service requirements exceed the maximum request timeout provided by FunctionGraph, or if the application needs to maintain logical connection stability during running, you are advised to add a timeout reconnection mechanism to the client code. You can use the Reconnecting-WebSocket or SocketIO library.
- Session Affinity
FunctionGraph is a serverless computing platform. Its function instances use request-triggered lifecycle management. During high concurrency, the system automatically scales by creating multiple instance replicas but cannot guarantee routing consecutive client requests to the same instance. For WebSocket applications that require session state maintenance, use external storage systems such as Redis, Kafka, and databases to implement cross-instance state synchronization.
For example, in a chat room application, all users may not be connected to the same function instance at the same time. You can use the Redis publish/subscribe function to broadcast messages. When a user joins a chat room, the function subscribes to the channel of the chat room. When the user sends a message, the function publishes the message to the channel of the chat room in Redis. Because all users in the chat room have subscribed to the channel, all users receive the message.
Feedback
Was this page helpful?
Provide feedbackThank you very much for your feedback. We will continue working to improve the documentation.See the reply and handling status in My Cloud VOC.
For any further questions, feel free to contact us through the chatbot.
Chatbot


