Purchasing an ECS in Quick Config Mode
Scenarios
Elastic Cloud Server (ECS) is a cloud server that provides scalable, on-demand resources, including vCPUs, memory, OS, and Elastic Volume Service (EVS) disks. After purchasing an ECS, you can use it like using your local computer or physical server.
The quick config mode provides basic, cost-effective, and high-performance instance specifications for you to choose from. You can specify the billing mode, region, image, public network access, and purchase details to quickly purchase an ECS.
The following describes how to purchase an ECS in quick config mode on the management console. To learn how to purchase an ECS in custom config mode, see Purchasing an ECS in Custom Config Mode.
Constraints
- Only yearly/monthly and pay-per-use billing modes are supported.
- Only randomly allocated AZs are supported.
- You can only choose from the recommended instance specifications.
- Only public images are supported.
Prerequisites
- Sign up for a HUAWEI ID and complete real-name authentication.
Before purchasing an ECS, sign up for a HUAWEI ID and enable Huawei Cloud services and complete real-name authentication first.
If you have enabled Huawei Cloud services and completed real-name authentication, skip this step.
- Top up your account.
Ensure that your account has sufficient balance. If not, top up your account.
Procedure
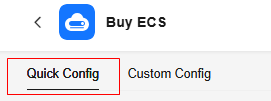
- Click Buy ECS on the ECS console.
Figure 1 Quick config

- Set Basic Configuration.
- Set Billing Mode.
You can select an appropriate billing mode based on the required duration and resource inventory to help you save costs.
Table 1 Billing modes Option
Description
Scenarios and Constraints
Reference
Yearly/Monthly
Yearly/Monthly is a prepaid billing mode in which you pay for ECSs before using them.
Yearly/monthly ECSs are billed by the purchased duration specified in the order.
This cost-effective mode is ideal when the duration of ECS usage is predictable. This billing mode is recommended for long-term users.
A yearly/monthly ECS cannot be deleted. If such an ECS is not required anymore, unsubscribe from it.
Pay-per-use
Pay-per-use is a postpaid billing mode. You pay as you go and just pay for what you use.
Pay-per-use ECSs are billed by the second and settled by the hour.
This billing mode is ideal for scenarios where resource demands fluctuate and you want more flexibility on resource usage.
- Set Region.
A region refers to a physical data center area where ECSs reside. For lower network latency and faster resource access, select the region nearest to your services.

- ECSs in different regions cannot communicate with each other over an intranet.
- Once ECSs are purchased, the region cannot be changed.
- Set Billing Mode.
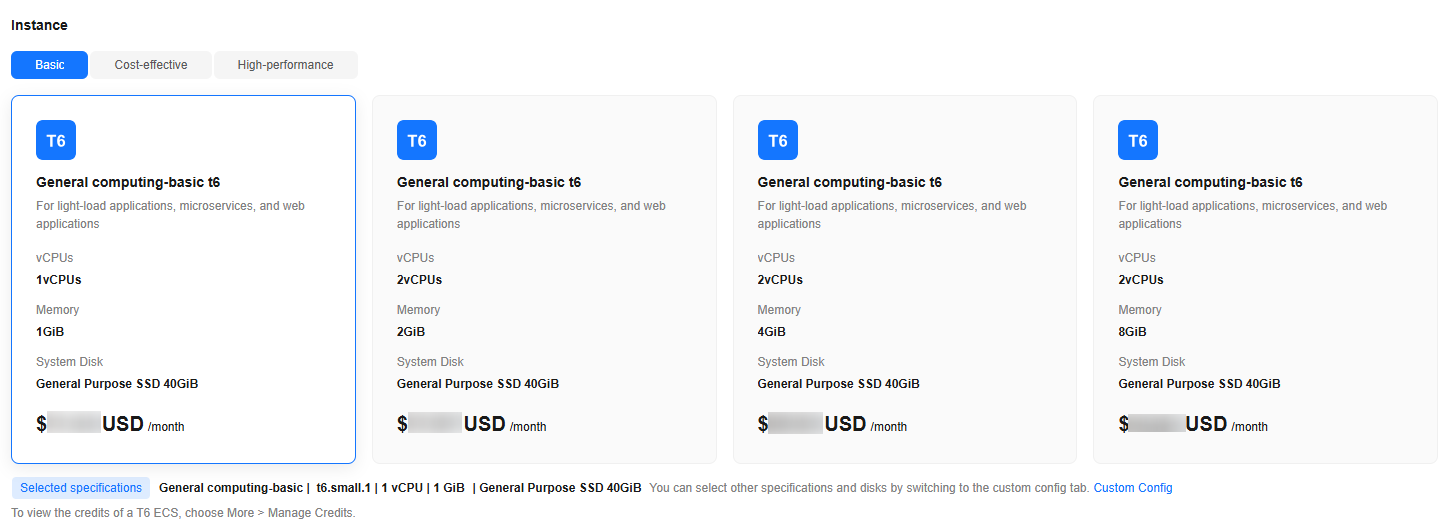
- Set Instance.
The quick config mode provides basic, cost-effective, and high-performance instance specifications for you to choose from. Select appropriate instance specifications based on service requirements.
If the recommended specifications cannot meet your requirements, you can switch to the Custom Config tab. For details, see Purchasing an ECS in Custom Config Mode.
Figure 2 Instance specifications
Table 2 Instance application scenarios Type
Description
Recommended Flavors (Subject to Console)
Basic
Economical, suitable for medium- and light-load enterprise applications and individual users
T6: t6.small.1 and t6.large.1
S7: s7.large.2 and s7.large.4
Cost-effective
High network bandwidth and PPS, suitable for medium- and light-load enterprise applications that require high computing and network performance
S7: s7.small.1, s7.large.2, s7.xlarge.2, and s7.2xlarge.2
High-performance
Higher performance, security, and stability, suitable for medium- and heavy-load enterprise applications that require high computing and network performance
C7: c7.large.2, c7.xlarge.2, c7.2xlarge.2, and c7.3xlarge.2
- Set OS.
- Select an image for the ECS.
Only public images are provided in quick config mode. You can select an image based on service requirements.
For more details, see Public Image Overview.
Figure 3 OS
- (Optional) Set Host protection (HSS).
When you select certain public images, Host Security Service (HSS) is enabled by default. HSS Basic Edition provides one-month free trial and automatically installs the HSS agent. HSS Basic Edition provides functions such as weak password and vulnerability detection.
HSS is designed to improve the overall security for ECSs. It helps you eliminate risks, defend against intrusions and web page tampering, provide advanced defense, and manage security operations.
After the one-month free trial period expires, the HSS basic edition quotas will be automatically released, and HSS will not protect your servers.
If you want to continue using HSS or upgrade HSS security capabilities, you need to purchase HSS. For details, see What Should I Do When the Free Trial of HSS Basic Edition Expires?
After ECSs are purchased, you can switch between different HSS editions on the HSS console. For details about differences among different editions, see Specifications of Different Editions.
- Select an image for the ECS.
- Set Public Network Access.
- You can select Public Network Access to buy and bind an EIP to the ECS.
If you do not select it, no EIPs will be assigned.

If the default EIP route is sold out, Public Network Access cannot be selected.
- (Optional) Set Billed By.
This parameter is displayed only when Public Network Access is selected. Each bandwidth can be used by only one EIP.
- Bandwidth: Dedicated bandwidth will be billed by size.
- Traffic: Dedicated bandwidth will be billed by traffic you have actually used.
- (Optional) Set Bandwidth Size.
This parameter is displayed only when Public Network Access is selected. Select the bandwidth based on service requirements. The unit is Mbit/s.
- You can select Public Network Access to buy and bind an EIP to the ECS.
- Set Other.
Other settings use the system defaults. If you need to customize the settings, switch to the Custom Config tab.
For details, see Purchasing an ECS in Custom Config Mode.
Table 3 Other settings Parameter
Example
Description
Reference
AZ
Random
AZs are randomly allocated by default.
VPC
vpc-default
By default, the VPC and subnet of the latest created ECS are used.
- If no ECSs were created in your account, the latest created VPC and the latest available subnet in the VPC are used by default.
- If no VPCs are available in your account, the system creates a VPC and subnet by default.
- If a VPC is available but no subnets are available, switch to the Custom Config tab to purchase ECSs. For details, see Purchasing an ECS in Custom Config Mode.
- The primary NIC is automatically assigned IPv4 and IPv6 addresses by default.
NOTE:
If IPv6 is not enabled for the selected subnet, no IPv6 address is assigned.
Primary NIC
subnet-default
Security Group
default or Sys-WebServer
The default security group is used.
ECS Name
ecs-xxxx
The name is randomly generated by the system.
N/A
Cloud Eye
Detailed monitoring enabled (Free)
Detailed monitoring is enabled by default for certain public images.
Enterprise Project
default
This function is provided for enterprise users. By default, the enterprise project that the latest created ECS belongs to is used.
- If no ECSs were created in your account or the enterprise project that the latest created ECS belongs to is unavailable, the latest created enterprise project is used by default.
- If no enterprise projects are available in your account, the system creates an enterprise project by default.
- Set Purchase Details.
- (Optional) Select the required duration for ECSs.
This parameter is displayed only when Billing Mode is set to Yearly/Monthly. The duration can be from 1 month to 1 year.
- (Optional) Set Auto-renew.
This parameter is displayed only when Billing Mode is set to Yearly/Monthly.
You can select Auto-renew to automatically renew yearly/monthly resources when they expire.- Monthly: Your subscription will be automatically renewed each month.
- Yearly: Your subscription will be automatically renewed each year.
For details about auto-renewal, see Auto-Renewal Rules.
- Set Quantity.
You can set how many ECSs to be created in a batch. ECSs created in the same batch have the same configurations.
The system displays the remaining number of ECSs you are allowed to create. If the number of ECSs you want to create exceeds the quota, increase the quota.
- (Optional) Select the required duration for ECSs.
- Confirm the configuration and submit the order.
- In the Configuration Summary panel on the right side, review the ECS configuration details.
Mandatory fields that are not configured are displayed in red. You need to set them in the parameter configuration area.
- Read and agree to the agreement, and click Submit.
After the ECS is created, it will be started by default.
- Click back to ECS list. You can view the created ECS on the ECS list page.
- In the Configuration Summary panel on the right side, review the ECS configuration details.
Follow-up Procedure
- Resetting the password
No login credentials will be set in quick config. If you want to remotely log in, reset the password after the ECS is created.
For details, see Resetting the Password for Logging In to an ECS on the ECS Console.
- Connecting to an ECS
You can connect to an ECS in multiple ways. For details, see Login Overview (Windows) and Login Overview (Linux).
- Expanding storage capacity
If the system disk capacity is insufficient, you can add data disks to expand the storage capacity. For details, see Adding a Disk to an ECS.
- Using an ECS
After purchasing an ECS, you can build environments, websites, or applications on it. For details, see Best Practices Summary.
Feedback
Was this page helpful?
Provide feedbackThank you very much for your feedback. We will continue working to improve the documentation.See the reply and handling status in My Cloud VOC.
For any further questions, feel free to contact us through the chatbot.
Chatbot


