Compra de una instancia de BD y conexión a ella con el cliente de mysql
Después de comprar una instancia de BD, puede conectarse a ella usando un ECS de Linux con el cliente mysql instalado en una red privada. Esta sección describe cómo acceder a una instancia de BD desde un ECS mediante el cliente mysql.
Proceso de operación
| Proceso | Descripción |
|---|---|
| Regístrese para obtener un ID de HUAWEI, habilite los servicios de Huawei Cloud, asegúrese de tener configurada una forma de pago válida, cree usuarios de IAM y otórgueles permisos específicos de TaurusDB. | |
| Configure la información necesaria para la creación de instancias. | |
| Si desea utilizar el cliente mysql para conectarse a una instancia de BD, debe preparar un servidor, instalar el cliente mysql en el servidor y ejecutar el comando connection. Compre un ECS de Linux que esté en la misma región y VPC que su instancia de BD. Si ha comprado un ECS de Windows puede conectarse a la instancia de BD usando MySQL-Front. Para más detalles, véase Compra de una instancia de BD y conectarse a ella con MySQL-Front. | |
| Pruebe la conectividad de red entre el ECS y la dirección IP privada y el puerto de la instancia de BD e instale el cliente mysql en el ECS. | |
| Paso 4: Conectarse a la instancia de BD usando el cliente mysql | Utilice una interfaz de línea de comandos (CLI) para conectarse a la instancia de BD mediante la dirección IP privada y el puerto. |
Preparación
- Cree un ID de HUAWEI y habilite los servicios de Huawei Cloud.
- Antes de comprar instancias de BD, asegúrese de que el saldo de su cuenta sea suficiente. Recargar su cuenta si es necesario.
- Para una gestión detallada de permisos en los recursos de Huawei Cloud, utilice Identity and Access Management (IAM) para crear un usuario o grupo de usuarios y concederle permisos de operación específicos. Para obtener más información, véase Creación de un usuario y concesión de permisos de TaurusDB.
Paso 1: Comprar una instancia de BD
- Vaya a la página de Compra de instancia de BD.
- Configure la información de la instancia y haga clic en Next.
Parámetro
Valor de ejemplo
Descripción
Billing Mode
Pago por uso
Modo de facturación de una instancia.
- Yearly/Monthly: Modo de facturación prepago en el que paga los recursos antes de usarlo. Las facturas se liquidan según el período de suscripción. Cuanto más larga sea la suscripción, mayor será el descuento. Este modo es una buena opción para servicios estables a largo plazo.
- Pay-per-use: Modo de facturación pospago. Pague en el momento y solo por lo que utiliza. El uso de la instancia de BD se calcula por segundo pero se factura cada hora. Este modo permite ajustar fácilmente el uso de recursos. No necesita prepararse para los recursos con anticipación, ni terminar con recursos preestablecidos excesivos o insuficientes.
Region
AP-Singapore
Región en la que se encuentra una instancia.
NOTA:No puede cambiar la región de una instancia una vez que se ha comprado.
DB Instance Name
Taurusdb-8293
El nombre de la instancia de base de datos.
DB Engine Version
TaurusDB V2.0
El motor y la versión de la base de datos.
DB Instance Type
Clúster
Una instancia de clúster puede contener un nodo principal y hasta 15 réplicas de lectura. El nodo primario procesa las solicitudes de lectura y escritura, y las réplicas de lectura procesan solo las solicitudes de lectura. Si el nodo primario deja de estar disponible, TaurusDB conmuta automáticamente por error a una réplica de lectura. Las instancias de clúster se aplican a empresas medianas y grandes en los sectores de Internet, fiscalidad, banca y seguros.
Storage Type
DL6
El Shared storage original. El tipo de almacenamiento predeterminado de las instancias de TaurusDB creadas antes de julio de 2024 es Shared storage, mientras que el de las instancias de TaurusDB creadas en julio de 2024 y posteriores es DL6.
Las instancias basadas en DL6 logran cero RPO con un despliegue de 3 AZ y ofrecen mejor rendimiento y mayor throughput máximos. Son adecuados para sistemas de aplicaciones principales que son sensibles al rendimiento y tienen requisitos exigentes de E/S de almacenamiento durante las horas pico, como las de finanzas, comercio electrónico, gobierno y juegos.
AZ Type
Múltiples AZ
Si sus cargas de trabajo requieren DR entre AZ o son insensibles a la latencia entre AZ, se recomienda desplegar el nodo principal y leer réplicas en diferentes AZ para lograr una mayor disponibilidad y confiabilidad.
Primary AZ
AZ1
La AZ principal de una instancia.
Time Zone
(UTC+08:00) Beijing, Chongqing, Hong Kong, Urumqi
Debe seleccionar una zona horaria para la instancia en función de la región que alberga la instancia. La zona horaria se selecciona durante la creación de la instancia y no se puede cambiar después de crear la instancia.
Parámetro
Valor de ejemplo
Descripción
Instance Specifications
Dedicado
2 vCPUs | 8 GB
Las vCPU y la memoria de una instancia.
CPU Architecture
x86
Las instancias x86 utilizan procesadores Intel® Xeon® Scalable y un rendimiento informático sólido y estable de característica. Cuando se trabaja en redes de alto rendimiento, las instancias proporcionan el rendimiento y la estabilidad adicionales que exigen las aplicaciones de clase empresarial.
Nodes
2
Este parámetro es obligatorio para las instancias de clúster.
Storage
-
Contiene la sobrecarga del sistema requerida para inodes, bloques reservados y operaciones de base de datos.
Backup Space
-
TaurusDB proporciona espacio de copia de respaldo gratuito equivalente a la cantidad de almacenamiento utilizado. Después de que se agote el espacio de copia de respaldo gratuito, se le facturará el espacio adicional en una base de pago por uso.
Parámetro
Valor de ejemplo
Descripción
VPC
default_vpc
Red virtual en la que se encuentra la instancia. Una VPC puede aislar redes para diferentes cargas de trabajo.
Si no hay ninguna VPC disponible, haga clic en Create VPC. Después de crear una VPC, haga clic en
 . Para obtener más información, véase Creación de una VPC y una subred.AVISO:
Después de crear una instancia de TaurusDB, la VPC no se puede cambiar.
Subnet
default_subnet
Una subred proporciona los recursos de red dedicados que están lógicamente aislados de otras redes para la seguridad de la red.
Security Group
predeterminado
El grupo de seguridad mejora la seguridad al controlar el acceso a TaurusDB desde otros servicios.
Parámetro
Valor de ejemplo
Descripción
Administrator
root
Nombre de usuario de la cuenta del administrador de la base de datos. El nombre de usuario predeterminado es root.
Administrator Password
-
Debe contener entre 8 y 32 caracteres y contener al menos tres de los siguientes caracteres: letras mayúsculas, letras minúsculas, dígitos y caracteres especiales (~!@#%^*-_=+?,()&$|.). Ingrese una contraseña segura y cámbiela periódicamente para mejorar la seguridad, evitando riesgos de seguridad como descifrado por fuerza bruta.
Mantenga su contraseña segura porque no puede recuperarla del sistema.
Después de crear una instancia de BD, puede restablecer esta contraseña. Para obtener más información, consulte Restablecimiento de la contraseña de administrador.
Confirm Password
-
Ingrese la contraseña de administrador de nuevo.
Parameter Template
Default-GaussDB-for-MySQL 8.0
Una plantilla de parámetros contiene valores de configuración del motor que se pueden aplicar a una o más instancias.
Table Name
Sin distinción entre mayúsculas y minúsculas
Especifica si los nombres de tabla distinguen entre mayúsculas y minúsculas. Esta opción no se puede cambiar más tarde.
- Case sensitive: los nombres de las tablas distinguen mayúsculas de minúsculas.
- Case insensitive: los nombres de tabla no distinguen mayúsculas de minúsculas y se almacenan en minúsculas por defecto.
Enterprise Project
-
Si su cuenta se ha asociado a un proyecto de empresa, seleccione el proyecto de destino en la lista desplegable Enterprise Project.
Para obtener más información sobre los proyectos de empresa, consulte la Guía de usuario de Enterprise Management.
Tag
-
Etiqueta una instancia de BD. Este parámetro es opcional. Agregar etiquetas le ayuda a identificar y gestionar mejor sus instancias de base de datos. Cada instancia de BD puede tener hasta 20 etiquetas.
Quantity
1
Puede comprar instancias de BD por lotes. El valor predeterminado es 1. El valor varía de 1 a 10.
- Verifique la instancia de BD comprada.
- Haga clic en el nombre de la instancia de base de datos para ir a la página Basic Information.
- En el área Network Information, obtenga la dirección IP privada y el puerto de la base de datos. Figura 1 Consulta de la dirección IP privada y el puerto de la base de datos

Paso 2: Comprar un ECS
- Inicie sesión en la consola de gestión y compruebe si hay un ECS disponible.
- Si hay un ECS de Linux diríjase a 3.
- Si hay un ECS de Windows, véase Compra de una instancia de BD y conectarse a ella con MySQL-Front.
- Si no hay ningún ECS disponible, acceda a 2.
- Compre un ECS y seleccione Linux (por ejemplo, CentOS) como su sistema operativo.
Para descargar el cliente mysql al ECS, vincule una EIP al ECS. El ECS debe estar en la misma región, VPC y grupo de seguridad que la instancia de BD para las comunicaciones mutuas.
Para obtener detalles sobre cómo comprar un ECS de Linux, véase Compra de un ECS en Pasos iniciales a Elastic Cloud Server.
- En la página ECS Information, vea la región y la VPC del ECS. Figura 2 Consulta de información de ECS

- En la página Basic Information de la instancia de BD, vea la región y la VPC de la instancia de BD.
- Compruebe si el ECS y la instancia de base de datos están en la misma región y VPC.
- Si están en la misma región y VPC, vaya a Paso 3: Probar la conectividad e instalar el cliente mysql.
- If they are in different regions, comprar another ECS or DB instance. El ECS y la instancia de BD en diferentes regiones no pueden comunicarse entre sí. Para reducir la latencia de la red, despliegue su instancia de base de datos en la región más cercana a sus cargas de trabajo.
- Si están en diferentes VPC, cambie la VPC del ECS por la de la instancia de BD. Para obtener más información, consulte Cambio de una VPC.
Paso 3: Probar la conectividad e instalar el cliente mysql
- Inicie sesión en el ECS. Para obtener más información, véase Inicio de sesión en un ECS de Linux con VNC en la Guía del usuario de Elastic Cloud Server.
- En el ECS, verifique si se puede conectar a la instancia de BD usando la dirección IP privada y el puerto obtenidos en 5. telnet private_IP_address port

Si aparece el mensaje "command not found", instale la herramienta Telnet basada en el sistema operativo utilizado por el ECS.
- Si el ECS puede conectarse a la instancia de BD, no se requiere ninguna otra acción.
- Si el ECS no puede conectarse a la instancia de BD, compruebe las reglas del grupo de seguridad.
- Si en el grupo de seguridad asociado al ECS no hay una regla de salida con Destination establecido en 0.0.0.0/0 y Protocol & Port establecido en All, agregue la dirección IP privada y el puerto de la instancia de BD a las reglas de salida.
- Agregue la dirección IP privada y el puerto del ECS a las reglas de entrada en el grupo de seguridad asociado con la instancia de BD.
- Descargue el paquete de instalación del ECS de Linux del cliente mysql.
Se recomienda utilizar un cliente mysql que ejecute una versión posterior a la de la instancia de BD.
wget https://dev.mysql.com/get/mysql-community-client-8.0.21-1.el6.x86_64.rpm
- Ejecute el siguiente comando para instalar el cliente de mysql:
rpm -ivh --nodeps mysql-community-client-8.0.21-1.el6.x86_64.rpm
- Si se producen conflictos durante la instalación, agregue el parámetro replacefiles al comando e instale de nuevo el cliente.
rpm -ivh --replacefiles mysql-community-client-8.0.21-1.el6.x86_64.rpm
- Si aparece un mensaje solicitando que instale un paquete de dependencias durante la instalación, agregue el parámetro nodeps al comando e instale de nuevo el cliente.
rpm -ivh --nodeps mysql-community-client-8.0.21-1.el6.x86_64.rpm
- Si se producen conflictos durante la instalación, agregue el parámetro replacefiles al comando e instale de nuevo el cliente.
Paso 4: Conectarse a la instancia de BD usando el cliente mysql
- Ejecute el siguiente comando en el ECS para conectarse a la instancia de base de datos:
mysql -h <host> -P <port> -u <userName> -p
Por ejemplo:
mysql -h 192.*.*.* -P 3306 -u root -p
- Ingrese la contraseña de la cuenta de la base de datos si se muestra la siguiente información:
Enter password:
Figura 3 Conexión correcta
- Cree la base de datos db_test.
create database db_test;
Figura 4 Creación de una base de datos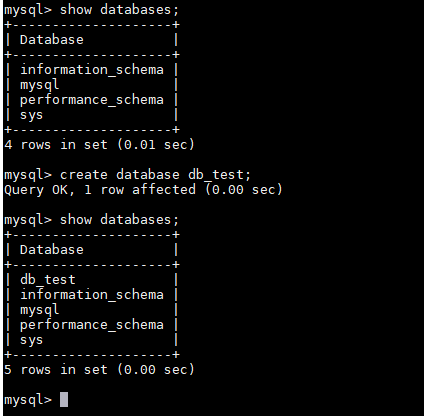
- Cree la tabla t_test.
create table t_test(id int(4), name char(20), age int(4));
Figura 5 Creación de una tabla
- Inserte un registro de datos en la tabla.
insert into t_test(id, name, age) values(1, 'zhangsan', 30);
Figura 6 Inserción de datos
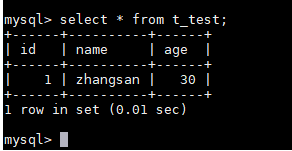
- Consulte datos en la tabla. Figura 7 Consulta de datos
- Actualice el valor de age para el registro de datos cuyo id sea 1 en la tabla.
update t_test set age=31 where id=1;
Figura 8 Actualización de datos
- Consulte los datos actualizados en la tabla.
select * from t_test where id=1;
Figura 9 Consulta de los datos actualizados
- Elimine el registro de datos cuyo id sea 1 de la tabla.
delete from t_test where id=1;
Figura 10 Supresión de datos de tabla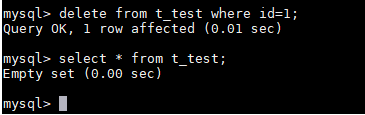
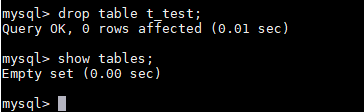
- Elimine la estructura de la tabla. Figura 11 Eliminar una estructura de tabla
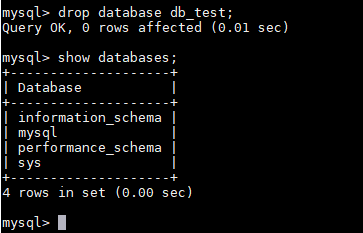
- Elimine la base de datos. Figura 12 Eliminación de una base de datos