
Video Production
Video production on the MetaStudio console allows creating virtual avatar videos.
Preparations
- If the preset virtual avatar images do not meet requirements, customize a virtual avatar image by referring to Image Modeling.
Constraints
- The preset virtual avatar images on the MetaStudio console are valid for three years (till the middle of 2027). The notice of taking a preset image offline will be released on the live network three months in advance.
- See Constraints on virtual avatar video production.
- Access the MetaStudio console from the Chrome browser.
Video
Watch this video to learn how to create your virtual avatar video on the MetaStudio console.
Procedure
- Log in to the MetaStudio console and go to the Overview page.
- Click Go to MetaStudio Console to go to the MetaStudio console.
- Click the Video production card to go to the video production page, as shown in Figure 1.
- Produce a video by referring to Common Configuration for Video Production.
- In the video material area, in addition to preset materials, you can add a custom virtual avatar in the Roles area; you can also import a background image, PowerPoint file, image overlay, video overlay, and music from your local device.
- PowerPoint slides, image overlays, video overlays, and virtual avatar added from the video material area to the video preview area can be adjusted, for example, Bring Forward (
 ), Send Backward (
 ), Bring to Front (
 ), Send to Back (
 ), Apply Everywhere (
 ), and Delete (
 ). You can also set the size of the overlays and drag them to change their positions.
 - You can click
 in the upper part of the video preview area to switch the video aspect ratio to 16:9 in landscape mode or 9:16 in portrait mode.
- Generate the audio of the virtual avatar's reading the input script.
Use any of the following methods:
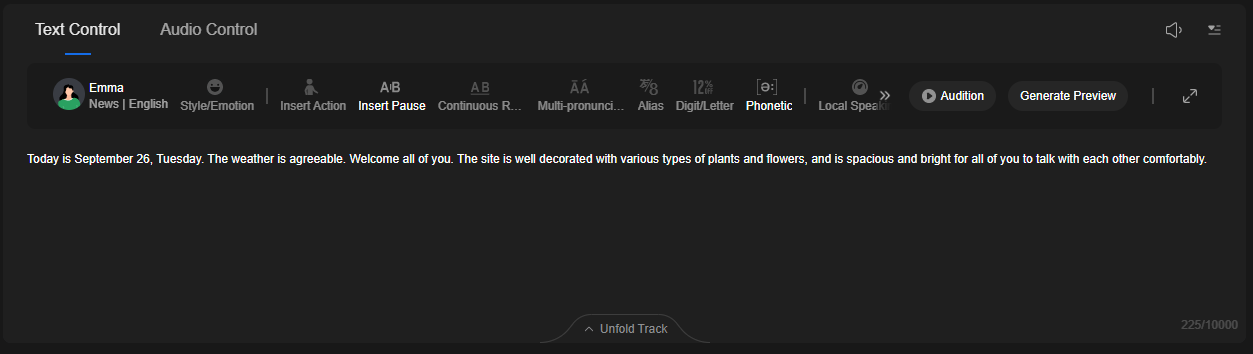
- Text control
Enter text in the text box to generate an audio file, as shown in Figure 1.
Example: Today is September 26, Tuesday. The weather is agreeable. Welcome all of you. The site is well decorated with various types of plants and flowers, and is spacious and bright for all of you to talk with each other comfortably.
Table 1 describes the operations of text control. The support for operations in Table 1 varies with voice models. If the icon of an operation in Table 1 is grayed out on the page, the voice model in use does not support this operation. You need to re-select a voice model that supports the required operation.
Table 1 Operations Item
Description
Voice selection
Click the voice name. In the window displayed, select the desired voice.
- Preset voices that are not marked can be used free of charge.
- Voices marked with Third-party can be used only after being purchased and activated. For details, see Purchasing a DupDub Voice Package.
Insert Action
For details, see Action Insertion.
Insert Pause
Move the cursor to the right of the text to be paused and click Insert Pause. In the dialog box displayed, select Changes in Breathing or set the pause length.
Continuous Reading
Select the text to be read continuously and click Continuous reading.
Multi-pronunciation Word
Select a multi-pronunciation word in the text and click Multi-pronunciation Word. In the dialog box displayed, select the correct pronunciation or customize one.
The multi-pronunciation word set here applies only to the current video draft. To apply it to all tasks under your account, refer to Special Words.
Alias
Select the text to be read in a different way and click Alias. Then set the reading method for the selected text.
The alias set here applies only to the current video draft. To apply it to all tasks under your account, refer to Special Words.
Digit/Letter
For example, the number 1024 can be read as follows:
- Digit: One zero two four
- Value: One thousand and twenty-four
- Date: October twenty-fourth
- Phone number: One zero two four
For example, the word API can be read as follows:
- Letter: A P I (read one by one)
- Word: api
Phonetic
Select an English word and enter its appropriate phonetic. You can also click Phonetic Search. Then enter a word to search for its correct pronunciation in the dictionary and copy the desired phonetic.
Local Speaking Speed
Select the text that requires adjustment to speaking speed.
The value ranges from 0.5x to 2x:
- 0.5x: read at the 0.5x speed
- 2x: read at the 2x speed
Global Speaking Speed
Set the global speaking speed.
The value ranges from 0.5x to 2x:
- 0.5x: read at the 0.5x speed
- 2x: read at the 2x speed
Special Words
You can enable or disable the special word function. Enabling it means you can set the pinyin, phonetics, continuous reading, aliases, and digits/letters for specific text and apply the settings to all the video drafts of your account. For details, see Special Words.
Audition
Click Audition to listen to the voice.
Generate Preview
Click Generate Preview and select Current scene or All scenes to preview the audio and subtitle display.
Note: Only some models support dynamic preview. The lip movements and actions in the preview are for reference only and may differ from the final video. For models that support only static preview, you can view the actual lip movements and actions of the virtual avatar only after compositing the video.

You can click
 to zoom in the Text Control tab.
Click OK to return to the original page.

Click this icon to adjust the volume of text reading.

Subtitling. To enable subtitling, refer to Subtitling or perform the following steps:
- Click
 to enable subtitling.
 - Click Generate Preview and select Current scene or All scenes to generate subtitles and the preview video.
For text control, the input text is extracted to generate subtitles. For audio control, the audio is converted to text before subtitles are generated.
- You can see the subtitle on the left of the preview area. You can adjust the content and style of the subtitle.
Note: For audio control, subtitling can be enabled only in Mandarin Chinese.

Shows the aspect ratio of the video.

When you click this icon for the first time, the Text Control or Audio Control area will be hidden. Clicking this icon again will show the hidden area.
- Audio control
Upload a recorded audio file (WAV, MP3, or M4A and no larger than 100 MB) from the local PC.
You can click Import to upload an audio file or drag a local audio file to the target area. Click
 on the left to listen to the audio. If the quality is below expectations, click Import to upload a new audio file.Figure 2 Audio control
- Text control
- After the audio file is uploaded, you can click the volume icon to adjust the audio volume.
After the preceding operations are complete, the video content of the first scene has been created.
- If you need to create more scenes, click the + icon under the Scenes tab to add a scene. The scene creation process is the same.
If you want to present a PowerPoint file in the video, click the PowerPoints tab, import the PowerPoint file from the local PC, and insert the PowerPoint slides to present. For details, see PowerPoints. A scene will be generated for each slide. Set all scenes in sequence.
- After all scenes are set, click Composite Video in the upper right corner of the page to go to the Compositing Settings dialog box.
Configure the parameters by referring to Table 2.
Table 2 Parameters Parameter
Description
Exported File Name
Name of the exported file.
Format
Format of the composited video. The default format is MP4.
You can export videos with transparent backgrounds in MOV format. However, the function of exporting an MOV video is invisible by default. You can see this function only after you submit a service ticket to obtain the permission for this function. The composited MOV video has the following constraints:
- The text used to control the virtual avatar in all scenes can contain a maximum of 1,500 characters.
- The audio files used to control the virtual avatar in all scenes cannot be longer than 5 minutes.
- You can watch the MOV video exported from the MetaStudio console only by using supported video players on the local PC.
Resolution
Select a suitable resolution.
Image Enhancement
Enabling this function means higher video definition but longer time for compositing.
Determine whether to enable it.
- Click OK to go to the Video Production Task Center dialog box.
You can check the progress of the video compositing task.
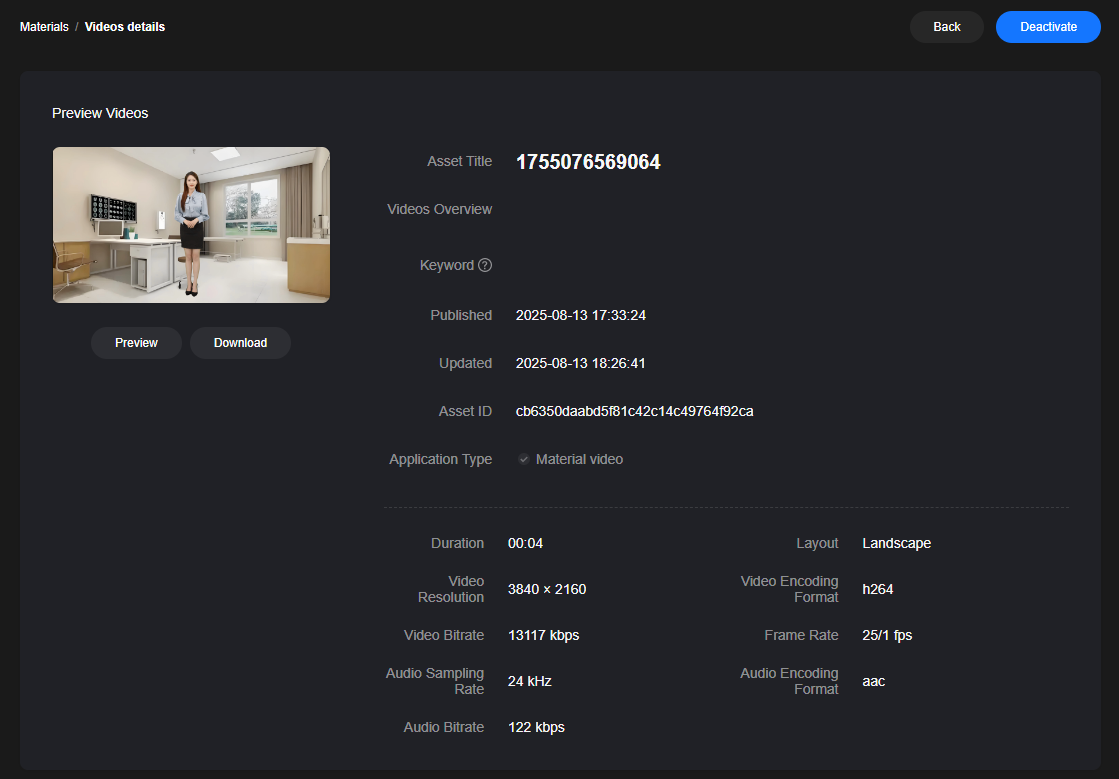
- When the task status becomes Composited, click
 on the right of Composited to go to the video details page, as shown in Figure 3.
Click Preview to watch the composited video. During the preview, you can play the video in full screen or download the video. By default, the composited video is activated. You can click Deactivate to deactivate the video.
Note:
- You can preview an MOV video only after downloading it and using a supported video player.
- If video compositing fails, rectify the fault by referring to What If Video Compositing Failed?
- You can view the usage of a purchased resource package for video production by referring to How Do I View the Minutes Used from a Purchased MetaStudio Resource Package for Video Production?
- If you use a transparent background for video compositing, only a WebM video can be exported.
Video Re-Compositing

Feedback
Was this page helpful?
Provide feedbackThank you very much for your feedback. We will continue working to improve the documentation.See the reply and handling status in My Cloud VOC.
For any further questions, feel free to contact us through the chatbot.
Chatbot


