Using Dex for OIDC Authentication on CCE
Dex is an open-source OpenID Connect (OIDC) identity provider. It enables flexible authentication and federated identity management in Kubernetes. As an intermediary layer, Dex translates multiple identity sources, such as Lightweight Directory Access Protocol (LDAP), GitHub, and Security Assertion Markup Language (SAML), into the standard OIDC protocol, for Kubernetes and other applications.
OIDC is an authentication method based on OAuth 2.0. It provides both an access token and an ID token, which is a JSON Web Token (JWT) signed by the server and contains well known fields such as a user's email. Kubernetes leverages the user information within ID tokens for RBAC authorization, enabling the translation of third-party identity sources into Kubernetes permissions. For details, see OpenID Connect Tokens.
The typical application scenarios include:
- LDAP/AD integration: Enterprises using LDAP seamlessly integrate their existing user systems with Kubernetes.
- Unified authentication for multiple clusters: Multiple Kubernetes clusters share the same Dex instance for unified login.
- Unified identity federation: During multi-team collaboration, user identity authentication from different sources (such as GitHub and GitLab) is transformed into the OIDC protocol via Dex, and an OIDC token that can be identified by Kubernetes is obtained.
This section uses an LDAP OAuth account as an example to describe how to complete OIDC authentication on CCE.
Solution Overview
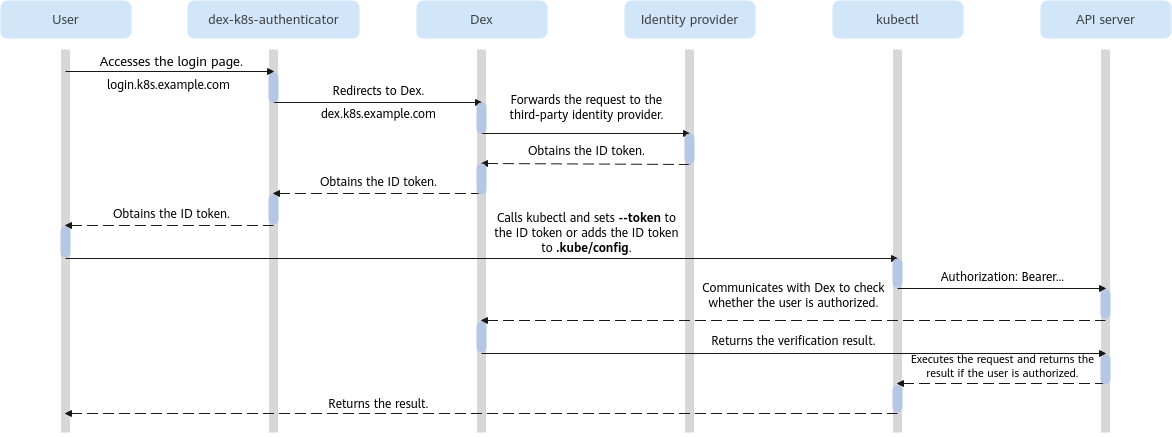
When Dex is used for OIDC authentication in a Kubernetes cluster, two key components are involved: Dex and dex-k8s-authenticator.
- Dex acts as a portal for identity providers. It forwards authentication requests to LDAP, SAML, GitHub, GitLab, or other identity providers.
- dex-k8s-authenticator is a web application that interacts with Dex. It retrieves tokens from Dex and provides necessary commands to create or update a kubeconfig file. After running these commands, you can configure the kubeconfig file.

The process of using Dex for login authentication is as follows:
- A user accesses the login page.
- The system redirects the login request to Dex for authentication.
- Dex forwards the request to the third-party identity provider.
- If authentication is successful, the third-party identity provider returns an ID token.
- When using kubectl, the user sets --token to the ID token or adds the ID token to the kubeconfig file.
- kubectl places the ID token in the Authorization header and sends it to the Kubernetes API server.
- The API server validates the JWT signature to confirm authenticity.
- The API server communicates with Dex to verify if the ID token is authorized.
- Dex confirms user authorization and returns the verification result.
- If authentication is successful, the API server sends a response to kubectl.
- kubectl presents the API server response to the user in a readable format.
Preparations
- Create a CCE cluster of v1.30 or later on the CCE console. For details about how to buy a cluster, see Buying a CCE Standard/Turbo Cluster.
- Prepare a VM that is in the same VPC as the cluster and can access the Internet, install kubectl for cluster access and Helm v3 on the VM.
- Create a load balancer and bind an EIP to it. For details, see Creating a Dedicated Load Balancer.
- Get the following domain names ready:
- Public network domain name 1: dex.k8s.example.com, which is the domain name for accessing Dex
- Public network domain name 2: login.k8s.example.com, which is the domain name for accessing dex-k8s-authenticator
- Configure DNS A records. Configure DNS public network resolution for these domain names. For details, see Adding Record Sets. If the domain names are accessed only over the private network, you can configure the node host file.
- Install the NGINX Ingress Controller add-on and select the load balancer created in 3. For details, see NGINX Ingress Controller.
- Ensure that there are an LDAP service, user groups, and users.
- (Optional) Configure SNAT for the node subnet. If Dex is deployed in another cluster, you need to create a public NAT gateway for the VPC where the cluster resides and the subnet where the nodes reside to allow kube-apiserver to access the Internet. For details, see Buying a Public NAT Gateway.
Step 1: Create a Key (Skip This Step If You Already Have a Certificate)
- Log in to the VM where kubectl and Helm have been installed.
- Create a Dex self-signed certificate. When Dex is accessed over HTTPS, certificate authentication is required. This involves obtaining both a self-signed server certificate and a CA certificate.
Create a create_cert.sh script file. The file content is as follows:
#!/bin/bash
mkdir -p ssl
cat << EOF > ssl/req.cnf
[req]
req_extensions = v3_req
distinguished_name = req_distinguished_name

[req_distinguished_name]

[ v3_req ]
basicConstraints = CA:FALSE
keyUsage = nonRepudiation, digitalSignature, keyEncipherment
subjectAltName = @alt_names

[alt_names]
DNS.1 = *.k8s.example.com  #  All domain names with the k8s.example.com suffix are trusted by this certificate.
EOF

openssl genrsa -out ssl/ca-key.pem 2048
openssl req -x509 -new -nodes -key ssl/ca-key.pem -days 3650 -out ssl/ca.pem -subj "/CN=kube-ca"

openssl genrsa -out ssl/key.pem 2048
openssl req -new -key ssl/key.pem -out ssl/csr.pem -subj "/CN=kube-ca" -config ssl/req.cnf
openssl x509 -req -in ssl/csr.pem -CA ssl/ca.pem -CAkey ssl/ca-key.pem -CAcreateserial -out ssl/cert.pem -days 3650 -extensions v3_req -extfile ssl/req.cnf
Run the following scripts:
chmod +x create_cert.sh
./create_cert.sh
- Generate a server certificate secret, which is required for accessing dex.k8s.example.com and login.k8s.example.com. In this example, the secret name is dex.example.com.tls.
kubectl create ns dex
cd ssl; mv key.pem tls.key; mv cert.pem tls.crt
kubectl create secret tls -n dex dex.example.com.tls \
   --cert=tls.crt\
   --key=tls.key
Step 2: Deploy a Dex Application
Deploy a Dex application using Helm. For details, see Kubernetes Authentication Through Dex.
- Log in to the VM where kubectl and Helm have been installed and add a Helm repository.
helm repo add dex https://charts.dexidp.io
helm repo update
- Create a dex-values.yaml file to specify Dex parameters. This file defines the Dex access mode and the LDAP backend service registered in Dex.
The file content is as follows:
tls:
  enabled: true
  clientCA: ""
ingress:
  enabled: true
  className: nginx   # Create an Nginx ingress.
  hosts:
    - host: dex.k8s.example.com   # Domain name for accessing Dex
      paths:
        - path: /
          pathType: ImplementationSpecific
  tls:
    - secretName: dex.example.com.tls  # Dex access key created in step 1
      hosts:
        - dex.k8s.example.com   # Domain name for accessing Dex
config:
  issuer: https://dex.k8s.example.com   # Domain name for accessing Dex. The access address can also be HTTP.
  storage:
    type: kubernetes
    config:
      inCluster: true
  oauth2:
    responseTypes: ["code", "token", "id_token"]
    skipApprovalScreen: true
  connectors:
   - type: ldap
     id: ldap
     name: LDAP
     config:
       host: xxx.xxx.xxx.xxx:389 # ldap server
       insecureNoSSL: true
       insecureSkipVerify: true
       bindDN: CN=admin,DC=example,DC=com # Administrator distinguished name (DN), which is the unique identifier in the LDAP directory
       bindPW: "*****" # Set the administrator password.
        userSearch: # Obtain the user information in LDAP and map it to Dex.
         baseDN: dc=example,dc=com
         filter: "(objectClass=posixAccount)"
         username: uid  # User login name
         idAttr: DN # In this example, the DN in the LDAP record is mapped to Dex.
         emailAttr: mail # In this example, the mail field in the LDAP record is mapped to Dex.
         nameAttr: cn # In this example, the cn field in the LDAP record is mapped to Dex.
       groupSearch:
         baseDN: dc=example,dc=com
         filter: "(objectClass=posixGroup)"
         userMatchers:
         - userAttr: uid
           groupAttr: memberUid
         nameAttr: cn
  staticClients:
    - id: kubernetes    # Register a client ID.
      secret: *****    # Set the client password.
      name: "kubernetes"
      redirectURIs:
       - https://login.k8s.example.com/callback   # Domain name for accessing dex-k8s-authenticator
For more parameter settings, see the official examples:
- Install Dex based on the custom configuration.
helm install dex dex/dex --namespace dex --create-namespace --version 0.19.1 --values dex-values.yaml
View the installed releases.
helm list
Step 3: Configure Intra-Cluster Domain Name Resolution
- Log in to the CCE console and click the cluster name to access the cluster console.
- In the navigation pane, choose Add-ons. Then, click Edit under CoreDNS.
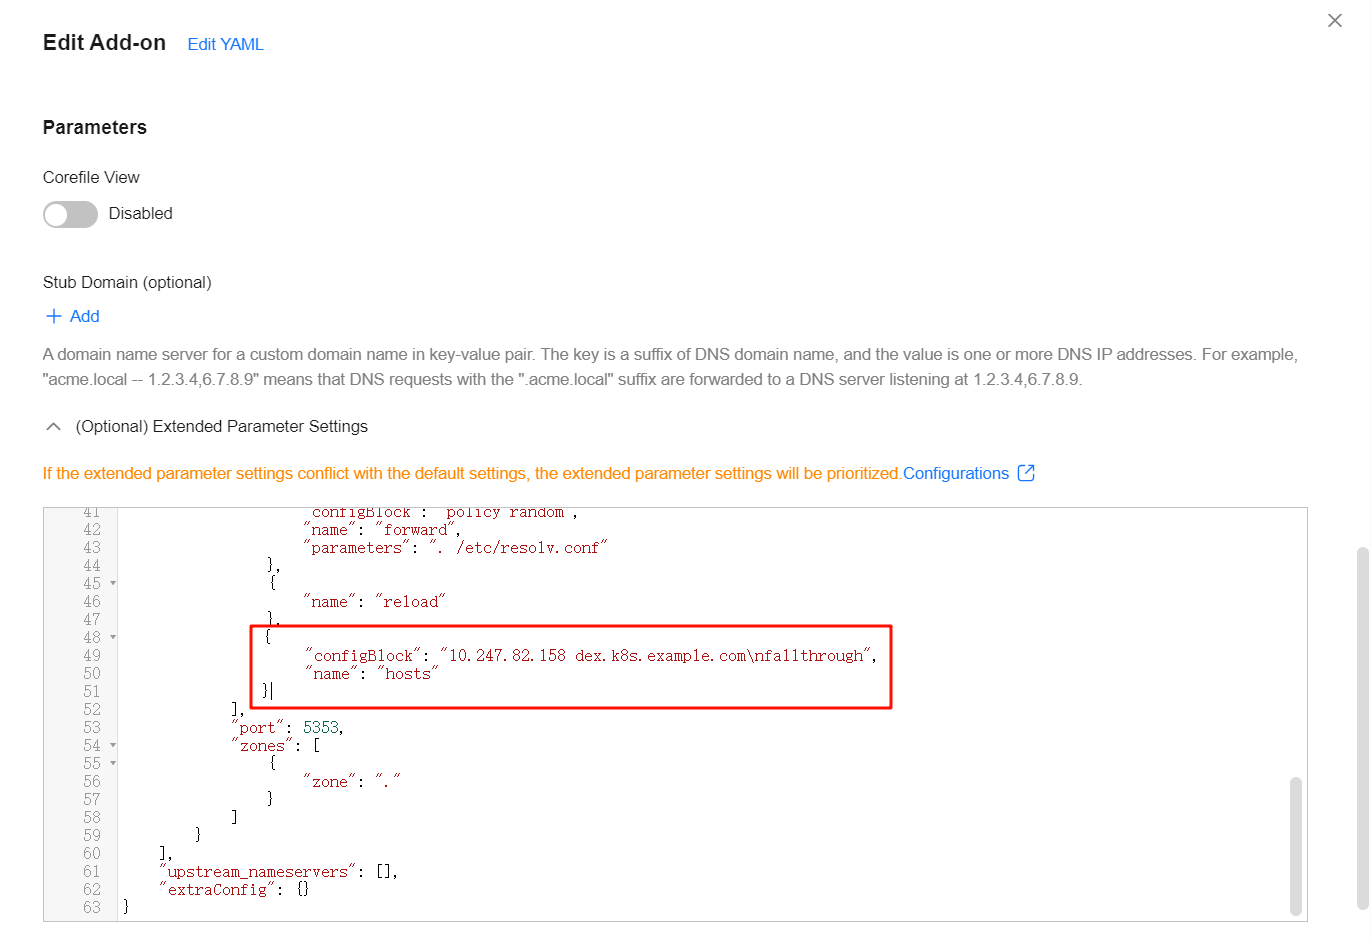
- In the Parameters area, edit the extended parameters and add the following content to the plugins field to configure the Dex service domain name resolution:
{
  "configBlock": "10.247.82.158 dex.k8s.example.com\nfallthrough",
  "name": "hosts"
}
10.247.82.158 is the ClusterIP of the nginx-ingress-controller Service.

- Click OK.
Step 4: Deploy the dex-k8s-authenticator Application
- Add a Helm repository.
helm repo add skm https://charts.sagikazarmark.dev
helm repo update
- Create an authen-values.yaml file to configure the dex-k8s-authenticator parameter. For details about the configuration example, see dex-k8s-authenticator.
config: clusters: - name: Hello-CCE short_description: "Your cluster" description: "Your cluster" issuer: https://dex.k8s.example.com # Domain name for accessing Dex client_id: kubernetes # Client ID in Dex config in Step 2: Deploy a Dex Application. client_secret: ***** # Client secret in Dex config in Step 2: Deploy a Dex Application. redirect_uri: https://login.k8s.example.com/callback # Domain name for accessing dex-k8s-authenticator k8s_master_uri: https://192.168.0.158:5443 # Address for accessing the cluster API server # CA certificate of the cluster k8s_ca_pem: | -----BEGIN CERTIFICATE----- ... -----END CERTIFICATE----- # If HTTPS is used for Dex access, the CA certificate of the Dex domain name must be provided. trusted_root_ca: | -----BEGIN CERTIFICATE----- ... -----END CERTIFICATE----- ingress: enabled: true className: nginx hosts: - host: login.k8s.example.com # Change the value to the domain name for accessing dex-k8s-authenticator. paths: - path: / pathType: ImplementationSpecific tls: - secretName: dex.example.com.tls # Dex access key created in Step 1: Create a Key (Skip This Step If You Already Have a Certificate) hosts: - login.k8s.example.com # Change the value to the domain name for accessing dex-k8s-authenticator. - Install dex-k8s-authenticator based on the custom configuration.
helm install dex-k8s-authenticator skm/dex-k8s-authenticator --namespace dex --version 0.0.3 --values authen-values.yaml
Step 5: Modify the Startup Parameters of the Cluster API Server
- Log in to the CCE console and click the cluster name to access the cluster console.
- In the navigation pane, choose Settings.
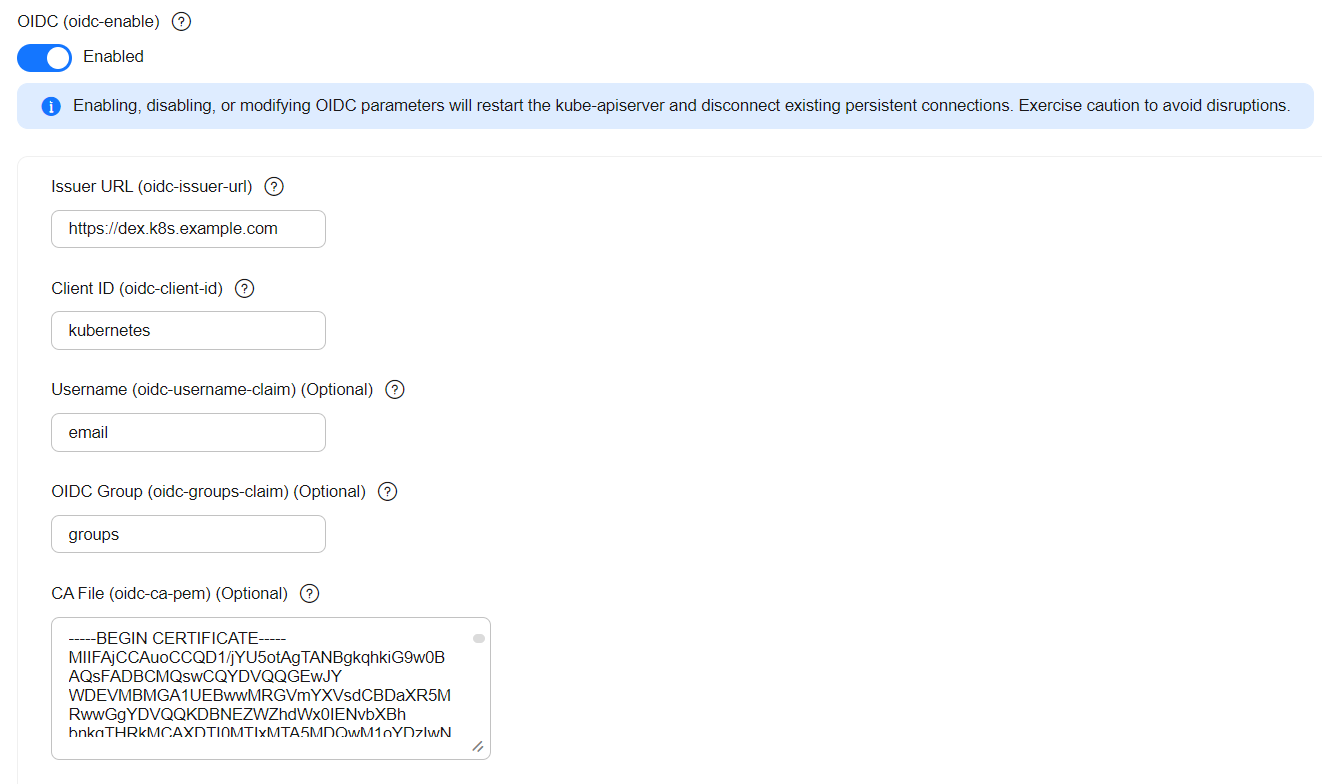
- Click the Cluster Access tab, enable OIDC, and configure the parameters required for kube-apiserver to use OIDC.
Parameter
Description
Example Value
Issuer URL (oidc-issuer-url)
The URL for OIDC authentication. It must be HTTPS-compliant.
https://dex.k8s.example.com
Client ID (oidc-client-id)
Client ID registered with the OIDC authentication service. For example, the client ID registered in Step 2: Deploy a Dex Application is kubernetes.
kubernetes
Username (oidc-username-claim)
The value to be used as the username. You need to specify a field in JWT claims for it. The default value is sub. It is typically the unique identifier of the end user. You can also select other fields, such as email or name.
You can grant Kubernetes permissions based on the username in the cluster. For details, see Step 6: Grant Kubernetes Permissions to a Third-Party User.
email
Setting the parameter to email means that the value of the email field (the email address) in the JWT claim is used as the username.
OIDC Group (oidc-groups-claim)
The value to be used as the user group. You need to specify a field in JWT claims for it. The field name of the user group is typically groups. You can grant Kubernetes permissions based on the user group. For details, see Step 6: Grant Kubernetes Permissions to a Third-Party User.
groups
Setting this parameter to groups means that the value of groups in the JWT claim is used as the user group.
CA File (oidc-ca-pem)
A CA certificate in PEM format. It is used to sign the identity provider's web certificate.
CA certificate of the Dex domain name in Step 1: Create a Key (Skip This Step If You Already Have a Certificate)

- Click Confirm Settings.
Step 6: Grant Kubernetes Permissions to a Third-Party User
Since Dex only handles authentication and does not directly authorize users within Kubernetes, you need to manually assign Kubernetes permissions to authenticated users.
In this example, permissions are granted to the group specified in Step 5: Modify the Startup Parameters of the Cluster API Server. That means that Kubernetes permissions are granted to the user group in the returned JWT. (In this example, the user group name is CCE.) If the logged-in user is a member of the specified user group, the user automatically inherits the corresponding Kubernetes permissions assigned to that group. An example of configuring a ClusterRoleBinding and ClusterRole is shown below. You can assign permissions as required.
kind: ClusterRoleBinding
apiVersion: rbac.authorization.k8s.io/v1
metadata:
  name: cce-admin
subjects:
- kind: Group
  name: "CCE"  # The CCE user group is the user group that the LDAP user belongs to. Users in this user group are granted Kubernetes permissions.
  apiGroup: rbac.authorization.k8s.io
roleRef:
  kind: ClusterRole
  name: cluster-admin
   apiGroup: rbac.authorization.k8s.io
Step 7: Perform Login Tests
- Open a browser and enter the dex-k8s-authenticator domain name in the address bar. In this example, the domain name is login.k8s.example.com.
- Enter the username and password of a user in the CCE user group in LDAP.
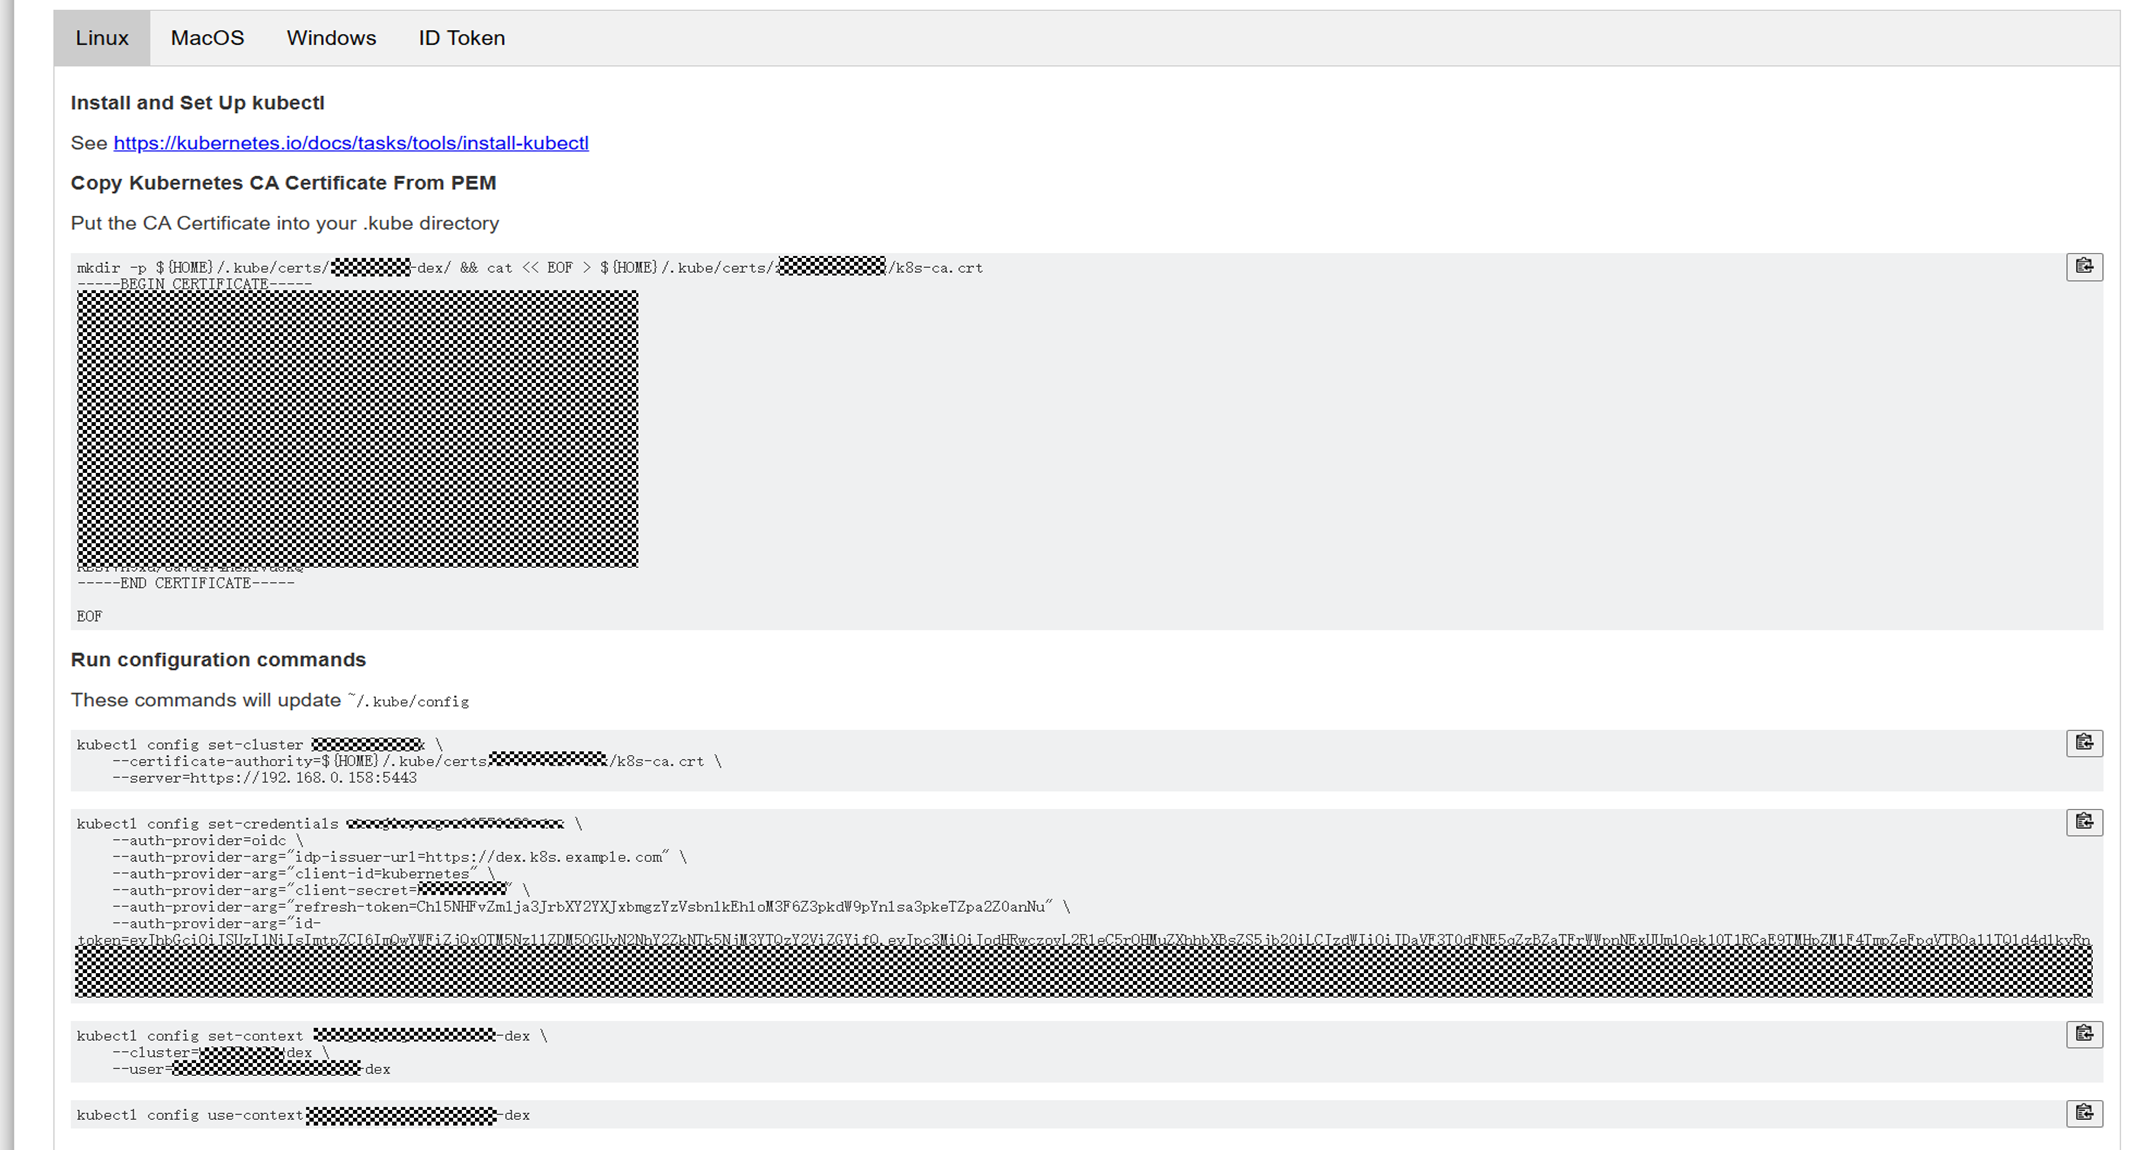
- Run commands by following the instructions. After the login is successful, dex-k8s-authenticator provides executable commands to help you configure the kubeconfig file.

- After the kubeconfig file is configured, access Kubernetes resources for testing using kubectl.

Feedback
Was this page helpful?
Provide feedbackThank you very much for your feedback. We will continue working to improve the documentation.See the reply and handling status in My Cloud VOC.
For any further questions, feel free to contact us through the chatbot.
Chatbot


