
Preparations
Preparing Resources
To facilitate subsequent operations, ensure that:
- Create a VPC. For details, see Creating a VPC.
- Create an exclusive ServiceComb engine with security authentication disabled. For details, see Creating a Microservice Engine.
The VPC to which the ServiceComb engine belongs is the one created in 1. If the VPCs are inconsistent, correctly configure the VPC connectivity.
- Create a CCE standard cluster. Set Cluster Scale to 50 nodes and Master Nodes to Single. For details, see Buying a CCE Standard/Turbo Cluster.
- The VPC to which the CCE cluster belongs is the one created in 1.
- The cluster must contain at least one ECS node with 8 vCPUs and 16 GB memory or two ECS nodes with 4 vCPUs and 8 GB memory and be bound to an EIP. For details, see Creating a Node.
Registering a GitHub Account and Forking the Weather Forecast Source Code
- Register a GitHub account.
- Log in to GitHub.
- Go to the weather forecast source code repository.
- Fork the weather forecast source code repository to your account. For details, see Forking a repository.
Setting GitHub Repository Authorization
You can set GitHub repository authorization so that build projects and application components can use the authorization information to access the GitHub source code repository.
- Log in to ServiceStage.
- Choose Continuous Delivery > Repository Authorization > Create Authorization and configure authorization information by referring to the following table.
Parameter
Description
*Name
Use the default authorization name. The name cannot be changed after the authorization is created.
*Repository Authorization
- Select GitHub.
- Select OAuth for Method.
- Click Use OAuth Authorization and complete the authorization for accessing the GitHub source code repository as prompted.
Creating an Organization
- Choose Deployment Source Management > Organization Management.
- Click Create Organization. On the displayed page, specify Organization Name. For example, org-test.
- Click OK.
Creating an Environment
- Choose Environment Management > Create Environment. Then set required environment parameters by referring to the following table, and retain the default values for other parameters.
Parameter
Description
Environment
Enter an environment name, for example, env-test.
Enterprise Project
default is selected by default.
Enterprise projects let you manage cloud resources and users by project.
It is available after you enable the enterprise project function.
Environment Type
Select Kubernetes.
HA Environment
Select No.
VPC
Select the VPC prepared in Preparing Resources.
The VPC cannot be modified after the environment is created.
Configuration Mode
Select Resource management.
Figure 1 Configuring an environment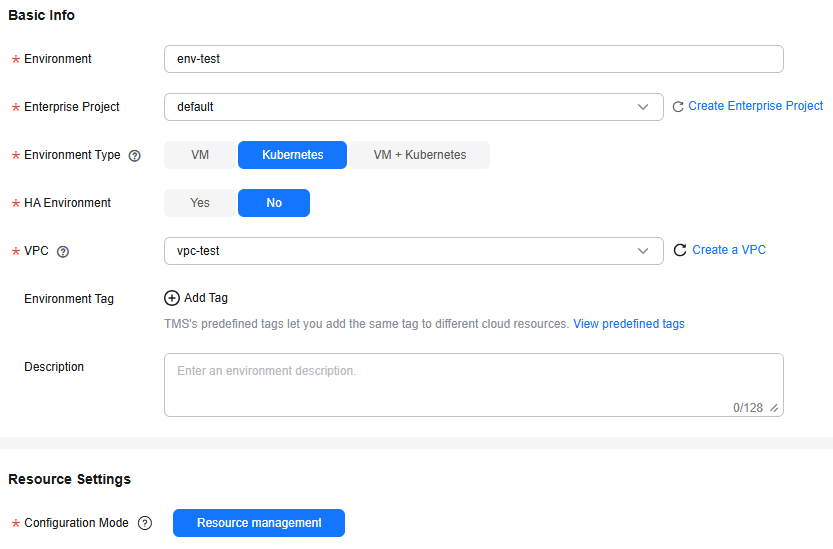
- Click Create Now.
- Choose Clusters under Compute and click Bind now.
- In the dialog box that is displayed, select the CCE cluster created in Preparing Resources and click OK.
- Choose ServiceComb Engines under Middleware and click Manage Resource.
- In the dialog box that is displayed, select the ServiceComb engine created in Preparing Resources and click OK.
Creating an Application
- Click
 in the upper left corner to return to the Environment Management page.
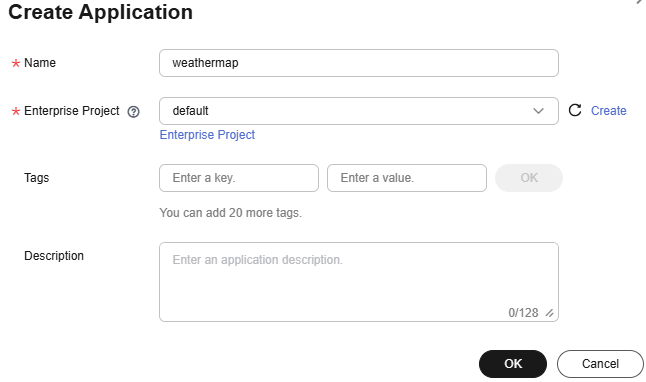
 - Choose Application Management > Create Application and set basic application information.
- Name: Enter weathermap.

If an application with the same name already exists in the application list, rectify the fault by referring to What Should I Do If a Weather Forecast Application with the Same Name Exists in the Current Environment?
- Enterprise Project: default is selected by default. Enterprise projects let you manage cloud resources and users by project.
It is available after you enable the enterprise project function.
- Name: Enter weathermap.
- Click OK.
Figure 2 Creating an application
Feedback
Was this page helpful?
Provide feedbackThank you very much for your feedback. We will continue working to improve the documentation.See the reply and handling status in My Cloud VOC.
For any further questions, feel free to contact us through the chatbot.
Chatbot


