Migrating a Custom Topic to the Cloud
Scenarios
As the number of IoT devices increases, self-managed IoT networks of enterprises face many problems, such as server capacity expansion, hardware investment, and O&M costs. To address these problems, Huawei Cloud provides a simplified solution to migrate enterprise devices quickly to IoTDA with few changes.
Solution Overview
Assume that enterprise devices are connected to the self-managed MQTT cluster. The following figure shows the service architecture.

The MQTT-based data reporting and command delivery services are defined as follows:
Scenario |
Topic |
Payload |
|---|---|---|
Device data reporting |
/aircondition/data/up |
{ "temperature": 26.0 } |
Server delivering commands |
/aircondition/cmd |
{ "switch": "off" } |
Huawei Cloud provides the following cost-effective solution to migrate devices to IoTDA without changing the original topic and payload packet formats.

There are three core changes after migrating enterprise devices to the cloud:
Procedure
Configure a product, device, and data forwarding rule on the console. For details, see Cloud Development.
Develop services on the device side. For details, see Device-side Development.
Develop services on the server side to implement device data receiving and control command delivery. For details, see Server-side Development.
Cloud Development
- Visit the IoTDA product page and click Access Console.
- Create a product.
- In the navigation pane, choose Products.
- Click Create Product on the left to create a product to be migrated, set the parameters, and click OK.
Basic Information
Product Name
Enter a value, for example, aircondition.
Protocol
Select MQTT.
Data Type
Select JSON.
Industry
Select Default.
Device Type
Set this parameter as required, for example, aircondition.
- Register a device.
- In the navigation pane, choose , and click Individual Register.
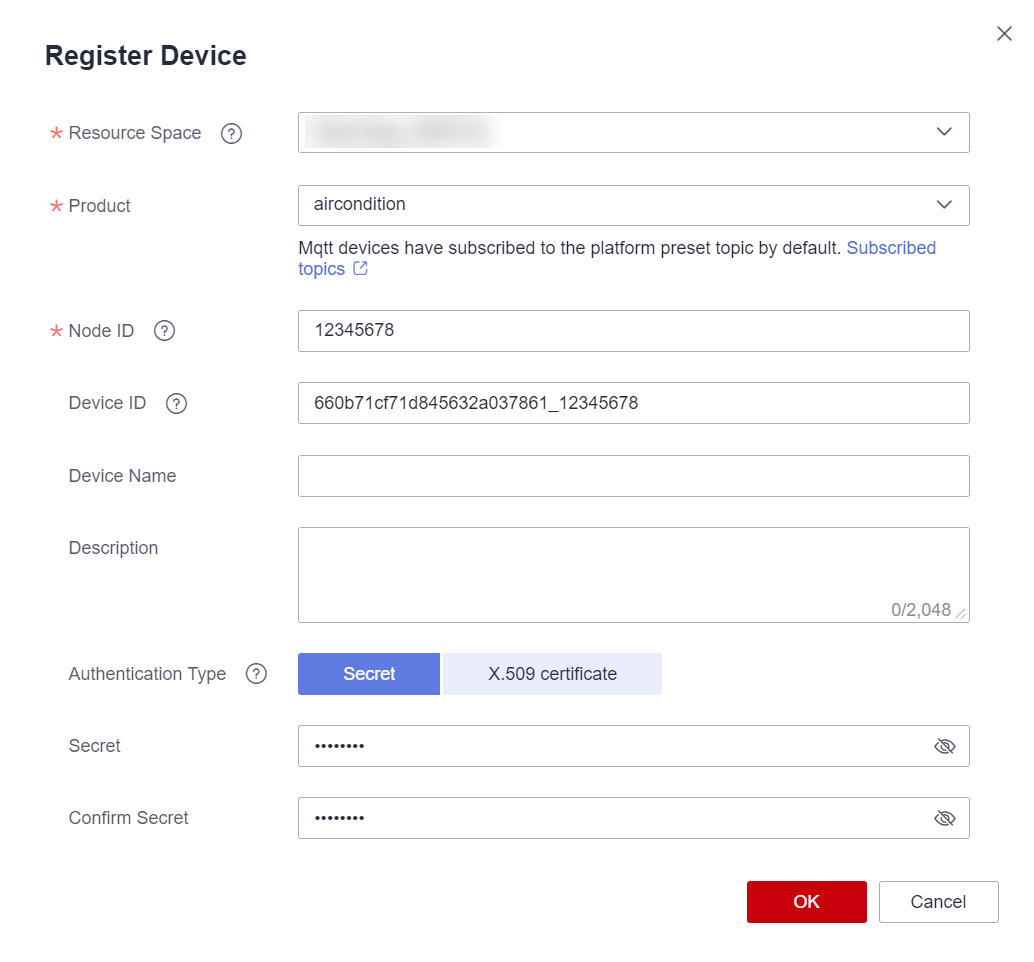
Figure 1 Registering a device - aircondition

Parameter
Description
Product
Select the product created in 2.
Node ID
Set this parameter to the IMEI, MAC address, or serial number of the device. If the device is not a physical one, set this parameter to a custom character string that contains letters and digits.
Device Name
Customize the value.
Authentication Type
Select an authentication type based on the existing device authentication type. Secret is used in this example.
Secret
Enter the secret of the device to be migrated.
- Set device parameters and click OK.
- In the navigation pane, choose , and click Individual Register.
- Create a data forwarding rule.
- In the navigation pane, choose , and click Create Rule on the left.
- Set the parameters based on the table below and click Create Rule.
Parameter
Description
Rule Name
Specify the name of a rule to create.
Description
Describe the rule.
Data Source
Select Device message. The device reports data based on the original topic and payload during cloud migration. By default, IoTDA processes messages based on the device message process.
Trigger
After the data source is selected, the platform automatically matches the trigger event.
Resource Space
You can select a single resource space or all resource spaces.
- Under Set Forwarding Target, click Add. On the displayed page, set the parameters based on the table below and click OK.
Parameter
Description
Forwarding Target
Select a data forwarding target, for example, AMQP message queue.
Message Queue
Click Select to select a message queue.
- If no message queue is available, create one. The queue name must be unique under a tenant and can contain 8–128 characters, including letters, numbers, underscores (_), hyphens (-), periods (.), and colons (:).
- To delete a message queue, click Delete on the right of the message queue.
NOTE:
A subscribed queue cannot be deleted.
- After the rule is defined, click Enable Rule to start forwarding data to the AMQP message queue.
Device-side Development
After the cloud configuration is complete, you need to develop services on the device side. For details about the device development process, see Development on the Device Side. This section uses MQTT.fx as an example to describe how to implement MQTT connection establishment, data reporting, and command receiving with minimum modifications on the device side in cloud migration.
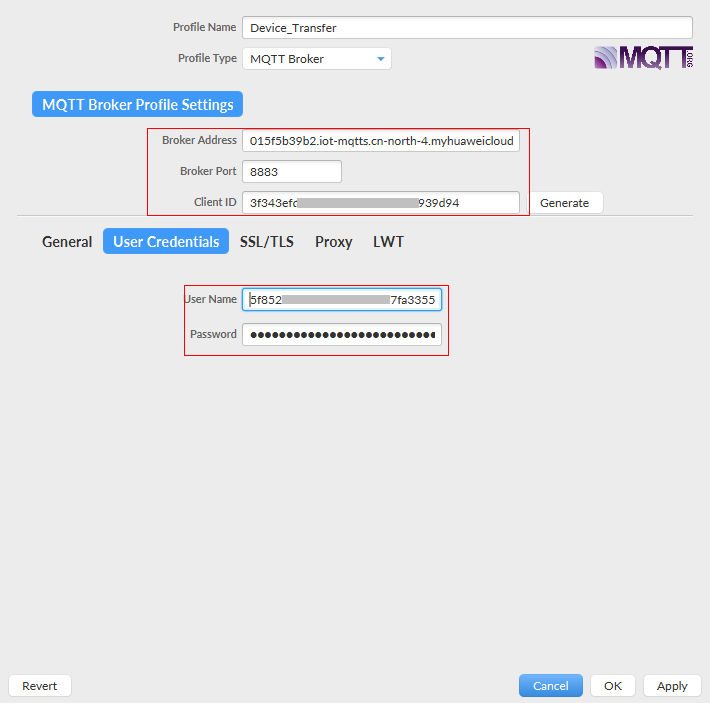
- Establish an MQTT connection between a device and IoTDA.
- Set authentication parameters by referring to the following table.

Parameter
Mandatory
Description
Broker Address
Yes
IoTDA access address for MQTT devices. Obtain it by referring to Obtaining Resources.
Broker Port
Yes
8883.
Client ID
No
Client ID before the migration.
User Name
Yes
Device ID generated during device registration in 3. By default, the device ID generated on the console is prefixed with the product ID. In the device migration scenario, if the User Name parameter on the device side cannot be modified, you can call the API Creating a Device to set the device ID to the value of User Name before the migration.
Password
Yes
Encrypted device secret. The value of this parameter is the device secret encrypted by using the HMAC-SHA256 algorithm with the timestamp as the key.
The device secret is returned by IoTDA upon successful device registration.
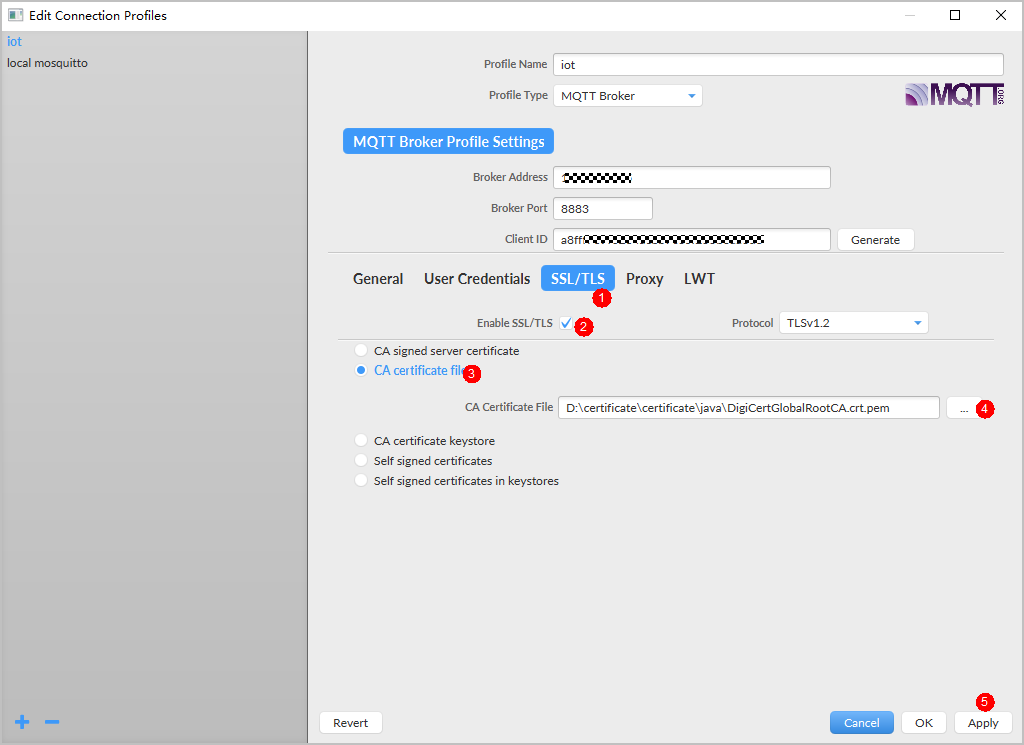
- Configure the SSL/TLS authentication parameters by referring to the following table and click Apply.

Parameter
Mandatory
Description
Enable SSL/TLS
Yes
Select Enable SSL/TLS.
CA certificate file
Yes
Upload the CA certificate obtained from Certificates.
- Set authentication parameters by referring to the following table.
- After a device is connected to IoTDA, the device uses the topic and payload format before the migration to report data. For non-predefined topics, IoTDA forwards data reported by devices to third-party applications or other Huawei Cloud services for processing based on the device message processing process.
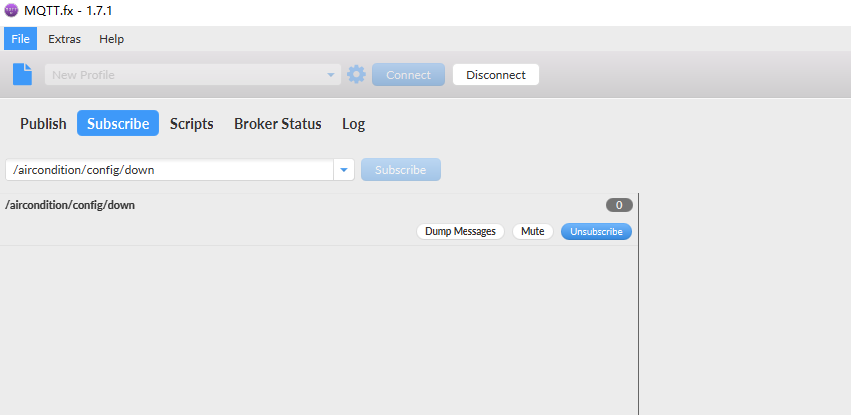
Figure 2 Device online status


- Subscribe to topics before the migration and receives commands from the application.

Server-side Development
Develop services on the server side to implement device data receiving and control command delivery. This section uses a Java script as an example to describe how to receive device data and deliver control commands.
- Receiving device data
The server receives messages using the AMQP client. For details, see AMQP Client Access and Java SDK Access Example. For details about the AMQP message receiving API, see Pushing a Device Property Reporting Notification.
The following shows an example of the message received by the AMQP client. The body field carries the original topic and payload reported by the device.
{
	"resource": "device.message",
	"event": "report",
	"event_time": "20201114T034403Z",
	"notify_data": {
		"header": {
			"app_id": "QAksSBSBBQpWYtEKC3LrrOboNk0a",
			"device_id": "5fae45e358115902ce609882_20201113",
			"node_id": "20201113",
			"product_id": "5fae45e358115902ce609882",
			"gateway_id": "5fae45e358115902ce609882_20201113"
		},
		"body": {
			"topic": "/aircondition/data/up",
			"content": {
				"temperature": 26.0
			}
		}
	}
}
Java core code example:
package com.huawei.iot.amqp.jms; import org.apache.qpid.jms.JmsConnection; import org.apache.qpid.jms.JmsConnectionFactory; import org.apache.qpid.jms.JmsConnectionListener; import org.apache.qpid.jms.message.JmsInboundMessageDispatch; import org.apache.qpid.jms.transports.TransportOptions; import org.apache.qpid.jms.transports.TransportSupport; import javax.jms.*; import javax.naming.Context; import javax.naming.InitialContext; import java.net.URI; import java.util.Hashtable; import java.util.concurrent.ExecutorService; import java.util.concurrent.LinkedBlockingQueue; import java.util.concurrent.ThreadPoolExecutor; import java.util.concurrent.TimeUnit; public class HwIotAmqpJavaClientDemo{ // Asynchronous thread pool. You can adjust the parameters based on service features or use other asynchronous processing modes. private final static ExecutorService executorService = new ThreadPoolExecutor(Runtime.getRuntime().availableProcessors(), Runtime.getRuntime().availableProcessors() * 2, 60, TimeUnit.SECONDS, new LinkedBlockingQueue<>(5000)); public static void main(String[] args) throws Exception{ // accessKey for the access credential. String accessKey = "${yourAccessKey}"; long timeStamp = System.currentTimeMillis(); // Method to assemble userName. For details, see AMQP Client Access. String userName = "accessKey=" + accessKey + "|timestamp=" + timeStamp; // accessCode for the access credential. String password = "${yourAccessCode}"; // Assemble the connection URL according to the qpid-jms specifications. String connectionUrl = "amqps://${UUCID}.iot-amqps.cn-north-4.myhuaweicloud.com:5671?amqp.vhost=default&amqp.idleTimeout=8000&amqp.saslMechanisms=PLAIN"; Hashtable<String, String> hashtable = new Hashtable<>(); hashtable.put("connectionfactory.HwConnectionURL", connectionUrl); // Queue name. You can use DefaultQueue. String queueName = "${yourQueue}"; hashtable.put("queue.HwQueueName", queueName); hashtable.put(Context.INITIAL_CONTEXT_FACTORY, "org.apache.qpid.jms.jndi.JmsInitialContextFactory"); Context context = new InitialContext(hashtable); JmsConnectionFactory cf = (JmsConnectionFactory) context.lookup("HwConnectionURL"); // Multiple queues can be created for one connection. Match queue.HwQueueName with queue.HwQueueName. Destination queue = (Destination) context.lookup("HwQueueName"); // Trust the server. TransportOptions to = new TransportOptions(); to.setTrustAll(true); cf.setSslContext(TransportSupport.createJdkSslContext(to)); // Create a connection. Connection connection = cf.createConnection(userName, password); ((JmsConnection) connection).addConnectionListener(myJmsConnectionListener); // Create a session. // Session.CLIENT_ACKNOWLEDGE: After receiving a message, manually call message.acknowledge(). // Session.AUTO_ACKNOWLEDGE: The SDK automatically responds with an ACK message. (recommended processing) Session session = connection.createSession(false, Session.AUTO_ACKNOWLEDGE); connection.start(); // Create a receiver link. MessageConsumer consumer = session.createConsumer(queue); // Messages can be processed in either of the following ways: // 1. Proactively pull data (recommended processing). For details, see receiveMessage(consumer). // 2. Add a listener. For details, see consumer.setMessageListener(messageListener). The server proactively pushes data to the client at an acceptable data rate. receiveMessage(consumer); // consumer.setMessageListener(messageListener); } private static void receiveMessage(MessageConsumer consumer) throws JMSException{ while (true){ try{ // It is recommended that received messages be processed asynchronously. Ensure that the receiveMessage function does not contain time-consuming logic. Message message = consumer.receive(); processMessage(message); } catch (Exception e) { System.out.println("receiveMessage hand an exception: " + e.getMessage()); e.printStackTrace(); } } } private static MessageListener messageListener = new MessageListener(){ @Override public void onMessage(Message message){ try { // It is recommended that received messages be processed asynchronously. Ensure that the onMessage function does not contain time-consuming logic. // If the service processing takes a long time and blocks the thread, the normal callback after the SDK receives the message may be affected. executorService.submit(() -> processMessage(message)); } catch (Exception e){ System.out.println("submit task occurs exception: " + e.getMessage()); e.printStackTrace(); } } }; /** * Service logic for processing the received messages */ private static void processMessage(Message message) { try { String body = message.getBody(String.class); String content = new String(body); System.out.println("receive an message, the content is " + content); } catch (Exception e){ System.out.println("processMessage occurs error: " + e.getMessage()); e.printStackTrace(); } } private static JmsConnectionListener myJmsConnectionListener = new JmsConnectionListener(){ /** * Connection established. */ @Override public void onConnectionEstablished(URI remoteURI){ System.out.println("onConnectionEstablished, remoteUri:" + remoteURI); } /** * The connection fails after the maximum number of retries is reached. */ @Override public void onConnectionFailure(Throwable error){ System.out.println("onConnectionFailure, " + error.getMessage()); } /** * Connection interrupted. */ @Override public void onConnectionInterrupted(URI remoteURI){ System.out.println("onConnectionInterrupted, remoteUri:" + remoteURI); } /** * Automatic reconnection. */ @Override public void onConnectionRestored(URI remoteURI){ System.out.println("onConnectionRestored, remoteUri:" + remoteURI); } @Override public void onInboundMessage(JmsInboundMessageDispatch envelope){ System.out.println("onInboundMessage, " + envelope); } @Override public void onSessionClosed(Session session, Throwable cause){ System.out.println("onSessionClosed, session=" + session + ", cause =" + cause); } @Override public void onConsumerClosed(MessageConsumer consumer, Throwable cause){ System.out.println("MessageConsumer, consumer=" + consumer + ", cause =" + cause); } @Override public void onProducerClosed(MessageProducer producer, Throwable cause){ System.out.println("MessageProducer, producer=" + producer + ", cause =" + cause); } }; } - Delivering control commands
An application calls the message delivery API to deliver control commands. For details, see Delivering a Message to a Device.
Key parameters for device message delivery are as follows.
Parameter
Mandatory
Type
Location
Description
X-Auth-Token
Yes
String
Header
User token. You can obtain the token by calling the IAM API Obtaining a User Token Through Password Authentication. X-Subject-Token in the response header returned by the API is the desired user token. For details about how to obtain the token, see Token Authentication.
Instance-Id
No
String
Header
Instance ID. This parameter is required only when the API is called from the management plane in the physical multi-tenant scenario.
project_id
Yes
String
Path
Project ID. For details on how to obtain a project ID, see Obtaining a Project ID.
device_id
Yes
String
Path
ID of the device to be migrated.
message
Yes
String
Body
Message executed by the device. The value is a string. The specific format depends on the application and device.
topic_full_name
No
String(128)
Body
Topic of the device to be migrated.
Example response:
POST https://{Endpoint}/v5/iot/{project_id}/devices/{device_id}/messages
Content-Type: application/json
X-Auth-Token: ********
Instance-Id: ********

{
   "message": "{\"switch\":\"off\"}",
   "topic_full_name": "/aircondition/cmd"

}
Java core code example:
public class DeviceMessage {
    public static void main(String[] args) throws KeyManagementException, NoSuchAlgorithmException, IOException {
        String token = Authentication.getToken();
        Map<String, String> headers = new HashMap<String, String>();
        headers.put("Content-Type", "application/json");
        headers.put("X-Auth-Token", token);

        Message message = new Message();
        message.setMessage("{\"switch\" :\"off\"}");
        message.setTopic_full_name("/aircondition/cmd");

        String projectId = "11111";
        String deviceId = "5fae45e358115902ce609882_20201113";
        String url = "https://iotda.cn-north-4.myhuaweicloud.com/v5/iot/%s/devices/%s/messages";
        url = String.format(url, projectId, deviceId);
        HttpUtils httpUtils = new HttpUtils();
        httpUtils.initClient();
        StreamClosedHttpResponse httpResponse = httpUtils.doPost(url, headers, JsonUtils.Obj2String(message));
        System.out.println(httpResponse.getContent());
    }
}
Feedback
Was this page helpful?
Provide feedbackThank you very much for your feedback. We will continue working to improve the documentation.See the reply and handling status in My Cloud VOC.
For any further questions, feel free to contact us through the chatbot.
Chatbot


