
How Do I Prevent Personal Sensitive Data From Being Disclosed During Development and Testing?
Sensitive data refers to information that, if accessed, disclosed, or misused by unauthorized persons, may pose serious risks to individuals or organizations.
- For individuals, this includes personal information such as ID card numbers, home addresses, employers, and bank card numbers.
- For enterprises or organizations, sensitive data encompasses core information such as customer data, financial details, technical information, and major decisions.
The static data masking function provided by Huawei Cloud Data Security Center (DSC) allows you to convert a large amount of data at a time based on the masking rules. It is usually used to deliver sensitive data in the production environment to the development, test, or outside environment for development and test, data sharing, and data research.
Common Causes of Data Breaches
- Insider leakage
- Laptops or mobile devices are lost or stolen.
- Sensitive data or storage is accessed by unauthorized personal
- Sensitive data is sent, printed, and copied by employees.
- Sensitive data is accidentally transmitted out.
- Leakage caused by external attacks
- Data access is uncontrollable, or there are security vulnerabilities in the data storage system.
- Improper configurations allow external attacks.
- Sensitive data or storage is accessed by unauthorized personal
Step 1: Buying the DSC Professional Edition
- Log in to the DSC console.
- Click
 in the upper left corner of the management console and select a region or project.
 - If you are a first-time user, click Buy DSC.
- On the Buy DSC page, set Region and Project.

You can select a region from the Region drop-down list to switch to another region. Only one DSC edition can be purchased in a region.
- Set Database Expansion Package and OBS Expansion Package.
Figure 1 Selecting expansion packages

- An expansion package offers one database instance. RDS and GaussDB(DWS) databases, user-built databases on ECSs, DLI, Elasticsearch, and big data on ECSs are supported.
- An OBS expansion package offers 1 TB (1,024 GB) of OBS storage.
- Specify the Required Duration. The required duration can be from one month to three years.
The Auto-renew option enables the system to renew your service by the purchased period when the service is about to expire.
- Click Next.
If you have any questions about the pricing, click Pricing details.
- Confirm the order information and agree to the DSC disclaimer by selecting I have read and agree to the Data Security Center Service Statement and click Pay Now.
- Select a payment method to pay for your order on the displayed page.
Step 2: Identifying Sensitive Data
- Log in to the DSC console.
- In the navigation pane on the left, choose Sensitive Data Identification > Identification Task.
- Click Create Task. In the displayed dialog box, configure the basic parameters.
Table 1 Parameters for creating a sensitive data identification task Parameter
Description
Example Value
Task Name
You can customize the task name.
The task name must:
- Contain 4 to 255 characters.
- Consist of letters, digits, underscores (_), or hyphens (-).
- Start with a letter.
- Be unique.
test
Data Type
Type of data to be identified. You can select multiple types.
- OBS: After DSC is authorized to access your Huawei Cloud OBS asset, DSC will identify the sensitive data in it. For details about how to add OBS assets, see Adding an OBS Asset.
- Database: DSC will identify the sensitive data in the authorized databases. For details about how to authorize a database, see Adding and Authorizing Database Assets.
- Big Data: DSC will identify the sensitive data in the authorized big data assets. For details about how to authorize big data assets, see Adding and Authorizing Big Data Assets.
- MRS: DSC will identify the sensitive data in the authorized MRS assets. For details about how to authorize MRS assets, see Adding and Authorizing Big Data Assets.
- LTS: DSC will identify the sensitive data in the authorized LTS assets. For details about how to add a log stream, see Adding a Log Stream.
Database > gbx-jiami
Identification Template
You can select a built-in or custom template. DSC displays data by level and category based on the template you select. For details about how to create an identification template, see Customizing a Rule.
Huawei Cloud Data Security Classifying and Grading Template
Identification Period
Set the execution policy of the data identification task.
- Once: The task will be executed once at a specified time.
- Daily: The task is executed at a fixed time every day.
- Weekly: The task is executed at a specified time every week.
- Monthly: The task is executed at a specified time every month.
Once
When to Execute
This parameter is displayed when Identification Period is set to Once.- Now: Select the option and click OK, the system executes the data identification task immediately.
- As scheduled: The task will be executed at a specified time.
Now
- Click OK. The sensitive data identification task list is displayed.
- When the status of the identification task changes to Identification completed. Click View Result in the Operation column to go to the result details page.
The Birthday and PhoneNumbers columns are identified as sensitive data.
- Click View Leveling and Details to view the result details.
Figure 2 Categorizing and leveling results
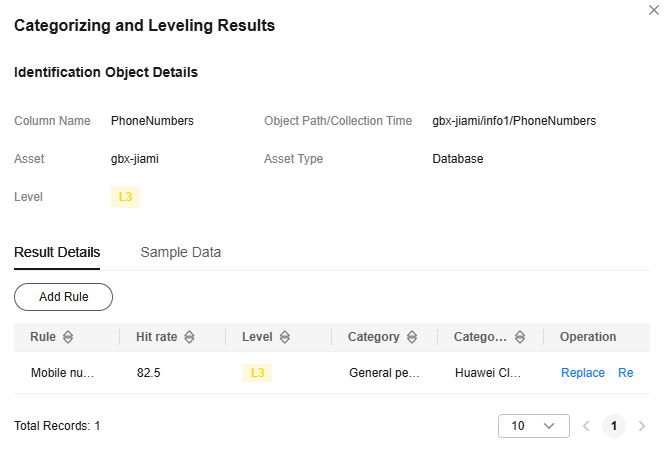
Perform operations described in Step 3: Performing Static Data Masking to mask the sensitive data in the Birthday and PhoneNumbers columns of the info1 table in the gbx-jiami database.
Step 3: Performing Static Data Masking
You can use DSC to create data masking tasks for databases, and Elasticsearch, MRS, and Hive assets. This section describes how to create a static data masking task for a database. For details about how to mask data for other data sources, see Creating a Static Data Masking Task.
- In the navigation pane on the left, choose Data Asset Protection > Static Data Masking. The Data Masking page is displayed.
- Set Mask Sensitive RDS Data to
 .
. - Click Create Task to configure the data source.
Select all data types if you want a complete table that contains all types of data after the data masking is completed.
Figure 3 Data source configuration
- Click Next to switch to Set Masking Algorithm.
Figure 4 Configuring the data masking algorithm

- Click Next to switch to the Configure Data Masking Period page and configure the data masking period.
- Click Next to the Set Target Data page and configure the storage location of the table generated after data masking.
Figure 5 Configuring the storage location of the table generated after data masking

- Click Finish to return to the database data masking task list. Click
 to enable the masking task and then Execute in the Operation column to execute the task.
If the status changes to Completed, the data masking task has been successfully executed.
Feedback
Was this page helpful?
Provide feedbackThank you very much for your feedback. We will continue working to improve the documentation.See the reply and handling status in My Cloud VOC.
For any further questions, feel free to contact us through the chatbot.
Chatbot


