
Creating a Static Data Masking Task
DSC supports masking of database, OBS data, and big data. For details about the supported data types, see Constraints. This section describes how to create masking tasks of different data types.
Prerequisites
- Access to cloud assets has been authorized. For details, see Allowing or Disallowing Access to Cloud Assets.
- An OBS bucket or database/big data asset has been added and authorized. For details, see the operations of adding and authorizing assets in Adding and Authorizing Data Assets in DSC.
- Sensitive data has been identified by referring to Creating an Identification Task.
- Related MRS_Hive permission needs to be configured for MRS masking. For details, see Modifying Hive User Rights.
Constraints
|
Masking Type |
File Type |
Constraints |
|---|---|---|
|
Data masking |
- |
The following data sources are supported: SQLServer, MySQL, TDSQL, PostgreSQL, Dameng, Kingbase, GaussDB, Oracle, and DWS. |
|
Big data masking: |
- |
The value can be DLI, Elasticsearch, MRS_HIVE, Hive, or HBase. |
|
OBS masking |
File type |
Files such as .txt, .log, .xml, .ini, .sql, .inf, .java and .json and files whose mime type starts with "text" are supported. |
|
Logo type |
JPEG, JPEG2000, BMP, and PNG images are supported. |
|
|
The following identification types are supported: face and license plate. |
||
|
The following masking modes are supported: mosaic mask and white block mask. |
||
|
Minimum pixel detection metrics:
|
Creating a Static Data Masking Task
You can create a static data masking task on the DSC console and mask data sources based on the selected masking rule. For details about how to view and test masking rules, see Configuring and Viewing Masking Rules.
Creating and Running a Database Masking Task
- Log in to the DSC console.
- Click
 in the upper left corner and select a region or project.
 - In the navigation pane on the left, choose Data Asset Protection > Static Data Masking.
- In the Databases tab, set Mask Sensitive Database Data to
 .
. - Click Create Task. On the displayed Configure Data Source page, configure parameters according to Table 2.
Figure 1 Configuring a database data masking task
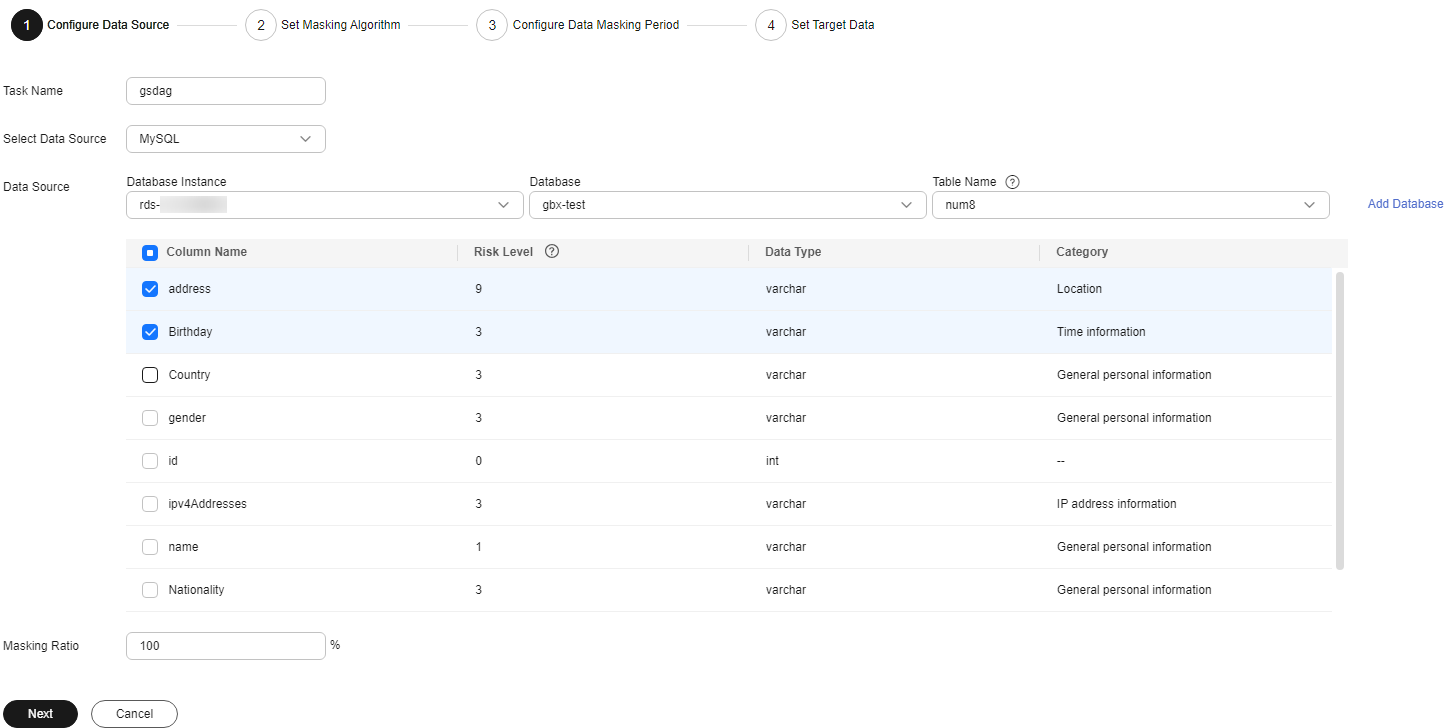
Table 2 Parameter description Parameter
Description
Task Name
You can customize the name of a data masking task.
The task name must meet the following requirements:- Contain 1 to 255 characters.
- Consist of letters, digits, underscores (_), and hyphens (-).
Select Data Source
Select a data source.
Data Source
NOTE:If no database instance is available, click Add Database to add or authorize a database. For details, see Adding and Authorizing Database Assets.
Database Instance: Select the database instance to be masked.
Database: Select the name of the database to be masked.
Schema: This parameter is available only when SQLServer, KingBase, GaussDB, PostgreSQL, or DWS is selected for Data Source.
Table name: Select the name of the database table where the data you want to mask is located.
Column Information
The column information includes Column Name, Risk Level, Data Type, and Category.
Masking Ratio
Specify the database's masking ratio. For instance, setting it to 80% will mask the initial 800 rows in a database with 1000 rows.
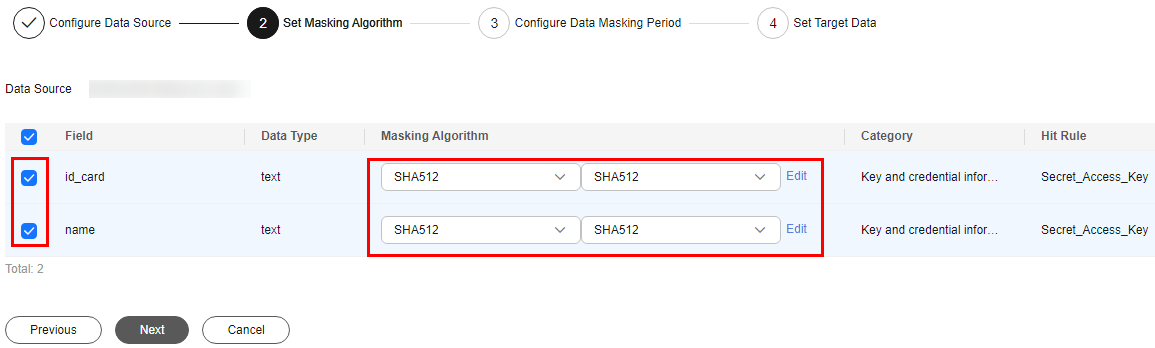
- Click Next. The Set Masking Algorithm page is displayed.
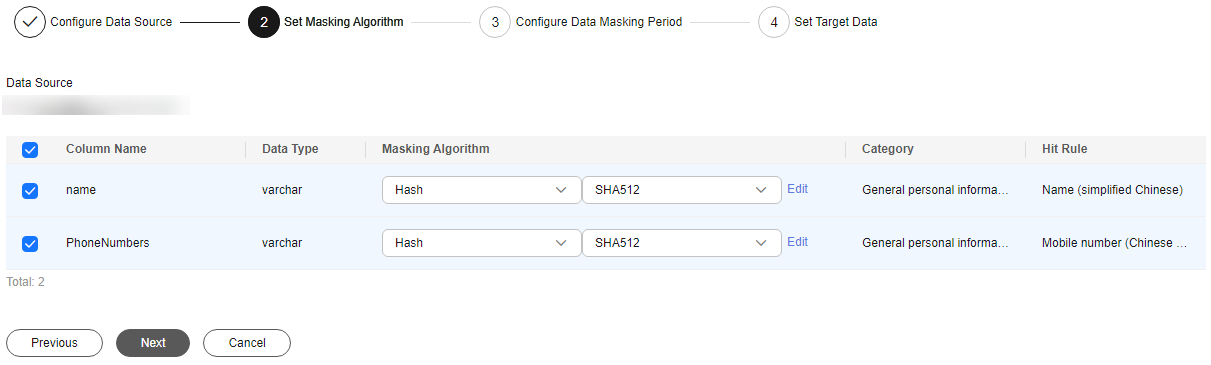
Figure 2 Configuring the data masking algorithm
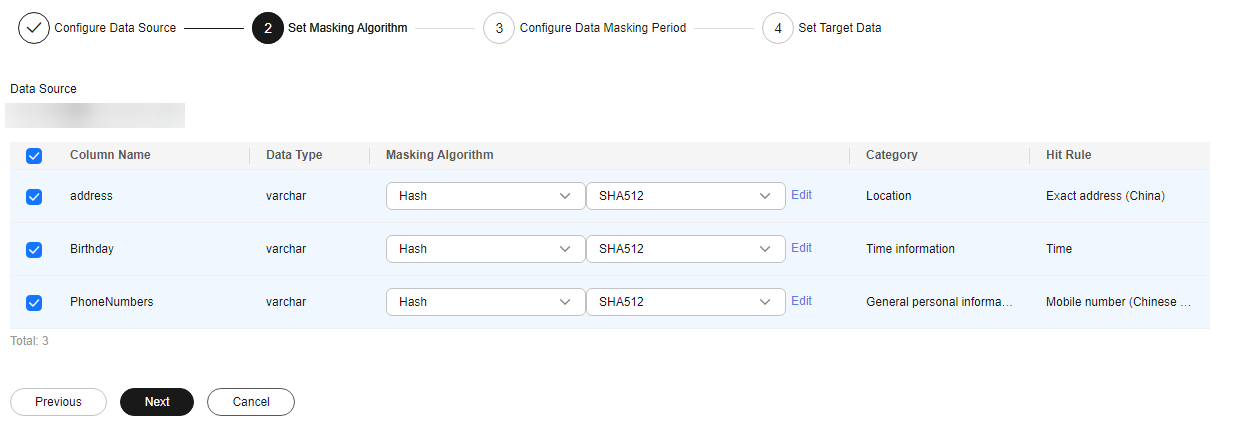
- Select the data columns you want to mask.
- Select a proper masking algorithm based on the data type. For details about data masking algorithms, see Configuring and Viewing Masking Rules.

If the decryption masking algorithm is selected for encrypted data, the encrypted data will be decrypted then masked.
If the masking algorithm is selected for unencrypted data, data remains unchanged after masking.
- Click Edit. On the editing test page displayed, test the masking algorithm you selected. Enter the replacement string and raw data, click Test, and view the masking result. For details about masking rules, see Configuring and Viewing Masking Rules.
- Click Next to switch to the Configure Data Masking Period page and configure the data masking period.
Click
 next to Incremental Masking to enable incremental masking.
Incremental Key Value: Select an incremental key value from the drop-down list box, for example, id.
- After incremental masking is enabled, the data to be masked is the data added after the last masking task is complete. Select a field that increases with time in the source data as the incremental column, for example, the creation time and auto-increment ID.
- Currently, incremental masking supports the following database field types: int, bigint, integer, date, and datetime.
Select and set the execution period of a masking task.
- Manual: Manually enable a masking task and execute it based on masking rules.
- Hourly: Execute a data masking task every several hours.
Example: If the masking task needs to be executed every two hours, set this parameter to 02:00.
- Daily: Execute a data masking task at a specified time every day.
Example: If the masking task needs to be executed at 12:00 every day, set this parameter to 12:00:00.
- Weekly: Execute a data masking task at a specified time every week.
Example: If the masking task needs to be executed at 12:00 every Monday, set this parameter to 12:00:00 every Monday.
- Monthly: Execute a data masking task at a specified time on a specified day every month.
Example: If the masking task needs to be executed at 12:00 on the 12th day of each month, set this parameter to 12:00:00 12th day of every month.
If you want to execute a data masking task on the 31st day of each month, the system automatically executes the task on the last day of every month.
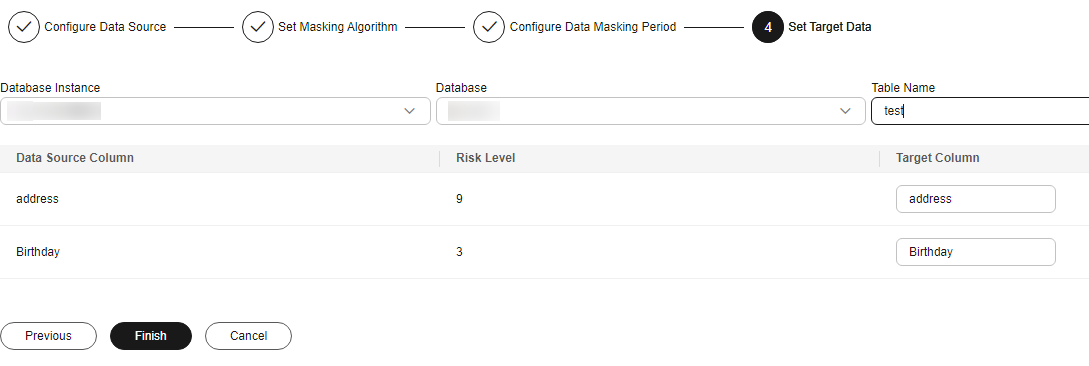
- Click Next. The Set Target Data page is displayed.
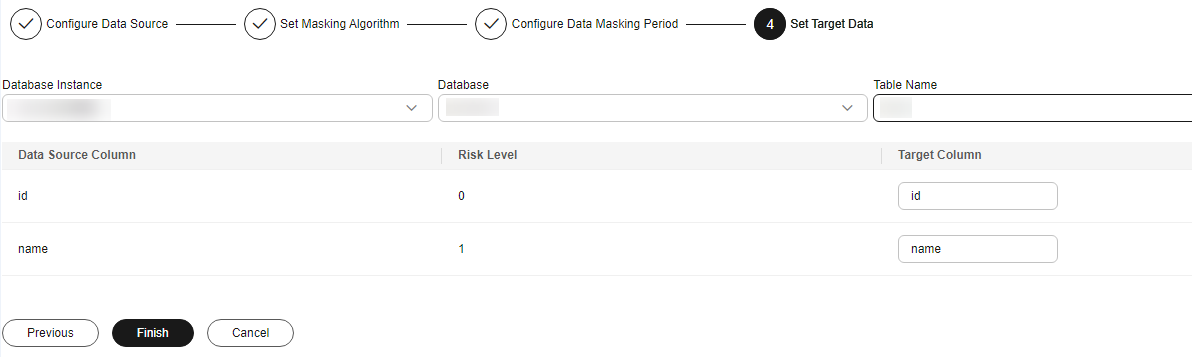
Figure 3 Configuring a target data type

- Select a database instance, database name, schema (if any), and enter the table name.
If the entered data table name already exists, the system updates the data table in the target database.
If the entered data table name does not exist, the system automatically creates a data table with the same name in the target database.

- Do not fill in an existing service data table. Otherwise, services may be affected.
- Do not select an original data table as the target data table. Otherwise, the original data may be overwritten.
- Set the column name of the target data type.
By default, the system generates a name that is the same as the name of the data source column. You can retain the default name or change it as required.
- Select a database instance, database name, schema (if any), and enter the table name.
- Click Finish.
- Click the Database tab and click the button under Enable/Disable to enable the task. Locate the target masking task and click Execute in the Operation column.
- The data masking task is executed as configured.
- Click
 in front of the target masking task and verify that Status of the masking task is Finished. Then, go to the database and check the masking effect.
Creating and Running an Elasticsearch Data Masking Task
- Log in to the DSC console.
- Click in the upper left corner and select a region or project.
- In the navigation pane on the left, choose Data Asset Protection > Data Masking and click the Elasticsearch tab. The Elasticsearch masking page is displayed.
- Set Elasticsearch to
 to enable Elasticsearch masking.
 - Click Create Task. On the displayed Configure Data Source page, configure parameters according to Table 3.
Table 3 Parameter description Parameter
Description
Task Name
You can customize the name of a data masking task.
The task name must meet the following requirements:- Contain 1 to 255 characters.
- Consist of letters, digits, underscores (_), and hyphens (-).
Select Data Source
Select a data source. Currently, the value can only be Elasticsearch.
Data Source
NOTE:If no Elasticsearch instance is available, click Add to add Elasticsearch indexes. For details, see Adding and Authorizing Big Data Assets.
Elasticsearch: Select the Elasticsearch instance where the data to be masked is located.
Index: Select the index where the data to be masked is located.
Type: Select the type of the data to be masked.
Field Information
The field information includes Field Name, Risk Level, Data Type, and Category.
- Click Next. The Set Masking Algorithm page is displayed.
Figure 4 Configuring a masking algorithm for an Elasticsearch masking task
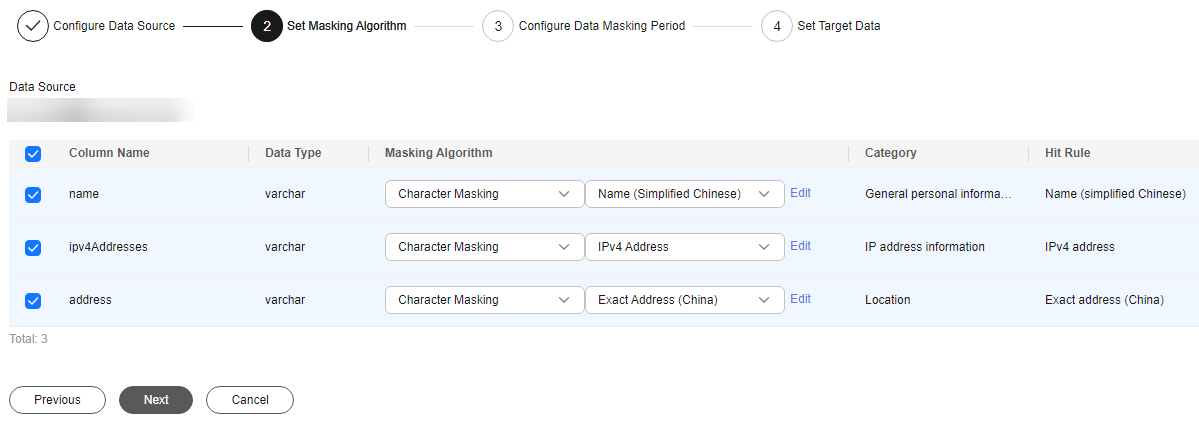
- Select the data columns you want to mask.
- Select a data masking algorithm. For details about data masking algorithms, see Configuring and Viewing Masking Rules.
- Click Next to switch to the Configure Data Masking Period page and configure the data masking period.
Select and set the execution period of a masking task.
- Manual: Manually enable a masking task and execute it based on masking rules.
- Hourly: Execute a data masking task every several hours.
Example: If the masking task needs to be executed every two hours, set this parameter to 02:00.
- Daily: Execute a data masking task at a specified time every day.
Example: If the masking task needs to be executed at 12:00 every day, set this parameter to 12:00:00.
- Weekly: Execute a data masking task at a specified time every week.
Example: If the masking task needs to be executed at 12:00 every Monday, set this parameter to 12:00:00 every Monday.
- Monthly: Execute a data masking task at a specified time on a specified day every month.
Example: If the masking task needs to be executed at 12:00 on the 12th day of each month, set this parameter to 12:00:00 12th day of every month.
If you want to execute a data masking task on the 31st day of each month, the system automatically executes the task on the last day of every month.
- Click Next. The Set Target Data page is displayed.
Figure 5 Setting target data for an Elasticsearch masking task
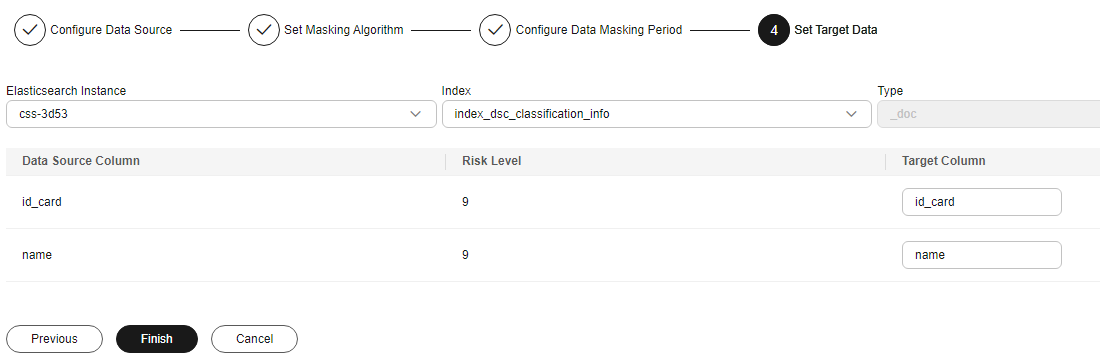
- Select an Elasticsearch instance and index, and set Type.
If the type you entered already exists, the system updates the data of the type in the target data source.
If the type you entered does not exist, the system automatically creates a type with the same name in the target data source.
If you want to use an existing type, do not set Type. Otherwise, services may be affected.
- Set the column name of the target data type.
By default, the system generates the same name as the data source column. You can retain the default name or change it as needed.
- Select an Elasticsearch instance and index, and set Type.
- Click Finish.
- Click the Elasticsearch tab. Locate the row containing the target data masking task and click Execute in the Operation column.
- The system starts to execute the data masking task as configured.
If
 is displayed in the Enable/Disable column, the task is disabled, and you are not allowed to click Execute.
 - Click
 in front of the target masking task and verify that Status of the masking task is Finished. Then, go to Elasticsearch and check the masking effect.
Creating and Running an MRS Data Masking Task
- Log in to the DSC console.
- Click
 in the upper left corner and select a region or project.
 - In the navigation pane on the left, choose Data asset protection > Static Data Masking and click the MRS tab. The MRS masking page is displayed.
- Set Mask Sensitive MRS Data to
 to enable MRS masking.
 - Click Create Task. On the displayed Configure Data Source page, configure parameters according to Table 4.
Table 4 Parameter description Parameter
Description
Task Name
You can customize the name of a data masking task.
The task name must meet the following requirements:- Contain 1 to 255 characters.
- Consist of letters, digits, underscores (_), and hyphens (-).
Select Data Source
Select a data source. Only MRS_HIVE is available.
Data Source
NOTE:If no Hive database instance is available, click Authorize Database to add a big data instance asset. For details, see Adding and Authorizing Big Data Assets.
Database Instance: Select the database instance where the data you want to mask is located.
Database: Select the name of the database where the data you want to mask is located.
Table Name: Select the name of the database table where the data you want to mask is located.
Select a column name to copy the data in the column to the target database.
Column Information
The column information includes Column Name, Risk Level, Data Type, and Category.
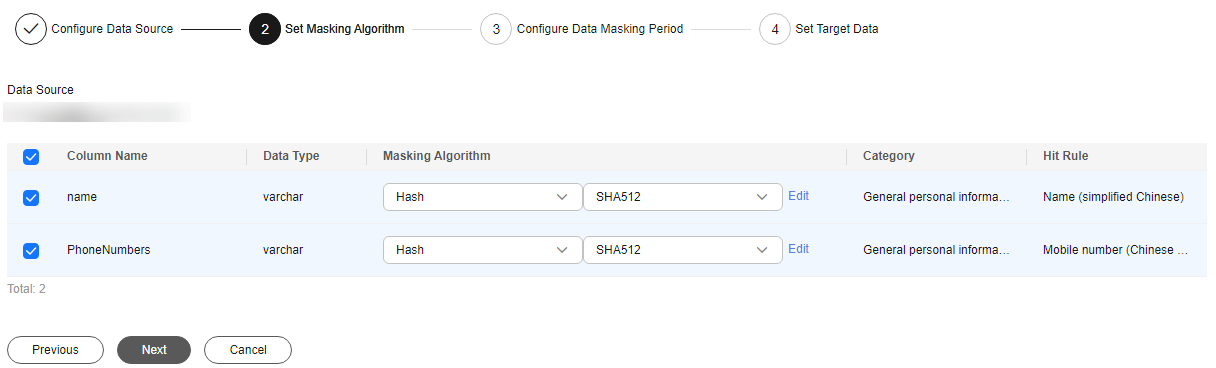
- Click Next. The Set Masking Algorithm page is displayed.
Figure 6 Setting a masking algorithm
- Select the data columns you want to mask.
- Select a data masking algorithm. For details about data masking algorithms, see Configuring and Viewing Masking Rules.
- Click Next to switch to the Configure Data Masking Period page and configure the data masking period.
Select and set the execution period of a masking task.
- Manual: Manually enable a masking task and execute it based on masking rules.
- Hourly: Execute a data masking task every several hours.
Example: If the masking task needs to be executed every two hours, set this parameter to 02:00.
- Daily: Execute a data masking task at a specified time every day.
Example: If the masking task needs to be executed at 12:00 every day, set this parameter to 12:00:00.
- Weekly: Execute a data masking task at a specified time every week.
Example: If the masking task needs to be executed at 12:00 every Monday, set this parameter to 12:00:00 every Monday.
- Monthly: Execute a data masking task at a specified time on a specified day every month.
Example: If the masking task needs to be executed at 12:00 on the 12th day of each month, set this parameter to 12:00:00 12th day of every month.
If you want to execute a data masking task on the 31st day of each month, the system automatically executes the task on the last day of every month.
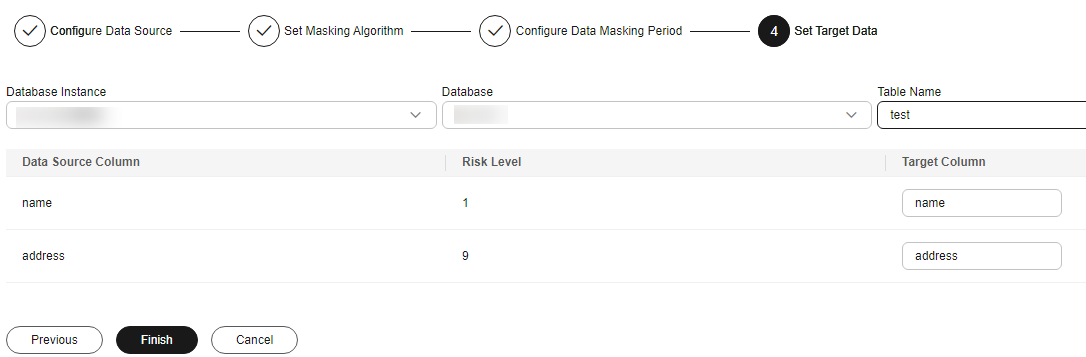
- Click Next. The Set Target Data page is displayed.
Figure 7 Setting target data
- Select a database instance and database name, and enter the database table name.
If the entered data table name already exists, the system updates the data table in the target database.
If the entered data table name does not exist, the system automatically creates a data table with the same name in the target database.
Do not fill in an existing service data table. Otherwise, services may be affected.
- Set the column name of the target data type.
By default, the system generates a name that is the same as the name of the data source column. You can retain the default name or change it as required.
- Select a database instance and database name, and enter the database table name.
- Click Finish.
- Click the MRS tab. Locate the row containing the target data masking task and click Execute in the Operation column.
- The data masking task is executed as configured.
- Click
 in front of the target masking task and verify that Status of the masking task is Finished. Then, go to MRS and check the masking effect.
Creating and Running a Hive Masking Task
- Log in to the DSC console.
- Click
 in the upper left corner and select a region or project.
 - In the navigation pane on the left, choose Data Asset Protection > Static Data Masking and click the Hive tab. The Hive masking page is displayed.
- Set Mask Sensitive Hive Data to
 to enable Hive masking.
 - Click Create Task. On the displayed Configure Data Source page, configure parameters according to Table 5.
Table 5 Parameter description Parameter
Description
Task Name
You can customize the name of a data masking task.
The task name must meet the following requirements:- Contain 1 to 255 characters.
- Consist of letters, digits, underscores (_), and hyphens (-).
Select Data Source
Select a data source. Only Hive is supported.
Data Source
NOTE:If no Hive database instance is available, click Add Database to add a big data asset. For details, see Adding and Authorizing Big Data Assets.
Database Instance: Select the database instance where the data you want to mask is located.
Database: Select the name of the database where the data you want to mask is located.
Table name: Select the name of the database table where the data you want to mask is located.
If you select the check box, data in this column is copied to the Data Type column.
Data Partitioning (Optional)
You can mask partitioned tables. Set this parameter to
 to select data partitions. You can select Quick Selection or Customization.
Column Information
The column information includes Column Name, Risk Level, Data Type, and Category.
- Click Next. The Set Masking Algorithm page is displayed.
Figure 8 Setting a masking algorithm for a Hive masking task

- Select the data columns you want to mask.
- Select a data masking algorithm. For details about data masking algorithms, see Configuring and Viewing Masking Rules.
- Click Next to switch to the Configure Data Masking Period page and configure the data masking period.
Select and set the execution period of a masking task.
- Manual: Manually enable a masking task and execute it based on masking rules.
- Hourly: Execute a data masking task every several hours.
Example: If the masking task needs to be executed every two hours, set this parameter to 02:00.
- Daily: Execute a data masking task at a specified time every day.
Example: If the masking task needs to be executed at 12:00 every day, set this parameter to 12:00:00.
- Weekly: Execute a data masking task at a specified time every week.
Example: If the masking task needs to be executed at 12:00 every Monday, set this parameter to 12:00:00 every Monday.
- Monthly: Execute a data masking task at a specified time on a specified day every month.
Example: If the masking task needs to be executed at 12:00 on the 12th day of each month, set this parameter to 12:00:00 12th day of every month.
If you want to execute a data masking task on the 31st day of each month, the system automatically executes the task on the last day of every month.
- Click Next. The Set Target Data page is displayed.
Figure 9 Setting target data for a Hive masking task
- Select a database instance and database name, and enter the database table name.
If the entered data table name already exists, the system updates the data table in the target database.
If the entered data table name does not exist, the system automatically creates a data table with the same name in the target database.
Do not fill in an existing service data table. Otherwise, services may be affected.
- Set the column name of the target data type.
By default, the system generates a name that is the same as the name of the data source column. You can retain the default name or change it as required.
- Select a database instance and database name, and enter the database table name.
- Click Finish.
- On the Hive page. In the Operation column of the target anonymization task, click Execute.
- The data masking task is executed as configured.
- Click
 in front of the target masking task and verify that Status of the masking task is Finished. Then, go to Hive and check the masking effect.
Creating and Running an HBase Masking Task
- Log in to the DSC console.
- Click
 in the upper left corner and select a region or project.
 - In the navigation pane, choose Data Asset Protection > Static Data Masking and click the HBase tab. The HBase masking page is displayed.
- Set Mask Sensitive HBase Data to
 to enable HBase masking.
 - Click Create Task. On the displayed Configure Data Source page, configure parameters according to Table 6.
Table 6 Parameter description Parameter
Description
Task Name
You can customize the name of a data masking task.
The task name must meet the following requirements:- Contain 1 to 255 characters.
- Consist of letters, digits, underscores (_), and hyphens (-).
Select Data Source
Select a data source. Only HBase is supported.
Data Source
NOTE:If no database instance is available, click Add Database to add a big data asset. For details, see Adding and Authorizing Big Data Assets.
Database Instance: Select the database instance where the data you want to mask is located.
Namespace: Select the namespace where the data to be masked is located.
Table name: Select the name of the database table where the data you want to mask is located.
Column Family: Select the column where the data to be masked is located.
If you select a column, data in this column will be copied to the target database.
Column Information
The column information includes Column Name, Risk Level, Data Type, and Category.
- Click Next. The Set Masking Algorithm page is displayed.
Figure 10 Setting a masking algorithm for an HBase masking task
- Select the data columns you want to mask.
- Select a data masking algorithm. For details about data masking algorithms, see Configuring and Viewing Masking Rules.
- Click Next to switch to the Configure Data Masking Period page and configure the data masking period.
Select and set the execution period of a masking task.
- Manual: Manually enable a masking task and execute it based on masking rules.
- Hourly: Execute a data masking task every several hours.
Example: If the masking task needs to be executed every two hours, set this parameter to 02:00.
- Daily: Execute a data masking task at a specified time every day.
Example: If the masking task needs to be executed at 12:00 every day, set this parameter to 12:00:00.
- Weekly: Execute a data masking task at a specified time every week.
Example: If the masking task needs to be executed at 12:00 every Monday, set this parameter to 12:00:00 every Monday.
- Monthly: Execute a data masking task at a specified time on a specified day every month.
Example: If the masking task needs to be executed at 12:00 on the 12th day of each month, set this parameter to 12:00:00 12th day of every month.
If you want to execute a data masking task on the 31st day of each month, the system automatically executes the task on the last day of every month.
- Click Next. The Set Target Data page is displayed.
Figure 11 Setting target data for an HBase masking task
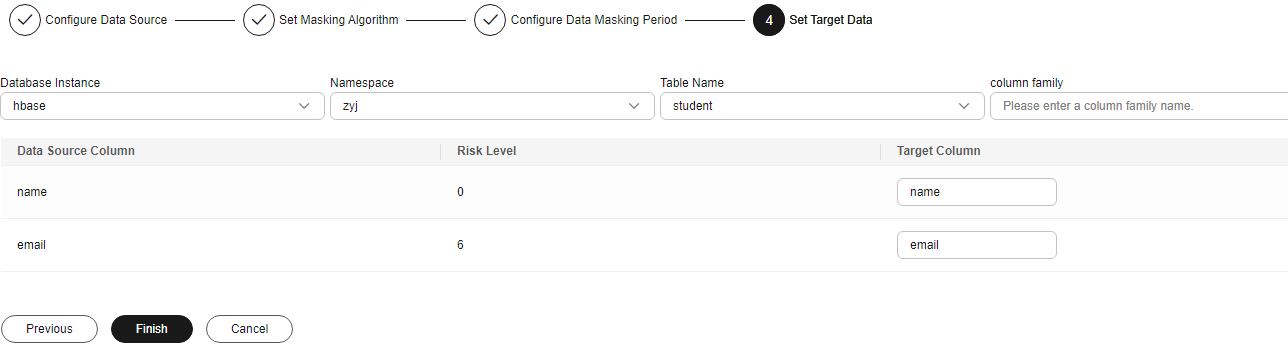
- Select the database instance, namespace, and data table name, and enter the column family.
If the entered column name already exists, the system updates the data in the column.
If the entered column name does not exist, the system automatically creates the column in the target data table.
Do not fill in an existing service data table. Otherwise, services may be affected.
- Set the column name of the target data type.
By default, the system generates a name that is the same as the name of the data source column. You can retain the default name or change it as required.
- Select the database instance, namespace, and data table name, and enter the column family.
- Click Finish.
- On the HBase page. In the Operation column of the target anonymization task, click Execute.
- The data masking task is executed as configured.
- Click
 in front of the target masking task and verify that Status of the masking task is Finished. Then, go to HBase and check the masking effect.
Creating and Running a DLI Masking Task
- Log in to the DSC console.
- Click
 in the upper left corner and select a region or project.
 - In the navigation pane, choose Data Asset Protection > Static Data Masking and click the DLI tab. The DLI masking page is displayed.
- Set Masking Sensitive DLI Data to
 to enable DLI masking.
 - Click Create Task. On the displayed Configure Data Source page, configure parameters according to Table 7.
Table 7 Parameter description Parameter
Description
Task Name
You can customize the name of a data masking task.
The task name must meet the following requirements:- Contain 1 to 255 characters.
- Consist of letters, digits, underscores (_), and hyphens (-).
Select Data Source
Select a data source. Only DLI is supported.
Data Source
(If no database instance is available, click Add Database to add a database. For details, see Adding and Authorizing Big Data Assets.)
Database Instance: Select the database instance where the data you want to mask is located.
Database Name: Enter the name of the database for masking.
Table Name: Enter the name of the table to be masked.
NOTE:Only assets with read and write permissions can use the masking function.
Select the columns to be masked. You can select multiple columns.
AK/SK
Enter an access key. For details, see Access Keys. You can obtain the AK from the access key list and SK from the downloaded CSV file.
Column Information
The column information includes Column Name, Risk Level, Data Type, and Category.
- Click Next. The Set Masking Algorithm page is displayed.
Figure 12 Setting a masking algorithm
- Select the data columns you want to mask.
- Select a data masking algorithm. For details about data masking algorithms, see Configuring and Viewing Masking Rules.
- Click Next to switch to the Configure Data Masking Period page and configure the data masking period.
Select and set the execution period of a masking task.
- Manual: Manually enable a masking task and execute it based on masking rules.
- Hourly: Execute a data masking task every several hours.
Example: If the masking task needs to be executed every two hours, set this parameter to 02:00.
- Daily: Execute a data masking task at a specified time every day.
Example: If the masking task needs to be executed at 12:00 every day, set this parameter to 12:00:00.
- Weekly: Execute a data masking task at a specified time every week.
Example: If the masking task needs to be executed at 12:00 every Monday, set this parameter to 12:00:00 every Monday.
- Monthly: Execute a data masking task at a specified time on a specified day every month.
Example: If the masking task needs to be executed at 12:00 on the 12th day of each month, set this parameter to 12:00:00 12th day of every month.
If you want to execute a data masking task on the 31st day of each month, the system automatically executes the task on the last day of every month.
- Click Next. The Set Target Data page is displayed.
Figure 13 Setting target data
- Select a database instance and database name, and enter the table name.
If the entered table name already exists, the system will update the data in the existing table.
If the table name is new, it will automatically create and name the table in the target database.
Do not fill in an existing service data table. Otherwise, services may be affected.
- Set the column name of the target data type.
By default, the system generates a name that is the same as the name of the data source column. You can retain the default name or change it as required.
- Select a database instance and database name, and enter the table name.
- Click Finish.
- On the DLI page. In the Operation column of the target anonymization task, click Execute.
- The data masking task is executed as configured.
- Click
 in front of the target masking task and verify that Status of the masking task is Finished. Then, go to DLI and check the masking effect.
Creating and Running an OBS Masking Task
- Log in to the DSC console.
- Click
 in the upper left corner and select a region or project.
 - In the navigation pane, choose Data Asset Protection > Static Data Masking and click the OBS tab. The OBS masking page is displayed.
- Set Mask Sensitive OBS Data to
 to enable OBS masking.
 - Click Create Task. On the displayed Configure Data Source page, configure parameters according to Table 8.
Table 8 Parameter description Parameter
Description
Task Name
You can customize the name of a data masking task.
The task name must meet the following requirements:- Contain 1 to 255 characters.
- Consist of letters, digits, underscores (_), and hyphens (-).
Select Data Source
Select a data source. Only OBS is supported.
Data Source
Bucket Name: Select an OBS bucket name from the drop-down list box.
OBS Storage Path: Select the path of the OBS bucket file from the drop-down list box.
File type: Text and Image are supported. For details about the constraints, see Table 1.
NOTE:Only assets with read and write permissions can use the masking function.
- Click Next. The Set Masking Algorithm page is displayed.
- Image type:
- Masking Algorithm: Mosaic and White block.
The masking effect is as follows:
Figure 14 Mosaic masking on faces Figure 15 White block masking on a license plate number
- Masking Algorithm: Mosaic and White block.
- Image type:
- Click Next. The Configure Data Masking Period page is displayed.
- Traverse Sub-directories: If you enable this option, the subdirectories in the source directory will be masked.
- Rename File: If you enable this option, the masked files will be renamed.
- File Prefix/File Suffix: The value can contain only letters, digits, underscores (_), and hyphens (-), and cannot exceed 16 characters.
- Example of renaming a file: The original file name is Test.txt, the prefix is DSC_, and the suffix is 1. The renamed file is DSC_Test1.txt.
- Click Next. The Set Target Data page is displayed.
Figure 16 Setting target data
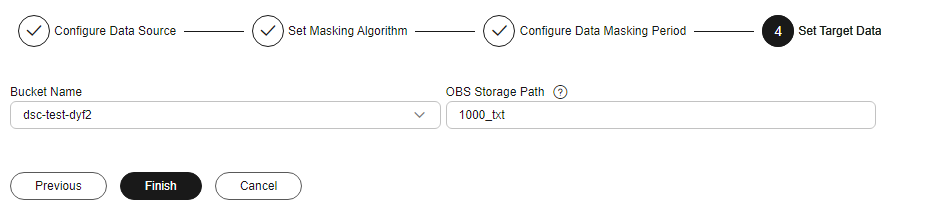
- Bucket Name: Select a bucket from the drop-down list for storing the masked file.
- OBS Storage Path: Click to select an OBS file path.
The path of the target OBS bucket cannot be the same as that of the source OBS bucket or the subdirectory of the source OBS bucket.
- Click Finish. The OBS masking task is created.
- Go to the OBS tab, locate the target masking task, click Enable/Disable to enable the task, and click Execute in the Operation column.
- After the task is executed, the system starts to perform masking based on the settings.
- Click
 in front of the target masking task and verify that Status of the masking task is Finished. Then, go to OBS and check the masking effect.
Related Operations
- Click
 next to the target masking task to view the running status of the masking task. The statuses are as follows:
- Queuing: The masking task is in the queue.
- Completed: The data masking task has been successfully executed.
- Running: The data masking task is being executed.
- Pending execution: The data masking task is not executed.
- Stopped: The data masking task has been manually stopped.
- Failed: The data masking task fails to be executed. Hover the cursor over
 to view the failure cause.
- Click in the Operation column of the target masking task to reconfigure the masking task information.
- Click in the Operation column of the target masking task to delete the task.
Feedback
Was this page helpful?
Provide feedbackThank you very much for your feedback. We will continue working to improve the documentation.See the reply and handling status in My Cloud VOC.
For any further questions, feel free to contact us through the chatbot.
Chatbot


