C# Demo Usage Guide
Overview
This topic uses C# as an example to describe how to connect a device to the platform over MQTTS or MQTT and how to use platform APIs to report properties and subscribe to a topic for receiving commands.

The code snippets in this document are only examples and are for trial use only. To put them into commercial use, obtain the IoT Device SDKs of the corresponding language for integration by referring to Obtaining Resources.
Prerequisites
- You have installed Microsoft Visual Studio. If not, follow the instructions provided in Install Microsoft Visual Studio.
- You have obtained the device access address from the IoTDA console. For details, see Platform Connection Information.
- You have created a product and a device on the IoTDA console. For details, see Create a Product, Registering an Individual Device, and Registering a Batch of Devices.
Preparations
- Go to the Microsoft website to download and install Microsoft Visual Studio of a desired version. (The following uses Windows 64-bit, Microsoft Visual Studio 2017, and .NET Framework 4.5.1 as examples.)
- After the download is complete, run the installation file and install Microsoft Visual Studio as prompted.
Importing Sample Code
- Download the sample code quickStart(C#).
- Run Microsoft Visual Studio 2017, click Open Project/Solution, and select the sample code downloaded.
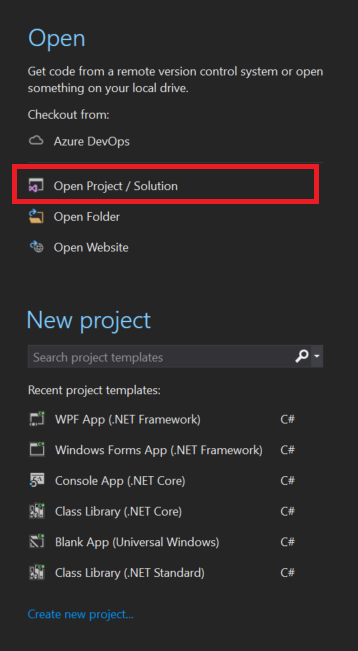
- Import the sample code.
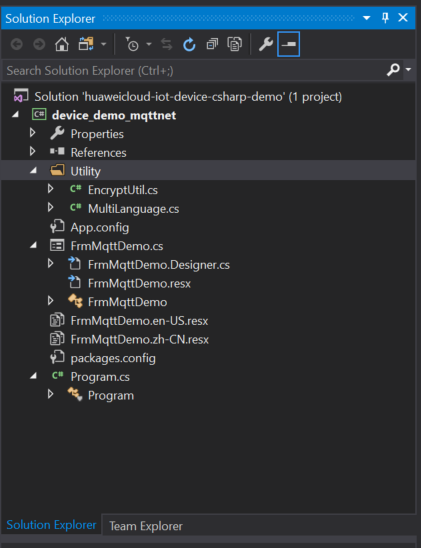
Description of the directories:
- App.config: configuration file containing the server address and device information
- C#: C# code of the project
EncryptUtil.cs: auxiliary class for device secret encryption
FrmMqttDemo.cs: window UI
Program.cs: entry for starting the demo
- dll: third-party libraries used in the project
MQTTnet v3.0.11 is a high-performance, open-source .NET library based on MQTT. It supports both MQTT servers and clients. The reference library files include MQTTnet.dll.
MQTTnet.Extensions.ManagedClient v3.0.11 is an extension library that uses MQTTnet to provide additional functions for the managed MQTT client.
- Set the project parameters in the demo.
- App.config: Set the server address, device ID, and device secret. When the demo is started, the information is automatically written to the demo main page.
<add key="serverUri" value="serveruri"/>
<add key="deviceId" value="deviceid"/>
<add key="deviceSecret" value="secret"/>
<add key="PortIsSsl" value="8883"/>
<add key="PortNotSsl" value="1883"/>
- App.config: Set the server address, device ID, and device secret. When the demo is started, the information is automatically written to the demo main page.
UI Display
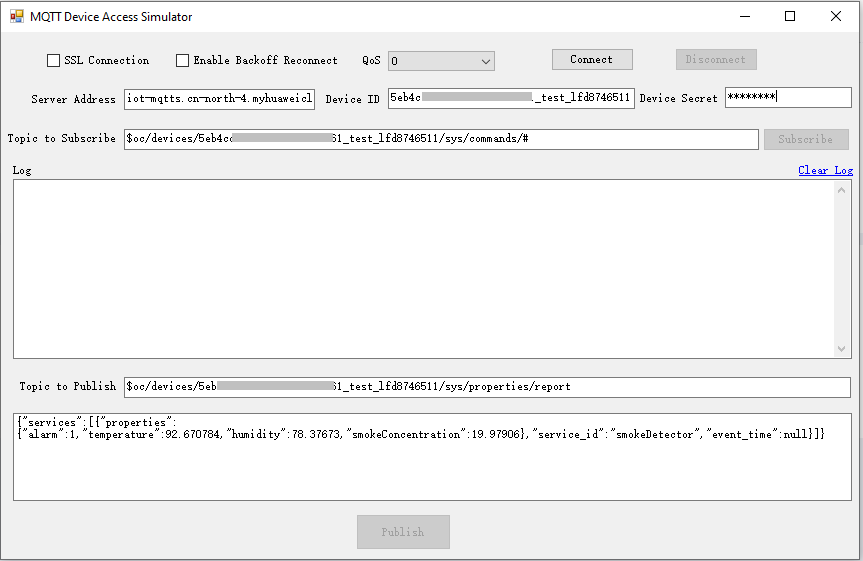
- The FrmMqttDemo class provides a UI. By default, the FrmMqttDemo class automatically obtains the server address, device ID, and device secret from the App.config file after startup. Set the parameters based on the actual device information.
- Server address: domain name. For details on how to obtain the domain name, see Platform Connection Information.
- Device ID and secret: obtained after the device is registered on the IoTDA console or the API Creating a Device is called.
- In the example, enter the server address. (The server address must match and be used together with the corresponding certificate file during SSL-encrypted access.)
<add key="serverUri" value="iot-mqtts.cn-north-4.myhuaweicloud.com"/>;
- Select SSL encryption or no encryption when establishing a connection on the device side and set the QoS mode to 0 or 1. Currently, QoS 2 is not supported. For details, see Constraints.
Establishing a Connection
To connect a device or gateway to the platform, upload the device information to bind the device or gateway to the platform.
- The FrmMqttDemo class provides methods for establishing MQTT or MQTTS connections. By default, MQTT uses port 1883, and MQTTS uses port 8883. (In the case of MQTTS connections, you must load the DigiCertGlobalRootCA.crt.pem certificate for verifying the platform identity. This certificate is used for login authentication when the device connects to the platform. You can download the certificate file from Obtaining Resources.) Call the ManagedMqttClientOptionsBuilder class to set the initial KeepAlivePeriod. The recommended heartbeat interval for MQTT connections is 120 seconds. For details, see Constraints.
 1
 2
 3
 4
 5
 6
 7
 8
 9
10
11
12
13
14
15
16
17
18
19
20
21
22
23
24
25
26
27
28
29
30
31
32
33
34
35
36
37
38
39
40
41
42
43
44
45
46
47
48
49
50
51
52
53
54
55
56
57
58
59
60
61
int portIsSsl = int.Parse(ConfigurationManager.AppSettings["PortIsSsl"]);
int portNotSsl = int.Parse(ConfigurationManager.AppSettings["PortNotSsl"]);

if (client == null)
{
	client = new MqttFactory().CreateManagedMqttClient();
}

string timestamp = DateTime.Now.ToString("yyyyMMddHH");
string clientID = txtDeviceId.Text + "_0_0_" + timestamp;

// Encrypt passwords using HMAC SHA256.
string secret = string.Empty;
if (!string.IsNullOrEmpty(txtDeviceSecret.Text))
{
	secret = EncryptUtil.HmacSHA256(txtDeviceSecret.Text, timestamp);
}

// Check whether the connection is secure.
if (!cbSSLConnect.Checked)
{
	options = new ManagedMqttClientOptionsBuilder()
	.WithAutoReconnectDelay(TimeSpan.FromSeconds(RECONNECT_TIME))
	.WithClientOptions(new MqttClientOptionsBuilder()
		.WithTcpServer(txtServerUri.Text, portNotSsl)
		.WithCommunicationTimeout(TimeSpan.FromSeconds(DEFAULT_CONNECT_TIMEOUT))
		.WithCredentials(txtDeviceId.Text, secret)
		.WithClientId(clientID)
		.WithKeepAlivePeriod(TimeSpan.FromSeconds(DEFAULT_KEEPLIVE))
		.WithCleanSession(false)
		.WithProtocolVersion(MqttProtocolVersion.V311)
		.Build())
	.Build();
}
else
{
	string caCertPath = Environment.CurrentDirectory + @"\certificate\rootcert.pem";
	X509Certificate2 crt = new X509Certificate2(caCertPath);

	options = new ManagedMqttClientOptionsBuilder()
	.WithAutoReconnectDelay(TimeSpan.FromSeconds(RECONNECT_TIME))
	.WithClientOptions(new MqttClientOptionsBuilder()
		.WithTcpServer(txtServerUri.Text, portIsSsl)
		.WithCommunicationTimeout(TimeSpan.FromSeconds(DEFAULT_CONNECT_TIMEOUT))
		.WithCredentials(txtDeviceId.Text, secret)
		.WithClientId(clientID)
		.WithKeepAlivePeriod(TimeSpan.FromSeconds(DEFAULT_KEEPLIVE))
		.WithCleanSession(false)
		.WithTls(new MqttClientOptionsBuilderTlsParameters()
		{
			AllowUntrustedCertificates = true,
			UseTls = true,
			Certificates = new List<X509Certificate> { crt },
			CertificateValidationHandler = delegate { return true; },
			IgnoreCertificateChainErrors = false,
			IgnoreCertificateRevocationErrors = false
		})
		.WithProtocolVersion(MqttProtocolVersion.V311)
		.Build())
	.Build();
}
- Call the StartAsync method in the FrmMqttDemo class to set up a connection. After the connection is set up, the OnMqttClientConnected is called to print connection success logs.
 1
 2
 3
 4
 5
 6
 7
 8
 9
10
11
12
13
14
15
16
17
18
19
20
21
Invoke((new Action(() =>
{
	ShowLogs($"{"try to connect to server " + txtServerUri.Text}{Environment.NewLine}");
})));

if (client.IsStarted)
{
	await client.StopAsync();
}

// Register an event.
client.ApplicationMessageProcessedHandler = new ApplicationMessageProcessedHandlerDelegate(new Action<ApplicationMessageProcessedEventArgs>(ApplicationMessageProcessedHandlerMethod)); // Called when a message is published.

client.ApplicationMessageReceivedHandler = new MqttApplicationMessageReceivedHandlerDelegate(new Action<MqttApplicationMessageReceivedEventArgs>(MqttApplicationMessageReceived)); // Called when a command is delivered.

client.ConnectedHandler = new MqttClientConnectedHandlerDelegate(new Action<MqttClientConnectedEventArgs>(OnMqttClientConnected)); // Called when a connection is set up.

client.DisconnectedHandler = new MqttClientDisconnectedHandlerDelegate(new Action<MqttClientDisconnectedEventArgs>(OnMqttClientDisconnected)); // Called when a connection is released.

// Connect to the platform.
await client.StartAsync(options);
If the connection fails, the OnMqttClientDisconnected function executes backoff reconnection. Sample code:
 1
 2
 3
 4
 5
 6
 7
 8
 9
10
11
12
13
14
15
16
17
18
19
20
21
22
23
24
25
26
27
28
29
30
31
32
33
34
35
36
37
38
39
40
41
42
43
44
45
46
47
48
private void OnMqttClientDisconnected(MqttClientDisconnectedEventArgs e)
{
	try {
		Invoke((new Action(() =>
		{
			ShowLogs("mqtt server is disconnected" + Environment.NewLine);

			txtSubTopic.Enabled = true;
			btnConnect.Enabled = true;
			btnDisconnect.Enabled = false;
			btnPublish.Enabled = false;
			btnSubscribe.Enabled = false;
		})));

		if (cbReconnect.Checked)
		{
			Invoke((new Action(() =>
			{
				ShowLogs("reconnect is starting" + Environment.NewLine);
			})));

			// Backoff reconnection
			int lowBound = (int)(defaultBackoff * 0.8);
			int highBound = (int)(defaultBackoff * 1.2);
			long randomBackOff = random.Next(highBound - lowBound);
			long backOffWithJitter = (int)(Math.Pow(2.0, retryTimes)) * (randomBackOff + lowBound);
			long waitTImeUtilNextRetry = (int)(minBackoff + backOffWithJitter) > maxBackoff ? maxBackoff : (minBackoff + backOffWithJitter);

			Invoke((new Action(() =>
			{
				ShowLogs("next retry time: " + waitTImeUtilNextRetry + Environment.NewLine);
			})));

			Thread.Sleep((int)waitTImeUtilNextRetry);

			retryTimes++;

			Task.Run(async () => { await ConnectMqttServerAsync(); });
		}
	}
	catch (Exception ex)
	{
		Invoke((new Action(() =>
		{
			ShowLogs("mqtt demo error: " + ex.Message + Environment.NewLine);
		})));
	}
}
Subscribing to a Topic
Only devices that subscribe to a specific topic can receive messages about the topic published by the broker. For details on the preset topics, see Topics.
The FrmMqttDemo class provides the method for delivering subscription commands to topics.
List<MqttTopicFilter> listTopic = new List<MqttTopicFilter>();

var topicFilterBulderPreTopic = new MqttTopicFilterBuilder().WithTopic(topic).Build();
listTopic.Add(topicFilterBulderPreTopic);

// Subscribe to a topic.
client.SubscribeAsync(listTopic.ToArray()).Wait();
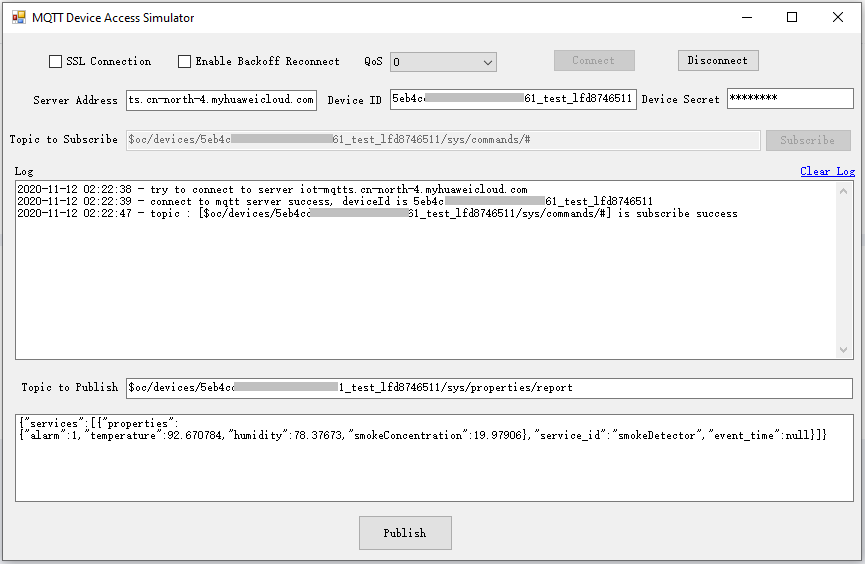
After the connection is established and a topic is subscribed, the following information is displayed in the log area on the home page of the demo:
Receiving a Command
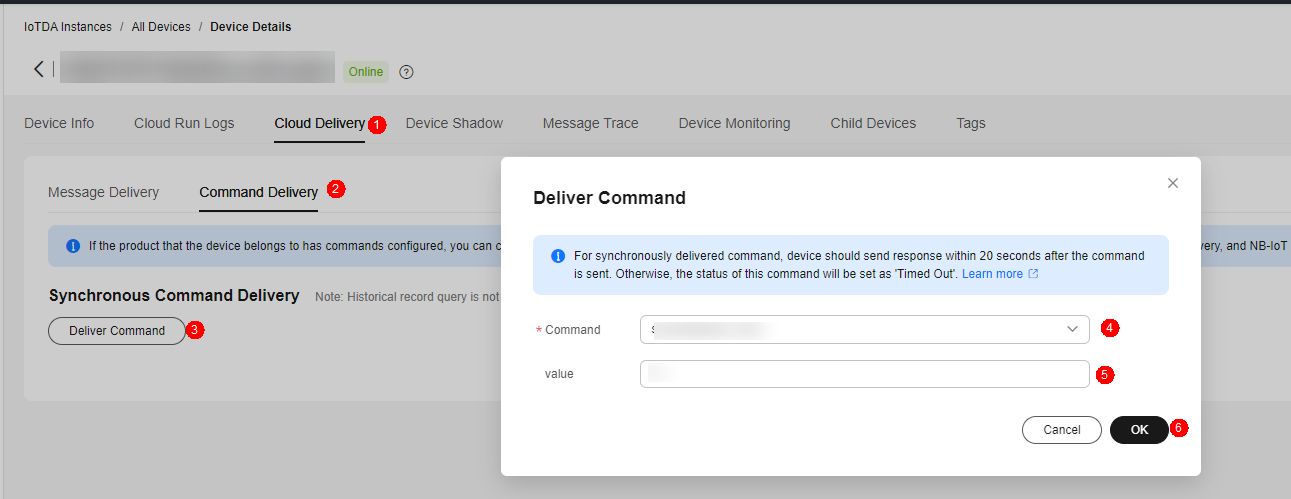
The FrmMqttDemo class provides the method for receiving commands delivered by the platform. After an MQTT connection is established and a topic is subscribed, you can deliver a command on the device details page of the IoTDA console or by using the demo on the application side. After the command is delivered, the MQTT callback receives the command delivered by the platform.
1 2 3 4 5 6 7 8 9 10 11 12 13 14 15 16 17 18 19 20 21 22 |
private void MqttApplicationMessageReceived(MqttApplicationMessageReceivedEventArgs e) { Invoke((new Action(() => { ShowLogs($"received message is {Encoding.UTF8.GetString(e.ApplicationMessage.Payload)}{Environment.NewLine}"); string msg = "{\"result_code\": 0,\"response_name\": \"COMMAND_RESPONSE\",\"paras\": {\"result\": \"success\"}}"; string topic = "$oc/devices/" + txtDeviceId.Text + "/sys/commands/response/request_id=" + e.ApplicationMessage.Topic.Split('=')[1]; ShowLogs($"{"response message msg = " + msg}{Environment.NewLine}"); var appMsg = new MqttApplicationMessage(); appMsg.Payload = Encoding.UTF8.GetBytes(msg); appMsg.Topic = topic; appMsg.QualityOfServiceLevel = int.Parse(cbOosSelect.SelectedValue.ToString()) == 0 ? MqttQualityOfServiceLevel.AtMostOnce : MqttQualityOfServiceLevel.AtLeastOnce; appMsg.Retain = false; // Return the upstream response. client.PublishAsync(appMsg).Wait(); }))); } |
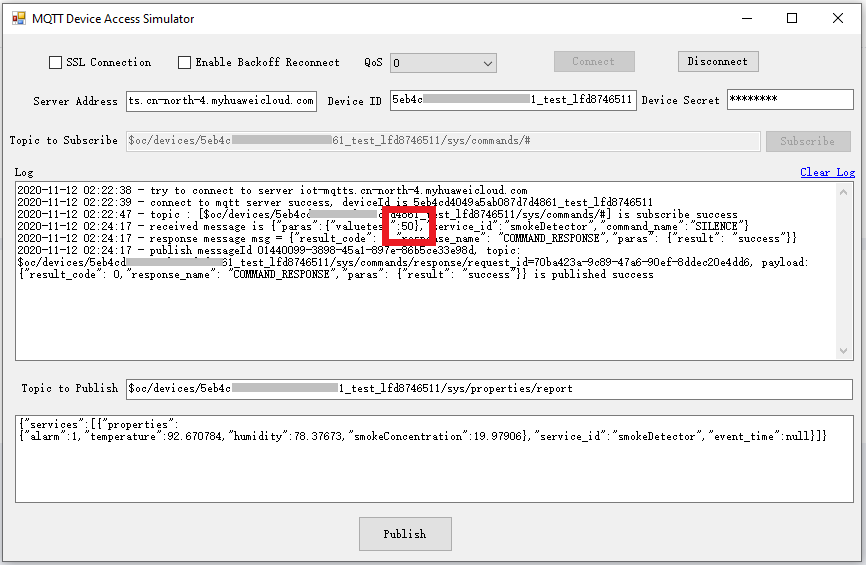
For example, deliver a command carrying the parameter name SmokeDetectorControl: SILENCE and parameter value 50.
After the command is delivered, the following information is displayed on the demo page:
Publishing a Topic
Publishing a topic means that a device proactively reports its properties or messages to the platform. For details, see the API Device Reporting Properties.
The FrmMqttDemo class implements the property reporting topic and property reporting.
1 2 3 4 5 6 7 8 |
var appMsg = new MqttApplicationMessage(); appMsg.Payload = Encoding.UTF8.GetBytes(inputString); appMsg.Topic = topic; appMsg.QualityOfServiceLevel = int.Parse(cbOosSelect.SelectedValue.ToString()) == 0 ? MqttQualityOfServiceLevel.AtMostOnce : MqttQualityOfServiceLevel.AtLeastOnce; appMsg.Retain = false; // Return the upstream response. client.PublishAsync(appMsg).Wait(); |
After a topic is published, the following information is displayed on the demo page:
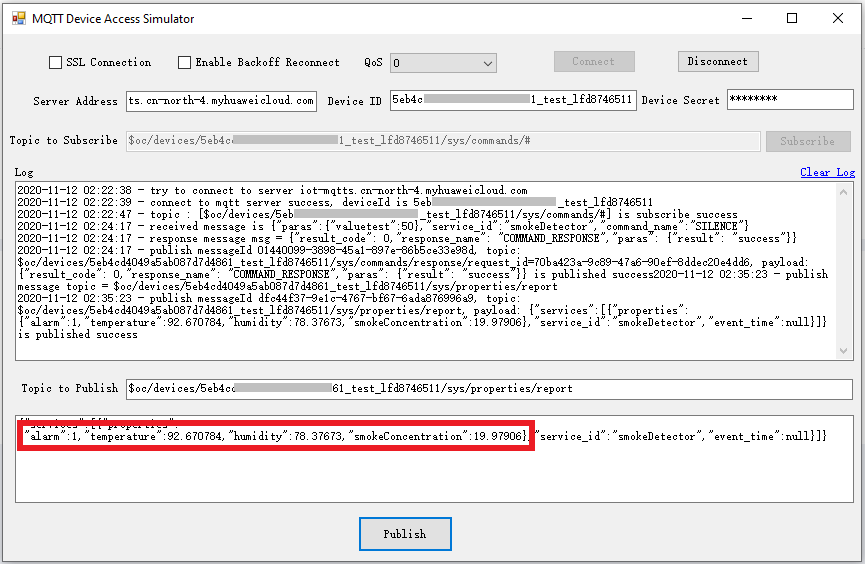
If the reporting is successful, the reported device properties are displayed on the device details page.
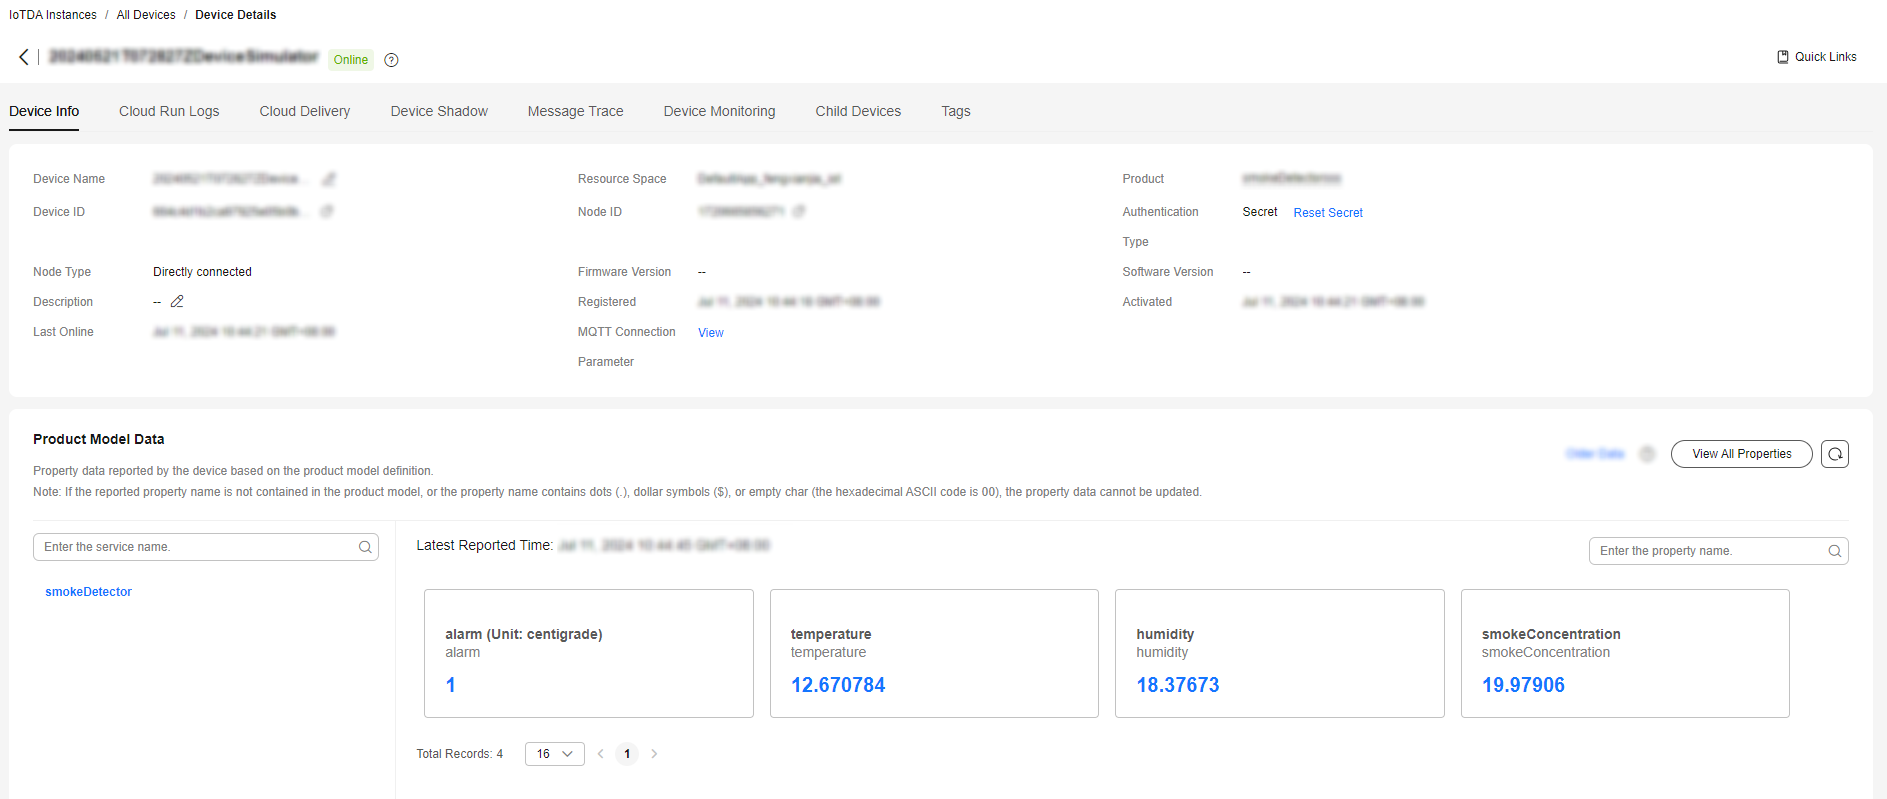

If the latest data is not displayed on the device details page, check whether the services and properties reported by the device are the same as those in the product model.
Feedback
Was this page helpful?
Provide feedbackThank you very much for your feedback. We will continue working to improve the documentation.See the reply and handling status in My Cloud VOC.
For any further questions, feel free to contact us through the chatbot.
Chatbot


