Configuring a Public Zone for an Email Domain
Scenarios
You can configure record sets for your email domain.
For example, if you want access to a mailbox from a web browser using mail.example.com or from an email client over SMTP, IMAP, or POP, add the following record sets:
- An MX record set to map domain name example.com to the email server address
- Four CNAME record sets for example.com so that end users can access the mailbox from a web browser or from an email client (such as Outlook or Foxmail) over SMTP, IMAP, or POP using mail.example.com.
- A TXT record set containing SPF information for example.com to prevent spam

You only need to obtain the domain name of the email server. You do not need the account and location of the email server.
Procedure
|
Step |
Description |
|---|---|
|
Before using Huawei Cloud DNS to resolve email domains, you need to sign up for a HUAWEI ID and enable Huawei Cloud services, set up email servers, register a domain name, and apply for an ICP license. |
|
|
Before configuring record sets for a domain name, add the domain name to the DNS console. |
|
|
Step 2: Ensure that Huawei Cloud DNS Server Addresses Are Used |
When configuring record sets for a domain name, use the DNS server addresses provided by Huawei Cloud. |
|
Add an MX record set to map domain name example.com to the email server address. |
|
|
Add four CNAME record sets for example.com so that end users can access the mailbox from a web browser or from an email client (such as Outlook or Foxmail) over SMTP, IMAP, or POP using mail.example.com. |
|
|
Add a TXT record set for the domain name to prevent spam. |
|
|
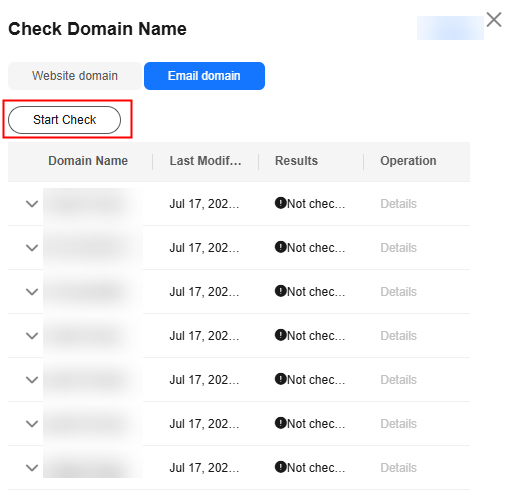
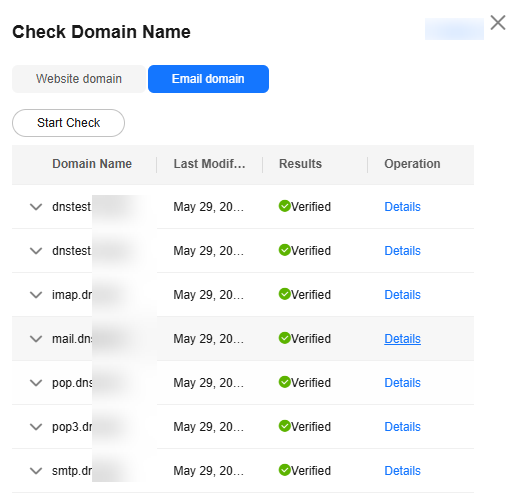
Verify that the record sets are active. |
Preparations
- Sign up for a HUAWEI ID.
For details, see Sign up for a HUAWEI ID and enable Huawei Cloud services.
- Ensure that you have deployed an email server, obtained its public IP address, and registered a domain name.
- Ensure that you have obtained the licenses of domain names and IP addresses of web servers in the Chinese mainland.
- If the server is deployed on Huawei Cloud, you need to apply for an ICP license from the ICP filing center of Huawei Cloud.
For details, see What Is an ICP Filing?
- If your email server is from another cloud provider, you have obtained the license from that cloud provider.
- If the server is deployed on Huawei Cloud, you need to apply for an ICP license from the ICP filing center of Huawei Cloud.
- Plan the data required for configuring the record sets based on Table 1.
Table 1 Email domain record sets Record Set Type
Name
Value
Description
MX
-
5 mx01.mailserver.com
10 mx02.mailserver.com
Email server address, which is obtained from the email service provider
TXT
-
"v=spf1 include:spf.mailserver.com -all"
SPF records used to prevent spam
CNAME
mail
mailserver.com
Use mail.example.com to log in to the mailbox.
CNAME
smtp
smtp.mailserver.com
Use smtp.example.com as the alias of smtp.mailserver.com.
CNAME
imap
imap.mailserver.com
Use imap.example.com as the alias of imap.mailserver.com.
CNAME
pop
pop.mailserver.com
Use pop.example.com as the alias of pop.mailserver.com.
Step 1: Create a Public Zone
-
- Go to the Public Zones page.
- In the upper right corner of the page, click Create Public Zone to host the domain name to the DNS service.

If "This public zone has been created by another account. You need to reclaim the public zone first." is displayed when you are creating a public zone, you can reclaim the public zone. For details, see Reclaiming a Public Zone.
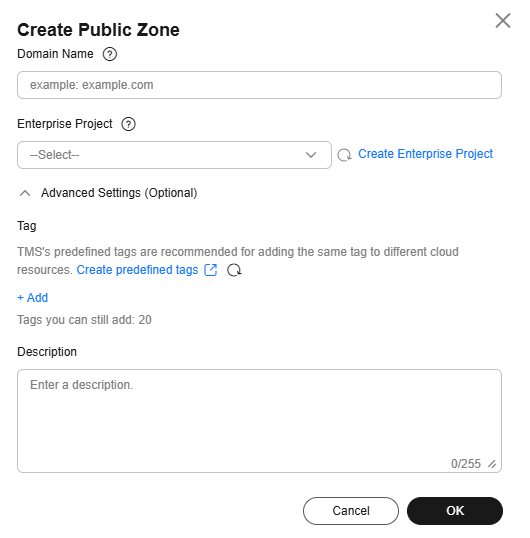
Table 2 Parameters for creating a public zone Parameter
Description
Example
Domain Name
Domain name purchased from a domain name registrar.
Subdomains can be added.
exampleowner.com
Enterprise Project
The enterprise project by which public zones are centrally managed. Select an existing enterprise project for the public zone.
This parameter is available and mandatory only when Account Type is set to Enterprise Account.
default
Tag
A tag that will be added to classify and identify the public zone.
example_key1
example_value1
Description
Supplementary information about the zone.
The description can contain a maximum of 255 characters.
This is a zone example.
Step 2: Ensure that Huawei Cloud DNS Server Addresses Are Used
In the public zone list, locate the public zone and view the DNS server addresses in the DNS Servers column.
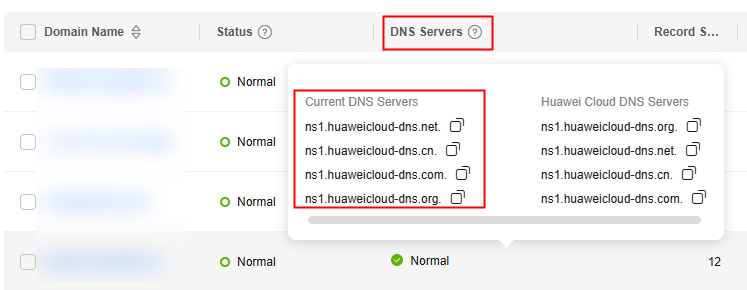
- If one or more Huawei Cloud DNS server addresses are used, go to Step 3 Add an MX Record Set.
- If the DNS server addresses are not the Huawei Cloud DNS server addresses, change the DNS server for the public zone by referring to Changing DNS Servers for a Public Domain Name.
After the DNS server addresses are changed, the changes are synchronized to the DNS Servers column in the public zone list.

Generally, the new DNS server addresses are quickly synchronized to the top-level domain servers and take effect. However, domain name registrars usually set the TTL value in the NS record set to 48 hours. In some regions, the local DNS server may cache the NS record of the domain name, and it may take a maximum of 48 hours for the DNS server address change to take effect.
Step 3 Add an MX Record Set
An MX record set specifies the email server address mapped to the domain name you have registered. The record set value is the email server domain name provided by the email service provider.
- On the Public Zones page, locate the public zone you created and click the domain name (example.com).
- In the upper right corner of the page, click Add Record Set.
- Configure the parameters as follows:
- Type: Select MX - Map domains to email servers.
- Name: Leave this parameter blank. This is a record set for the domain name, which is example.com.

The Name field cannot be set to an at sign (@). Just leave the field blank.
- Value: Set the record value to the email server address in the format of [Priority][Mail server address].
- priority: priority for an email server to receive emails. A smaller value indicates a higher priority.
- mail server host name: domain name provided by the email service provider
Example:
5 mx01.mailserver.com
10 mx01.mailserver.com
Retain the default settings for other parameters. For details, see Record Set Types and Configuration Rules.
- Click OK.
The added record set is in the Normal state.
Step 4: Add CNAME Record Sets
To allow access to mailbox from a web browser using mail.example.com or from an email client (such as Outlook or Foxmail) over SMTP, IMAP, and POP, you need to add CNAME record sets for example.com.

- The email service provider determines whether to allow end users to log in to the mailbox from a web browser.
- SMTP, IMAP, and POP are email transfer protocols and can be enabled or disabled in email server settings. Email transfer protocols supported by an email server are determined by its settings.
Add four CNAME record sets based on Table 1.
- On the Public Zones page, locate the public zone you created and click the domain name (example.com).
- In the upper right corner of the page, click Add Record Set.
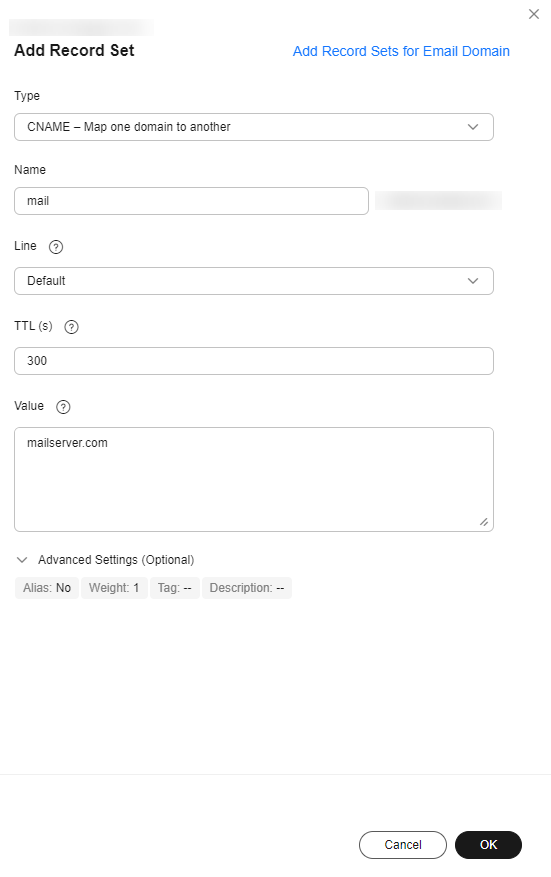
- Configure the parameters as follows:
- Type: Select CNAME - Map one domain to another.
- Name: Set the value to mail, which means that this is a record set for mail.example.com, a subdomain of the example.com domain name.
- Value: Enter mailserver.com.
Retain the default settings for other parameters. For details, see Record Set Types and Configuration Rules.
- Click OK.
The added record set is in the Normal state.
- Repeat 1 through 4 to add the other three record sets.
For details, see Table 1.
Step 5: Add a TXT Record Set
Add a TXT record set for the domain name to prevent spam.
SPF provides a mechanism to prevent spam. It allows you to list all IP addresses used by a domain name to send emails on the Internet in a TXT record set.
You can add a TXT record set in the SPF format to improve the credibility of the domain name and prevent spam.
- On the Public Zones page, locate the public zone you created and click the domain name (example.com).
- In the upper right corner of the page, click Add Record Set.
- Configure the parameters as follows:
- Type: Select TXT - Specify text records.
- Name: Leave this parameter blank. This is a record set for the domain name, which is example.com.

The Name field cannot be set to an at sign (@). Just leave the field blank.
- Value: Enter the value in SPF format, for example v=spf1 include:spf.mailserver.com -all.
In the example, spf1 is the SPT version. All emails sent with domain name example.com from IP addresses specified by spf.mailserver.com will not be considered as spam.
Retain the default settings for other parameters. For details, see Record Set Types and Configuration Rules.
- Click OK.
The added record set is in the Normal state.
- On your local host, click the search icon and enter cmd to open the CLI.
- Run the command to check whether the record sets are taking effect.
- Verify the configured MX record set which specifies the email server address.
- Verify the configured CNAME record set: nslookup -qt=cname Domain name
Example: nslookup -qt=cname example.com
- Verify the configured TXT record set: nslookup -qt=txt Domain name
Example: nslookup -qt=txt example.com
Feedback
Was this page helpful?
Provide feedbackThank you very much for your feedback. We will continue working to improve the documentation.See the reply and handling status in My Cloud VOC.
For any further questions, feel free to contact us through the chatbot.
Chatbot

