Calling Third-Party APIs with Custom Connectors
Scenario
You can use Huawei Cloud Astro Zero custom connectors, flows, or events to quickly connect to external service APIs. For example, you can connect to an existing RESTful service, obtain and process data through the RESTful service, and use the data in Huawei Cloud Astro Zero.
|
Parameter |
Value |
|---|---|
|
Path |
https://example.com/path/to/data?key=value |
|
Method |
POST |
|
Request header |
X-Header |
|
Request body type |
application/json |
|
Request body parameter |
{
"request": "value"
} |
|
Response body type |
application/json |
|
Response body parameter |
{
"response": "value"
} |
Procedure
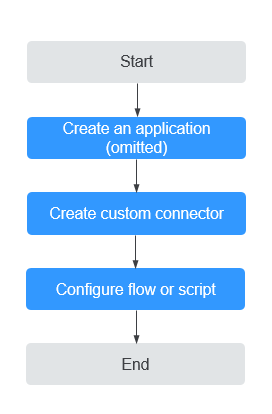
Figure 1 shows the process of using a custom connector to call third-party APIs.
Step 1: Creating a Custom Connector
- Log in to the application designer by referring to Logging In to the Application Designer.
- In the navigation pane, choose Integrations.
- Click Connector Instance under Connector.
- In the Type area, select Custom Connector.
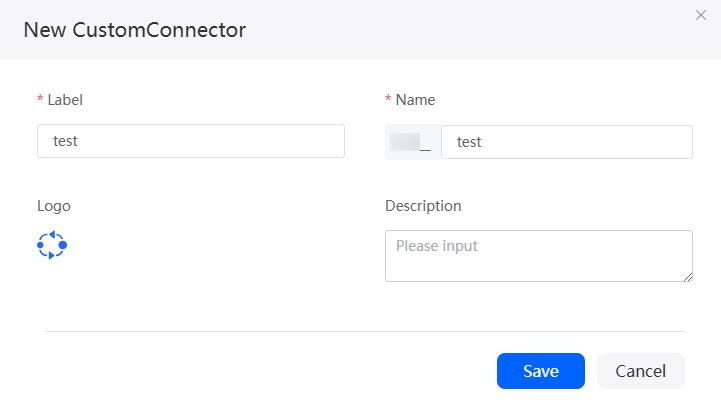
- Click +, configure the connector information, and click Save.
Figure 2 Creating a custom connector
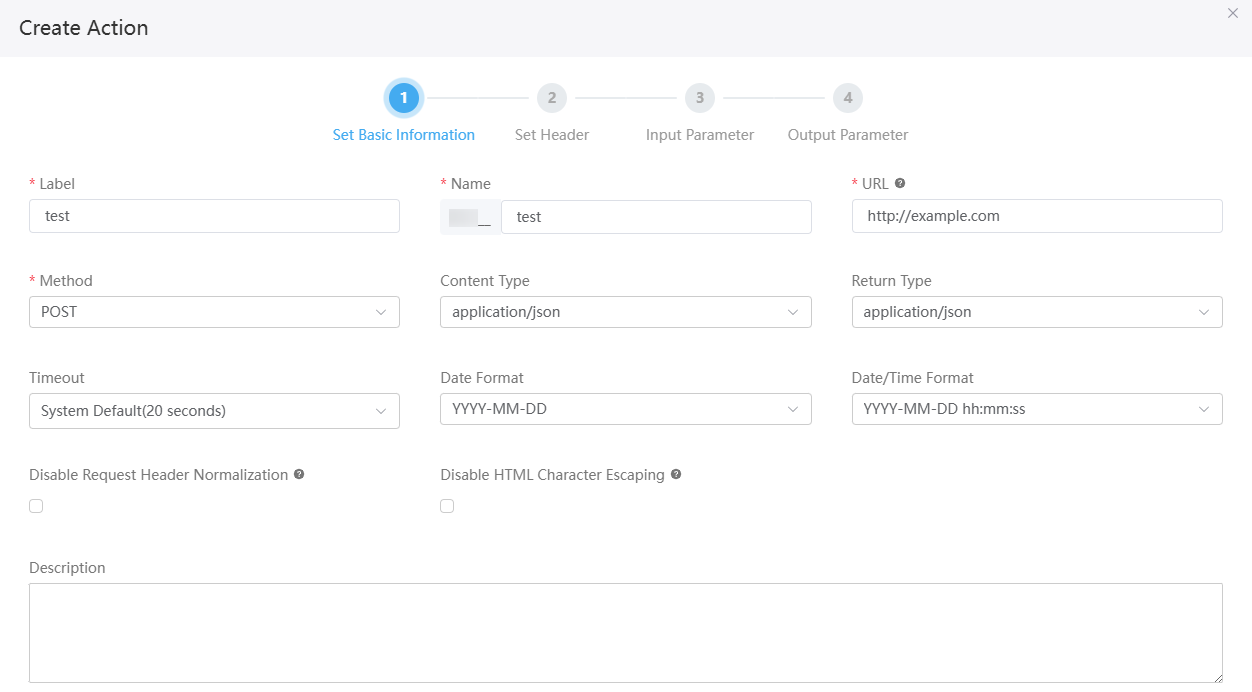
- On the Action tab page, create a custom connector action, set basic information about the action, and click Next.
Figure 3 Setting basic information
- Click Next to configure the header input parameter.
If this API does not have header input parameters, click
 to delete the first row. If there are multiple message header input parameters, click
  to copy them.Figure 4 Header input parameter configuration page
Table 4 Parameters on the header input parameter configuration page Parameter
Description
Label
Label of a message header input parameter, which is displayed on the page.
Name
Unique name of a header input parameter.
Data Type
Data type of a header input parameter. The options are as follows:- Number
- String
- Boolean
- Sensitive Text
Default Value
Default value of the header input parameter. You can customize the value only after selecting Default.
Description
Enter the description of the input parameter.
Default
Indicates whether the input parameter of the header has a default value. If this parameter is selected, you can customize the value in Default Value. If Data Type is set to Sensitive Text, the default value cannot be set.
Required
Indicates whether the input parameter of the header is mandatory.
Operation
Click
 or
or  to copy or delete the header input parameter.
 - Click Next to configure the input parameter.
This step configures the request path or content corresponding to the message body. Placement determines whether the parameter is a path parameter or a message body parameter.
In this example, set the URL query parameter to key and the request body parameter to request. For details about the parameters, see Table 5.
Figure 5 Page for configuring the input parameter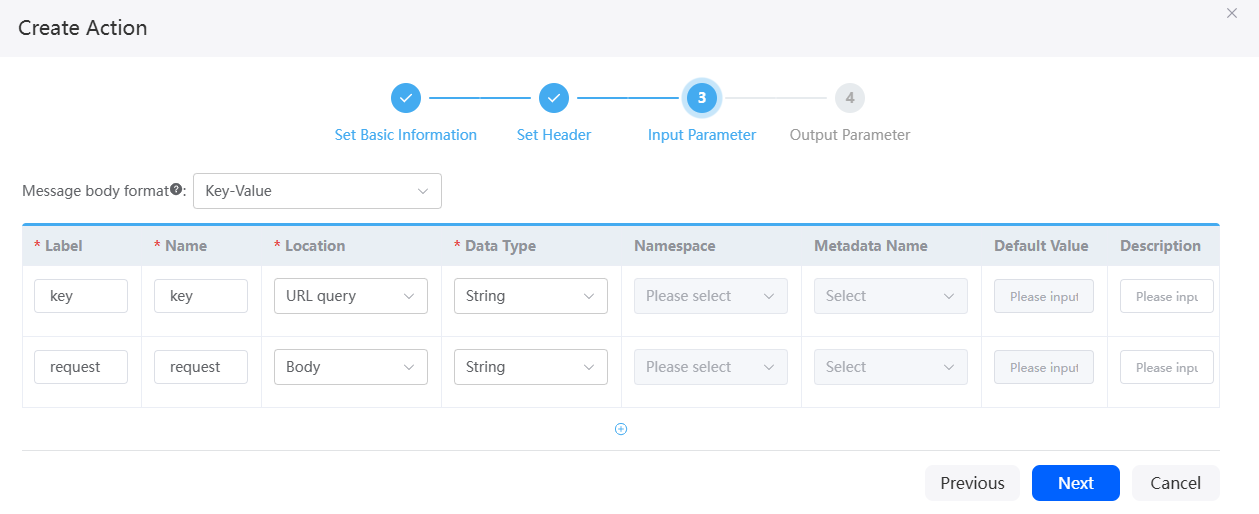
Table 5 Input parameter description Parameter
Description
Label
Label of an input parameter, which is displayed on the page.
Name
Name of an input parameter, which uniquely identifies the input parameter in the system.
Placement
Position of the input parameter. The options are as follows:
- Body
- URL Query
- URL Path
Data Type
Data type of the input parameter. The options are as follows:- Date: accurate to days.
- Date Time: accurate to seconds.
- Number: The value is a number.
- String
- Boolean: Only two values are allowed, for example, true and false.
- External Struct
- Map
- Object: Object identifier type.
- Sensitive Text: Such as name or mobile number.
Namespace
If DataType is set to External Struct, you need to set the namespace to which the input parameter belongs.
Metadata Name
When the data type is set to object, you need to select the metadata name, that is, the custom object created in the application.
Default Value
Sets the default value of an input parameter.
Description
Enter the description of the input parameter.
Value: 1–255 characters.
Default
Indicates whether an input parameter has a default value. If this parameter is selected, you can customize the value in Default Value. If DataType is set to Sensitive Text, the default value cannot be set.
Required
Indicates whether an input parameter is mandatory.
Collection
Whether the input parameter is set to the array type.
Operation
Click
 or
or  to copy or delete the input parameter.
 - Configure output parameters and click Save.
Output parameter, which depends on the value of Placement, may come from the response header or request header. In this example, the response body contains a response parameter.
Figure 6 Page for configuring output parameters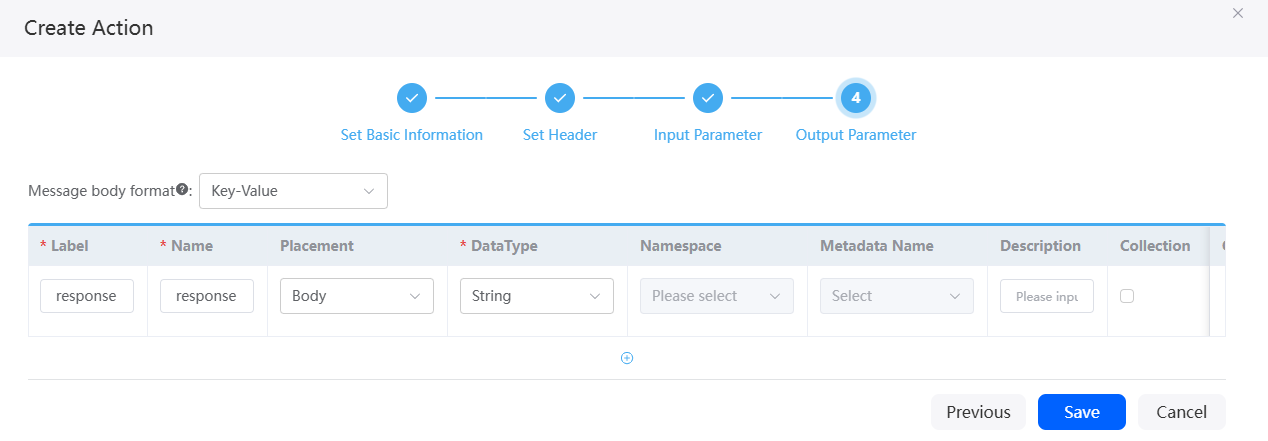
Table 6 Parameters for configuring output parameters Parameter
Description
Label
Label of an output parameter, which is displayed on the page.
Name
Name of an output parameter, which uniquely identifies the output parameter in the system.
Placement
Position of the output parameter. The options are as follows:
- Header
- Body
Data Type
Data type of the output parameter. The options are as follows:- Date: The value is accurate to day.
- Date/Time: time type, accurate to second.
- Number: The value is a number.
- Character string: The value is a character string.
- Boolean: The value is true or false.
- Global structure
- Key-value pair (Map): Map collection type.
- Object: Object identifier type.
Namespace
If the data type is set to global structure, you need to set the namespace to which the parameter belongs.
Metadata Name
When the data type is set to object, you need to select the metadata name, that is, the custom object created in the application.
Description
Description of the parameter.
Collection
Whether the input parameter is set to the array type.
Operation
Click
 or
or  to copy or delete the parameter.
 - On the Action tab page, click
 in the row where the action is located to enable the action.
Step 2: Configuring Connector Authentication Information
Before calling a custom connector in flows or events, you need to configure authentication information.
- Go to the custom connector page by referring to Step 1: Creating a Custom Connector.
- On the Authentication Information tab page, click New.
- Set authentication information and click Save.
Huawei Cloud Astro Zero provides various authentication types for you to select. Configure authentication information based on your service requirements.Figure 7 Adding authentication information - basic information
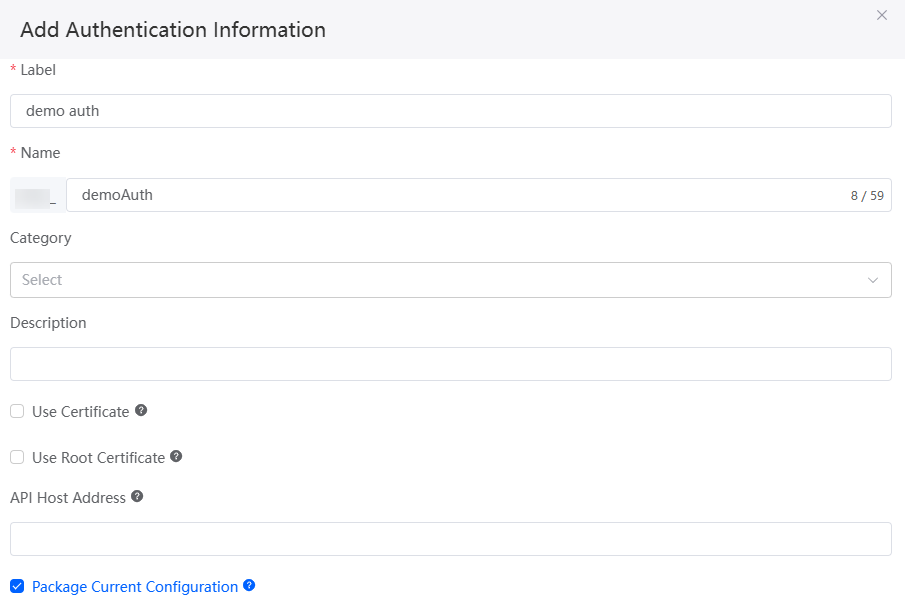
Table 7 Parameters for adding authentication information Parameter
Description
Label
Authentication label, which is displayed on the page.
Value: 1–64 characters.
Name
Authentication name, which uniquely identifies the authentication in the system. The naming requirements are as follows:
- The value cannot exceed 64 characters, including the prefix namespace.
To prevent duplicate data names among different tenants, each tenant must define a unique namespace when first creating an application. A tenant can create only one namespace. After being created, the namespace cannot be modified.
- Start with a letter and can contain only letters, digits, and underscores (_). Do not end with an underscore (_).
Category
Category to which the authentication belongs.
Description
Enter the authentication description as required.
Value: 1–255 characters.
Use Certificate
Whether the client certificate is required on the server and whether bidirectional authentication is required. If this parameter is selected, you need to configure the Type, Certificate, and Key.
This parameter is selected by default.
Type
This parameter is displayed only when Use Certificate is selected.
Type of the certificate. The value can be CRT or P12.
Certificate
This parameter is displayed only when Use Certificate is selected.
Upload the CRT or P12 certificate from the local PC.
Key
This parameter is displayed only when Use Certificate is selected.
Enter the access key of the uploaded certificate.
Use Root Certificate
Whether the server certificate is required on the client and whether bidirectional authentication is required.
If this parameter is selected, you need to enable root certificate verification and upload the root certificate in advance. For details, see Enabling Root Certificate Authentication for Server Identity Verification. After the upload, select the corresponding certificate from the Root Certificate drop-down list.
API Host Address
After this parameter is configured, only RESTful operation requests whose request URL starts with the specified address will be allowed. This prevents leakage of sensitive information. Each time the address is changed, the authentication information needs to be reconfigured.
Package Current Configuration
If this parameter is selected, the connector will be packed together with applications. For example, if an application package is released to the runtime environment, the current configuration is synchronized to the runtime environment by default. This parameter is selected by default. You are advised not to select this option in information-sensitive scenarios.
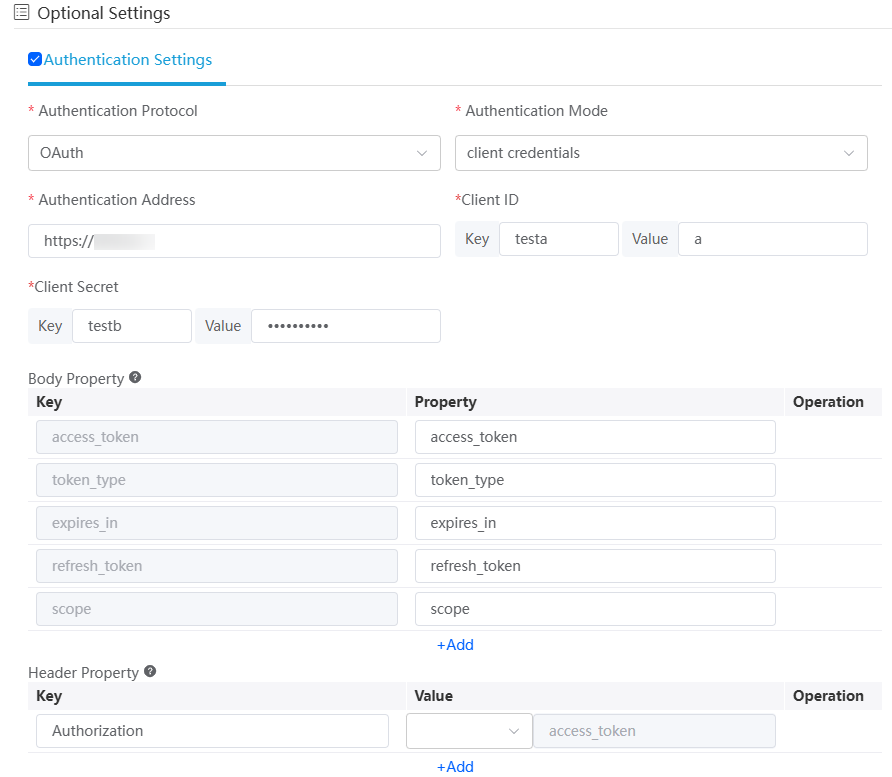
Authentication Setting
- Auth Protocol: Authentication protocol. The options are OAuth, Simple headers, and JWT.
- Auth Mode: Set it to client credentials. Only client credentials of OAuth 2.0 are supported.
- Auth Address: Address for a third-party system to obtain the token through the OAuth 2.0 protocol. An example address to obtain a token is https://{host}:{port}/baas/auth/v1.0/oauth2/token.
- Client ID: Client ID in the OAuth 2.0 protocol. If the REST service is provided by Huawei Cloud Astro Zero, obtain the client ID by referring to Access Authentication with Client Credentials.
- Client Secret: Client secret in the OAuth 2.0 protocol. If the REST service is provided by Huawei Cloud Astro Zero, obtain the client secret by referring to Access Authentication with Client Credentials.
Body Property
Mapping rules for message fields returned from authentication APIs.
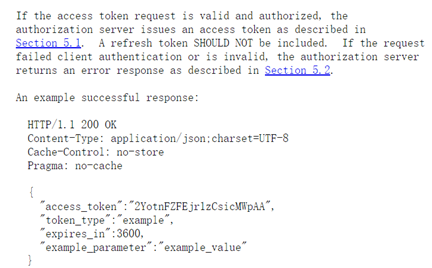
Figure 9 describes the response body based on the OAuth2 standard protocol. The key returned by some third-party APIs may not be the standard key. For example, some third-party APIs will return accessToken instead of access_token used in Astro Zero. Therefore, you need to configure the mapping between the keys.
The message body property configured in Figure 8 is accessToken returned by a third-party system. Huawei Cloud Astro Zero uses the access_token key value to store the message body property. The final storage result is as follows:
{
"access_token": ${accessToken}
}
Header Property
Mapping rules for message headers in requests to service APIs.
According to OAuth 2.0, the token is put in the request header: Authorization: Bearer ${access_token}.
However, some APIs do not comply with this rule. For example, for an API used to access the platform, the token is put in the request header Access-Token and does not need the prefix Bearer.
The message header property configured in Figure 8 indicates that you need to obtain the value of access_token from the message body and put the value in the request header Access-Token.
- The value cannot exceed 64 characters, including the prefix namespace.
Step 3: Calling a Custom Connector Using a Flow
Create a flow. Then, call the created custom connector using the flow, and use the data processed by the RESTful service in Huawei Cloud Astro Zero.
- Log in to the application designer by referring to Logging In to the Application Designer.
- In the navigation pane, choose Logic.
- Click
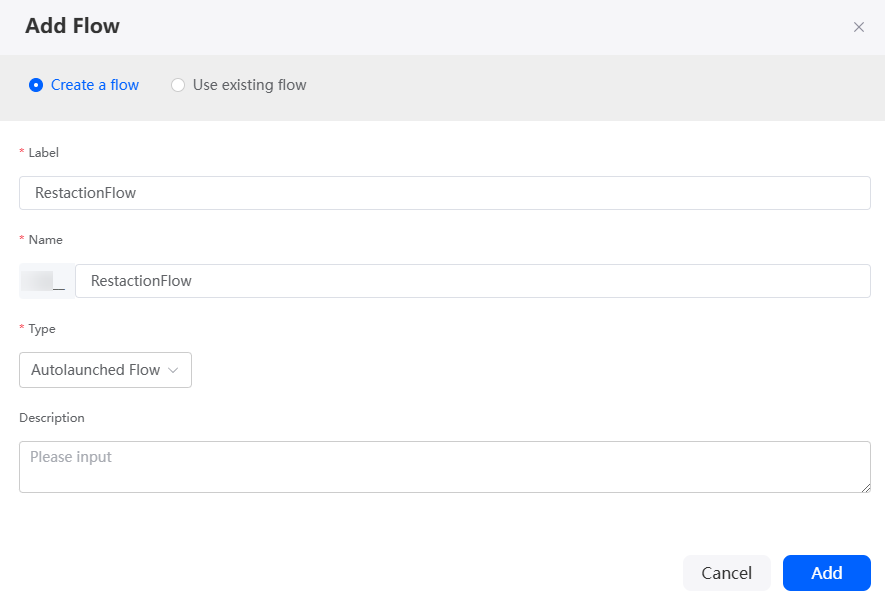
 next to Flow. On the displayed dialog box, specify the flow label and name and click Add.
Figure 10 Adding a flow
- In the navigation pane of the flow designer page, choose Connector > Custom > Service name, and drag the RESTful service icon created in Step 1: Creating a Custom Connector to the canvas.
Ensure that authentication information (such as Step 2: Configuring Connector Authentication Information) has been added to the custom connector. Otherwise, the custom connector cannot be dragged.
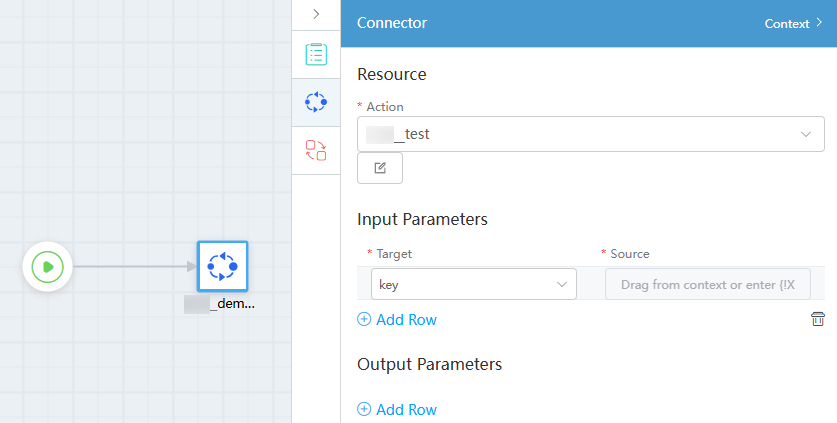
- Configure the action to be called.
Figure 11 Configuring the action to be called
- Click
 in the upper part of the flow designer page to save the flow.
 - Click
 to activate the flow.
If the RESTful service fails to be called, click Tracer on the toolbar to view run logs. For example, the most common gateway is unreachable.
Figure 12 Gateway unreachable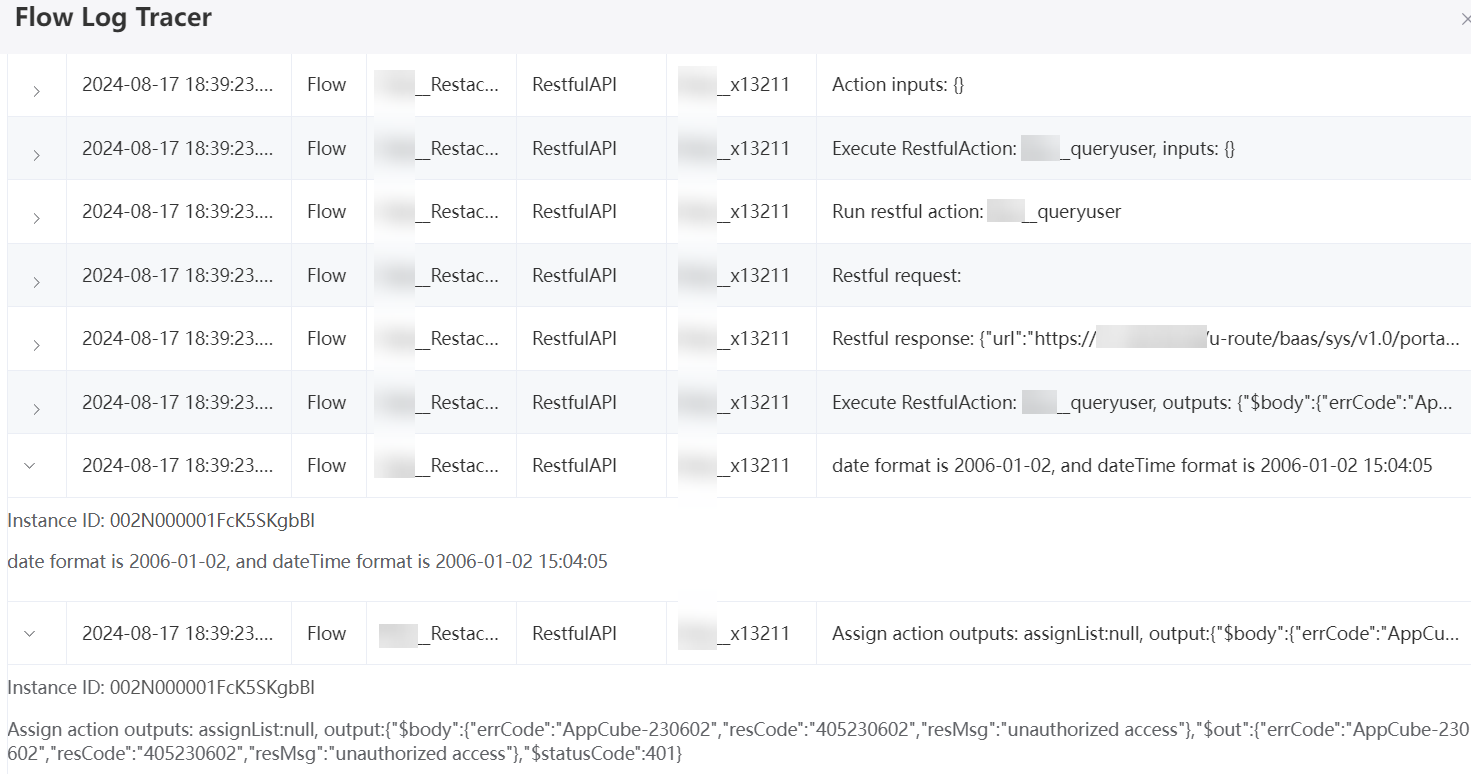
After the flow is debugged successfully, you can apply the flow to your service logic.
Related Documents
You can use a custom connector to integrate a third-party database into Huawei Cloud Astro Zero. For details, see Connecting to Third-Party Databases with a Connector.
Feedback
Was this page helpful?
Provide feedbackThank you very much for your feedback. We will continue working to improve the documentation.See the reply and handling status in My Cloud VOC.
For any further questions, feel free to contact us through the chatbot.
Chatbot

