Secret Authentication
Overview
MQTT(S) secret authentication requires a device to have its ID and secret for access authentication. For devices connected through MQTTS, a CA certificate must be preconfigured on the devices.
Process

- An application calls the API for registering a device. Alternatively, a user uses the IoTDA console to register a device.

During registration, use the MAC address, serial number, or IMEI of the device as the node ID.
- The device needs to integrate the preset CA certificate (only for the authentication process of MQTTS access).
- During login, the device sends a connection request carrying the device ID and secret.
- If the authentication is successful, the platform returns a success message, and the device is connected to the platform.
Procedure
This section uses MQTT.fx to describe how to activate a device registered on the IoT platform.
- Download MQTT.fx (64-bit OS) or MQTT.fx (32-bit OS) and install it.
- Go to the device details page, click MQTT Connection Parameters, and check the device connection information (ClientId, Username, and Password).
Figure 2 Device - Connection parameters
 Alternatively, access the parameter generation tool and enter the device ID (device_id) and secret (secret) generated after registration to generate the parameters (ClientId, Username, and Password) required for device connection authentication.
Table 1 Parameters Parameter
Mandatory
Type
Description
ClientId
Yes
String
Definition
The value of this parameter consists of a device ID, device type, password signature type, and timestamp. They are separated by underscores (_).
- Device ID: A device ID uniquely identifies a device and is generated when the device is registered with IoTDA. The value usually consists of a device's product ID and node ID which are separated by an underscore (_).
- Device type: The value is fixed at 0, indicating a device ID.
- Password signature type: The length is 1 byte, and the value can be 0 or 1.
- 0: The timestamp is not verified using the HMAC-SHA256 algorithm.
- 1: The timestamp is verified using the HMAC-SHA256 algorithm.
- Timestamp: The UTC time when the device was connected to IoTDA. The format is YYYYMMDDHH. For example, if the UTC time is 2018/7/24 17:56:20, the timestamp is 2018072417.
Range
Up to 256 characters.
UserName
Yes
String
Definition
The value is the device ID (device_id).
Range
Up to 256 characters.
Password
Yes
String
Definition
With the timestamp (in YYYYMMDDHH format) as the key, use the HMAC-SHA256 algorithm to encrypt the device secret returned by IoTDA upon successful device registration. The result is the password. Password = hmacsha256 ("secret", "timestamp")
Set this parameter only if the device authentication type is SECRET. Not required for X.509 certificate authentication (CERTIFICATES).
HMACSHA256 is an HMAC algorithm that uses SHA-256 to generate a hash value. The generated hash value is represented by a 64-character hexadecimal string. For example, if the device secret is 12345678 and the timestamp is 2025041401, the result is c75150e6cb841417396819e4d2ee4358a416344a03a083e3a8567074ddec820a.
Range
Up to 256 characters.
Each device performs authentication using the MQTT CONNECT message, which must contain all information of the client ID. After receiving a CONNECT message, the platform checks the authentication type and password digest algorithm of the device.
The generated client ID is in the format Device ID_0_0_Timestamp. By default, the timestamp is not verified.
- If the timestamp needs to be verified, the platform checks whether the message timestamp is consistent with the platform time and then checks whether the password is correct.
- If the timestamp does not need to be verified, the timestamp must also be contained in the CONNECT message, but the platform does not check whether the time is correct. In this case, only the password is checked.
If the authentication fails, the platform returns an error message and automatically disconnects the MQTT connections.
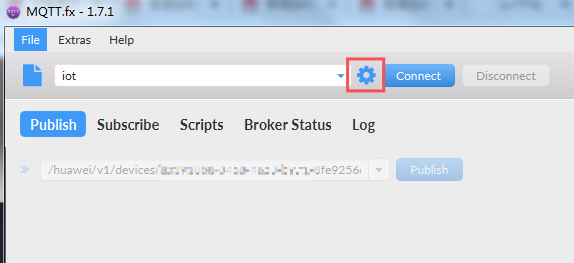
- Open MQTT.fx and click the setting icon.
Figure 3 MQTT.fx - Setting

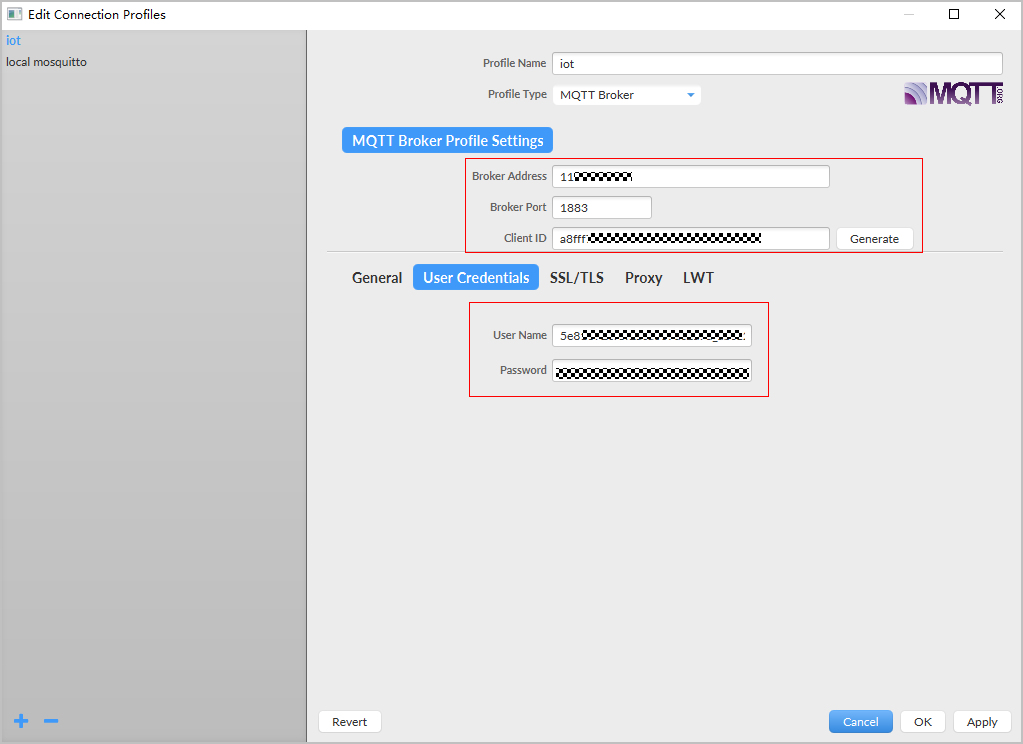
- Configure authentication parameters and click Apply.
Figure 4 Connection configuration

Parameter
Description
Broker Address
Enter the device access address (domain name) obtained from the IoTDA console. For devices that cannot be connected to the platform using a domain name, run the ping Domain name command in the CLI to obtain the IP address. The IP address is variable and needs to be set using a configuration item.
Broker Port
For MQTT non-encrypted protocols, the port number is 1883, which is the default value. For MQTTS encrypted protocols, change the port number to 8883 and obtain the certificate for verifying the IoT platform identity. For details, see Using MQTT.fx to Simulate Communication Between the Smart Street Light and the Platform.
Client ID
Enter the device client ID obtained in 2.
User Name
Enter the device ID obtained in 2.
Password
Enter the encrypted device secret obtained in 2.
- Click Connect. If the device authentication is successful, the device is displayed online on the platform.
Figure 5 Device online status

Best Practices
Developing an MQTT-based Simulated Smart Street Light Online
Feedback
Was this page helpful?
Provide feedbackThank you very much for your feedback. We will continue working to improve the documentation.See the reply and handling status in My Cloud VOC.
For any further questions, feel free to contact us through the chatbot.
Chatbot


