Configuring a Public Zone for a Website Domain
Scenarios
After you register a domain name and set up a website, you can configure record sets to point the domain name to the IP address of the web server where the website is deployed so that visitors can use the domain name to access your website over the Internet.
Suppose you have already built a website on a web server with an IPv4 EIP bound. To allow end users to access your website using your domain name example.com and a subdomain www.example.com, do as follows:
- Add an A record set that maps domain name (example.com) to the EIP.
- Add an A record set that maps subdomain (www.example.com) to the EIP.

Configuring record sets for a website domain is irrelevant to the registrar of the domain name, and the account and location of the web server. You only need to obtain the domain name and the EIP of the web server.
Procedure
|
Step |
Description |
|---|---|
|
Before using Huawei Cloud DNS to resolve website domains, you need to sign up for a HUAWEI ID and enable Huawei Cloud services, set up website servers, register a domain name, and apply for an ICP license. |
|
|
Before configuring record sets for a domain name, add the domain name to the DNS console. |
|
|
Step 2: Ensure that Huawei Cloud DNS Server Addresses Are Used |
When configuring record sets for a domain name, use the DNS server addresses provided by Huawei Cloud. |
|
Add an A record set for the domain name so that the website can be accessed through the domain name. |
|
|
Add an A record set for a subdomain so that the website can be accessed through this subdomain. |
|
|
Verify that the record sets are active. |
Preparations
- Sign up for a HUAWEI ID.
For details, see Sign up for a HUAWEI ID and enable Huawei Cloud services.
Step 1: Create a Public Zone
-
- Go to the Public Zones page.
- In the upper right corner of the page, click Create Public Zone to host the domain name to the DNS service.

If "This public zone has been created by another account. You need to reclaim the public zone first." is displayed when you are creating a public zone, you can reclaim the public zone. For details, see Reclaiming a Public Zone.
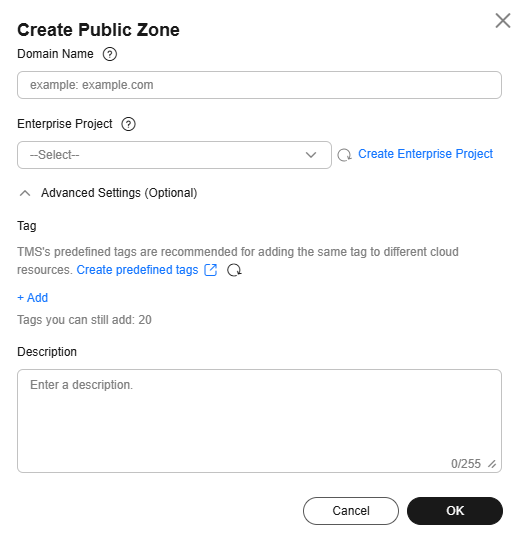
Table 1 Parameters for creating a public zone Parameter
Description
Example
Domain Name
Domain name purchased from a domain name registrar.
Subdomains can be added.
example.com
Enterprise Project
The enterprise project by which public zones are centrally managed. Select an existing enterprise project for the public zone.
This parameter is available and mandatory only when Account Type is set to Enterprise Account.
default
Tag
A tag that will be added to classify and identify the public zone.
example_key1
example_value1
Description
Supplementary information about the zone.
The description can contain a maximum of 255 characters.
This is a zone example.
Step 2: Ensure that Huawei Cloud DNS Server Addresses Are Used
In the public zone list, locate the public zone and view the DNS server addresses in the DNS Servers column.
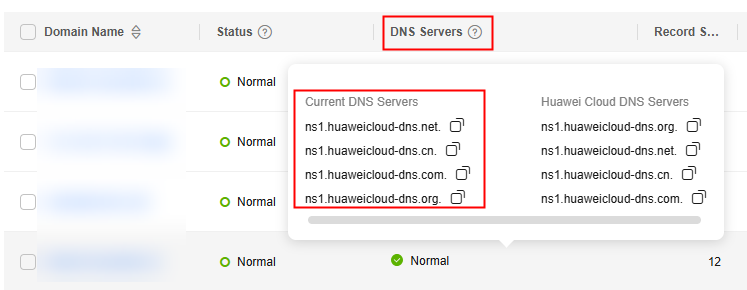
- If one or more Huawei Cloud DNS server addresses are used, go to Step 3: Add an A Record Set for the Domain Name.
- If the DNS server addresses are not the Huawei Cloud DNS server addresses, Changing DNS Servers for a Public Domain Name.
After the DNS server addresses are changed, the changes are synchronized to the DNS Servers column in the public zone list.

Generally, the new DNS server addresses are quickly synchronized to the top-level domain servers and take effect. However, domain name registrars usually set the TTL value in the NS record set to 48 hours. In some regions, the local DNS server may cache the NS record of the domain name, and it may take a maximum of 48 hours for the DNS server address change to take effect.
Step 3: Add an A Record Set for the Domain Name
To access a website using the domain name example.com, add an A record set for the domain name example.com to map the domain name to the IPv4 public IP address of the website server.
- On the Public Zones page, locate the public zone you created and click the domain name (example.com).
- In the upper right corner of the page, click Add Record Set.
- Configure the parameters as follows:
- Type: Retain the default setting A – Map domains to IPv4 addresses.
- Name: Leave this parameter blank. This is a record set for the domain name, which is example.com.
- Value: Enter the EIP of your web server.
Retain the default settings for other parameters. For details, see Record Set Types and Configuration Rules.
Figure 1 Adding an A record set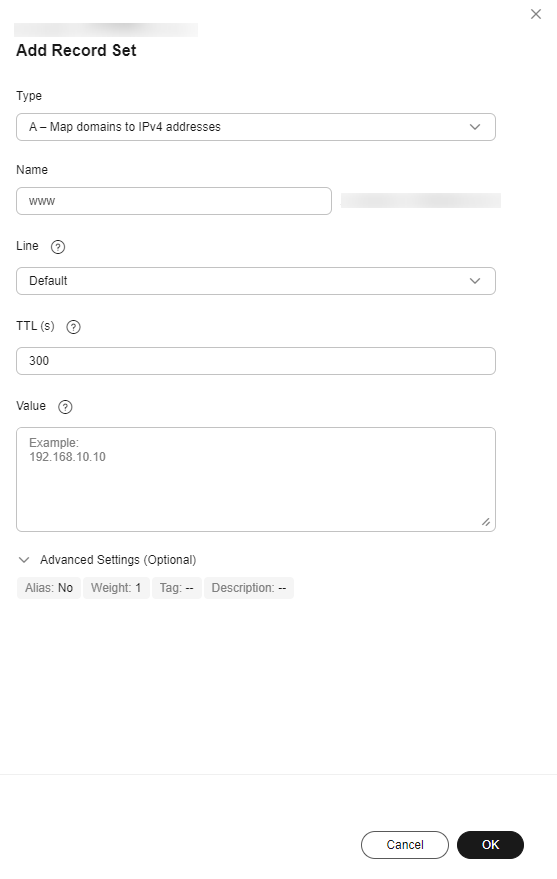
- Click OK.
The added record set is in the Normal state.
Step 4: Add an A Record Set for a Subdomain
A subdomain is essentially an extension of the primary domain name, created by adding a prefix (one or more parts) before the primary domain name. You can use subdomains to categorize and separate different types of services on your website. Website administrators can map primary and subdomains to the same content or use redirects to avoid duplicate content issues. Some websites use subdomains with the "www." prefix, while others do not. However, both belong to the same registered domain name.
In this section, www.example.com is a subdomain name of example.com. To access the website through www.example.com, you need to add an A record set for it.
- On the Public Zones page, locate the public zone you created and click the domain name (example.com).
- In the upper right corner of the page, click Add Record Set.
- Configure the parameters as follows:
- Type: Retain the default setting A – Map domains to IPv4 addresses.
- Name: Set it to www, which means that this is a record set for the www.example.com subdomain.
- Value: Enter the EIP of your web server.
Retain the default settings for other parameters. For details, see Record Set Types and Configuration Rules.
Figure 2 Adding an A record set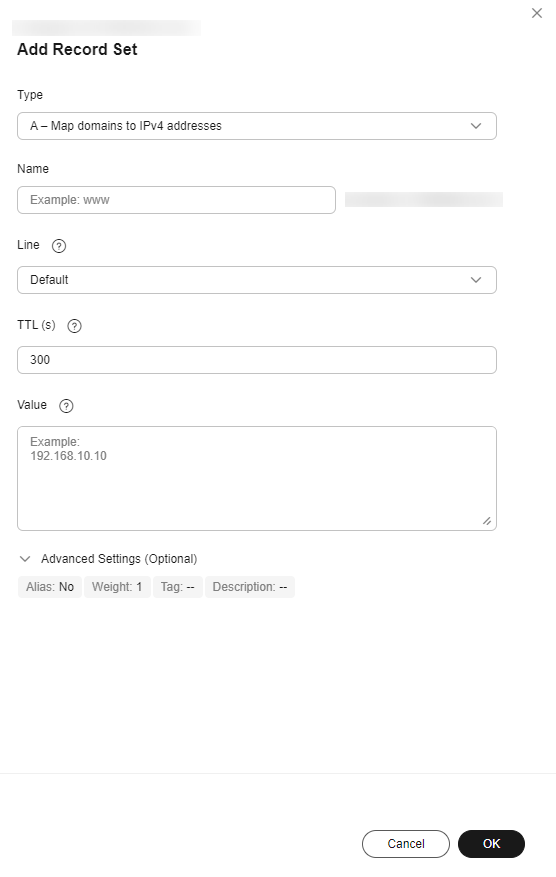
- Click OK.
The added record set is in the Normal state.
- On your local host, click the search icon and enter cmd to open the CLI.
- Run the nslookup -qt=a Domain name command to check whether the record set takes effect.
Example: nslookup -qt=a example.com
If the displayed IP address is the same as that configured in the record set, the record set taken effect.
Feedback
Was this page helpful?
Provide feedbackThank you very much for your feedback. We will continue working to improve the documentation.See the reply and handling status in My Cloud VOC.
For any further questions, feel free to contact us through the chatbot.
Chatbot


