

Creating a Disk Backup
Scenarios
This section describes how to quickly purchase a disk backup vault and perform backups.
If the disk to be backed up is encrypted, the backups will also be encrypted. The encryption attribute of backups cannot be changed.
You are not advised to back up a disk using both cloud disk backup and cloud server backup.
Procedure
| Step | Description |
|---|---|
| Sign up for Huawei Cloud. | |
| Purchase a disk backup vault to store disk backups. | |
| Associate your disks with the vault to back up and replicate data. | |
| Create a disk backup to protect data. |
Making Preparations
- Sign up for a Huawei Cloud account.
- To sign up for a Huawei Cloud account, see Signing Up for a Huawei Cloud Account.
Purchasing a Disk Backup Vault
Before backing up data, you need to purchase a disk backup vault.
- Go to the Buy Disk Backup Vault page.
- Set mandatory parameters for the disk backup vault based on the parameter description table. Retain default values for the parameters that are not included in this table.
Configure Basic Settings, Protection Type, Resources to Back Up, and Backup Capacity.
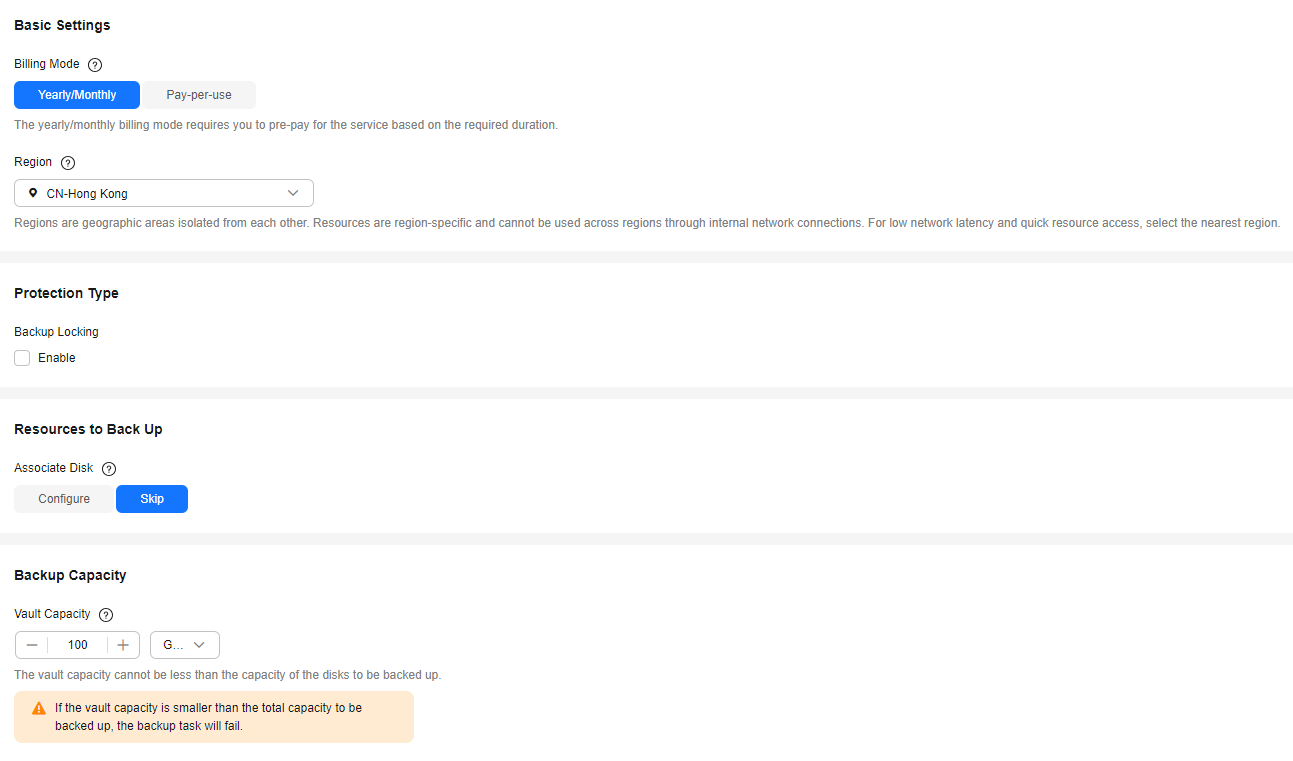
Parameter
Example Value
Description
Billing Mode
Pay-per-use
- Yearly/Monthly is a prepaid billing mode. You are billed based on the subscription duration you specify. This mode is ideal when the resource use duration is predictable. A longer subscription often means a lower cost.
- Pay-per-use is a postpaid billing mode. You are billed based on your resource usage and you can add or delete resources anytime. Fees are deducted from your account balance.
Region
CN-Hong Kong
Resources in different regions cannot communicate with each other over an intranet. Select the region closest to you to enjoy low latency.
Resources to Back Up
Skip
- Configure: Select the disks to be associated with the vault.
- Skip: If no disk is available, you can purchase the vault first and associate disks with the vault later.
Vault Capacity
100 GB
Specify the vault capacity. The capacity ranges from 10 GB to 10,485,760 GB.
This capacity indicates the total size of the disks that you want to associate with this vault. Properly plan the vault capacity, which must be at least as large as the disks you want to back up.
You can expand the vault capacity if it becomes insufficient.
Auto Capacity Expansion
Skip
- If you select Configure, the vault capacity will be automatically expanded to 1.25 times the original capacity when the capacity is about to be used up.
- If you select Skip, the vault capacity will not be expanded automatically. If the vault capacity is about to be used up, you can manually expand it. For details, see Expanding Vault Capacity.
Configure Backup Policy, Enterprise Project and Advanced Settings.

Parameter
Example Value
Description
Auto Backup
Skip
- Configure: A backup policy can be applied to this vault. Resources associated with this vault will be automatically backed up based on the policy. You can select an existing backup policy or create a new one.
- Skip: Resources associated with this vault will not be automatically backed up until you apply a backup policy to the vault. If you need to automatically back up data periodically, you can create a policy and apply it to the vault. For details, see Policy Management.
Automatic Association
Skip
- If you select Configure, in the next backup period, CBR will automatically scan for all unprotected servers, associate them with the vault, and then perform backups.
- Skip: Resources associated with this vault will not be automatically backed up until you apply a backup policy to the vault. If you need to automatically back up data periodically, you can create a policy and apply it to the vault. For details, see Policy Management.
Enterprise Project
default
Add the vault to an existing enterprise project.
This parameter is displayed only for enterprise users who have enabled enterprise project management.
NOTE:If an IAM user has been assigned the CBR FullAccess policy but cannot view or select enterprise projects when creating a vault, the administrator must grant the CBR FullAccess policy for the enterprise project to the user group in the IAM console.
Vault Name
vault-6fa8
Specify a name for the vault.
The name can contain 1 to 64 characters. Only letters, digits, dots, underscores (_), and hyphens (-) are allowed. You can also use the default name vault_xxxx.
- Click Next.
- Click Submit. Confirm the order details and complete the payment.
- Go back to the Cloud Disk Backups page. You can view the created vault in the vault list. The vault is in the Available state.
Associating Disks with the Vault
If you have associated disks when purchasing a vault, skip this step.
Prerequisites
Ensure that the selected disks have not been associated with any vault and are in the Available or In-use state.
Procedure
- On the Cloud Disk Backups page, locate the target vault and click Associate Disk in the Operation column.
- In the disk list, select the disks you want to associate with the vault. After disks are selected, they are added to the list of selected disks.

- Click OK. Then on the Associated Disks tab, you can view the disks that have been associated with the vault.
For details about automatic association, see Associating Resources with a Vault.
Creating a Disk Backup
The backup service experiences peak usage from 22:00 to 08:00, during which delays may occur. To ensure optimal performance, it is recommended that you evaluate your service types and stagger backups across discrete time periods.
Prerequisites
A disk can be backed up only when its status is Available or In-use. If you have performed operations such as expanding, attaching, detaching, or deleting a disk, refresh the page first to ensure that the operation is complete. Then determine whether to back up the disk.
Procedure
- On the Cloud Disk Backups page, click the Vaults tab and find the vault with which the disk is associated.
- Click Perform Backup in the Operation column. In the disk list, select the disk you want to back up. After a disk is selected, it is added to the list of selected disks.


CBR will identify whether the selected disk is encrypted. If it is encrypted, the backups will be automatically encrypted.
- Set Name and Description for the backup.
Parameter
Example Value
Description
Name
manualbk_d819
Name of the backup you are creating.
The name can contain 1 to 64 characters. Only letters, digits, underscores (_), and hyphens (-) are allowed.
NOTE:You can also use the default name manualbk_xxxx.
If multiple servers are to be backed up, CBR automatically adds suffixes to their backup names, for example, backup-0001 and backup-0002.
Description
-
Description of the backup.
It cannot exceed 255 characters.
- Choose whether to enable full backup. If full backup is enabled, CBR performs a full backup on every associated disk. A full backup requires a larger capacity than an incremental backup.

By default, the first backup is a full backup, and subsequent backups are incremental ones.
To ensure data security, CBR performs a full backup after every 365 incremental backups when you manually run a backup.
For details, see What Are Full Backup and Incremental Backup?
- Click OK. CBR automatically creates a backup for the disk.
On the Backups tab, if the status of the backup is Available, the backup task is successful.
If you delete data from the disk during the backup, the deleted data may not be backed up. To ensure data integrity, complete the backup first, perform your data operations, and then run the backup again.
Related Information
- After the backup is complete, you can use the backup to restore disk data. For details, see Restoring Data Using a Cloud Disk Backup.
- You can use a disk backup to create a disk that contains the same data as the backup. For details, see Creating a Disk from a Cloud Disk Backup.
What is your overall rating for this page?
Thank you very much for your feedback. We will continue working to improve the documentation.See the reply and handling status in My Cloud VOC.
For any further questions, feel free to contact us through the chatbot.
Chatbot


