
Creating a Custom Object
Scenario
The platform supports custom objects and creates standard fields for them. You can modify standard fields or create custom fields. A field describes the properties of an object.
Figure 1 shows the process of creating a custom object.

(Optional) Creating a Folder for Storing Objects
By default, objects are stored in the root folder. Before creating an object, you can create a folder for storing the object. You can drag the object to a specified folder.
- Log in to the application designer by referring to Logging In to the Application Designer.
- In the navigation pane, choose Data.
- Click
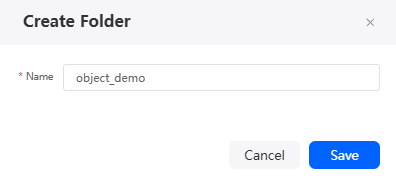
 next to Object to add a folder for the object.
 - Enter a name and click the save button. The name must not exceed 60 characters.Figure 2 Entering a folder name
Creating a Custom Object
- Move the cursor to the folder created in (Optional) Creating a Folder for Storing Objects and click
 . The page for creating an object is displayed.
 You can also click
 next to Object to go to the page for creating an object.
- Set basic object information and click the confirm button. Figure 3 Setting basic object information

Table 1 Parameters for creating an object Parameter
Description
Object Name
Name of the new object, which is displayed on the page and can be modified after being created.
Value: 1–80 characters.
Unique ID
Unique ID of the new object, which cannot be modified after being created. The naming requirements are as follows:
- The value cannot exceed 63 characters, including the prefix namespace and suffix __CST.
To prevent duplicate data names among different tenants, each tenant must define a unique namespace when first creating an application. A tenant can create only one namespace. After being created, the namespace cannot be modified.
- Start with a letter and can contain only letters, digits, and underscores (_). It cannot end with an underscore (_).
- The value cannot exceed 63 characters, including the prefix namespace and suffix __CST.
Adding a Field to an Object
After an object is created, you can add, edit, and delete fields for the object. You can also add fields to an object in batches by referring to Adding Object Fields in Batches.
- In the navigation pane, choose Data.
- Move the cursor to
 of the target object, and choose Detail to access the object designer.
 - Click
 in the object. You can also click
 to add a field for the object, as shown in Figure 4.
 - On the object details page, click Add. The Add Field page is displayed.
- Set basic information about the field and click the confirm button. Figure 5 Adding a field

Table 2 Parameters for adding a field Parameter
Description
Display Name
Enter a field name, which is displayed on the page and can be modified after being created.
Value: 1–63 characters.
Unique ID
Unique ID of the field in the system, which cannot be modified after being created. The naming requirements are as follows:
- The value cannot exceed 63 characters, including the prefix namespace and suffix __CST.
To prevent duplicate data names among different tenants, each tenant must define a unique namespace when first creating an application. A tenant can create only one namespace. After being created, the namespace cannot be modified.
- Start with a letter and can contain only letters, digits, and underscores (_). Do not end with an underscore (_).
Field Type
Click
 . On the displayed page, select a type.
- Text: You can enter a maximum of 255 characters, including any combination of letters and digits.
- Encrypted Text: You can enter a maximum of 111 characters and store them in encrypted format, including any combination of letters and digits.
- Text Area: You can enter up to 1,048,576 characters in multiple lines.
- Number: You can enter any digit. Leading zeros are removed.
- Percentage: You can enter a percentage number, for example, 10, and the percent sign is automatically added to the number.
- Phone: You can enter any phone number, which is automatically displayed in the phone number format.
- Currency: You can enter amounts in other currencies, which will automatically be converted to the correct format. This function is useful when exporting data to Excel or other spreadsheets.
- Date: You can enter a date or select a date from the calendar that is displayed.
- Date/Time: You can enter a date and time or select a date from the calendar that is displayed. When you click a date in the calendar that is displayed, the date and current time are shown in this field.
- Email: You can enter an email address. The system validates the email address format. If this field is specified for a contact or a potential customer, you can select an address when you send an email. Custom addresses cannot be used for batch emails. Emails are displayed in plaintext.
- Checkbox: You can select a true (checked) or false (unchecked) value.
- Picklist: You can select a value from a defined list.
- Picklist (Multi-Select): You can select multiple values from a defined list.
- URL: You can enter any valid URL. When you click this field, you will visit the URL in a separate browser window.
- Lookup Relationship: You can create a relationship that associates this object to another object.
- Auto Number: The system generates serial numbers in the format that you define. The sequence number increases by one for each newly added record.
- Formula: The system generates a read-only field in the formula expression that you define. If the source field used in any expression is changed, the value of this field will be updated.
- Master-Detail Relationship: You can create a type of primary/secondary relationship between one object and another. Ownership of detailed records is determined by the master record. When you delete the master record, all detailed records will be deleted.
- Multiple Language: You can select content in multiple languages from the customized resource table.
- Attachment: You can save the addresses of multiple uploaded files. Images and documents are supported.
Data Length
Specify the length. This parameter is displayed only when Field Type is set to Number.
Decimal Places
Enter the number of decimal places after the integer based on the site requirements. This parameter is displayed only when Field Type is set to Number.
Description
Enter the description of the field.
Value: 1–255 characters.
- The value cannot exceed 63 characters, including the prefix namespace and suffix __CST.
- (Optional) Manage fields.
- Editing the added fields
- On an object details page, click the Fields tab and click an added field.
- In the Field Detail area on the right, you can modify the field attributes.
The content displayed here varies according to the field type. The following uses a field of the number type as an example.
Table 3 Parameters for editing a field Parameter
Description
Display Name
The parameter is inherited from the field name entered during field creation in 5 and can be edited.
Unique ID
This parameter is inherited from the ID entered during field creation in 5 and cannot be edited.
Field Type
This parameter is inherited from the field type selected during field creation in 5 and cannot be edited.
Field Help
Enter the description of the field prompt.
Description
Enter the description of the field.
Field Settings
- Unique: If this parameter is selected, the field is unique.
- Required: If this parameter is selected, the field is mandatory.
- Searchable: Indicates whether the search statement can be used to search for this field on the frontend developer console or in a script. The search statement can be regarded as a subset of the SQL statement. The system supports most common SQL query statements. You only need to change the keyword "select" at the beginning of the SQL query statement to "search". The features and restrictions of the search statement are as follows:
- Currently, the search statement does not support grouping, wildcard, and DISTINCT.
- The search statement does not support wildcard. The IN query supports fuzzy query.
- Except aggregate functions (AVG, COUNT, MAX, MIN, and SUM), the search statement must contain a where clause. Otherwise, an error occurs.
- By default, the character string type is converted to the text type in Elasticsearch, so inverted indexing of terms can be implemented. Fielddata=on is not set by default because it reduces performance. As a result, character strings cannot be sorted.
- Non-searchable fields cannot exist in the where clause of the search statement. For example, search from myobject where t1 = 'abc' (t1 is a non-searchable field) is not supported.
- Currently, the search statement can be used only to search for a single table.
- The search statement does not support the HAVING and OFFSET clauses.
- The search statement does not support common query and aggregation at the same time. For example, you cannot search for search count(column name), column name from list name;.
- In a search statement, you cannot add .* to the list name for a full query. For example, you cannot search for search T.* from table as T where ...;.
- The text type uses the English analyzer, so it is insensitive to case and single or plural forms. For example, movie can match Movies.
- Similar to SQL statements, search statements are case-insensitive.
- Is Sensitive: You can specify whether the value is case sensitive. For example, if ABC and abc are considered equal, the setting is case insensitive. If they are treated as different, the setting is case sensitive.
Data Length
This parameter is inherited from the specified length during field creation in 5 and can be modified. Field length cannot be decreased. For example, if a field is initially set to a length of 18 characters when created, any value entered must exceed this length.
Decimal Places
This parameter is inherited from the specified value during field creation in 5 and can be modified. Decimal places cannot be reduced. For example, if a field is set to two decimal places when created, any value entered must have at least two digits after the decimal point.
Default Value
Specify this parameter as required. The default value length must be less than or equal to the value of Data Length.
- Click the save button.
- Hiding the system preset standard fields
On the Fields tab page, click
 in the upper right corner to hide preset standard fields. By default, standard fields are displayed.
 - Deleting an added field
Only custom fields can be deleted. Preset fields cannot be deleted. Deleted fields cannot be recovered. Exercise caution when performing this operation.
- On the Fields tab page, select the field to be deleted.
- In the Field Detail area on the right, click Delete Field.
- In the displayed dialog box, click Delete.
- Editing the added fields

Adding Indexes to an Object
You can add up to 10 custom indexes for an object. Indexes offer benefits such as ensuring data uniqueness, speeding up data retrieval, enhancing table connections, and reducing the time for grouping and sorting.
- In the navigation pane, choose Data.
- Move the cursor to of the target object, and choose Detail to access the object designer.
- In the object designer, click
 in the object. The object details page is displayed.
 - On the Indexes tab page, click Add.
- Set index information and click Save. Figure 6 Configuring index information

Table 4 Parameters for adding an index Parameter
Description
Display Name
Name of the new index, which is displayed on the page and can be modified after being created.
Value: 1–63 characters.
Unique ID
Unique ID of the new index, which cannot be modified after being created. The naming requirements are as follows:
- The value cannot exceed 63 characters, including the prefix namespace and suffix __CST.
To prevent duplicate data names among different tenants, each tenant must define a unique namespace when first creating an application. A tenant can create only one namespace. After being created, the namespace cannot be modified.
- Start with a letter and can contain only letters, digits, and underscores (_). It cannot end with an underscore (_).
Type
Type of the index to be created. Normal and Unique are available.
- Normal: The indexed data column can contain duplicate values. You can select the number of fields to be bound.
- Unique: The indexed data column must not have duplicate values to ensure the uniqueness of the data records, and they must be bound to two fields.
Default value: Normal.
Field
Field associated with the index. The requirements are as follows:
- Indexes cannot be created for fields of Text, Encrypted Text, Text Area, Checkbox, Picklist (Multi-Select), Formula, Multiple Language, and Attachment.
- When using associated fields (lookup relationship and master/slave relationship) to create an index, you must bind two or more fields.
- The value cannot exceed 63 characters, including the prefix namespace and suffix __CST.
- (Optional) Manage fields.
- Editing an added index
- On the Indexes tab page, select an added index.
- In the index attribute panel on the right, modify the index according to the parameter description in Table 4.
- Deleting an added index
- On the Indexes tab page, click the target index.
- In the index attribute panel on the right, click Delete Index.
- In the displayed dialog box, click Delete.
Deleted indexes cannot be recovered. Exercise caution when performing this operation.
- Editing an added index
Adding a Validation Rule for an Object
You can add validation rules for an object to ensure data correctness and validity. For example, for a sales information object, field A indicates the sales revenue, and field B indicates the sales profit, you can add the rule that the profit (field B) cannot be more than the sales revenue (field A). This helps keep the data correct.
- In the navigation pane, choose Data.
- Move the cursor to of the target object, and choose Detail to access the object designer.
- Click
 in an object to go to its details page.
 - On the Validations tab page, click New.
- Set basic validation information and click Save. Figure 7 Adding a validation rule

Table 5 Parameters for adding a validation rule Parameter
Description
Display Name
Name of a validation rule, which is displayed on the page and can be modified after being created.
Value: 1–63 characters.
Unique ID
Unique ID of a validation rule in the system which cannot be modified after being created. The naming requirements are as follows:
- Value: 1–63 characters.
- Start with a letter and can contain only letters, digits, and underscores (_). It cannot end with an underscore (_).
- (Optional) Manage validation rules.
- Editing a validation rule
- On the Validations tab page, click a validation.
- In the validation attribute panel on the right, modify the validation rule.
- Display name: Change the name displayed on the GUI.
- Unique ID: unique ID of a verification rule, which cannot be modified.
- Description: description of the validation rule.
- Whether to enable: indicates whether to use the verification rule.
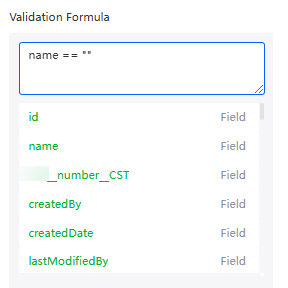
- Verification formula: Set the formula of the verification rule. In the text box, you can select an element from the drop-down list. The selected element is automatically displayed in the text box.
- Error Message: cause of the validation failure.
- Click the save button.
- Deleting a validation rule
- On the Validations tab page, click a validation.
- In the validation attribute panel on the right, click Delete Validation.
- In the displayed dialog box, click Delete.
Deleted validation rules cannot be recovered. Exercise caution when performing this operation.
- Editing a validation rule
Adding a Clearing Task for an Object
You can set up automated clearing rules for objects to delete expired data records. For example, if a record is older than 12 months and marked as invalid, it will be deleted. These rules come with the application and work in the environment where the application is installed.
- In the navigation pane, choose Data.
- Move the cursor to of the target object, and choose Detail to access the object designer.
- Click
 in an object to go to its details page.
 - On the Data Clearance tab page, click Enable.
- Specify the date field as required.
Only fields of all date types of the current object can be selected.
Figure 9 Specifying the date field
- Specify the retention period.
When the value of a specified field in a record exceeds the value of this parameter, the clearing task automatically clears the record.
- Click New and specify the matching conditions. Only the records that meet the conditions are cleared. Figure 10 Specifying matching conditions

- Set the clearing action and click Save.
Set the clearing action to delete records. That is, the clearing task directly deletes the records that meet the conditions.
Figure 11 Clearing an action
- (Optional) Manage clearing tasks.
Adding Data to an Object
Before adding data, ensure that you have added custom fields by referring to Adding a Field to an Object. The following describes how to create the age and gender fields (the name field has been preset in the system) and add a simple data record. You can also add data to an object in batches by referring to Importing Object Data in Batches.
- In the navigation pane, choose Data.
- Move the cursor to of the target object, and choose Detail to access the object designer.
- Click
 in an object to go to its details page.
 - On the Data tab page, click Add.
- In the table below, enter the required data. The entered data is automatically saved. Figure 12 Entering data

Setting Factory Data of an Object
Factory data is the predefined configuration information established during the application's creation. It is included in the application package and automatically installed when you deploy the application in an environment. Using factory data helps the team quickly set up example data, which speeds up the process of getting the application ready for use.
- In the navigation pane, choose Data.
- Move the cursor to of the target object, and choose Detail to access the object designer.
- Click
 in an object to go to its details page.
 - On the Data tab page, click Setting Factory Data.
- Set factory data and click Save.
- Specify the factory data to be included. The application package can contain a maximum of 10,000 factory data records.
- Select all: All data of the current object is included in the application package.
- Manual selection: Only the selected data will be included in the package.
- Specify the installation policy of the factory data.
- Incremental data: The factory data included in the object is incrementally added to the environment. Only new records are added. If there are any duplicates already in the environment, they are ignored. For example, when new device specifications are introduced in a device management application, these are added to the environment, but any specifications that are already there are not duplicated.
- If data with the same ID already exists in the environment, check whether the data is factory data. If yes, check whether the data has been updated. Only the factory data that has not been updated will be overwritten.
- If the data does not exist in the environment, the data is written to the environment as incremental data.
- Fixed Data: The factory data that comes with objects in an application cannot be changed or deleted once it is in the environment. For example, in a customer management application, there are two preset customer types: individual and organization. However, when you upgrade the application, the new factory data will replace the existing factory data.
- Other service data can be imported into objects in the environment.
- When you upgrade an application, all fixed data is replaced with the new factory data. Suppose you have three types of data, A, B, and C. If the new version of the application comes with A, B, and a new type, D, then after updating, the old data type C will be replaced by the new type D.
- example: The factory data that comes with an application's objects is loaded only when you first install the application in an environment. It is not updated when you upgrade the application. This policy is helpful when you want to install the application in different demonstration environments. For example, the first time you install a survey application, it comes with a sample survey.
- Incremental data: The factory data included in the object is incrementally added to the environment. Only new records are added. If there are any duplicates already in the environment, they are ignored. For example, when new device specifications are introduced in a device management application, these are added to the environment, but any specifications that are already there are not duplicated.
After a field is set to factory data, when you modify the factory data, the system displays a message indicating that the data is factory data. Exercise caution when modifying the data.
Figure 13 Prompt for modifying factory data
If an object's factory data installation policy is modified during application development, the new policy will be used when the application is upgraded. This means the record ID in the factory data will change. For details on the change rules, see Table 6.
Table 6 Change rules Installation Policy
Sample Data (New)
Fixed Data (New)
Incremental Data (New)
Sample data (old)
-
During an upgrade, if the data in your environment is sample data, it will be replaced with fixed data by ID, even if you have made changes to it. However, if the original data set does not have this ID, no changes will be made during the upgrade.
During an upgrade, if the data in your environment is sample data, it will be replaced with incremental data identified by ID, even if you have made changes to it. However, if the original data set does not have this ID, no changes will be made during the upgrade.
Fixed data (old)
During an upgrade, no new sample data is added. The factory data is not fixed data and all previous fixed data is deleted.
-
If the data in the environment is part of the factory data, the data is overwritten as incremental data and the status is not modified. Otherwise, delete it directly.
Incremental data (old)
The new sample data is not written because the upgrade is performed. Only the policy of clearing the environment data is deleted.
If the data in the environment is part of the factory data, the data is overwritten as fixed data. Otherwise, only the policy for deleting the environment data is deleted.
-
- Specify the factory data to be included. The application package can contain a maximum of 10,000 factory data records.
- (Optional) If you need to modify the factory data, click Setting Factory Data and modify the data in the attribute panel on the right.
- Click Manual selection to deselect data.
- Select another installation policy.
- Click Clear on the attribute panel to cancel the factory settings of all data.
- Package an application.
- The exported installation package contains factory data by default. Figure 14 Exporting an installation package
- The factory data of the exported patch package is selected during the packaging. Figure 15 Exporting a patch package
 Figure 16 Adding factory data
- The exported installation package contains factory data by default.
Feedback
Was this page helpful?
Provide feedbackThank you very much for your feedback. We will continue working to improve the documentation.See the reply and handling status in My Cloud VOC.
For any further questions, feel free to contact us through the chatbot.
Chatbot


