
Associating Customer Information with Order Data and Synchronizing the Modification
Expected Results
In some order systems, customer information and order data need to be associated for order processing and inventory deduction. For example, order application A has two objects: customerList and orderList. You can establish an association between these two objects to implement the following functions:
- Add and display customer object data. Figure 1 Adding customer object data
 Figure 2 Displaying customer object data
- Add order data and associate it with the existing customer information. Figure 3 Adding order data and associating it with the existing customer information

- After the customer data is deleted, the associated order data is also deleted. Figure 4 Deleting customer data
 Figure 5 Associated order data deleted
Procedure
- Create a low-code application.
- Apply for a free trial or purchase a commercial instance by referring to Authorization of Users for Huawei Cloud Astro Zero Usage and Instance Purchases.
- After the instance is purchased, click Access Homepage on Homepage. The application development page is displayed.
- In the navigation pane, choose Applications. On the displayed page, click Low-Code or
 .
. When you create an application for the first time, create a namespace as prompted. Once it is created, you cannot change or delete it, so check the details carefully. Use your company or team's abbreviation for the namespace.
- In the displayed dialog box, choose Standard Applications and click Confirm.
- Enter a label and name of the application, and click the confirm button. The application designer is displayed. Figure 6 Creating a blank application

- Create the customer object customerList and the order object orderList, and add fields to the objects.
- In the navigation pane, choose Data, and click + next to Object.
- Complete the configuration and click the confirm button. Figure 7 Creating the object customerList

- Click
 to go to the object details page. Figure 8 Clicking the edit button
- On the Fields tab page, click Add and add the customerId field for the object. Figure 9 Adding the customerId field

Table 3 Parameters for adding the customerId field Parameter
Description
Example
Display Name
Name of the new field, which can be changed after the field is created.
Value: 1–63 characters.
customerId
Unique ID
ID of a new field in the system. The value cannot be changed after the field is created. Naming rules:
- Max. 63 characters, including the prefix namespace.
- Start with a letter and use only letters, digits, and an underscore (_). Do not end with an underscore (_).
customerId
Field Type
Click
 . On the page that is displayed, select the type of the new field based on the parameter description.
Text
Data Length
Length of a field that can be entered.
64
- On the Fields tab page, click Add again to add the customerName field. Figure 10 Adding the customerName field

- Repeat the preceding operations to create the order object orderList and add the orderId field to it. Figure 11 Creating the orderList object and adding a field

- Select the order object and add an association.
- Click
 next to the object. The page for adding an association is displayed. Figure 12 Clicking the association button
- Select Master-Detail Relationship and click the next button. Master-Detail Relationship: You can establish a master/slave relationship between objects by linking the current field to another object's ID. After a master relationship is defined, the value of the current field can be obtained only from the associated master object. When the records of the object are deleted, the records of the subtables are also deleted.Figure 13 Selecting the master relationship

- Add the association and click Confirm. Figure 14 Adding an association

Table 4 Parameters for adding the orderRe association Parameter
Description
Example
Label
Name of the association displayed on the page. The name can be changed after the association is created.
Value: 1–80 characters.
orderRe
Unique ID
Unique ID of the association in the system, which cannot be modified after being created.
Naming rules:
- Max. 63 characters, including the prefix namespace.
- Start with a letter and use only letters, digits, and an underscore (_). Do not end with an underscore (_).
orderRe
Related Object
Select an object from the drop-down list.
Select the customer object customerList created in 2.
- Click
- Create pages for the customer and order object
- Select the order object orderList and choose Action > Create Page in the object editing area on the right. Figure 15 Clicking Create Page

- Deselect Form Page and retain only List Page. Click Confirm. Figure 16 Creating a list page for the orderList object

After the page is created, a message shows that the page is ready. Choose > Standard Page to view the created list page.
- Use the same method to create a list page for the customer object customerList.
- Select the order object orderList and choose Action > Create Page in the object editing area on the right.
- On the order object page, set the fields to be displayed for the parent object.
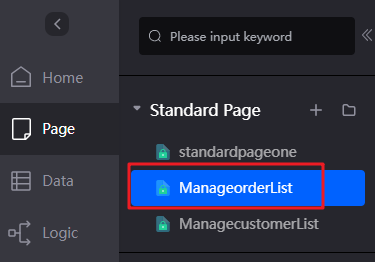
- In the navigation pane, choose Page.
- Under Standard Page, choose ManageorderList. Figure 17 Clicking the order object page orderList
- Select the orderRe field, set Selection Type to Drop-Down List and Show Field to customerName in the Properties > Basic Attributes area. Figure 18 Setting the fields to be displayed for the parent object

- On the New area, select the orderRe field, set Selection Type to Drop-Down List and Show Field to customerName in the Properties > Basic Attributes area. Figure 19 Setting the fields to be displayed for the parent object on the New area

- Click
 in the upper part of the page to save the page settings.
 - After the configuration is saved, click
 in the upper part of the page to view the configuration effect.
Feedback
Was this page helpful?
Provide feedbackThank you very much for your feedback. We will continue working to improve the documentation.See the reply and handling status in My Cloud VOC.
For any further questions, feel free to contact us through the chatbot.
Chatbot


