Android Demo Usage Guide
Overview
This topic uses Android as an example to describe how to connect a device to the platform over MQTTS or MQTT and how to use platform APIs to report properties and subscribe to a topic for receiving commands.

The code snippets in this document are only examples and are for trial use only. To put them into commercial use, obtain the IoT Device SDKs of the corresponding language for integration by referring to Obtaining Resources.
Prerequisites
- You have installed Android Studio. If not, install Android Studio by following the instructions provided on the Android Studio website and then install the JDK.
- You have obtained the device access address from the IoTDA console. For details about how to obtain the address, see Platform Connection Information.
- You have created a product and a device on the IoTDA console. For details, see Creating a Product, Registering an Individual Device, and Registering a Batch of Devices.
Preparations
- Install Android Studio.
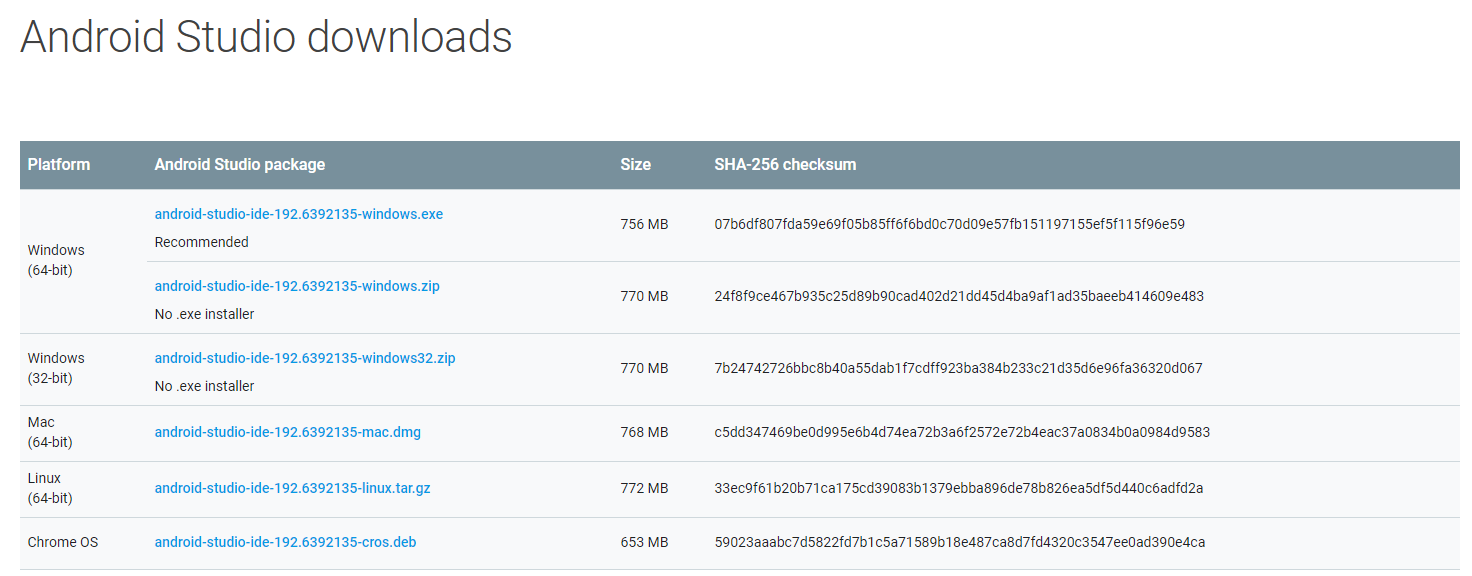
Go to the Android Studio website to download and install a desired version. The following uses Android Studio 3.5 running on 64-bit Windows as an example.
- Install the JDK. You can also use the built-in JDK of the IDE.
- Go to the Oracle website to download a desired version. The following uses JDK 8 for Windows x64 as an example.
- After the download is complete, run the installation file and install the JDK as prompted.
Importing Sample Code
- Download the sample code quickStart(Android).
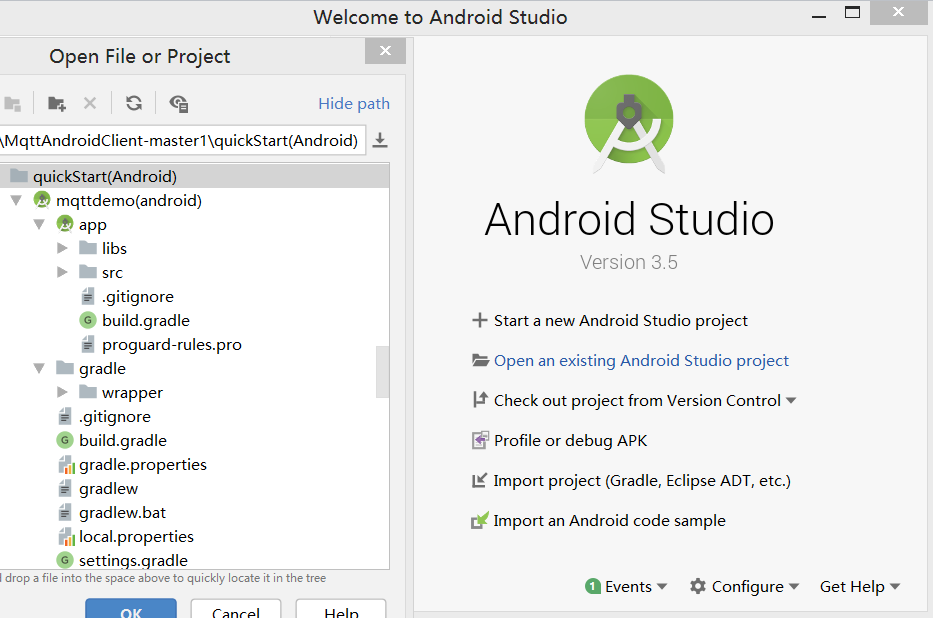
- Run Android Studio, click Open, and select the sample code downloaded.
- Import the sample code.
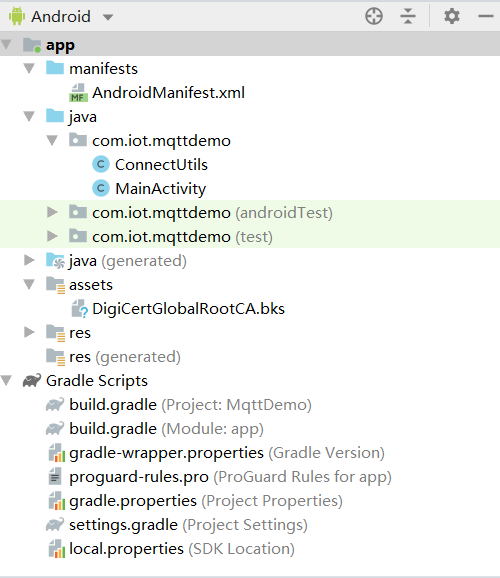
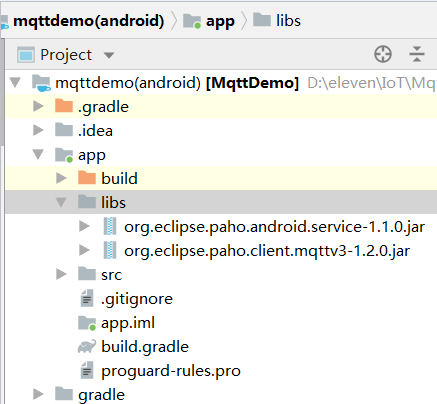
Description of the directories:
- manifests: configuration file of the Android project
- java: Java code of the project
MainActivity: demo UI class
ConnectUtils: MQTT connection auxiliary class
- asset: native file of the project
DigiCertGlobalRootCA.bks: certificate used by the device to verify the platform identity. It is used for login authentication when the device connects to the platform.
- res: project resource file (image, layout, and character string)
- gradle: global Gradle build script of the project
- libs: third-party JAR packages used in the project
org.eclipse.paho.android.service-1.1.0.jar: component for Android to start the background service component to publish and subscribe to messages
org.eclipse.paho.client.mqttv3-1.2.0.jar: MQTT java client component
- (Optional) Understand the key project configurations in the demo. (By default, you do not need to modify the configurations.)
- AndroidManifest.xml: Add the following information to support the MQTT service.
<service android:name="org.eclipse.paho.android.service.MqttService" />
- build.gradle: Add dependencies and import the JAR packages required for the two MQTT connections in the libs directory. (You can also add the reference to the official website of the JAR package.)
implementation files('libs/org.eclipse.paho.android.service-1.1.0.jar')
implementation files('libs/org.eclipse.paho.client.mqttv3-1.2.0.jar')
- AndroidManifest.xml: Add the following information to support the MQTT service.
UI Display
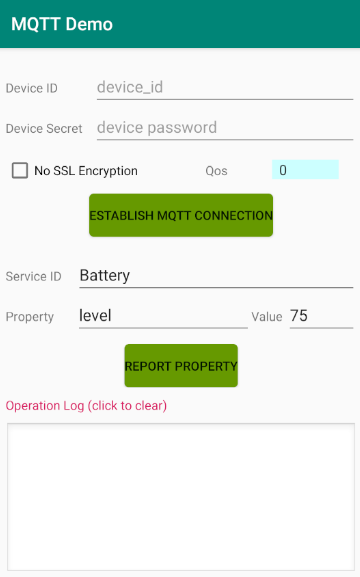
- The MainActivity class provides UI display. Enter the device ID and secret, which are obtained after the device is registered on the IoTDA console or by calling the API Creating a Device.
- In the example, the domain name accessed by the device is used by default. (The domain name must match and be used together with the corresponding certificate file during SSL-encrypted access.)
private final static String IOT_PLATFORM_URL = "iot-mqtts.cn-north-4.myhuaweicloud.com";
- Select SSL encryption or no encryption when establishing a connection on the device side and set the QoS mode to 0 or 1. Currently, QoS 2 is not supported. For details, see Constraints.
checkbox_mqtt_connet_ssl.setOnCheckedChangeListener(new CompoundButton.OnCheckedChangeListener() {
    @Override
    public void onCheckedChanged(CompoundButton buttonView, boolean isChecked) {
        if (isChecked) {
            isSSL = true;
            checkbox_mqtt_connet_ssl.setText ("SSL encryption");
        } else {
            isSSL = false;
            checkbox_mqtt_connet_ssl.setText ("no SSL encryption");
        }
    }
})
Establishing a Connection
To connect a device or gateway to the platform, upload the device information to bind the device or gateway to the platform.
- Call the MainActivity class to establish an MQTT or MQTTS connection. By default, MQTT uses port 1883, and MQTTS uses port 8883 (a certificate must be loaded).
if (isSSL) { editText_mqtt_log.append("Starting to establish an MQTTS connection" + "\n"); serverUrl = "ssl://" + IOT_PLATFORM_URL + ":8883"; } else { editText_mqtt_log.append("Starting to establish an MQTT connection" + "\n"); serverUrl = "tcp://" + IOT_PLATFORM_URL + ":1883"; } - Call the getMqttsCertificate method in the ConnectUtils class to load an SSL certificate. This step is required only if an MQTTS connection is established.
DigiCertGlobalRootCA.bks: certificate used by the device to verify the platform identity for login authentication when the device connects to the platform. You can download the certificate file using the link provided in Certificates.
SSLContext sslContext = SSLContext.getInstance("SSL"); KeyStore keyStore = KeyStore.getInstance("bks"); keyStore.load(context.getAssets().open("DigiCertGlobalRootCA.bks"), null);// Load the certificate in the libs directory. TrustManagerFactory trustManagerFactory = TrustManagerFactory.getInstance("X509"); trustManagerFactory.init(keyStore); TrustManager[] trustManagers = trustManagerFactory.getTrustManagers(); sslContext.init(null, trustManagers, new SecureRandom()); sslSocketFactory = sslContext.getSocketFactory(); - Call the intitMqttConnectOptions method in the MainActivity class to initialize MqttConnectOptions. The recommended heartbeat interval for MQTT connections is 120 seconds. For details, see Constraints.
mqttAndroidClient = new MqttAndroidClient(mContext, serverUrl, clientId); private MqttConnectOptions intitMqttConnectOptions(String currentDate) { String password = ConnectUtils.sha256_HMAC(editText_mqtt_device_connect_password.getText().toString(), currentDate); MqttConnectOptions mqttConnectOptions = new MqttConnectOptions(); mqttConnectOptions.setAutomaticReconnect(true); mqttConnectOptions.setCleanSession(true); mqttConnectOptions.setKeepAliveInterval(120); mqttConnectOptions.setConnectionTimeout(30); mqttConnectOptions.setUserName(editText_mqtt_device_connect_deviceId.getText().toString()); mqttConnectOptions.setPassword(password.toCharArray()); return mqttConnectOptions; } - Call the connect method in the MainActivity class to set up a connection and the setCallback method to process the message returned after the connection is set up.
mqttAndroidClient.connect(mqttConnectOptions, null, new IMqttActionListener()
mqttAndroidClient.setCallback(new MqttCallBack4IoTHub());
If the connection fails, the onFailure function in initMqttConnects executes backoff reconnection. Sample code:
@Override
public void onFailure(IMqttToken asyncActionToken, Throwable exception) {
	exception.printStackTrace();
	Log.e(TAG, "Fail to connect to: " + exception.getMessage());
	editText_mqtt_log.append("Failed to set up the connection: "+ exception.getMessage() + "\n");

	// Backoff reconnection
	int lowBound = (int) (defaultBackoff * 0.8);
	int highBound = (int) (defaultBackoff * 1.2);
	long randomBackOff = random.nextInt(highBound - lowBound);
	long backOffWithJitter = (int) (Math.pow(2.0, (double) retryTimes)) * (randomBackOff + lowBound);
	long waitTImeUntilNextRetry = (int) (minBackoff + backOffWithJitter) > maxBackoff ? maxBackoff : (minBackoff + backOffWithJitter);
	try {
		Thread.sleep(waitTImeUntilNextRetry);
	} catch (InterruptedException e) {
		System.out.println("sleep failed, the reason is" + e.getMessage().toString());
	}
	retryTimes++;
	MainActivity.this.initMqttConnects();
}
Subscribing to a Topic
Only devices that subscribe to a specific topic can receive messages about the topic published by the broker. For details on the preset topics, see Topics.
The MainActivity class provides the methods for delivering subscription commands to topics, subscribing to topics, and unsubscribing from topics.
String mqtt_sub_topic_command_json = String.format("$oc/devices/%s/sys/commands/#", editText_mqtt_device_connect_deviceId.getText().toString());
mqttAndroidClient.subscribe(getSubscriptionTopic(), qos, null, new IMqttActionListener()
mqttAndroidClient.unsubscribe(getSubscriptionTopic(), null, new IMqttActionListener()
If the connection is established, you can subscribe to the topic using a callback function.
mqttAndroidClient.connect(mqttConnectOptions, null, new IMqttActionListener() {
    @Overridepublic void onSuccess(IMqttToken asyncActionToken) {
        ......
        subscribeToTopic();
}
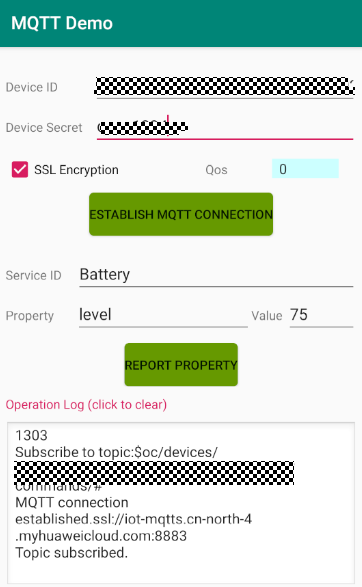
After the connection is established, the following information is displayed in the log area of the application page:
Reporting Properties
Devices can report their properties to the platform. For details about the API, see Device Reporting Properties.
The MainActivity class implements the property reporting topic and property reporting.
String mqtt_report_topic_json = String.format("$oc/devices/%s/sys/properties/report", editText_mqtt_device_connect_deviceId.getText().toString());
MqttMessage mqttMessage = new MqttMessage();
mqttMessage.setPayload(publishMessage.getBytes());
mqttAndroidClient.publish(publishTopic, mqttMessage);
If the reporting is successful, the reported device properties are displayed on the device details page.
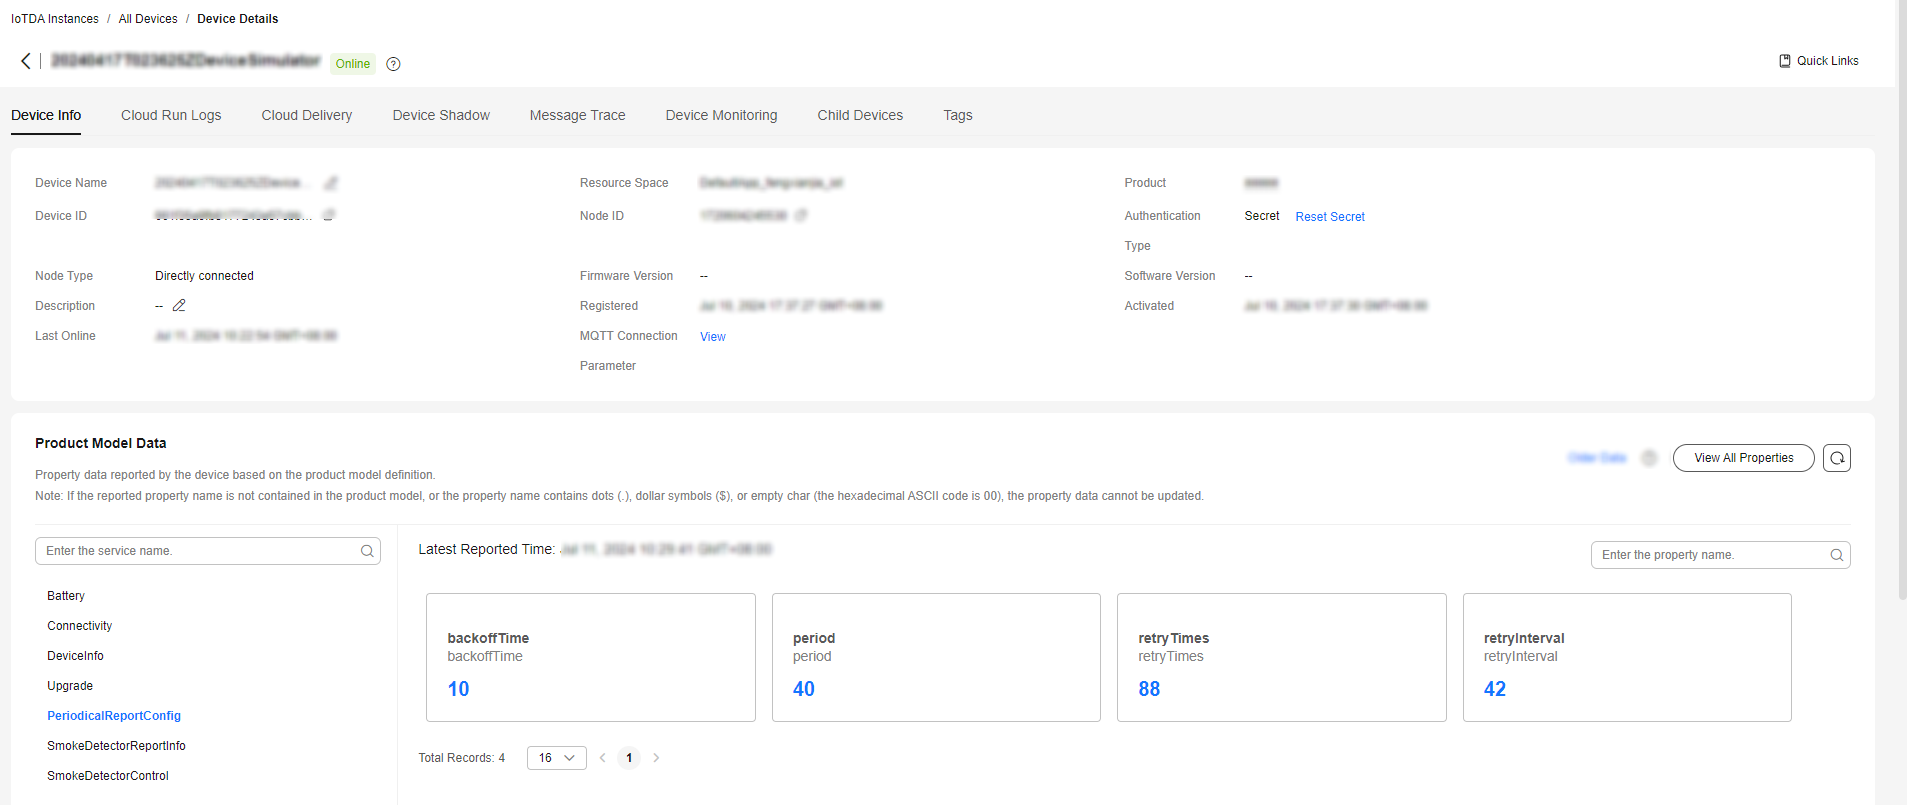
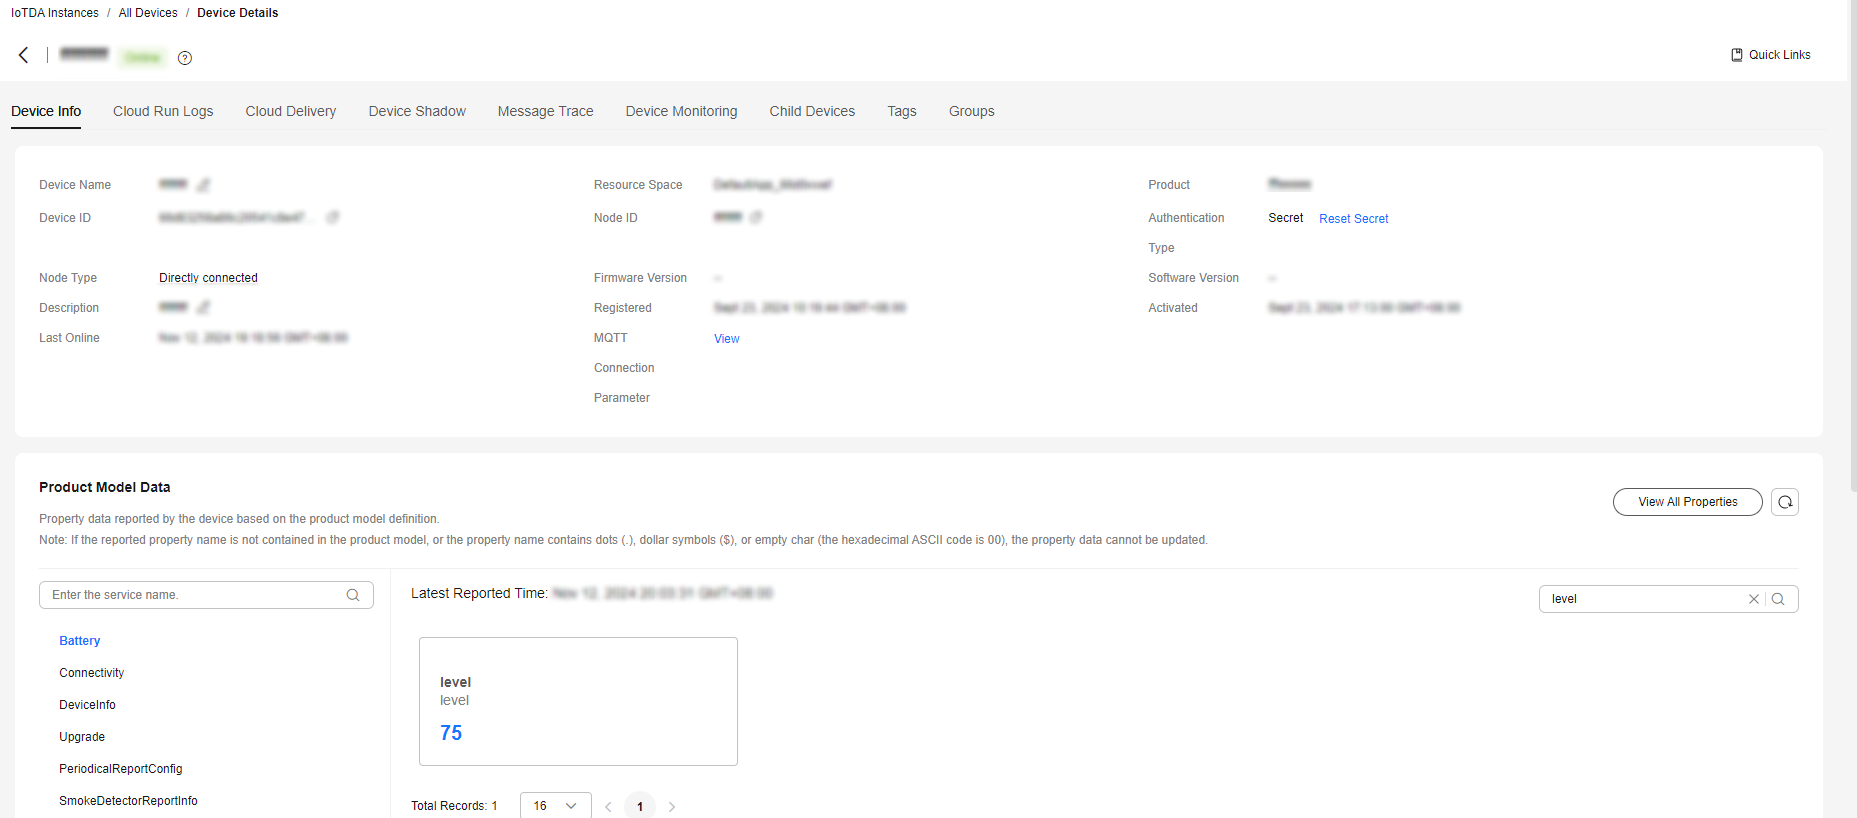

If the latest data is not displayed on the device details page, check whether the services and properties reported by the device are the same as those in the product model.
Receiving a Command
The MainActivity class provides the methods for receiving commands delivered by the platform. After an MQTT connection is established, you can deliver commands on the device details page of the IoTDA console or by using the demo on the application side. For example, deliver a command carrying the parameter name command and parameter value 5. After the command is delivered, a result is received using the MQTT callback.
private final class MqttCallBack4IoTHub implements MqttCallbackExtended {
    ......
    @Overridepublic void messageArrived(String topic, MqttMessage message) throws Exception {
        Log.i(TAG, "Incoming message: " + new String(message.getPayload(), StandardCharsets.UTF_8));
        editText_mqtt_log.append("MQTT receives the delivered command: " + message + "\n")
    }
On the device details page, you can view the command delivery status. In this example, timeout is displayed because this demo does not return a response to the platform.
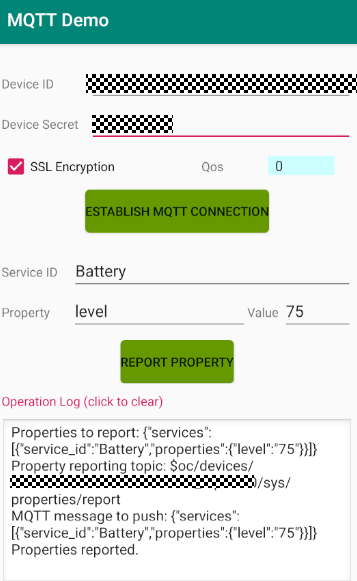
If the property reporting and command receiving are successful, the result is displayed as follows in the application.
Feedback
Was this page helpful?
Provide feedbackThank you very much for your feedback. We will continue working to improve the documentation.See the reply and handling status in My Cloud VOC.
For any further questions, feel free to contact us through the chatbot.
Chatbot


