Creating a Server Migration Plan
A server migration plan outlines the source servers to be migrated and the paired target servers. You can create a migration workflow based on a migration plan to implement batch migration. The following content describes how to create a server migration plan.
Preparations
- Create an application migration project.
- Discover source servers and collect their details. MgC provides three methods to meet your requirements in different scenarios.
- If your source servers are on a cloud platform, such as Alibaba Cloud, Huawei Cloud, AWS, Tencent Cloud, Google Cloud, or Azure, you are advised to perform an online discovery. You can also manually add the server details to MgC.
- If your source servers are in an on-premises IDC or vCenter, you can perform an intranet discovery. MgC enables you to scan for servers by network range or VMware vCenter Server. You can also manually add the server details to MgC.
- Install the MgC Agent in the source intranet environment. For details, see Installing the MgC Agent on Windows. Then log in and connect the MgC Agent to MgC.
Constraints
- Only one migration workflow can be created for a migration plan.
- A server can only be included in one migration plan.
- A maximum of 100 servers can be added to a migration plan.
Procedure
- Sign in to the MgC console. In the navigation pane, under Project, select your application migration project from the drop-down list.
- In the navigation pane, choose Migration Plans.
- Click Create Migration Plan in the upper right corner of the page.
- In the Batch Server Migration card, click Configure Migration Plan.
- In the Basic Settings area, set parameters based on Table 1.
Table 1 Basic settings Parameter
Configuration
Migration Plan Name
User-defined.
Description (Optional)
Source Platform
Select the cloud platform where the source servers are located.
NOTICE:A migration plan can only include servers from the same platform.
Target Region
Select the region you want to migrate to.
- In the Source Servers area, click Add.

- Select the servers to be migrated together and click Confirm.

- The source servers included in this plan will be migrated using the same migration workflow. The same migration settings, such as the VPC, subnet, and security group settings, will be applied to these source servers.
- The selected servers must come from the source platform selected in step 5.
- Click Save and Next to go to the Check Source Servers phase.
- Configure server credentials. There are two methods for you to do this.
- Manual addition: You can choose this method if you configure credentials for a small number of servers. For details, see Adding Resource Credentials.
- Batch addition: You can choose this method if you configure credentials for a large number of servers.
- Click Associate Credentials above the list of source servers to download the batch configuration template. Open the template file, enter the credential information (username and password) of all servers in the current migration plan, and save the file.

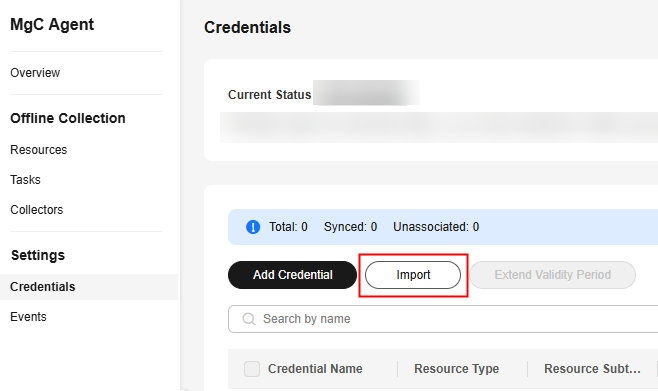
- Import the saved template file to the MgC Agent you connected to MgC. The system automatically configures the MgC Agent and credentials for the servers.

- Click Associate Credentials above the list of source servers to download the batch configuration template. Open the template file, enter the credential information (username and password) of all servers in the current migration plan, and save the file.
You can use Modify in the Operation column to update settings, such as Access IP Address, Access Port, MgC Agent, and Credential.
To change the connection ports of source servers in batches, use the Change Port button above the list.

- Select all the servers and click Check Migration Readiness above the list. The system checks if the source servers are ready for migration.

- If the Migration Readiness Check column displays a Completed status, the source server passes the check and is ready for migration.
- If the Migration Readiness Check column displays a Check failed status and the failure cause is that certain source server information is missing, click Collect in the Deep Collection column to collect the server details.
- If the Migration Readiness Check column displays a Check failed status and the failure cause is that the source server is unreachable, check whether the access information you provided is correct. If it is correct, check the migration readiness again.
- After Completed shows up in the Migration Readiness Check column for all the source servers, click Next to go to the optional phase Conduct Performance Collection.
- (Optional) Collect server performance data. The collected data can be used to get target server recommendations in the next step. A collection takes some time because performance data is sampled from source servers once every 5 minutes. You can determine whether to perform performance collection. For more constraints, see Precautions for performance collection. If you do not need to collect server performance data, click Next to go to the Configure Target phase.
Select the source servers whose performance data needs to be collected and choose Performance Collection > Start above the list. Collecting will be displayed in the Performance Collection column
After performance data collection starts, you can:
- Click View Performance in the Operation column to view the collected server performance data.
- Choose Performance Collection > Stop above the list to suspend performance data collection for servers.
- Configure target servers. You can use the following methods to complete this job:
- Associating source servers with target servers: If you have cloud servers on Huawei Cloud, you can associate them with the source servers. Then in the migration workflow, these cloud servers will receive data and workloads migrated from the source servers. For requirements about your existing cloud servers (target servers), see Associating Source Servers with Target Servers.
- Locate a source server in the list, click Associate in the Target Association column.

- In the displayed dialog box, select the region and project where the existing cloud servers are located. If the source server's storage disks are overprovisioned, regardless of the quantity or space, you can choose an existing cloud server that precisely fits your needs to optimize resource utilization and save costs.

- Ensure that the target server has an EIP bound.
- Disk downsizing is only available for Linux, and the decreased sizes must be larger than the used sizes of the source disks.
- In the cross-AZ migration scenario, only disk upsizing is supported. Even if you choose to downsize disks here, the settings will not be applied, and the system will create target disks as large as source disks.
- Click Confirm. After the association is complete, Associated shows up in the Target Association column. You can click Details to view the details of the associated target server. The system will automatically check whether the associated target server has downsized disks compared with the source server. If it does, Yes will be displayed in the Disk Downsized column. If it does not, No will be displayed.
- Locate a source server in the list, click Associate in the Target Association column.
- Generating target server recommendations: The system can provide recommendations for Huawei Cloud server sizes tailored based on the specifications of the source servers. If the recommended configurations do not align with your requirements, you can make changes as necessary. In the subsequent migration workflow, the target servers will be automatically created based on the specifications configured here. Source servers with target servers associated will be skipped during the recommendation process.
- In the source server list, select the ones that you want to generate target server recommendations for and click Generate Target Recommendations above the list.
- Configure an assessment policy based on Table 2.
Table 2 Settings used for computing target recommendations Parameter
Description
Priority
Preferences
Configure your preferences for target servers. The system will prioritize your preferences and try to match them first during the recommendation process. For details about how the system recommends appropriate target resources, see How Does MgC Generate Target Server Recommendations?
- Server Types (Optional)
- Server Series (Optional)
Select the server series you prefer. The system will generate recommendations based on your preferred server types and series.
NOTICE:If you select Display only series allowed on DeHs, Server Types will be dimmed, and the server series allowed on DeHs in the target region will be listed.
- System Disk (Optional)
- Data Disk (Optional)
- Sizing Criteria
Choose the criteria that the system will use to generate server recommendations.
- If you select As-in on source, the system will recommend target servers with the same or similar CPU and memory capacity as the source servers.
- If you select Performance-based, you need to perform a performance collection for the source servers, and then set assessment parameters. The system will then recommend target servers with your desired CPU and memory capacity.
NOTICE:
The more performance data is collected, the more accurate the recommendations are. The collection of server performance data should take no less than seven days.
- Click Confirm. If Success shows up in the Target Configuration column, the target recommendation is generated. You can check the recommended configuration in the next column

- (Optional) Modify target server specifications recommended by the system if needed.
- Locate a source server and click Modify Target Specifications in the Operation column.
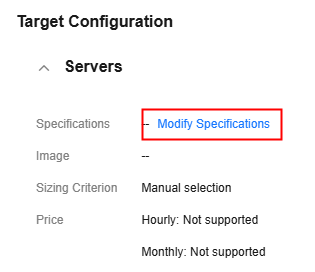
- Click Modify Specifications next to Specifications. Select the target server specifications and image as required, and click Confirm.

- In the Disks area, locate a disk and click Modify Specifications in the Target Specifications column to modify the disk type and capacity. Only disks on Linux target servers can be downsized if the paired source servers have over-provisioned storage resources. After you downsize a disk for the target server, the system will set Disk Downsized to Yes. The reverse also applies.

- The system disk capacity ranges from 40 GB to 1,024 GB.
- The data disk capacity ranges from 10 GB to 32,768 GB.
- Disk downsizing is only available for Linux, and the decreased sizes must be larger than the used sizes of the source disks.
- In the cross-AZ migration scenario, only disk upsizing is supported. Even if you choose to downsize disks here, the settings will not be applied, and the system will create target disks as large as source disks.

- Configuring target server specifications: You can manually configure the same target server specifications for the source servers all at once.

When selecting server specifications, it is crucial to ensure they meet your requirements. The system does not check whether they match the source servers. MgC does not assume responsibility for any issues arising from inappropriate server specifications.
- In the server list, select the source servers and click Configure Target Specifications above the list.
- Select the target server specifications and click OK. Then you can that Manual appears in the Target Configuration column.

- Configuring an image for target servers: You can select an image to apply to all the target servers.

When selecting an image, it is crucial to ensure it meets your requirements. The system does not check whether it matches the source servers. MgC does not assume responsibility for any issues arising from inappropriate images.
- In the server list, select the source servers and click Configure Image above the list.
- On the displayed page, choose an image type, an OS, and an OS version and click Confirm. If a target server has a system disk smaller than what defined in the image you choose, configuring the image will fail for that server.
- Exporting and then importing target server configurations: You can export the server records, configure target server flavors, disks, and images, and then import the records back. Some technical expertise is needed for this process.
- In the list of source servers, choose Export/Import Target Configuration > Export Target Configuration to download the server records as an Excel file to the local PC.

- Open the exported file. On the first sheet named servers, the blue columns (A to G) indicate the source server information, which does not need to be modified. The yellow columns (H to K) indicate the target server information, which needs to be configured.

- Configure the target server information (in columns H to K) according to Table 3.
Table 3 Parameters in columns H to K Parameter
Configuration
flavor
Specify a flavor for each target server. The second sheet flavors lists the flavors in S (general-purpose) and C (computing-plus) series available in the target region. Choose a proper flavor and copy the flavor name to this cell.
NOTE:If a source server has been assessed, the recommended flavor is included in the exported file. If a source server has not been assessed, its flavor field is empty.
disks(name,osDisk,type,capacity;)
Enter the information about all disks. Separate multiple disks with semicolons (;). You must specify the name, function (system disk or not), type, and size for each disk. Separate these items with commas (,). Specify a disk size as a numeric value without a unit. The default unit is GiB.
Example: /dev/sda,true,SAS,1024;/dev/sdb,false,SAS,2046
NOTE:If a source server has been assessed, the recommended disk specifications show up in the exported file. If a source server has not been assessed, the source disk specifications remain in this column, but the disk type changes to SAS by default.
image_type
Enter an image type. The options are:
- public: public image
- private: private image
- shared: shared image
image
Enter an image name. You can view all images available in the target region on the third sheet images.
- After configuring a target server for each source server, save the Excel file. Return to the MgC console. Choose Export/Import Target Configuration > Import Target Configuration above the list of source servers.

- In the displayed dialog box, click Access OBS.

- Select a bucket and upload the Excel file to the bucket.
- After the upload is successful, return to the MgC console. In the Import Target Configuration dialog box, select the file stored in the OBS bucket from the drop-down list.
- Click Confirm to import the target server configurations.

- If the flavor field is empty in a row, this row will be ignored during the import.
- If the disk or image field is left empty in a row, the source server's disk and image information is used during the import.
- If the number in the disk field in a row is inconsistent with what the source server actually has, an error message is reported, indicating that the disk numbers are inconsistent.
- If in a row, the disk type conflicts with the flavor, an error message will be reported, indicating that the disk type is incorrect.
- In the list of source servers, choose Export/Import Target Configuration > Export Target Configuration to download the server records as an Excel file to the local PC.
- Associating source servers with DeHs if you want to migrate to Huawei Cloud DeH. Then after you create a migration workflow using this plan, the system will provision target servers on that DeH.
- In the source server list, select the ones to be associated with a DeH.
- Choose DeH Configuration > Associate DeH above the list.
- Select the target DeH to be associated from the drop-down list and click Confirm. Associated will show up in the DeH column. You can click Details to view the associated DeH.
- Associating source servers with target servers: If you have cloud servers on Huawei Cloud, you can associate them with the source servers. Then in the migration workflow, these cloud servers will receive data and workloads migrated from the source servers. For requirements about your existing cloud servers (target servers), see Associating Source Servers with Target Servers.
- (Optional) Enable Specify Target IP Address. You can specify IP addresses for target servers. After the migration is complete, the target servers will use the IP addresses you specify.

- If a source server is associated with an existing target server, you cannot specify an IP address for that target server.
- If you specify an IP address for a target server, the server will use that IP address after the migration is complete, even if you choose to retain the paired source server's IP address on that target server when creating a migration workflow.
- In the Configure Target stage, click a server name in the server list. The Resource Details page is displayed on the right.
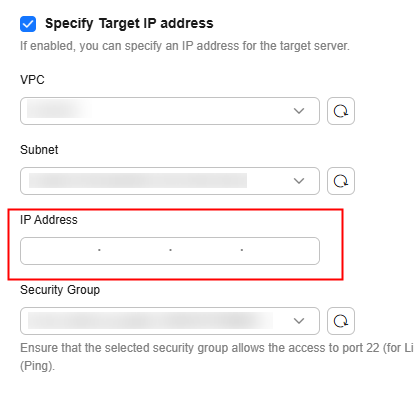
- At the bottom of the Target tab, select Specify Target IP Address.
- Set VPC, Subnet, and Security Group as required.
- In the IP Address text box, enter an IP address for the target server. The system will automatically verify the entered IP address. If the IP address meets the requirements, switching to another tab or closing the page will automatically save and apply the settings. If the IP address does not meet the requirements, the system will not save or apply the settings.

- Perform subsequent operations as needed.
- Create a server migration workflow.
Click Create Workflow to create a migration workflow. For more information, see 5.
- Only save the migration plan.
Click Confirm to save the migration plan. Then you can:
- Click Design in the Operation column to update the migration plan.
- Click Create Workflow in the Operation column to create a server migration workflow to migrate the source servers included in the migration plan. For more information, see 5.
- Create a server migration workflow.
Feedback
Was this page helpful?
Provide feedbackThank you very much for your feedback. We will continue working to improve the documentation.See the reply and handling status in My Cloud VOC.
For any further questions, feel free to contact us through the chatbot.
Chatbot


