

Buying a DB Instance and Connecting to It Using the mysql Client
After buying a DB instance, you can connect to it using a Linux ECS with the mysql client installed over a private network. This section describes how to access a DB instance from an ECS using the mysql client.
Operation Process
| Process | Description |
|---|---|
| Sign up for a Huawei Cloud Account, ensure that there is a valid payment method configured, and implement fine-grained permissions management on TaurusDB. | |
| Configure information required for instance creation. | |
| If you want to use the mysql client to connect to a DB instance, you need to prepare a server, install the mysql client on the server, and run the connection command. Purchase a Linux ECS that is in the same region and VPC as your DB instance. If you have purchased a Windows ECS, you can connect to the DB instance using MySQL-Front. For details, see Buying a DB Instance and Connecting to It Using MySQL-Front. | |
| Test the network connectivity between the ECS and the private IP address and port of the DB instance, and install the mysql client on the ECS. | |
| Use the mysql client to connect to the DB instance through the private IP address and port. |
Preparations
- Before buying a TaurusDB instance, sign up for a Huawei Cloud account.
If you have enabled Huawei Cloud services, skip this step.
- For fine-grained permissions management on Huawei Cloud resources, use Identity and Access Management (IAM) to create a user or user group and grant it specific operation permissions. For details, see Creating a User and Granting TaurusDB Permissions.
Procedure
Step 1: Buy a DB Instance
- Go to the Buy DB Instance page.
- On the Custom Config page, configure information about the instance and click Next.
- Basic configuration Figure 1 Basic configuration

Table 1 Basic configuration Parameter
Example
Description
Billing Mode
Pay-per-use
Billing mode of an instance.
- Yearly/Monthly: a prepaid billing mode in which you pay for resources before using them. Bills are settled based on the subscription period. The longer the subscription, the bigger the discount. This mode is a good option for long-term, stable workloads.
- Pay-per-use: a postpaid billing mode. You pay as you go and just pay for what you use. The DB instance usage is calculated by the second but billed every hour. This mode allows for flexible resource adjustment without the risk of over- or under-provisioning.
- Serverless: The instance capacity automatically changes based on application requirements. You can start using the DB instance first and then pay as you go.
Region
CN-Hong Kong
Region where an instance is deployed.
NOTE:You cannot change the region of an instance once it is purchased.
- Resource selection Figure 2 Resource selection

Table 2 Resource selection Parameter
Example
Description
DB Engine Version
TaurusDB V2.0 (MySQL-compatible)
DB engine and version.
Kernel Version
2.0.63.250300
DB kernel version. For details about the updates in each kernel version, see Kernel Version Release History.
Specifying the kernel version when buying an instance is in the OBT phase. To use this function, submit a service ticket.
DB Instance Type
Cluster
A cluster instance can contain one primary node and 1 to 15 read replicas. The primary node processes read and write requests, and the read replicas process only read requests. If the primary node becomes unavailable, TaurusDB automatically fails over to a read replica. Cluster instances apply to medium- and large-sized enterprises in the Internet, taxation, banking, and insurance sectors.
AZ Type
Multi-AZ
An AZ is a physical region where resources have their own independent power supply and networks. AZs are physically isolated but interconnected through an internal network. Some regions support both single-AZ and multi-AZ deployment and some only support single-AZ deployment.
- Single-AZ: The primary node and read replicas are deployed in the same AZ.
- Multi-AZ: The primary node and read replicas are deployed in different AZs to achieve higher availability and reliability. It is suitable for workloads that require cross-AZ DR or are insensitive to cross-AZ latency.
Storage Type
DL6
The original shared storage. TaurusDB instances created before July 2024 use shared storage by default, whereas those created in or after July 2024 use DL6 by default.
DL6-based instances achieve zero RPO with a 3-AZ deployment and deliver better performance and higher peak throughput. They are suitable for core application systems that are sensitive to performance and have demanding requirements on storage I/O during peak hours, such as those in finance, e-commerce, government, and gaming.
- Instance options Figure 3 Instance specifications

Table 3 Instance specifications Parameter
Example
Description
Instance Specifications
Dedicated
2 vCPUs | 4 GB
vCPUs and memory of an instance.
CPU Architecture
x86
x86 instances use Intel® Xeon® Scalable processors and feature robust and stable computing performance. When working on high-performance networks, the instances provide the additional performance and stability that enterprise-class applications demand.
Nodes
2
This parameter is mandatory for cluster instances.
Storage
-
It contains the file system overhead required for inodes, reserved blocks, and database operations.
Backup Space
-
TaurusDB provides free backup space equal to the amount of your used storage. After the free backup space is used up, you will be billed for the additional space on a pay-per-use basis.
DR Instance
Disabled
Only single-node RDS for MySQL DR instances are supported. Enabling this parameter automatically creates a DR instance and adjusts the binlog settings when your instance is ready.
TDE
Disabled
Transparent Data Encryption (TDE) encrypts data files and backup files using certificates to implement real-time I/O encryption and decryption. This function effectively protects your databases and data files.
Figure 4 Network

Table 4 Network Parameter
Example
Description
VPC
default_vpc
Virtual network in which your instance is located. A VPC can isolate networks for different workloads.
If no VPC is available, click Create VPC. After a VPC is created, click
 . For details, see Creating a VPC with a Subnet.
After the TaurusDB instance is created, the VPC cannot be changed.
IPv4 Address
Automatically-assigned
IPv4 addresses can be automatically or manually assigned.
Subnet
default_subnet
A subnet provides dedicated network resources that are logically isolated from other networks for network security.
Security Group
default
A security group enhances security by controlling access to TaurusDB from other services.
Figure 5 Database configuration

Table 5 Database configuration Parameter
Example
Description
DB Instance Name
TaurusDB-985e
DB instance name.
Administrator Password
-
The default administrator account is root.
The administrator password must consist of 8 to 32 characters and contain at least four of the following: uppercase letters, lowercase letters, digits, and special characters (~!@#%^*-_=+?,()&$|.). Enter a strong password and periodically change it to improve security and defend against threats such as brute force cracking attempts.
Keep this password secure. If lost, the system cannot retrieve it.
After a DB instance is created, you can reset this password. For details, see Resetting the Administrator Password.
Confirm Password
-
Enter the administrator password again.
- Advanced settings Figure 6 Advanced settings

Table 6 Advanced settings and required quantity Parameter
Example
Description
Database Proxy
Enabled
After database proxy is enabled, you can use a proxy address to connect to your DB instance.
To enable Database Proxy when buying a DB instance, submit a service ticket.
Proxy Mode
Read/Write
You can select Read/Write or Read-only (TP) as needed.
- Read/Write: All write requests are forwarded only to the primary node, and all read requests are forwarded to the selected nodes based on the read weights.
- Read-only (TP): Write requests are not accepted. All read requests are forwarded to the selected read replicas based on their read weights. Read requests are not forwarded to the primary node even if the primary node is selected as a service node.
Proxy Instance Specifications
2 vCPUs | 4 GB
You can select the proxy instance specifications as needed.
Enterprise Project
default
If your account has been associated with an enterprise project, select the target project from the Enterprise Project drop-down list.
For more information about enterprise projects, see Enterprise Management User Guide.
Parameter Template
Default-TaurusDB V2.0
Contains engine configuration values that can be applied to one or more instances.
Time Zone
-
You need to select a time zone for your instance based on the region hosting your instance. The time zone is selected during instance creation and cannot be changed after the instance is created.
Table Name
Case insensitive
Specifies whether table names are case sensitive. This option cannot be changed later.
- Case sensitive: Table names are case sensitive.
- Case insensitive: Table names are case insensitive and are stored in lowercase letters by default.
Tag
-
Tags a DB instance. This parameter is optional. Adding tags helps you better identify and manage your DB instances. Each DB instance can have up to 20 tags.
Quantity
1
You can buy DB instances in batches. The default value is 1. The value ranges from 1 to 10.
- Basic configuration
- Check the purchased DB instance.
- Click the DB instance name to go to the Basic Information page.
- In the Network Information area, obtain the private IP address and database port. Figure 7 Viewing the private IP address and database port

Step 2: Buy an ECS
- Log in to the management console and check whether there is an ECS available.
- If there is a Linux ECS, go to 3.
- If there is a Windows ECS, see Buying a DB Instance and Connecting to It Using MySQL-Front.
- If no ECS is available, go to 2.
- Buy an ECS and select Linux (for example, CentOS) as its OS.
To download a MySQL client to the ECS, bind an EIP to the ECS. The ECS must be in the same region, VPC, and security group as the DB instance for mutual communication.
For details about how to purchase a Linux ECS, see Purchasing and Using a Linux ECS.
- On the ECS Information page, view the region and VPC of the ECS. Figure 8 Viewing ECS information

- On the Basic Information page of the DB instance, view the region and VPC of the DB instance. Figure 9 Viewing the region and VPC of the DB instance

- Check whether the ECS and DB instance are in the same region and VPC.
- If they are in the same region and VPC, go to Step 3: Test Connectivity and Install the mysql Client.
- If they are in different regions, buy another ECS or DB instance. The ECS and DB instance in different regions cannot communicate with each other. To reduce network latency, deploy your DB instance in the region nearest to your workloads.
- If they are in different VPCs, change the VPC of the ECS to that of the DB instance. For details, see Changing a VPC.
Step 3: Test Connectivity and Install the mysql Client
- Log in to the ECS using VNC. For details, see Logging In to a Linux ECS Using VNC.
- Click
 and choose Compute > Elastic Cloud Server.
 - Select the ECS you want to log in to and click Remote Login in the Operation column.
- (Optional) If you need your cursor to be displayed on the remote login page, click Local Cursor.
- Enter the ECS password as prompted.
If the message "Welcome to Huawei Cloud Service" is displayed, the login is successful.
- Click
- On the ECS, check whether it can connect to the DB instance using the private IP address and port obtained in 5.
curl -kv private_IP_address:port
Example:
curl -kv 192.168.6.144:3306
- If yes, network connectivity is normal. Figure 10 Normal network connectivity

- If no, check the security group rules.
- If the ECS security group lacks an outbound rule with Destination set to 0.0.0.0/0 and Protocol & Port set to All, add an outbound rule to allow the private IP address and port of the DB instance. Figure 11 ECS security group

- Check inbound rules of the TaurusDB security group. Add an inbound rule to allow the ECS's private IP address and port. For details, see Configuring Security Group Rules.
- If the ECS security group lacks an outbound rule with Destination set to 0.0.0.0/0 and Protocol & Port set to All, add an outbound rule to allow the private IP address and port of the DB instance.
- If yes, network connectivity is normal.
- Download the mysql client installation package for the Linux ECS.
You are advised to use a MySQL client running a version later than that of the DB instance.
mysql-community-client-8.0.21-1.el6.x86_64.rpm is used as an example.
wget https://dev.mysql.com/get/mysql-community-client-8.0.21-1.el6.x86_64.rpm
- Run the following command to install the MySQL client:
rpm -ivh --nodeps mysql-community-client-8.0.21-1.el6.x86_64.rpm

- If any conflicts occur during the installation, add the replacefiles parameter to the command and install the client again.
rpm -ivh --replacefiles mysql-community-client-8.0.21-1.el6.x86_64.rpm
- If a message is displayed prompting you to install a dependency package during the installation, add the nodeps parameter to the command and install the client again.
rpm -ivh --nodeps mysql-community-client-8.0.21-1.el6.x86_64.rpm
- If any conflicts occur during the installation, add the replacefiles parameter to the command and install the client again.
Step 4: Connect to the DB Instance Using the mysql Client
- Run the following command on the ECS to connect to the DB instance:
mysql -h <host> -P <port> -u <userName> -p
Example:
mysql -h 192.*.*.* -P 3306 -u root -p
- Enter the password of the database account if the following information is displayed:
Enter password:
Figure 12 Connection succeeded

- Create a database, for example, db_test.
create database db_test;
Figure 13 Creating a database

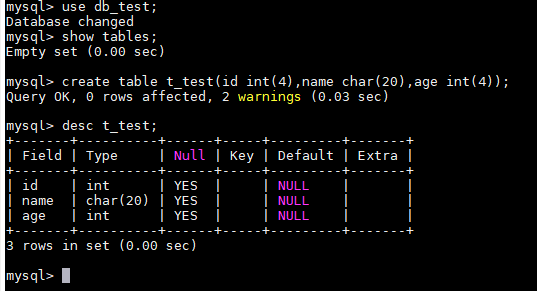
- Create a table, for example, t_test.
create table t_test(id int(4), name char(20), age int(4));
Figure 14 Creating a table
- Insert a data record into the table.
insert into t_test(id, name, age) values(1, 'zhangsan', 30);
Figure 15 Inserting data

- Query table data. Figure 16 Querying data

- Update the value of age for the data record whose id is 1 in the table.
update t_test set age=31 where id=1;
Figure 17 Updating data

- Query the updated table data.
select * from t_test where id=1;
Figure 18 Querying the updated data

- Delete the data record whose id is 1 from the table.
delete from t_test where id=1;
Figure 19 Deleting table data

- Drop the table structure. Figure 20 Dropping a table structure

- Drop the database. Figure 21 Dropping a database

What is your overall rating for this page?
Thank you very much for your feedback. We will continue working to improve the documentation.See the reply and handling status in My Cloud VOC.
For any further questions, feel free to contact us through the chatbot.
Chatbot


