Transferring CodeArts Pipeline Parameters to CodeArts Build and CodeArts Deploy
Overview
Pipeline parameters can be transferred among different services (such as CodeArts Build and CodeArts Deploy). By creating a CI/CD pipeline, you can streamline data of build and deployment.
Procedure
The following describes how to transfer a pipeline version number parameter to a build and a deployment job.
|
Step |
Description |
|---|---|
|
Create a build task, add the version number parameter, and reference it in the build step. |
|
|
Create an application, add a software package parameter, and reference it in the deployment step. |
|
|
Create a pipeline, add the version number parameter, and add the created build task and application to the pipeline.
|
|
|
Check whether:
|
Preparations
- You have enabled and authorized CodeArts Pipeline.
- You have created a project. The following uses a Scrum project named Project_Test as an example.
- You have created a code repository. The following uses a repository named Repo_Test (created using the Java Maven Demo template) as an example.
- You need to prepare a host with an EIP. You can use an existing host or purchase a Huawei Cloud ECS.
Step 1: Create a Build Task
- Log in to the Huawei Cloud console.
- Click
 in the upper left corner of the page and choose from the service list.
 - Click Access Service.
- Click Homepage from the top navigation pane. Search for the project created in Preparations and access the project.
- In the left navigation pane, choose CICD > Build.
- Click Create Task and enter basic information.
Table 2 Basic information Parameter
Description
Name
Build task name. Enter BuildTask01.
Project
Keep the default value, which is the project of the build task.
Code Source
Code source associated with the build task. Select Repo.
Repository
Code repository associated with the build task. Select the code repository Repo_Test created in Preparations.
Default Branch
Select master.
- Click Next, select the Maven template, and then click OK.
- On the Parameters tab page, add the releaseversion parameter, and toggle on Runtime Settings.
Figure 1 Creating a build parameter

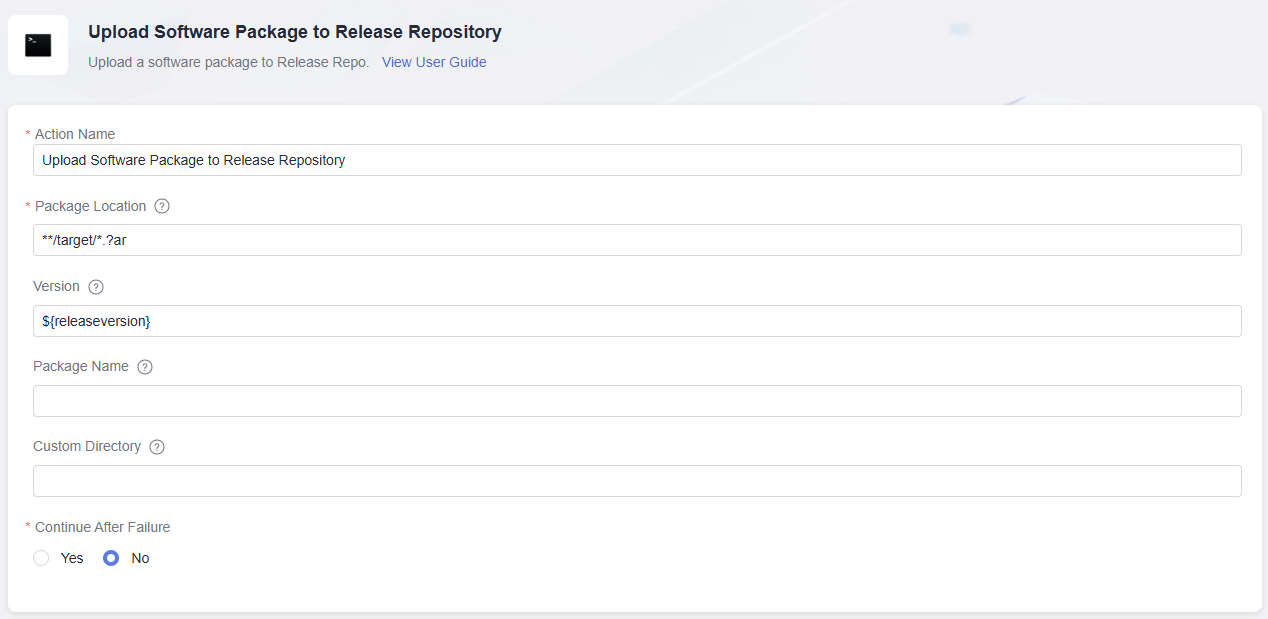
- On the Build Actions page, click Upload Software Package to Release Repository. For the Version field, enter ${releaseversion}, and retain the default values for other fields.
Figure 2 Configuring build actions
- Click Save.
Step 2: Create an application
- In the left navigation pane, choose . On the displayed page, click Create Host cluster and add the purchased host to the cluster.
- In the left navigation pane, choose CICD > Deploy.
- Click Create Application. On the displayed page, enter an application name DeployTask01, click Next, select Blank Template, and click OK.
- Click the Parameters tab. On the displayed page, create a custom parameter package_url, and toggle on Runtime Settings.
Figure 3 Creating a deployment parameter

- Click the Environment Management tab. On the displayed page, click Create Environment, enter an environment name Environment01, and click Save. On the displayed Resources page, click Import Host to import the host to the environment.
- Click the Deployment Actions tab. On the displayed page, configure the Select Deployment Source action as shown in Table 3.
Figure 4 Configuring deployment actions
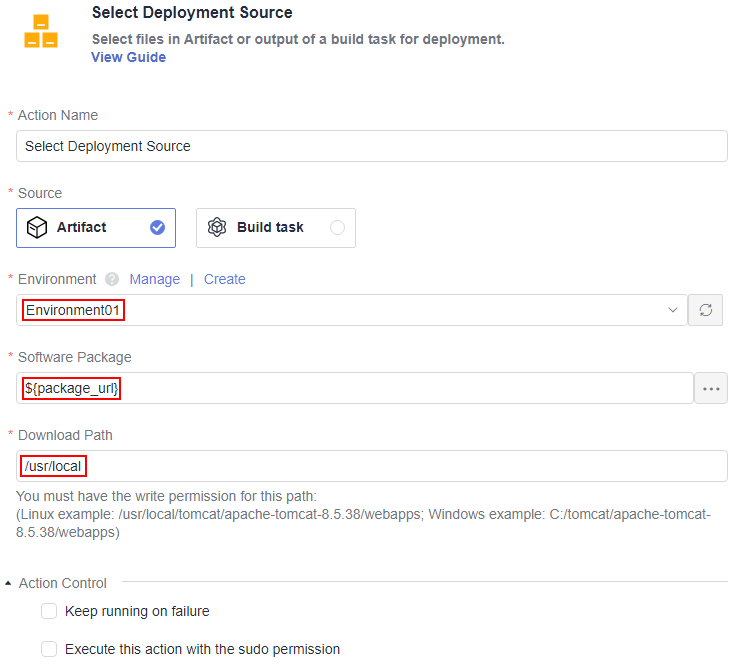
Table 3 Configuring deployment actions Parameter
Description
Action Name
Retain the default value.
Source
Software package source. Select Artifact.
Environment
Environment for deployment. Select Environment01.
Software Package
Software package to be deployed. Obtain the build package uploaded by the build task to Release Repos. Set this parameter to ${package_url} to reference the package_url parameter.
Download Path
Path for downloading the software package to the target host. Enter /usr/local.
Action Control
Retain the default setting.
- Click Save.
Step 3: Create and Execute a Pipeline
- In the navigation pane on the left, choose CICD > Pipeline.
- Click Create Pipeline and configure the pipeline information as shown in Table 4.
Table 4 Pipeline information Parameter
Description
Name
Enter Pipeline-Test.
Code Source
Code source associated with the pipeline. Select Repo.
Repository
Code repository associated with the pipeline. Select the code repository Repo_Test created in Preparations.
Default Branch
Select master.
- After configuring the basic information, click Next. On the displayed Select Template page, select Blank Template and click OK. The Task Orchestration page is displayed.
- Click the Parameter Configuration tab. On the displayed page, create a custom parameter releaseversion, set its default value to ${TIMESTAMP}, and click the toggle
 to enable Runtime Setting.
 - Click the Task Orchestration page. On the displayed page, two stages (Pipeline Source and Stage_1) are generated by default. Click Stage to add a new stage (Stage_2).
- Click Job under the Stage_1 and select From empty. Search for the Build extension, move the cursor to this extension, click Add, select the created build task, select the repository associated with the build task, and set releaseversion to ${releaseversion} to reference the releaseversion parameter of the pipeline.
Figure 5 Adding a build task
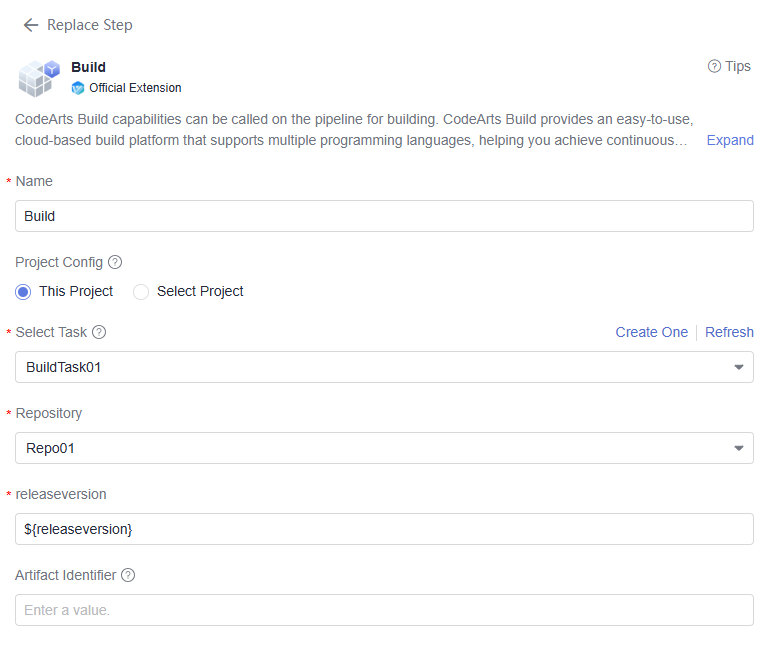
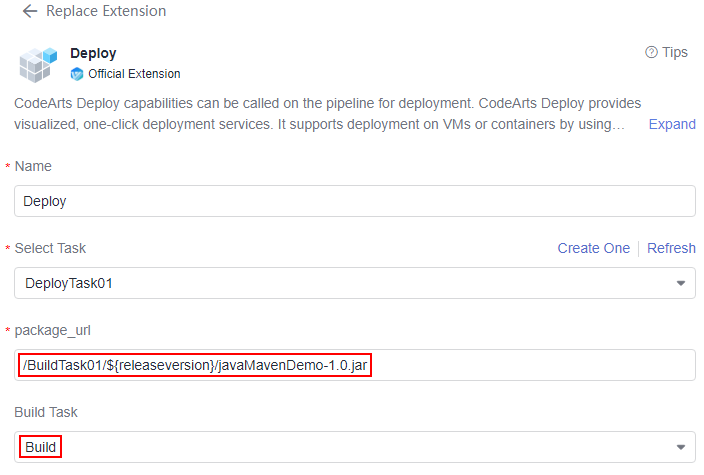
- Click Job under the Stage_2 stage and select From empty. In the displayed window, search for the Deploy extension, move the cursor to this extension, click Add, select the created application, enter the package_url path by referring to Figure 6, and associate with the build task in Step 6.

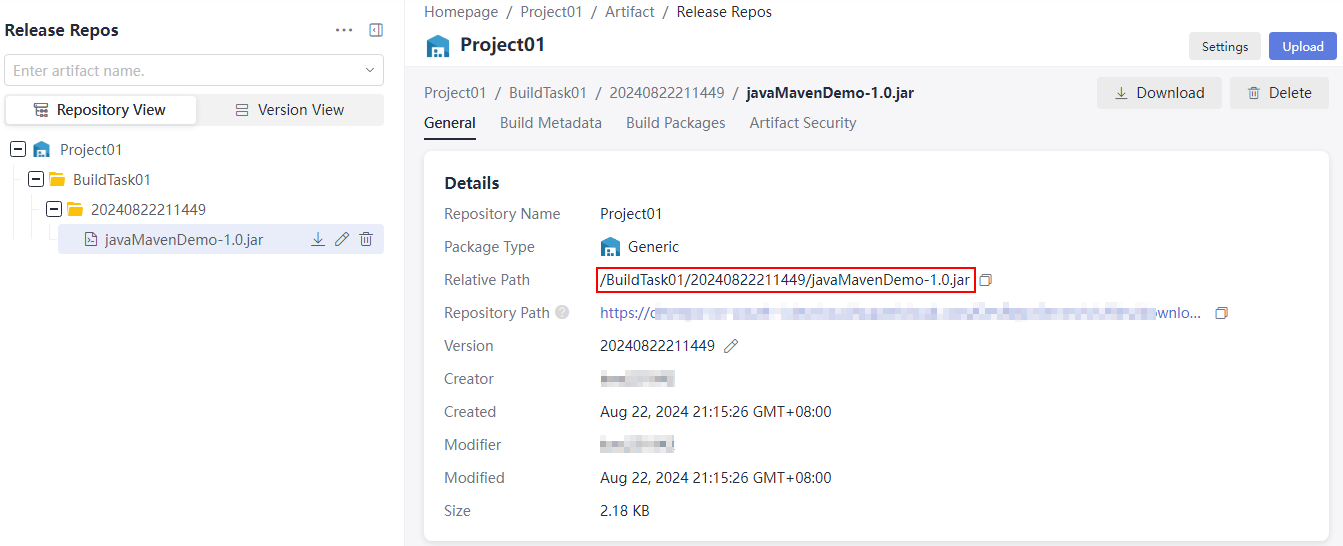
package_url is the relative path of the build package in Release Repos. The path includes the build task name, version number, and package name. In this section, the pipeline releaseversion parameter indicates the version number.
- Click Save and Execute.
Step 4: Check Build and Deployment Results
After the pipeline is successfully executed, check whether the pipeline parameter has been transferred to the build and deployment jobs.
- Check the build result
- In the navigation pane on the left, choose Artifact > Release Repos.
- Expand the project navigation tree on the left to check the uploaded build package.
- Check the deployment result
- Click the username in the upper right corner and choose CodeArts Console to access the console.
- Click
 in the upper left corner, search for Elastic Cloud Server, and click it to access its console.
 - Locate the ECS used for deployment, click Remote Login in the Operation column.
- In the Other Login Modes area, select Log in using Remote Login on the management console and click Log In.
- Enter the username and password for purchasing the ECS. Press Enter.
- Enter the following command and press Enter to go to the directory /usr/local configured during the Create an Application step.
cd /usr/local
- Enter the following command and press Enter. The deployed build package is displayed as shown in the following figure, which indicates that the pipeline parameter has been successfully transferred.
ls -al
Figure 8 Checking the deployment result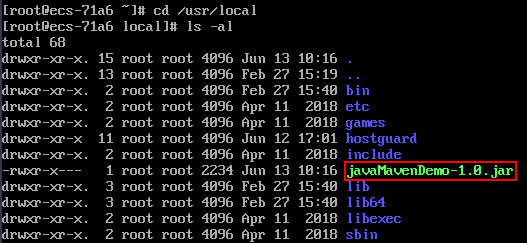
Feedback
Was this page helpful?
Provide feedbackThank you very much for your feedback. We will continue working to improve the documentation.See the reply and handling status in My Cloud VOC.
For any further questions, feel free to contact us through the chatbot.
Chatbot

