Configuring Pass Conditions for Automated Code Checks
Overview
Traditional software quality relies mainly on manual tests, leading to low efficiency.
CodeArts Pipeline uses pass conditions to control whether a pipeline can proceed to the next stage. You can apply policies to pipelines as pass conditions for efficient project management and high-quality delivery.
With CodeArts Pipeline, more than 70% issues can be intercepted through automated code checks. This improves test efficiency and software quality.
Procedure
The following describes how to configure code check thresholds and apply pass conditions to a stage for automated check.
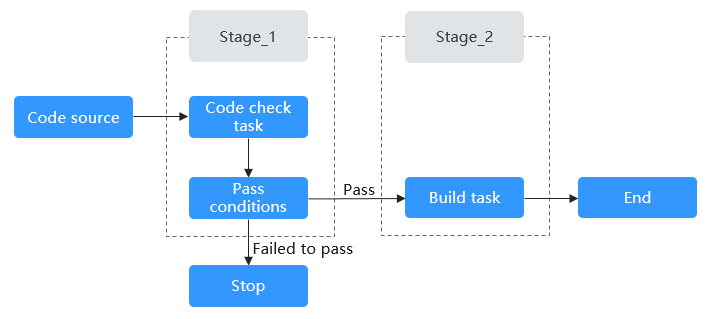
Perform the following procedure.
|
Step |
Description |
Billing |
|---|---|---|
|
Create a rule of the code check type and configure thresholds for the rule. |
Upgrade the CodeArts package to the basic edition. For details, see CodeArts Billing Modes. |
|
|
Add the preceding code check rule to the created policy. |
Upgrade the CodeArts package to the basic edition. For details, see CodeArts Billing Modes. |
|
|
Add the preceding policy to the pass conditions. |
No billing involved. |
|
|
Execute the pipeline:
|
No billing involved. |
Preparations
- You have enabled and authorized CodeArts Pipeline.
- You have created a project. The following uses a Scrum project named Project_Test as an example.
- You have created a code repository. The following uses a repository named Repo_Test (created using the Java Maven Demo template) as an example.
A code check task with the same name as the code repository is automatically created. Change the task name to CheckTask01 by referring to Creating a Task.
- You have created a build task with the Repo_Test repository. The following uses a build task (created using the Maven template) named BuildTask01 as an example.
- You have created a pipeline with the Repo01 repository. The following uses a pipeline named Pipeline-Test (created using the blank template) as an example.
Step 1: Create a Rule and Configure Thresholds
- Log in to the Huawei Cloud console.
- Click
 in the upper left corner of the page and choose from the service list.
 - Click Access Service.
- Click the avatar icon in the upper right corner and choose All Account Settings from the drop-down list.
- In the navigation pane on the left, choose Policy Management > Rules.
- Click Create Rule. On the displayed page, configure parameters.
Figure 2 Creating a rule
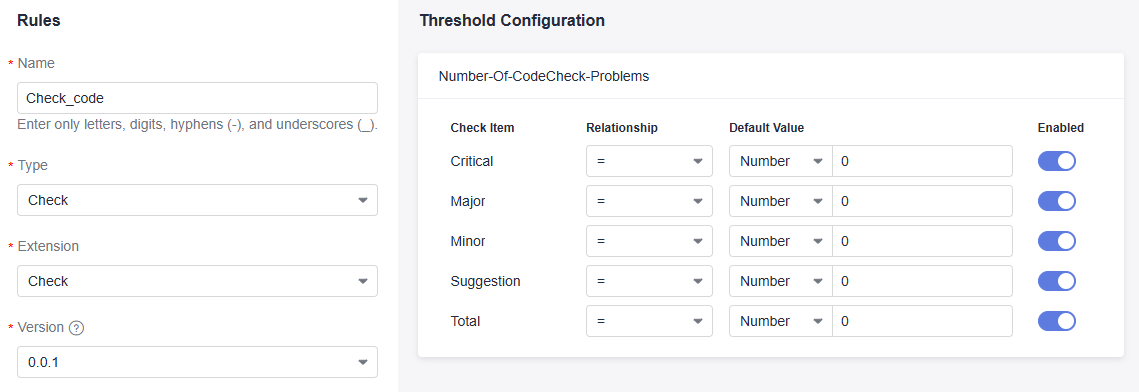
Table 2 Rule parameters Parameter
Description
Name
Enter a rule name, such as Check_code.
Type
Select the rule type Check.
Extension
Select the extension Check.
Version
Select the version 0.0.1.
Threshold Configuration
The extension thresholds are automatically filled based on the selected extension version. You can use the default values.
- Click OK.

Step 2: Create a Policy and Add a Rule to the Policy
There are tenant-level policies and project-level policies. Tenant-level policies can be applied to pipelines of all projects under the current tenant, while project-level policies can be applied to all pipelines under the current project. The following uses a tenant-level policy as an example.
- In the navigation pane on the left, choose Policies.

A system policy exists by default. You can view and use the policy, but cannot edit or delete it.
- Click Create Policy. On the displayed page, enter a policy name and select the rule created in Step 1: Create a Rule and Configure Thresholds.
Figure 3 Creating a policy

- Click OK.

Step 3: Configure a Pipeline
- On the top navigation bar, click Homepage.
- Search for the project created in Preparations and access the project.
- In the navigation pane on the left, choose CICD > Pipeline.
- Search for the pipeline created in Preparations, click
 in the Operation column, and select Edit. The Task Orchestration page is displayed.
 - Click
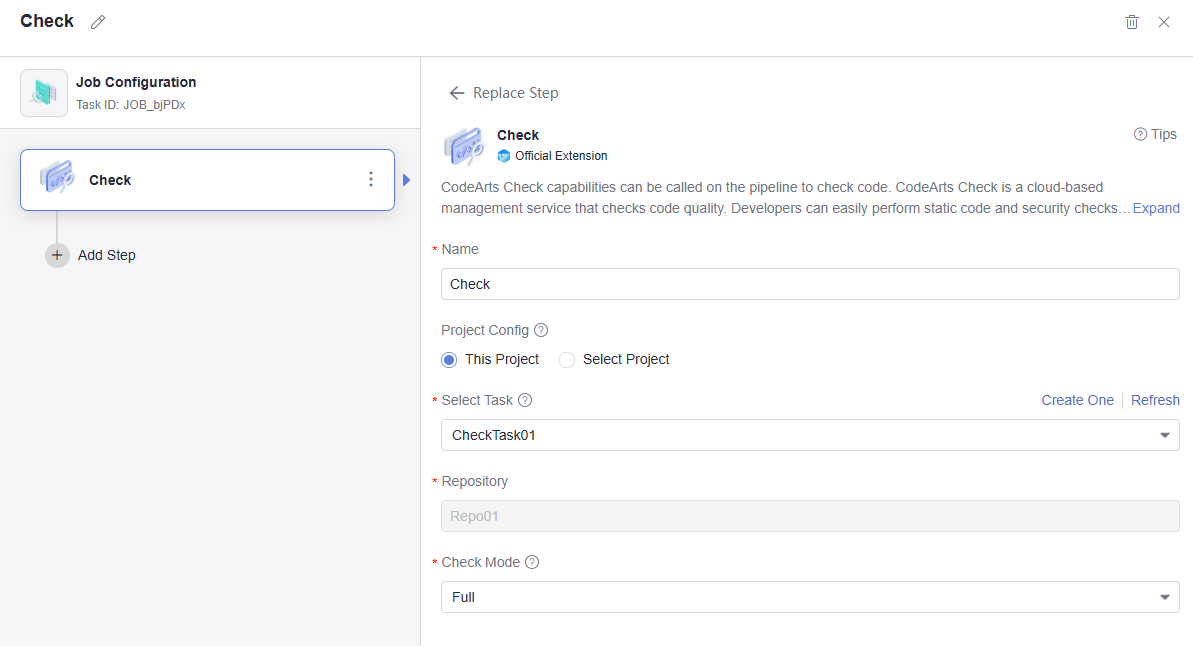
 under Stage_1, select From empty, add the code check task created in Preparations, set Check Mode to Full, and click OK.
Figure 4 Adding a code check task
- Click
 under Stage_1, on the displayed window, add Pass-Conditions-of-Standard-Policies, and select the policy created in Step 2: Create a Policy and Add a Rule to the Policy.
Figure 5 Adding pass conditions
- Click
 or
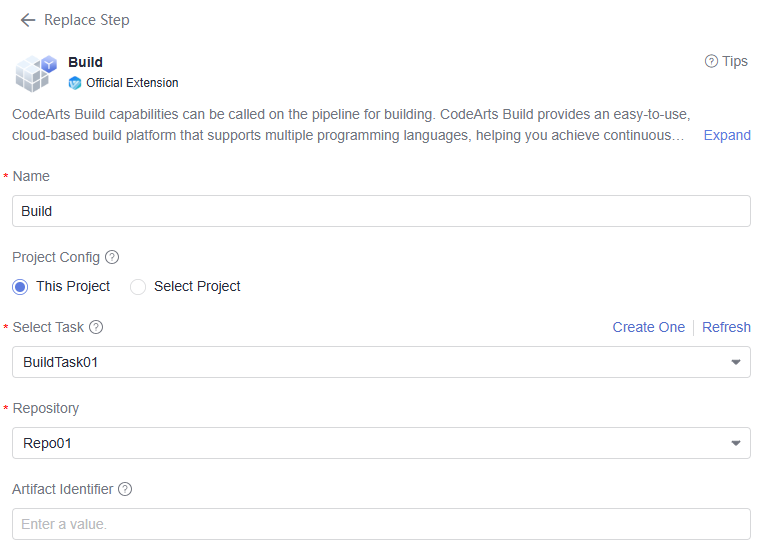
or  to add a new stage for the pipeline, add the build task created in Preparations, select the associated repository for the build task, and click OK.
Figure 6 Adding a build task
Step 4: Execute the Pipeline
- After configuring the pipeline, click Save and Execute.
- Check the execution result.
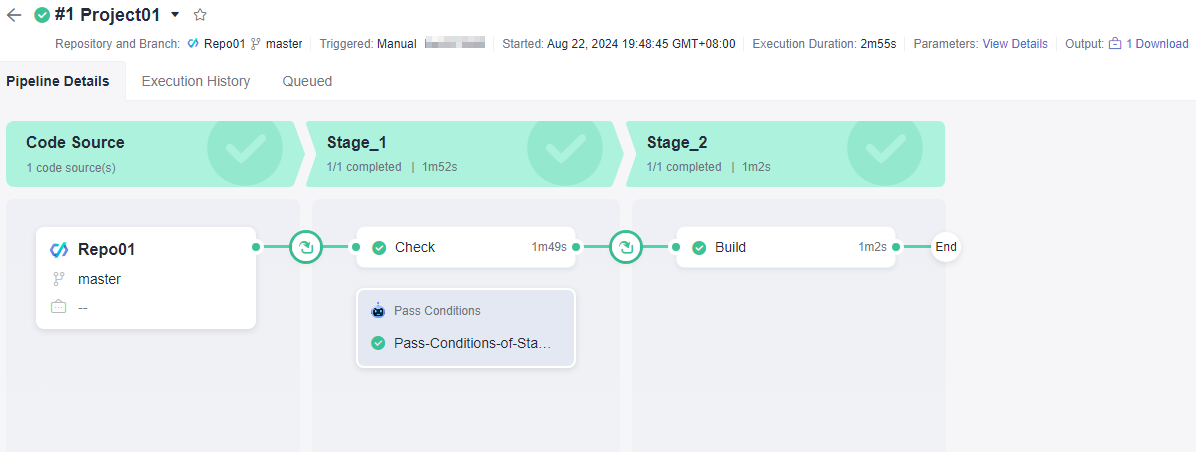
- If the code check job meets the pass conditions, the pipeline will proceed to the next stage, as shown in the following figure.
Figure 7 Executing a pipeline
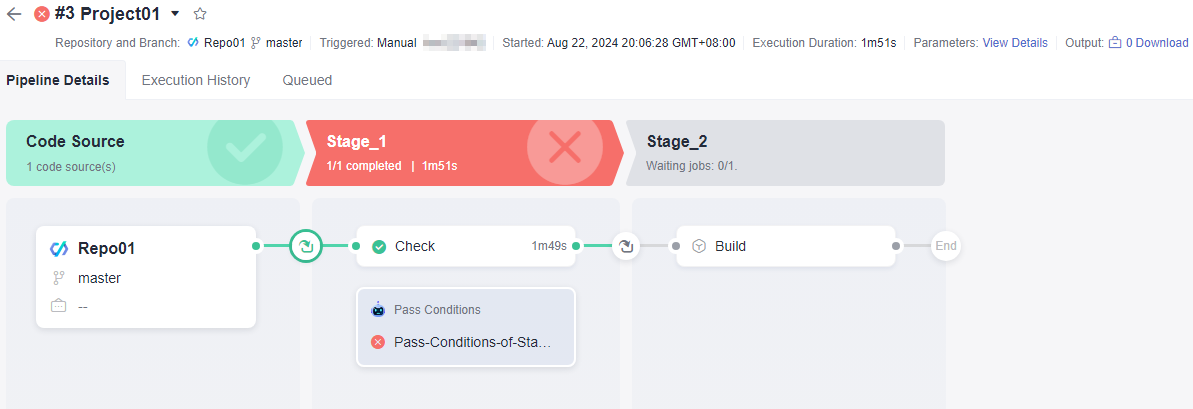
- If the code check task does not meet the pass conditions, the pipeline will stop running, as shown in the following figure. You can click the pass conditions card to check details.
Figure 8 Executing a pipeline
- If the code check job meets the pass conditions, the pipeline will proceed to the next stage, as shown in the following figure.
Feedback
Was this page helpful?
Provide feedbackThank you very much for your feedback. We will continue working to improve the documentation.See the reply and handling status in My Cloud VOC.
For any further questions, feel free to contact us through the chatbot.
Chatbot


