
Uploading Data from a Web Client to OBS and Setting an Upload Callback
Scenarios
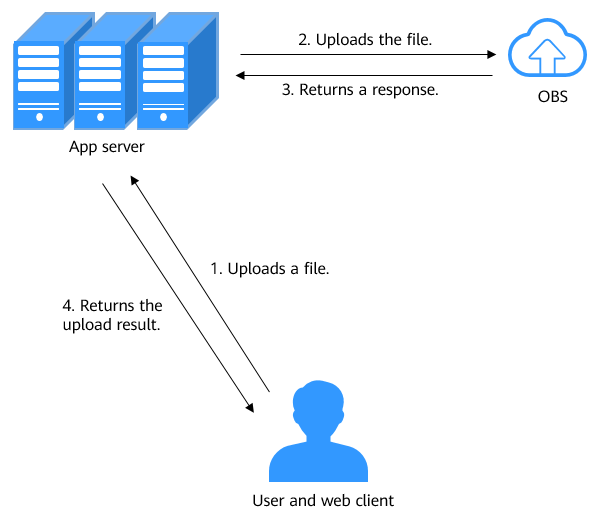
As shown in Figure 1, files are commonly uploaded through a browser to the app server and then uploaded to OBS. Data transfer on the app server results in a low efficiency. Moreover, the app server will be heavily loaded if multiple tasks are uploaded concurrently.
This section describes how to use the PostObject API to directly upload a file from a web client to OBS and set an upload callback, which is called form-based upload. After the upload is successful, the specified address will receive a callback. Solution Architecture shows the solution architecture of form-based upload. In this solution, a file is directly uploaded from a web client to OBS without being transferred through the app server. This makes the transfer faster and does not impose pressure on the server. Additionally, using a signature returned by the server makes direct transfer more secure.
Solution Architecture
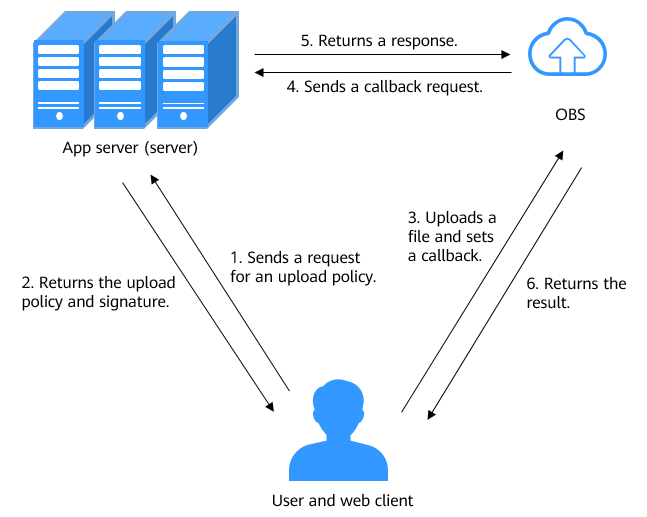
The following describes the process of uploading a file from a web client to OBS and setting an upload callback:
- A user sends a request to the server through the web client to obtain an upload security policy.
- The server calculates the signature using the security credentials and upload security policy, and returns the upload security policy and signature to the web client.
- The user uses the HTML form constructed on the web client to upload a file to OBS and set an upload callback.
- OBS sends a callback request to the server.
- The server returns a response to OBS.
- OBS returns the upload result to the web client.

A security policy defines which content can be uploaded using a form. For example, you can specify in a policy that only objects whose name starts with prefix01 can be uploaded using a form.
Resource Planning
| Region | Resource | Resource Name | Description | Quantity | Billing |
|---|---|---|---|---|---|
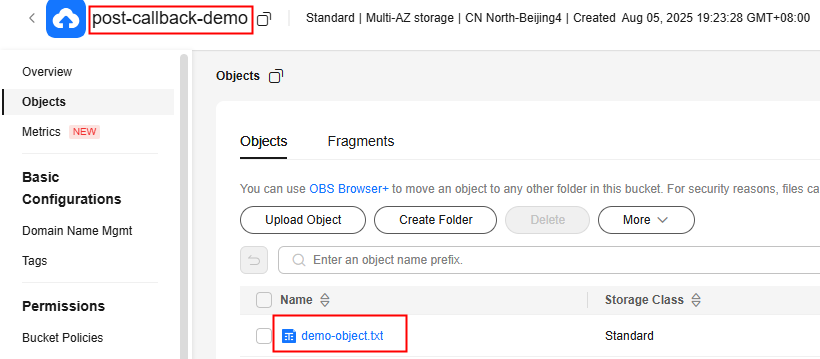
| CN North-Beijing4 | OBS bucket | post-callback-demo | The bucket used to store the uploaded file You need to create a bucket on OBS Console. | 1 | You will be billed for the storage space occupied by the file. For details, see Storage Space. |
| - | File | demo-object.txt | The file to be uploaded You need to prepare the file to be uploaded in advance. | 1 | - |
| - | AK/SK pair | AK/SK | The credential for accessing OBS. The server uses the AK/SK pair to generate a signature for user authentication. For details about AKs and SKs, see Access Keys. | 1 | - |
Operation Process
To upload a file from a web client to OBS and set an upload callback, do as follows:
- Create a bucket and configure a CORS rule: Create a bucket on OBS Console for storing the uploaded file. Configure a cross-origin resource sharing (CORS) rule for the bucket to allow cross-origin access from the web client.
- Request a signature from the server: Request the server to generate a signature. The signature is generated using the security credentials and upload policy (with the bucket name, object name prefix, expiration time, and others included), which authorizes you to complete the file upload within a specified time.
- Upload a file using a form and set an upload callback: Construct a POST request in an HTML form on the web client and set an upload callback.
Procedure
Step 2: Generate a Signature on the Server
The server generates a signature using the security credentials (the AK/SK pair and an optional security token) and upload policy (with the bucket name, object name prefix, expiration time, and others included). The signature authorizes you to complete the file upload within a specified time. To obtain or create an AK/SK pair, see Access Keys.

You are advised to configure the security credentials as environment variables to avoid exposing sensitive information in the code.
1. Configure environment variables.
- For Linux
- Run the following commands to add the environment variables to ~/.bashrc:
echo "export ACCESS_KEY_ID='your access key id'" >> ~/.bashrc
echo "export SECRET_ACCESS_KEY_ID='your secret access key id'" >> ~/.bashrc
- Run the following command to apply the settings in 1:
source ~/.bashrc
- Run the following commands to check whether the environment variables are successfully configured:
echo $ACCESS_KEY_ID
echo $SECRET_ACCESS_KEY_ID
- Run the following commands to add the environment variables to ~/.bashrc:
- For Windows
- Run the following commands in the Command Prompt (CMD) to configure the environment variables:
setx ACCESS_KEY_ID "your access key id"
setx SECRET_ACCESS_KEY_ID "your secret access key id"
- Open a new CMD window and run the following commands to check whether the environment variables are successfully configured:
echo %ACCESS_KEY_ID%
echo %SECRET_ACCESS_KEY_ID%
- Run the following commands in the Command Prompt (CMD) to configure the environment variables:
- For macOS
- Open the bash terminal and run the following commands to add the environment variables to ~/.bash_profile:
echo "export ACCESS_KEY_ID='your access key id'" >> ~/.bash_profile
echo "export SECRET_ACCESS_KEY_ID='your secret access key id'" >> ~/.bash_profile
- Run the following command to apply the settings in 1:
source ~/.bashrc
- Run the following commands to check whether the environment variables are successfully configured:
echo $ACCESS_KEY_ID
echo $SECRET_ACCESS_KEY_ID
- Open the bash terminal and run the following commands to add the environment variables to ~/.bash_profile:
2. Calculate the signature.
You can calculate the POST upload signature using the web framework and OBS SDK of a programming language. A security policy defines which content can be uploaded using a form. For example, you can specify in a policy that only objects whose name starts with prefix01 can be uploaded using a form. For more information about security policies, see Signing Browser-Based Upload Requests.
Obtain the security credentials and calculate the signature by referring to the following Java sample code:
1 2 3 4 5 6 7 8 9 10 11 12 13 14 15 16 17 18 19 20 21 22 23 24 25 26 27 28 29 30 31 32 33 34 35 36 37 38 39 40 41 42 43 44 45 46 47 48 49 50 51 52 53 54 55 56 57 58 59 60 61 62 63 64 65 66 67 68 69 70 71 72 73 74 75 | @Controller public class FormUploadCallbackController { String bucket = "post-callback-demo"; // The OBS address in CN North-Beijing4 is used as an example. String host = "obs.cn-north-4.myhuaweicloud.com"; String endpoint = "https://" + host; String callbackUrl = "http://obs-demo.huaweicloud.com:12345/callback"; //Specify the name prefix of files that can be uploaded to OBS. String prefix = "demo"; @GetMapping("/obs-post-callback-signature") public ResponseEntity<Map<String, String>> getSignature() throws Exception { // Obtain an AK/SK pair using environment variables or import the AK/SK pair in other ways. Using hard coding may result in leakage. // Obtain an AK/SK pair on the management console. String ak = System.getenv("ACCESS_KEY_ID"); String sk = System.getenv("SECRET_ACCESS_KEY_ID"); // (Optional) If you are using a temporary AK/SK pair and a security token to access OBS, you are advised not to use hard coding, which may result in information leakage. // Obtain an AK/SK pair and a security token using environment variables or import them in other ways. // String securityToken = System.getenv("SECURITY_TOKEN"); // Create an ObsClient instance. // (Optional) Use a temporary AK/SK pair and security token to initialize the client. // try ( ObsClient obsClient = new ObsClient(ak, sk, securityToken, endpoint)){ // Use a permanent AK/SK pair to initialize the client. try ( ObsClient obsClient = new ObsClient(ak, sk, endpoint)){ // 1. Specify conditions in a policy. // Generate a request for a form-based upload. PostSignatureRequest request = new PostSignatureRequest(); // Configure form parameters. Map<String, Object> formParams = new HashMap<>(); // Set the object ACL to public-read. Modify other configurations as required. formParams.put("x-obs-acl", "public-read"); request.setFormParams(formParams); List<String> conditions = new ArrayList<>(); // Set signature conditions for the POST request. conditions.add("[\"starts-with\", \"$key\", \"demo/\"]"); conditions.add("{\"bucket\": \"post-callback-demo\"}"); request.setConditions(conditions); // Configure the validity period (in seconds) for a form-based upload request. request.setExpires(3600); PostSignatureResponse response = obsClient.createPostSignature(request); System.out.println("createPostSignature successfully"); // Obtain the request parameters. System.out.println("Policy:" + response.getPolicy()); System.out.println("Signature:" + response.getSignature()); Map<String, String> signResponse = new HashMap<>(); signResponse.put("prefix", prefix); signResponse.put("accessKeyId", ak); signResponse.put("policy", response.getPolicy()); signResponse.put("signature", response.getSignature()); // (Optional) If you are using a temporary AK/SK pair and a security token to access OBS, the security token is returned. // signResponse.put("securityToken",securityToken); signResponse.put("host", host); signResponse.put("bucket", bucket); signResponse.put("callbackUrl", callbackUrl); signResponse.put("callbackBody", "key=$(key)&hash=$(etag)&fname=$(fname)&fsize=$(size)"); signResponse.put("callbackBodyType", "application/json"); return ResponseEntity.ok(signResponse); } catch (ObsException e) { System.out.println("createPostSignature failed"); // Request failed. Print the HTTP status code. System.out.println("HTTP Code:" + e.getResponseCode()); // Request failed. Print the server-side error code. System.out.println("Error Code:" + e.getErrorCode()); // Request failed. Print the error message. System.out.println("Error Message:" + e.getErrorMessage()); // Request failed. Print the request ID. System.out.println("Request ID:" + e.getErrorRequestId()); System.out.println("Host ID:" + e.getErrorHostId()); e.printStackTrace(); throw e; } } } |
Verification
The HTML form contains a file selection box and an upload button. You can select the file to be uploaded and submit the form.
When the form is submitted, JavaScript sends a request to the server to obtain the required signature and callback information. Once a valid response is received, the FormData object is constructed and populated with all required data. A POST request is then made to the OBS server using the fetch method to complete the file upload. Once the upload succeeds, a callback is triggered to the address specified by callbackUrl.
Upload the demo-object file to bucket post-callback-demo using the form. If the demo-object file can be found in the bucket post-callback-demo, the file is successfully uploaded.
Feedback
Was this page helpful?
Provide feedbackThank you very much for your feedback. We will continue working to improve the documentation.See the reply and handling status in My Cloud VOC.
For any further questions, feel free to contact us through the chatbot.
Chatbot


