Configuring Network Connection Between Cloud Desktops and Windows AD
Scenarios
When the Windows AD is deployed on the enterprise intranet or in the same VPC as the cloud desktop, if the cloud desktop uses the Windows AD for authentication, you need to configure the network connection between the cloud desktop and the Windows AD.
Prerequisites
You have obtained the domain administrator account and password.
Procedure
Scenario 1: Deploying the Windows AD in the customer's data center intranet

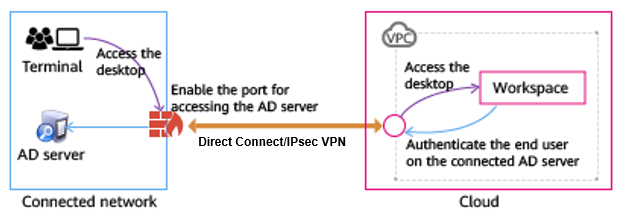
- Use Direct Connect or IPsec VPN to connect the customer data center to the VPC. For details, see Direct Connect Getting Started or VPN Administrator Guide.
- If a firewall is deployed between the Windows AD and the cloud desktop, enable the following ports on the firewall for successful connection, as shown in Table 1.
Table 1 Port list Role
Port
Agreement
Description
AD
135
TCP
Port for the Remote Procedure Call (RPC) protocol (LDAP, DFS, and DFSR)
137
UDP
Port for NetBIOS name resolution (network login service)
138
UDP
Port for the NetBIOS data gram service (DFS and network login service)
139
TCP
Port for the NetBIOS-SSN service (network basic input/output)
445
TCP
Port for the NetBIOS-SSN service (network basic input/output)
445
UDP
Port for the NetBIOS-SSN service (network basic input/output)
49152-65535
TCP
RPC dynamic port (This port is not hardened and opened on AD. If it is hardened on AD, ports 50152 to 51151 need to be enabled.)
49152-65535
UDP
RPC dynamic port (This port is not hardened and opened on AD. If it is hardened on AD, ports 50152 to 51151 need to be enabled.)
88
TCP
Kerberos key distribution center service
88
UDP
Kerberos key distribution center service
123
UDP
NTP service
389
UDP
LDAP server
389
TCP
LDAP server
464
TCP
Kerberos authentication protocol
464
UDP
Kerberos authentication protocol
500
UDP
isakmp
593
TCP
RPC over HTTP
636
TCP
LDAP SSL
DNS
53
TCP
DNS server
53
UDP
DNS server
- After the configuration is complete, check whether the networks and ports are working properly by referring to Verification Methods.
Scenario 2: Deploying the Windows AD in another subnet of the VPC where the cloud desktop is located

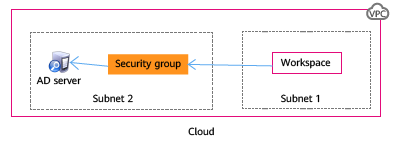
- Create a security group in the VPC. For details, see Creating a Security Group.
- Add an inbound rule. For details, see Adding a Security Group Rule.
- After the security group is created, apply the security group to the Windows AD management server so that the cloud desktop can communicate with the Windows AD.

To minimize the number of open ports and protocols, you can add multiple inbound rules to a security group and enable only the ports and protocols listed in Table 1.
- After the configuration is complete, check whether the networks and ports are working properly by referring to Verification Methods.
Verification Methods
- Check the firewall or security group settings of the AD server and ensure that ports in Table 1 are enabled.

For details about the port requirements of the Windows AD server, see Active Directory and Active Directory Domain Services Port Requirements.
- Use the ECS service to create a Windows OS instance in the VPC where the user desktop is located and add the instance to an existing domain.

For details about ECS configurations and operations, see ECS User Guide. Use the RDP client tool (such as mstsc) or VNC to log in to the Windows instance.
- Use an RDP client tool (such as mstsc), or VNC to log in to the Windows instance.
- Download ADTest.zip to the Windows instance and decompress it.
- Press Shift and right-click the blank area of the folder where ADTest.exe is located, and choose Open command windows here from the shortcut menu.
- In the displayed CLI, run the following command to check the connectivity of the Windows AD management server:
ADTest.exe -file ADTest.cfg -ip IP address of the Windows AD -domain Domain name of the Windows AD -user Domain administrator account
In this example, run the following command:
ADTest.exe -file ADTest.cfg -ip 192.168.161.78 -domain abc.com -user vdsadmin
- Enter the password of user vdsadmin.
- Check whether all the returned test results are SUCCEEDED. If FAILED is displayed, check the AD management server configurations or firewall ports as prompted.
Feedback
Was this page helpful?
Provide feedbackThank you very much for your feedback. We will continue working to improve the documentation.See the reply and handling status in My Cloud VOC.
For any further questions, feel free to contact us through the chatbot.
Chatbot


