Scenario 1: Encryption Process and Typical Encryption Configuration
Encryption Process
The following figure shows the encryption process of database encryption and access control.
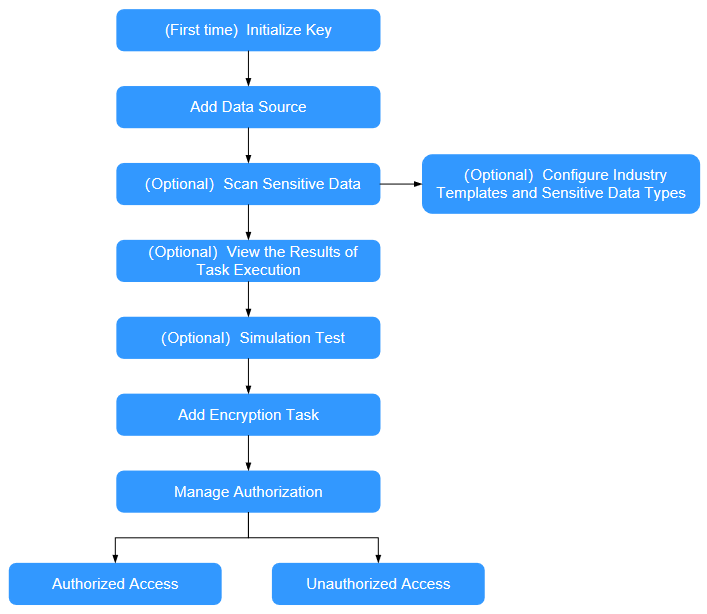
- Initialize the key for the first time.
When you use the system for the first time, initialize the key based on the key source. For details, see Initializing a Key.
- Add a data source.
Before using the data masking function, you need to add data assets to the system. For details, see Adding Data Assets.
- (Optional) Configure the industry template and sensitive data type.
The system has built-in sensitive data types and common industry templates that meet most requirements. If you have special requirements, you can also customize sensitive data types and industry templates. For details, see Adding an Industry Template and Adding a User-Defined Data Type.
- (Optional) Discover sensitive data.
Automatically scans and identifies sensitive data in data assets through sensitive data discovery tasks. For details, see Scanning Sensitive Data in Assets.
- (Optional) View the task execution result.
You can view the task execution result to check whether the result meets the sensitive data requirements. For details, see Viewing the Execution Result of a Scan Task.
- (Optional) Perform an emulation encryption test.
Perform a simulation encryption test to check whether the target supports encryption. For details, see Simulated Encryption Test.
- Create an encryption task.
You can create an encryption task based on sensitive data information in the result of a sensitive data discovery task. For details, see Creating an Encryption Task in the Result.
Encryption tasks can also be directly created in the data encryption module. For details, see Configuring an Encryption Task.
- Manage authorizations.
After encryption is configured, you can view only the encrypted data when accessing the database by default. To ensure the normal running of the application system, you need to obtain the data before encryption. In this case, you need to authorize the application system. For details, see Managing Authorization.
- After the configuration is complete, you can verify the configuration in the following ways:
- Use the authorized client address and user to access the database in proxy mode. In this case, you can view the plaintext data before encryption.
- Use an unauthorized client address or user to access the database in proxy mode. In this case, only encrypted data can be viewed.
Typical Configuration of the Encryption Function
Database encryption and access control encrypt sensitive data in the database to ensure data security. This example shows how to encrypt the database.
Networking description:
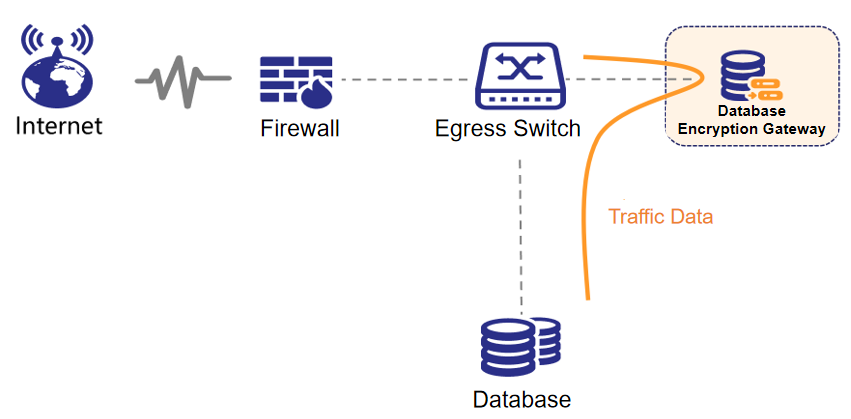
Database encryption and access control use the reverse proxy mode. The following figure shows the typical networking.
Prerequisite
- The route between the device and the application system is reachable.
- The route between the device and the database is reachable.
Step 1: Adding a Data Source
Before using the, you need to add the target database on the Asset Management page.
- Log in to the instance web console as user sysadmin.
- In the navigation pane, choose Assets Management > Data Source Management.
- Click Add Data Source in the upper right corner.
- In the Add Data Source dialog box, configure asset information.
Host information and log information are optional. The SSH service must be enabled on the database server.Figure 3 Adding a data source
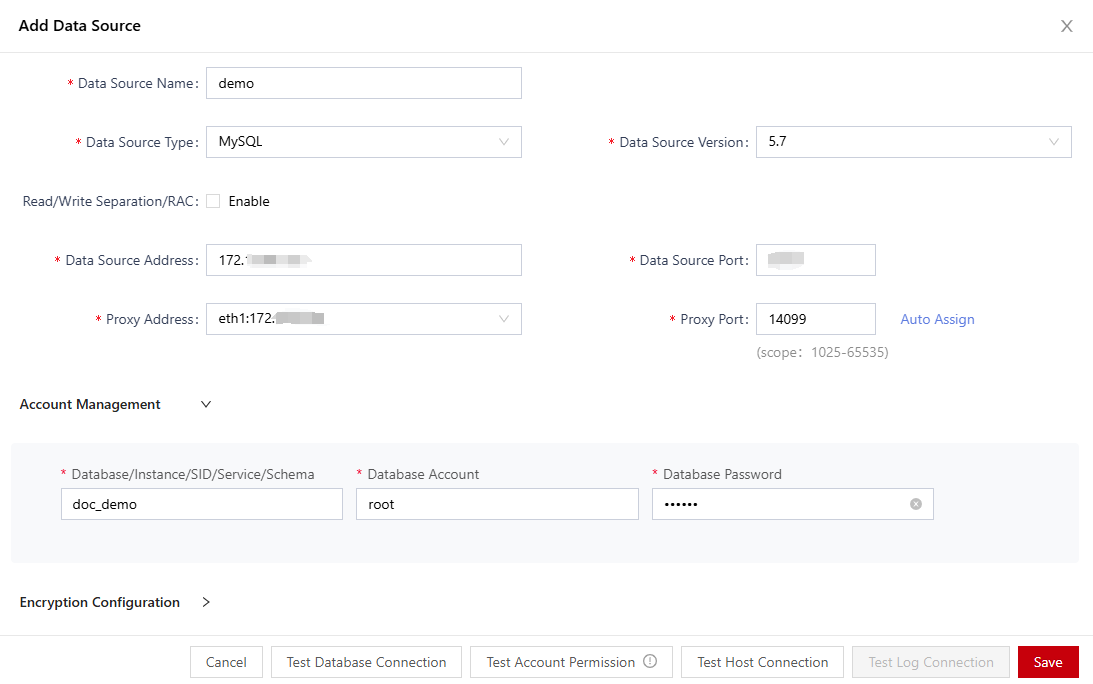
- After the configuration is complete, click Test Database Connection to check whether the database can be connected.
- Click Test Account Permission to check whether the database account permission meets the encryption requirements.
- Click Save.
Step 2: Executing a Sensitive Data Discovery Task
- Log in to the web console of the instance as user sysadmin.
- In the navigation tree on the left, choose Sensitive Data Discovery > Sensitive Data Scan.
- Find the target data asset and click Task Configuration.
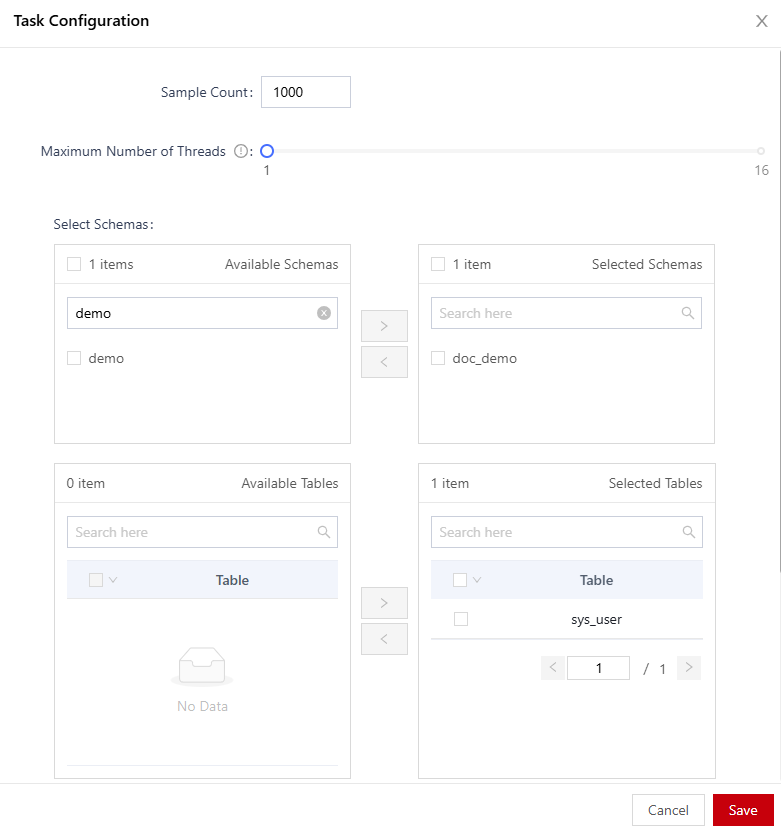
- In the Task Configuration dialog box, set a sensitive data discovery task.
Figure 4 Configuring a sensitive data discovery task
- Click Save.
- Find the target data asset and click
 to execute the sensitive data discovery task.
After the execution starts, the system automatically scans and identifies sensitive data. The scan duration depends on the amount of data to be scanned. The larger the amount of data, the longer the scan duration. You can view the scan progress on the page.
Step 3: Performing a Simulated Encryption Test
Before encrypting a database table, perform a simulation encryption test to check whether the database meets the encryption requirements.
- Log in to the web console of the instance as user sysadmin.
- In the navigation tree, choose Service Test > Simulation Test.
- Click Add Encryption Test.
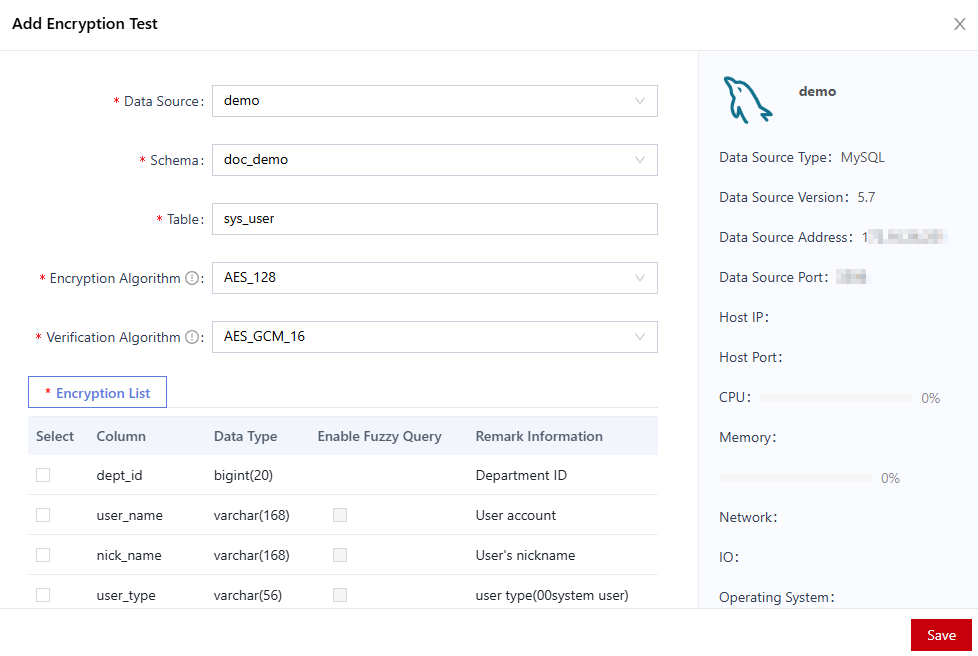
- In the Add Encryption Test dialog box, configure the test target.
Figure 5 Adding an encryption test
- Click Save.
After the test is complete, you can view the test result in the list and click Details to view the completion status of each node in the encryption process.
After the test is complete, click Delete to delete it.

- If a fault occurs during the simulation test, rectify the fault as prompted.
- If an encryption task needs to be configured after the test, delete the stimulated encryption test first.
Step 4: Creating an Encryption Task in the Discovery Result
- Log in to the web console of the instance as user sysadmin.
- In the navigation tree on the left, choose Sensitive Data Discovery > Sensitive Data Scanning.
- On the scan task list page, locate the target data asset and click View.
- On the scan result page, locate the target database table and click Add Encryption Task.
- In the Add Encryption Task dialog box, configure encryption information.
Figure 6 Adding an encrypted task
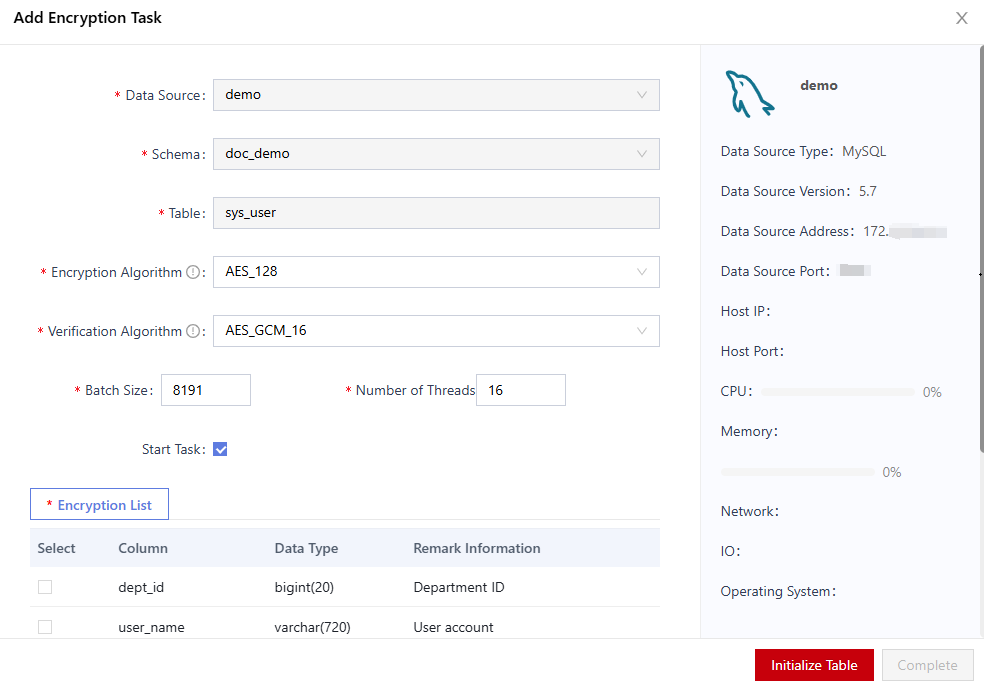
- Select an encryption algorithm from the Encryption Algorithm drop-down list box.
- Click the Encryption List tab and select the columns to be encrypted.
- Click Initialize Table to initialize the data table.
- Click Complete.
After the encryption task is executed, the encryption results of data will be retrieved when the database is accessed. In this case, you need to authorize the application system (or client) to access the application system (or client) to ensure that the application system (or client) can be used properly.
Step 5: Setting Access Authorization
The authorization management module supports client authorization and user authorization. The intersection of the two authorization modes is used.
- Log in to the web console of the instance as user sysadmin.
- In the navigation pane, choose Data Encryption > Authorization Management.
- In the data source list, click a data source.
- Locate the target encrypted database table and click Client Authorization.
- In the Client Authorization dialog box, set the client IP address range, time range, and week range, and then click Save.
Figure 7 Client authorization
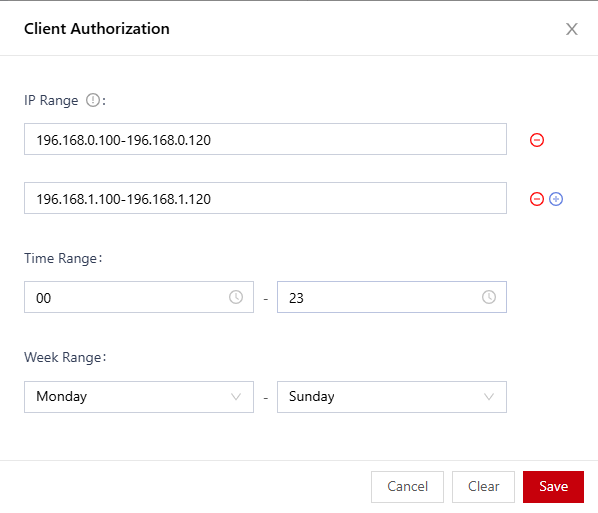
You can set the start IP address and end IP address for an IP address range. You can click
 to add multiple IP address ranges. A maximum of 10 IP address ranges can be set.
 - Locate the target encrypted database table and click User Authorization.
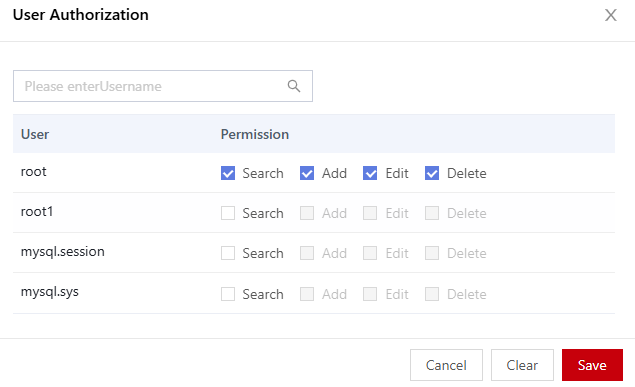
- In the User Authorization dialog box, set permissions for the database user and click Save.
Figure 8 User authorization
Step 6: Connecting to the Database Through a Proxy

The DBeaver tool is used as an example. In practice, you need to modify the information about the connection between the application system and the database.
This section uses the DBeaver tool as an example to describe how to connect to the database through a proxy.
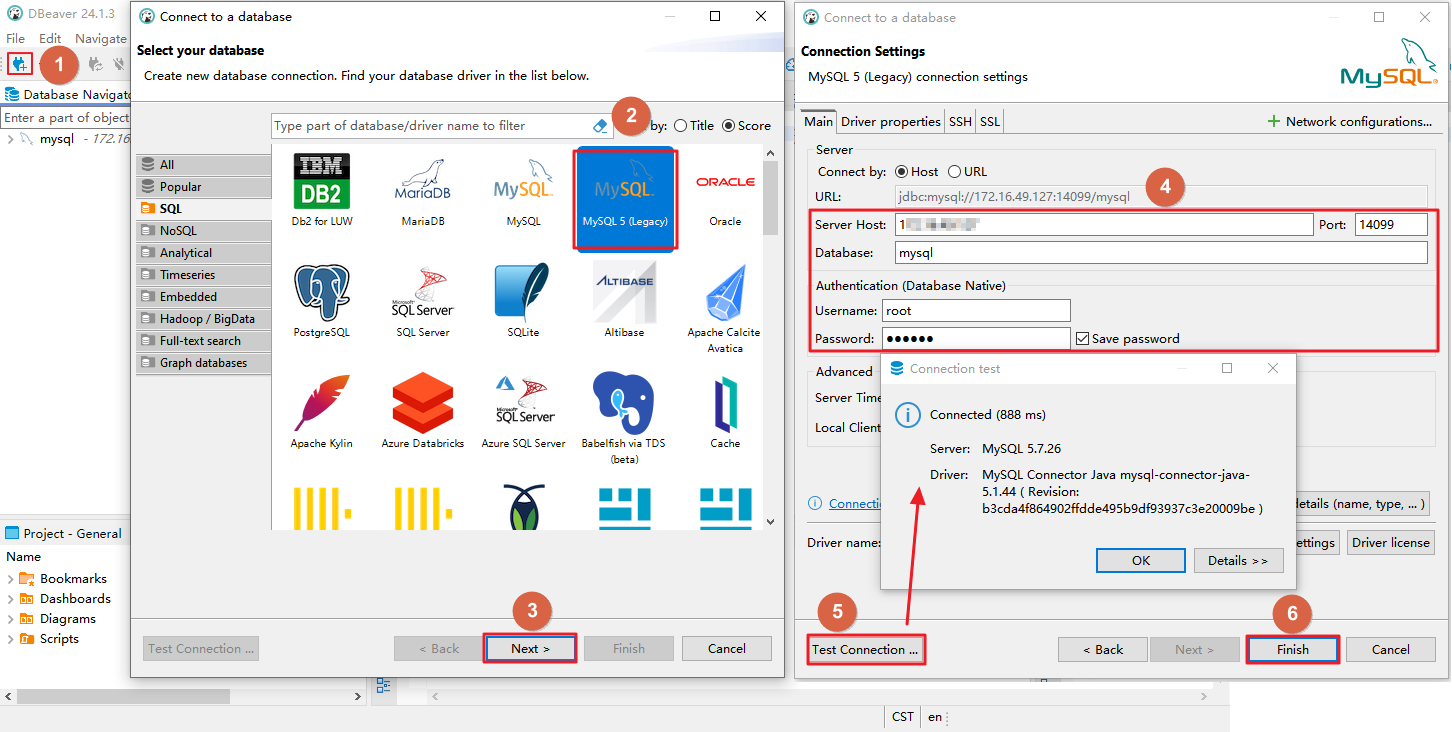
- Click
 .
. - In the Select your database dialog box, select MySQL.
- Click Next.
- In the Connection Settings dialog box, configure the connection information.
The connection information is described as follows:
- Address: IP address of database encryption and access control. For example, 192.xx.xx.54.
- Port: Use the proxy port, that is, the proxy port (14099) set during asset creation.
- Click Test Connection to check whether the database can be connected.
- After the test is passed, click Next and perform operations as prompted.
Step 7: Verifying the Encryption Result
Connect to the database by referring to Step 6 (Connecting to the Database Through a Proxy) to check whether the authorization is successfully configured.
- A user whose IP address is 192.168.0.105 (authorized address) can view plaintext data when accessing the database as an authorized user (for example, user root) in proxy mode.
Figure 10 Plaintext data

- A user whose IP address is 192.168.0.105 (authorized address) accesses the database as an unauthorized user (for example, user01) in proxy mode. Only encrypted data can be viewed.
Figure 11 Encrypted data

The encryption result is displayed based on the default display parameter of no permission configured during asset adding.
- The IP address of the user is 192.168.3.105 (an unauthorized address). When the user accesses the database in proxy mode as an authorized user (for example, user root), only encrypted data can be viewed.
Figure 12 Encrypted data

- In this case, use the original database address to access the database and view the ciphertext data.
Figure 13 Encrypted data

Feedback
Was this page helpful?
Provide feedbackThank you very much for your feedback. We will continue working to improve the documentation.See the reply and handling status in My Cloud VOC.
For any further questions, feel free to contact us through the chatbot.
Chatbot


