

Creating Scheduled Tasks
Scenarios
You can automatically execute scripts or jobs for target instances at a scheduled time, improving automated O&M efficiency.
You can perform operations on the Resource O&M > Automated O&M > Scheduled O&M > Create Task page.
Creating a Scheduled Task
- Log in to COC.
- In the navigation pane on the left, choose Resource O&M > Automated O&M.
- In the Routine O&M area, click Scheduled O&M.
- Click Create Task.
- Set Basic Information.
Table 1 Basic information parameters Parameter
Description
Example Value
Task Name
Customize a task name based on the naming rules.
The value can contain 3 to 100 characters, including letters, digits, hyphens (-), and underscores (_).
Test_Job
Enterprise Project
Select an enterprise project from the drop-down list.
default
Version
Enter the script version number.
1.0.0
Risk Level
Select High, Medium, or Low as required.
Medium
- Set Scheduled Settings.
Table 2 Parameters Parameter
Description
Time Zone
Select the time zone where the scheduled task is executed from the drop-down list.
Scheduled Type
Select a scheduled type.
- Single execution: A scheduled task is executed once at a specified time.
- Periodic execution: Execute the task periodically based on the specified rule until the rule expires.
Execution Time
It is used together with the timing type.
- For a single execution, set this parameter to the execution time.
- For periodic execution, select either of the following options:
- Simple: Select the execution time by week.
- Cron: Set the execution time using a cron expression. For details, see Using Cron Expressions.
Rule Expired
This parameter needs to be set when Timing Type is set to Periodic execution.
Configure the end time of the rule. The scheduled task is executed periodically based on the user-defined execution period until the rule end time.
- Perform operations by setting Task Type.
- Set Task Type.
- Scripts: Select a script from the drop-down list. You can select a custom script or common script.
- Script Input Parameters: If the script does not have input parameters, you do not need to set them.
- Executed By: root is set by default. It is the user who executes the script on a target instance node.
- Timeout Interval: 300 is set by default. It indicates the timeout interval for executing the script on a single target instance.
- Target Instance: Click Add and set Select Instance.
Table 3 Instance parameters Parameter
Description
Example Value
Selection Method
Select an instance selection method.- Manual Selection: Manually select an instance based on Enterprise Project, View Type, Resource Type, Region, and Target Instance.
- Select All: Automatically select all instances based on Enterprise Project, View Type, Resource Type, Region, and Target Instance.
Manual Selection
Enterprise Project
Select an enterprise project from the drop-down list. You can choose All.
All
View Type
Select a view type.
- CloudCMDB resources: Select an instance from the resource list.
- CloudCMDB application groups: Select an instance from the application group list.
CloudCMDB resources
Resource Type
The value can be ECS or BMS.
ECS
Region
Select a region from the drop-down list.
CN-Hong Kong
Target Instance
Set filter criteria in the filter box and select the filtered instances manually or automatically.
NOTE:If you select a task of ECS startup, ECS shutdown, or ECS restart, and select Select All for Selection Method, a maximum of 500 instances can be selected at a time. If more than 500 instances need to be selected, select Manual Selection for Selection Method.
-
- Batch Policy: Select Automatic, Manual, or No Batch.
- Automatic: The selected instances to be executed are automatically divided into multiple batches based on the preset rule.
- Manual: You can manually create multiple batches and add instances to each batch as required.
- No Batch: All instances will be executed in the same batch.
- Suspension Policy:
- You can set the execution success rate. When the number of failed hosts reaches the number failed ones that are calculated based on the execution success rate, the service ticket status becomes abnormal and the service ticket stops being executed.
- The success rate ranges from 0 to 100 and supports accuracy up to one decimal place.
- Set Task Type.
- Jobs: Select a job from the drop-down list. You can select a custom job or public job.
Currently, jobs that reference global parameters and jobs without target instances are not supported.
If you select a job to set a scheduled task and want to use the suspension policy in the script scenario, set a parameter in the specific job step. For example, if you want to stop an ECS, set the successRate parameter.Figure 1 Setting the suspension policy for stopping a scheduled ECS job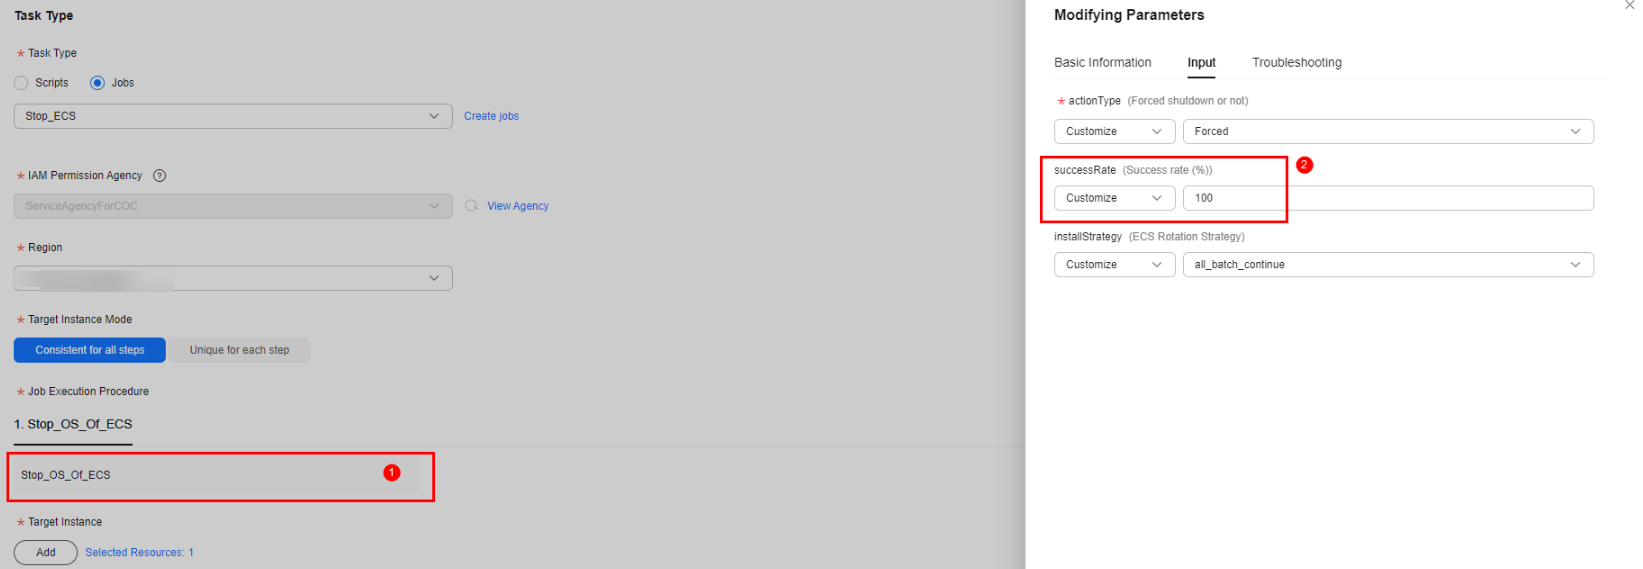
- IAM Agency: scope of permissions that can be used on COC to execute jobs.
- Region: Select the region where the target instance is located.
- Target Instance Mode: Select the execution mode of job step and target instances.
- Consistent for all steps: All tasks are executed on the selected instance using the same batch policy.
- Unique for each step: Tasks in one step are executed on the selected instance. Each step uses a batch policy.
- Job Execution Procedure: Customize job details.
- Click the job name. The Modifying Parameters drawer is displayed on the right.
- Set Input, Output, and Troubleshooting.
- Target Instance: Click Add and set Select Instance.
Table 4 Instance parameters Parameter
Description
Example Value
Selection Method
Select an instance selection method.- Manual Selection: Manually select an instance based on Enterprise Project, View Type, Resource Type, Region, and Target Instance.
- Select All: Automatically select all instances based on Enterprise Project, View Type, Resource Type, Region, and Target Instance.
Manual Selection
Enterprise Project
Select an enterprise project from the drop-down list. You can choose All.
All
View Type
Select a view type.
- CloudCMDB resources: Select an instance from the resource list.
- CloudCMDB application groups: Select an instance from the application group list.
CloudCMDB resources
Resource Type
The value can be ECS or BMS.
ECS
Region
The default parameter cannot be modified and is determined by Region in Execution Content.
CN-Hong Kong
Target Instance
Set filter criteria in the filter box and select the filtered instances manually or automatically.
-
- Batch Policy: Select Automatic, Manual, or No Batch.
- Automatic: The selected instances to be executed are automatically divided into multiple batches based on the preset rule.
- Manual: You can manually create multiple batches and add instances to each batch as required.
- No Batch: All instances will be executed in the same batch.
- Jobs: Select a job from the drop-down list. You can select a custom job or public job.
- Set Manual Review
- Manual Review: If this parameter is enabled, the task needs to be reviewed. For details about how to review, see Approving a Scheduled Task.
- Reviewer: Shift or Individual.
- Shift: Select a scenario and role from the drop-down lists based on the configured values. For details about how to configure a shift, see Shift Schedule Management.
- Individual: Select a reviewer. For details about how to configure a reviewer, see O&M Engineer Management.
- Notification Mode: Select a notification mode from the drop-down list.
- Default: Same as that selected in the reviewer subscription function. For details about how to set the default notification mode, see Selecting a Notification Method.
- SMS, WeCom, DingTalk, Lark, and Email: Notifications are sent based on the information reserved by the reviewer. For details about how to set reviewer information, see Modifying Personnel Information.
- No notification: The system does not notify any recipient.
- Enable Send Notification. This operation is optional.
- Send Notification: Enable it and set Recipient and Notification Mode based on the selected notification policy.
- Notification Policy: Select Start of execution, Execution failed, or Execution succeeded. Multiple options can be selected.
- Recipient: Select Shift or Individual.
- Shift: Select a scenario and role from the drop-down lists based on the configured values. For details about how to configure a shift, see Shift Schedule Management.
- Individual: Select a reviewer. For details about how to configure a reviewer, see O&M Engineer Management.
- Notification Mode: Select a notification mode from the drop-down list.
- Default: Same as that selected in the reviewer subscription function. For details about how to set the default notification mode, see Selecting a Notification Method.
- SMS, WeCom, DingTalk, Lark, and Email: Notifications are sent based on the information reserved by the reviewer. For details about how to set reviewer information, see Modifying Personnel Information.
- Click OK.
The scheduled task is created.

You can set the jobs and scripts to be executed on the Automated O&M > Script Management page or Automated O&M > Job Management page.
Feedback
Was this page helpful?
Provide feedbackThank you very much for your feedback. We will continue working to improve the documentation.See the reply and handling status in My Cloud VOC.
For any further questions, feel free to contact us through the chatbot.
Chatbot


