
Configuring a UniAgent
Scenarios
A Unified Data Collection Agent (UniAgent) mainly serves as the foundation for the cloud service O&M system, providing capabilities for middleware metric collection, custom metric collection, and script delivery and execution channels. This chapter introduces the installation, reinstallation, upgrade, uninstallation, and status synchronization operations of UniAgent. After the installation is complete, you can perform automated O&M on resources using a UniAgent.
Precautions
- Currently, you can only perform operations on UniAgent for ECSs.
- You can install UniAgent tools on a maximum of 100 ECSs in batches.
- The OS usage has restrictions.
Table 1 Linux operating systems and versions supported by a UniAgent OS
Version
EulerOS
1.1 64bit
2.0 64bit
CentOS
7.1 64bit
7.2 64bit
7.3 64bit
7.4 64bit
7.5 64bit
7.6 64bit
7.7 64bit
7.8 64bit
7.9 64bit
8.0 64bit
Ubuntu
16.04 server 64bit
18.04 server 64bit
20.04 server 64bit
22.04 server 64bit

- For Linux x86_64 servers, all the listed OSs and versions are supported.
- For Linux Arm hosts, CentOS 7.4/7.5/7.6, EulerOS 2.0, and Ubuntu 18.04 are supported.
Installing a UniAgent
- Log in to COC.
- In the navigation pane, choose Resources > Application and Resource Management.
- On the Resources page, select the target instances and choose UniAgent > Install.
Figure 1 Installing a UniAgent

When UniAgent is installed in a single VPC for the first time, you need to manually install the UniAgent and set a host with UniAgent installed as the installation host. For details, see How Do I Install UniAgent for the First Time?
- Set the parameters for installing UniAgent.
Table 2 Parameters for installing UniAgent Parameter
Description
UniAgent Version
Select a UniAgent version from the drop-down list.
Host Access Mode
There are three access modes: Direct access (private network), Direct access (public network), and Proxy access.
- Direct access (intranet): intended for Huawei cloud hosts.
- Direct access (public network): intended for non-Huawei Cloud hosts.
- Proxy access: Select a proxy area where a proxy has been configured and remotely install the UniAgent on a host through the proxy.
Proxy Area
When Proxy access is selected, you need to select a proxy area.
An agent area is used to manage agents by category. A proxy is a Huawei Cloud ECS purchased and configured on Huawei Cloud to implement network communication between multiple clouds.
Installation Host
Select an installation host from the drop-down list.
Select a host where the UniAgent has been installed. The installation host helps install the UniAgent on other hosts in the same VPC.
Hosts About to Accommodate UniAgent
Enter detailed information about the host where the UniAgent is to be installed.
- Host Name: host name.
- Host IP Address: IP address of a host.
- OS: operating system of the host, which can be Linux or Windows
- Login Account: account for logging in to the host. For the Linux OS, using the root account is recommended so that you have sufficient read and write permissions.
- Login Port: port for accessing the host.
- Authentication Mode: Currently, only password-based authentication is supported.
- Password: password for logging in to the host.
- O&M Test Result: shows whether the network between the installation host and the host where the UniAgent is to be installed is normal.
- Operation:
- Test Network
- Delete
NOTE:The Windows OS does not support connection tests.
- (Optional) Perform batch operations.
- Test Connection: Select multiple hosts to be installed and click Test Connection to perform O&M connection tests on the selected hosts in batches.
- Batch Specify Data
- Manual batch parameter settings: Login accounts, login ports, and passwords can be filled in batches.
Figure 2 Manual input

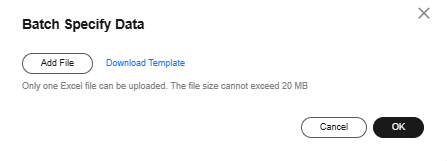
- Importing data in batches using an Excel file: You can click Download Template, manually enter data based on the template, and import data in batches using an Excel file.
Figure 3 Importing data in batches
- Manual batch parameter settings: Login accounts, login ports, and passwords can be filled in batches.
- Batch export: Export all data of the hosts to be installed in batches.
- Click OK.
Wait until the installation is complete.
Reinstalling the UniAgent
- Log in to COC.
- In the navigation pane, choose Resources > Application and Resource Management.
- Select the instances with the UniAgent status of Abnormal, Uninstalled, or Installation failed, then choose UniAgent > Reinstall or click reinstall in the UniAgent Status column.
Figure 4 Reinstalling the UniAgent

- The parameter information is essentially the same as that when the UniAgent is installed. For details, see 4.
- Click OK.
Wait until the reinstallation is complete.
Upgrading a UniAgent
- Log in to COC.
- In the navigation pane, choose Resources > Application and Resource Management.
- Select the instances where UniAgent has been installed and choose UniAgent > Upgrade.
Figure 5 Upgrading a UniAgent

- Set parameters for upgrading UniAgent.
Table 3 Parameters for upgrading the UniAgent Parameter
Description
UniAgent Version
(Mandatory) Version of a UniAgent.
- Click OK.
Wait until the upgrade is completed.
Uninstalling a UniAgent
- Log in to COC.
- In the navigation pane, choose Resources > Application and Resource Management.
- Select the instances where UniAgent has been installed and choose UniAgent > Uninstall.
Figure 6 Uninstalling a UniAgent

- Click OK.
Wait until the uninstallation is complete.
Synchronizing Statuses
- Log in to COC.
- In the navigation pane, choose Resources > Application and Resource Management.
- Select the instances where UniAgent is installed and choose UniAgent > Synchronize Status.
Figure 7 Status synchronization

Feedback
Was this page helpful?
Provide feedbackThank you very much for your feedback. We will continue working to improve the documentation.See the reply and handling status in My Cloud VOC.
For any further questions, feel free to contact us through the chatbot.
Chatbot


