Creating a Business Object
A business object (BO) is a software unit that encapsulates complete data models, service logic, and page display. It provides complete services for a scenario and specific services for upper-layer applications. Different users can customize BOs with specific functions. They can package these BOs and share them with others. Once a BO package is installed, it can be integrated into an application, providing access to its specialized services.
For example, a device BO provides unified device semantics for upper-layer applications and abstracts and encapsulates device capabilities excluding O&M. An alarm BO provides unified campus alarm semantics, obtains alarm data from subsystems and upper-layer applications, and displays data using a unified model. A GIS BO encapsulates and standardizes GIS APIs for tenant management, map management, and location services. You can use these BOs to develop smart smoke sensing applications for device data access, processing, and monitoring.
Creating a BO
- Go to the Huawei Cloud Astro Zero console.
- On the homepage, click Access Homepage. The application development page is displayed.
If the system shows a message indicating that you do not have the developer permission, contact the administrator to add it, see How Do I Grant Developer Permissions to a Subuser After Authorization Fails?
- In the navigation pane, choose Assets. On the displayed page, click Create BO or
 .
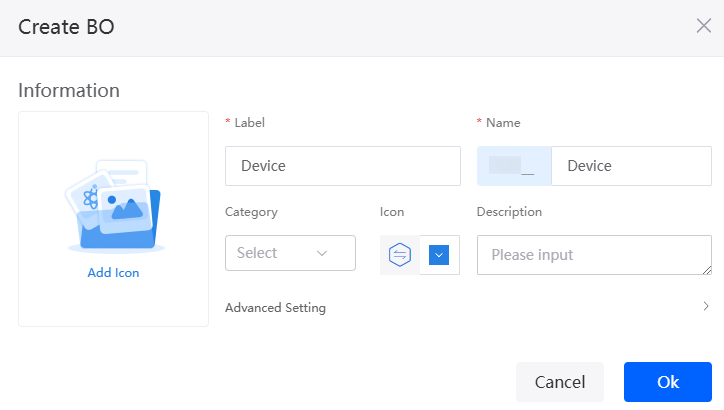
. - Set basic BO information and click OK.
Figure 1 Setting basic information
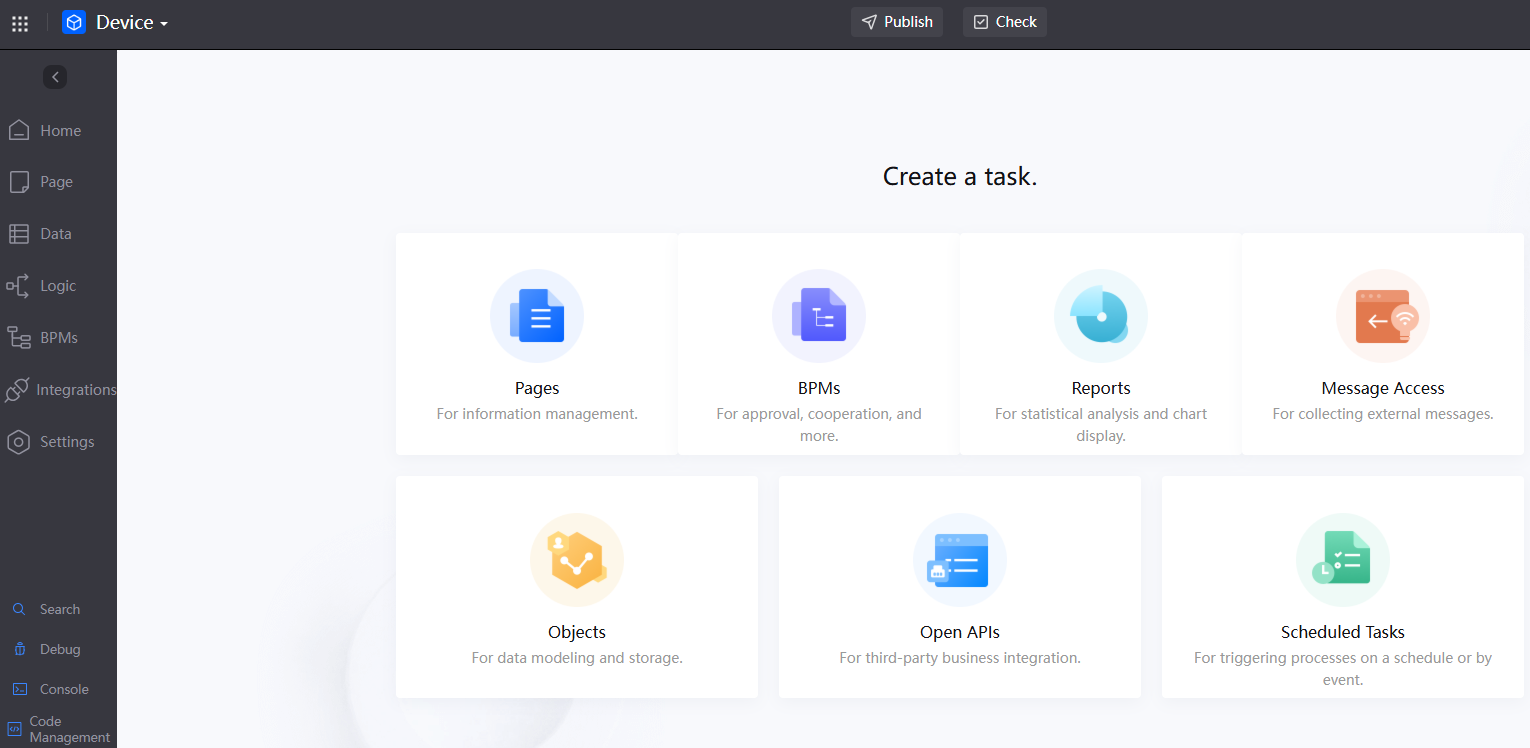
- On the BO development page, develop required objects, flows, events, and scripts.
Figure 2 BO development page
You can develop new system features or reuse existing similar features in the system. For example, if you want to reuse the existing flow queryProfiles, select Use existing flow when creating a flow, select the target flow, and click Add. For details about how to create a flow, see Creating a Blank Flow.
Figure 3 Reusing features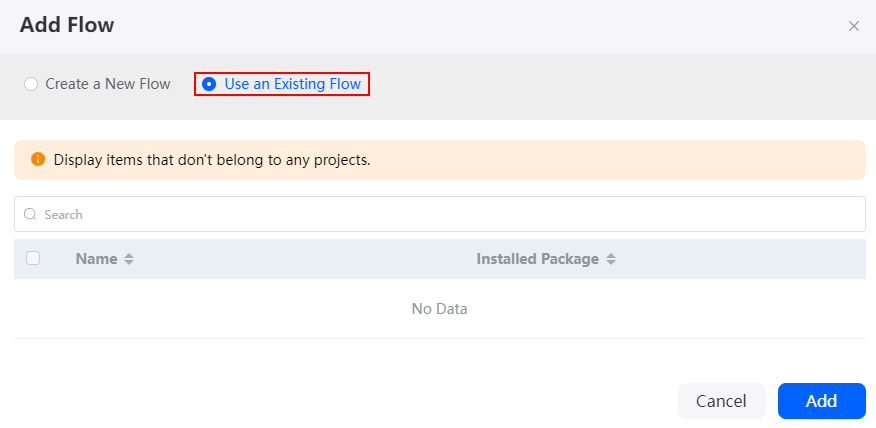
When creating a private BO API, you can bind flows, scripts, and objects. By defining service APIs, you can quickly customize required service APIs and register the API services with the gateway for third parties to use.
Figure 4 Creating a private API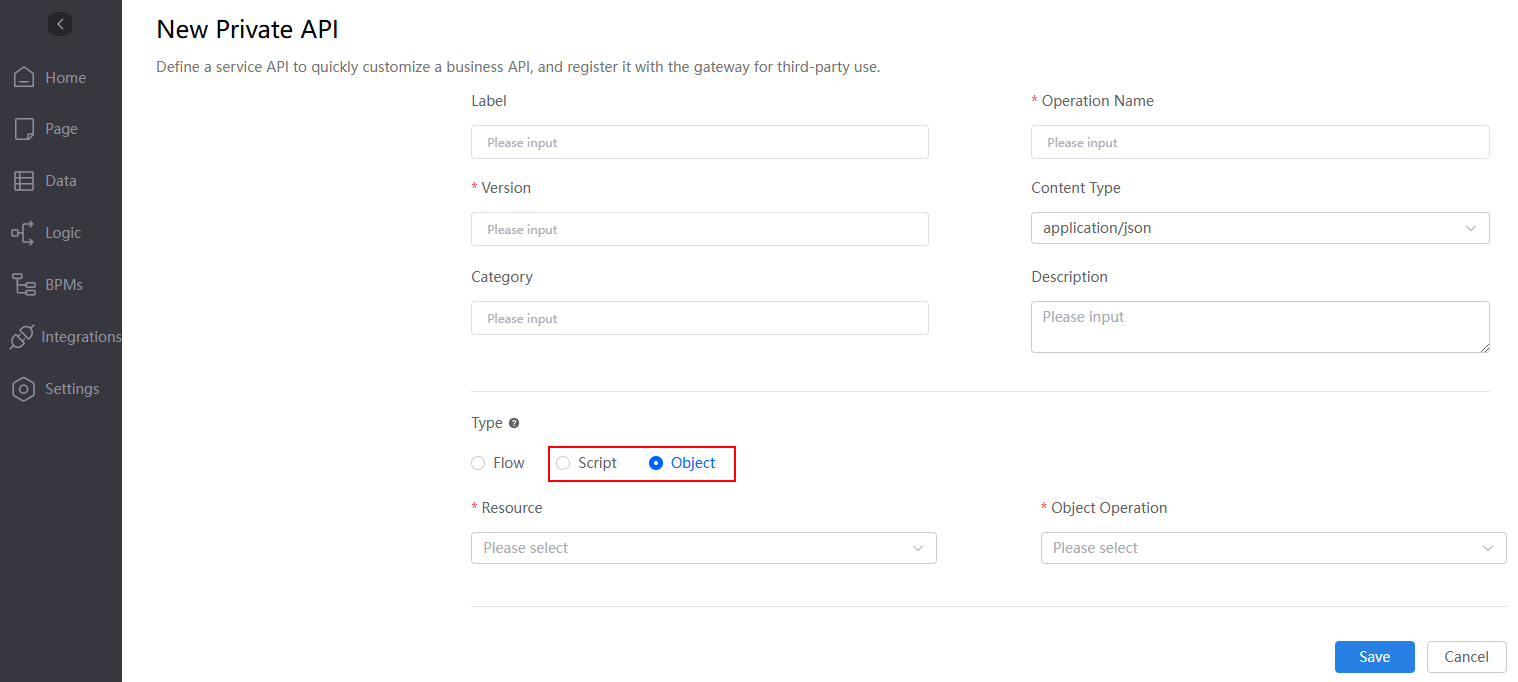
- In the navigation pane of the application designer, choose Integrations. Click + next to Private API to create a private API.
- If other applications use private APIs within this BO, the following rules apply: APIs bound to the flow resource type can be called by both flow and script. APIs bound to the script or object resource types are restricted to being called solely by script.
- After a BO is developed, you can package the BO and release it.
Release the BO as an installation package, patch package, or source code package by referring to the operations in Releasing an Application As an Installation Package or Patch Package and Releasing and Deploying a Source Code Package. The installation package and patch package do not support secondary development. The source code package supports secondary development.
Importing a BO Installation Package or Patch Package
If another user needs to use a created BO, the user can import the BO installation package or patch package to Huawei Cloud Astro Zero. After the BO is imported, it can be used when you create an application.
- Go to the Huawei Cloud Astro Zero console.
- On the homepage, click Access Homepage. The application development page is displayed.
If the system shows a message indicating that you do not have the developer permission, contact the administrator to add it, see How Do I Grant Developer Permissions to a Subuser After Authorization Fails?
- In the navigation pane, choose Assets.
- On the displayed page, click Install Asset.
- Upload the obtained BO installation package or patch package and click Confirm.
After the import is successful, you can view the imported BO on the Assets > Installed tab page.
Figure 5 Viewing the imported BO
- (Optional) After the BO asset package is imported, perform the following operations:
- On the Installed tab page, move the cursor to
 of the target BO, and choose Edit. The BO editing page is displayed. The BO can only be viewed. Secondary development is not supported.
 - On the Installed tab page, move the cursor to
 of the target BO, and choose Detail. On the displayed page, you can view the events and event parameters defined in the BO.
 - On the Installed tab page, move the cursor to
 of the target BO, and choose Delete to delete the imported BO.
- On the Installed tab page, move the cursor to
Importing the BO Source Code Package
If another user needs to use a created BO, the user can import the BO source code package to Huawei Cloud Astro Zero. After the BO is imported, it can be used when you create an application. The imported BO source code package supports secondary development.
- Go to the Huawei Cloud Astro Zero console.
- On the homepage, click Access Homepage. The application development page is displayed.
If the system shows a message indicating that you do not have the developer permission, contact the administrator to add it, see How Do I Grant Developer Permissions to a Subuser After Authorization Fails?
- In the navigation pane, choose Assets.
- On the displayed page, click Import Project.
- Upload the obtained BO source code package and click the confirm button.
After the import is successful, you can view the imported BO on the Assets > Developing tab page.
Figure 6 Viewing the imported BO
- (Optional) After the BO source code package is imported, perform the following operations:
- On the Developing tab page, move the cursor to
 of the target BO and choose Edit. The BO editing page is displayed. On the displayed page, you can perform secondary development on the BO.
 - On the Developing tab page, move the cursor to
 of the target BO and choose Clone to clone the BO. When a BO is cloned, the entire application structure is copied, but the object data of the application is not synchronized.
 - On the Developing tab page, move the cursor to the corresponding BO, click
 and choose Export to export the BO source code package to the local host.
 - On the Developing tab page, move the cursor to
 of the target BO and choose Delete to delete the BO.
 - On the Developing tab page, move the cursor to
 of the target BO and choose Detail. On the displayed page, you can modify the BO's label and runtime version and delete custom APIs.
- On the Developing tab page, move the cursor to
Using BOs in Applications
When developing an application, you can add BOs to the application by adding dependencies. Once a BO is integrated, it becomes available for use within the application. For instance, on a standard page's service model, you can call the flows from the included BOs.
- Log in to the application designer by referring to Logging In to the Application Designer.
- In the navigation pane, choose Settings.
- On the displayed page, choose Dependencies and Openness > App Dependencies > Add.
- On the displayed page, select the target BO and click Confirm.
Figure 7 Selecting the BO on which the application depends
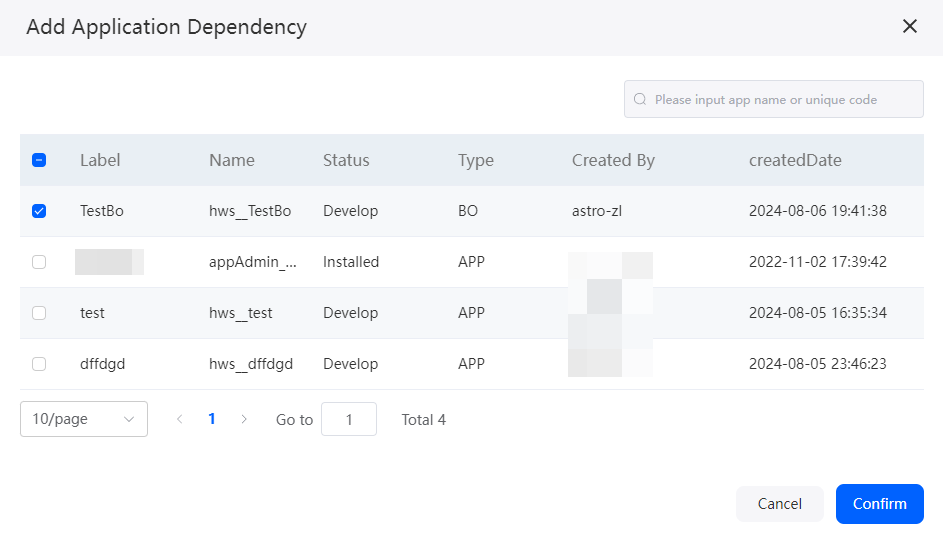
BOs that have been released as a source code package can be packaged together with associated upper-layer applications.
- Use the imported BO.
In the service model of a standard page, you can call the flows from the included BO.
- On a standard page, select a widget (for example, a form) and click
 under the data binding area.
Figure 8 Data binding
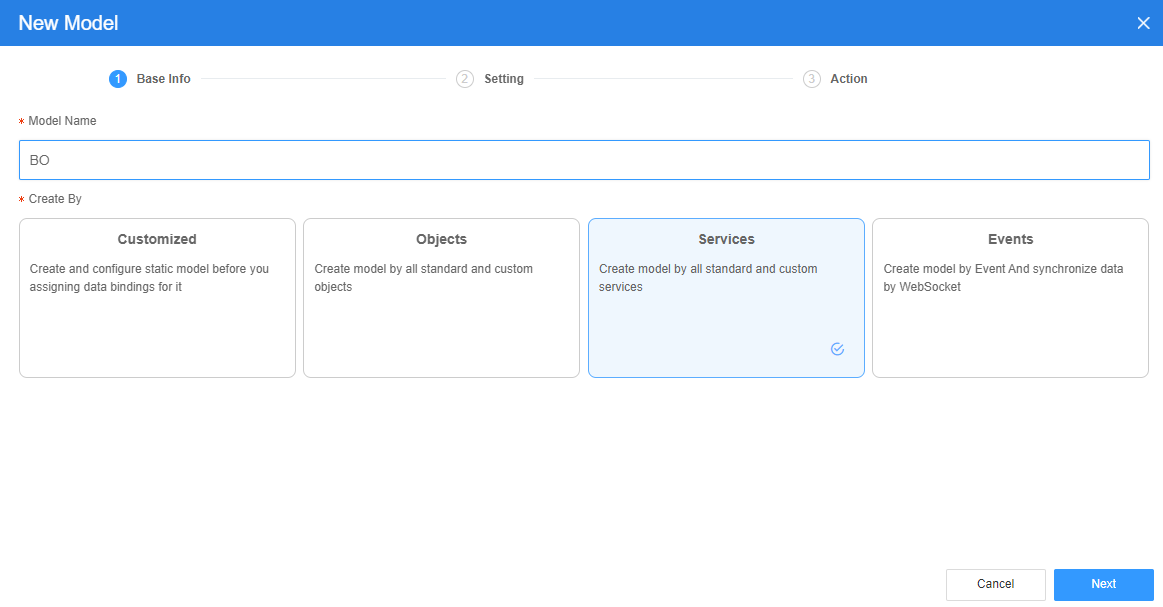
- In Select Model, click New. On the displayed page, set the model name, select Services, and click Next.
Figure 9 Creating a model
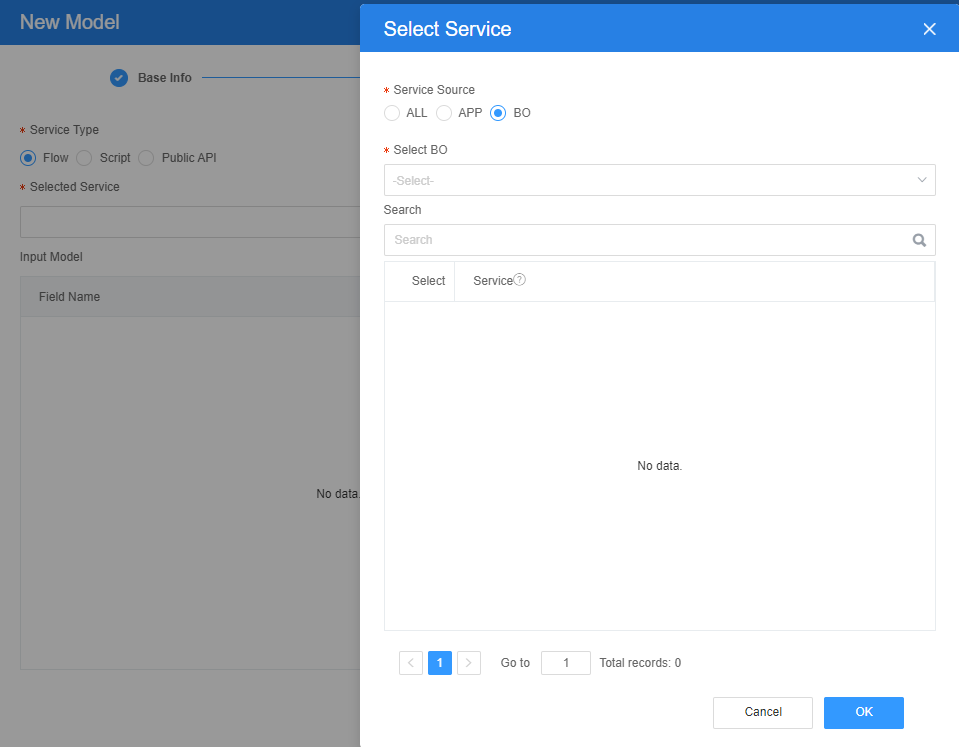
- Call the flows from the included BO.
Figure 10 Calling the flows from the included BO
- On a standard page, select a widget (for example, a form) and click
Related Documents
- Huawei Cloud Astro Zero supports collaborative development. For details, see How Do I Enable Collaborative Development?
- In collaborative development, you can assign each developer different permissions to view, build, or manage an application. For details, see How Do I Control User Permissions During Collaborative Development?
Feedback
Was this page helpful?
Provide feedbackThank you very much for your feedback. We will continue working to improve the documentation.See the reply and handling status in My Cloud VOC.
For any further questions, feel free to contact us through the chatbot.
Chatbot


