Creating a BPM Based on an Existing BPM
Scenario
You can create a BPM based on an existing BPM in the following scenarios:
- Scenario 1: Creating a version based on an existing BPM
If you need to change the BPM functions, modify the original BPM and save it as a new version. In this scenario, the original BPM automatically becomes invalid.
- Scenario 2: Creating a BPM based on an existing BPM
If the new BPM to be developed is similar to an existing BPM, modify the original BPM and save it as a new BPM. In this scenario, the original BPM is still valid. The new and old BPMs are independent of each other.
Creating a Version Based on an Existing BPM
If you need to change the BPM functions, modify the original BPM and save it as a new version. In this scenario, the original BPM automatically becomes invalid.
- Log in to the application designer by referring to Logging In to the Application Designer.
- In the navigation pane, choose BPMs.
- Move the cursor to
 of a created BPM and choose Edit.
 - On the main menu of the design page, click
 . The Save As page is displayed.
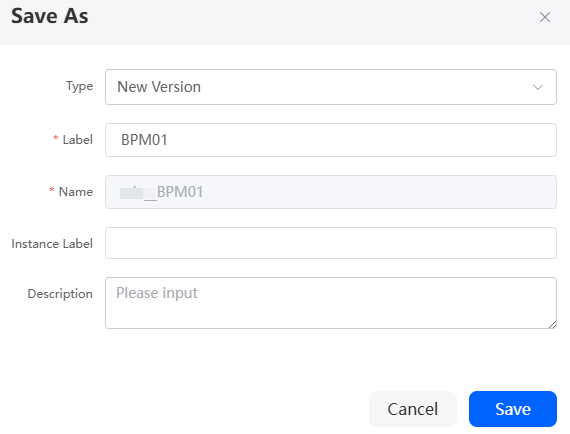
 - Set Type to New Version, specify the label and name, and click Save.
Figure 1 Saving a BPM as a new version

Table 1 Parameters for saving a BPM as a new version Parameter
Description
Type
BPM type. Select one from the drop-down list.
- New Version: A new version of the BPM is created based on the original BPM. After the creation, the original BPM automatically becomes invalid.
- New BP: A new BPM is created based on the original BPM. The original BPM is still valid. The new and old BPMs are independent of each other.
Default value: New Version. Use the default value.
Label
Label of the new BPM version, which is displayed on the page and can be modified after being created.
Value: 1–80 characters.
Name
The name of the original BPM is inherited and cannot be modified.
Instance Label
Label of a BPM instance. After the setting, click the blank area on the BPM design canvas and click
 . The instance label is displayed on BPM Runtime Configuration > Instance Info.
Description
Description of the BPM.
Value: 1–255 characters.
- On the BPM design page of the new version, customize the BPM.
On the BPM design page, you can see that the current BPM version is 1.0.2. That is, 1 is automatically added to the original BPM version.Figure 2 BPM of the new version

- After the BPM is customized, click
 in the upper part of the page to save it.
 - Click
 to run the BPM and check whether the BPM execution result meets your expectation.
 - If the BPM meets your expectation, click
 in the upper part of the page to activate the BPM.
A BPM can be used in other processes only after it is activated.
Creating a BPM Based on an Existing BPM
If the new BPM to be developed is similar to an existing BPM, modify the original BPM and save it as a new BPM. In this scenario, the original BPM is still valid. The new and old BPMs are independent of each other.
- Log in to the application designer by referring to Logging In to the Application Designer.
- In the navigation pane, choose BPMs.
- Move the cursor to
 of a created BPM and choose Edit.
 - On the BPM design page, click
 . The Save As page is displayed.
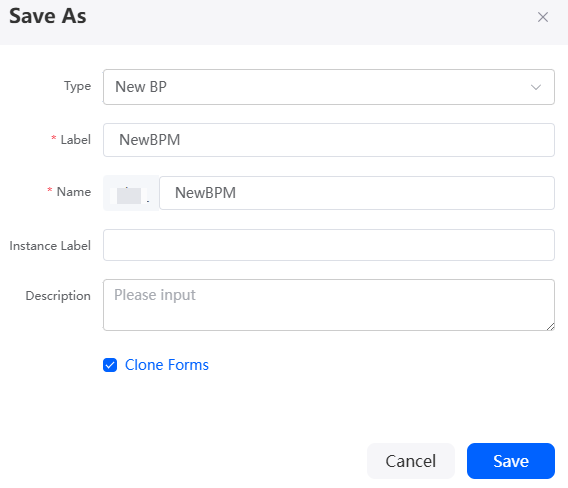
 - Set Type to New BP, specify the label and name, and click Save.
Figure 3 Saving as a new BPM

Table 2 Parameters Parameter
Description
Type
BPM type. Select one from the drop-down list.
- New Version: A new version of the BPM is created based on the original BPM. After the creation, the original BPM automatically becomes invalid.
- New BP: A new BPM is created based on the original BPM. After the workflow is created, the original workflow is still valid. The new and old BPMs are independent of each other.
Default value: New Version. Set this parameter to New BP.
Label
Label of the new BPM version, which is displayed on the page and can be modified after being created.
Value: 1–80 characters.
Name
Name of a custom BPM, which is the unique identifier of a BPM in the system and cannot be changed after the BPM is created. The naming requirements are as follows:
- The value cannot exceed 64 characters, including the prefix namespace.
To prevent duplicate data names among different tenants, each tenant must define a unique namespace when first creating an application. A tenant can create only one namespace. After being created, the namespace cannot be modified.
- Start with a letter and can contain only letters, digits, and underscores (_). Do not end with an underscore (_).
Instance Label
Label of a BPM instance. After the setting, click the blank area on the BPM design canvas and click
 . The instance label is displayed on BPM Runtime Configuration.
Description
Description of the BPM.
Value: 1–80 characters.
Clone Forms
Indicates whether to copy a BPM form the original BPM.
After the setting, click the blank area on the BPM design canvas and click
 . The form is displayed on BPM Runtime Configuration > BPM Forms. For details about how to create a BPM form, see Creating a Standard Form.
By default, this option is selected. That is, the form is copied when the BPM is saved.
- On the BPM design page of the new BPM, customize the BPM.
On the BPM design page, you can see the new BPM and its version is 1.0.1.Figure 4 New BPM

- After the BPM is customized, click
 in the upper part of the page to save it.
 - Click
 to run the BPM and check whether the BPM execution result meets your expectation.
 - If the BPM meets your expectation, click
 in the upper part of the page to activate the BPM.
A BPM can be used in other processes only after it is activated.
Feedback
Was this page helpful?
Provide feedbackThank you very much for your feedback. We will continue working to improve the documentation.See the reply and handling status in My Cloud VOC.
For any further questions, feel free to contact us through the chatbot.
Chatbot


