
Managing BPMs
Creating a Standard Form
For BPM's user activities requiring standard form pages, create the standard form beforehand to ensure seamless integration with User Activities diagram elements.

- Log in to the application designer by referring to Logging In to the Application Designer.
- In the navigation pane, choose Processes and click + next to Business Process to create a BPM.
- On the BPM design page, click the blank area.
- On the configuration page on the right, choose
 .
. - Click
 next to BPM Forms.
 - Set the form label and name (for example, Submission) and click Save. Figure 2 Creating a form

Table 1 Parameters for creating a form Parameter
Description
Label
Form label, which is displayed on the page and can be modified after being created.
Value: 1–60 characters.
Name
Form name, which uniquely identifies a form in the system and cannot be modified after being created. The naming requirements are as follows:
- Value: 1–47 characters.
- Start with a letter and can contain only letters and digits.
Description
Enter the description of the form.
Value: 1–255 characters.
- Click
 next to the created form. The form editing page is displayed. Figure 3 Form editing page
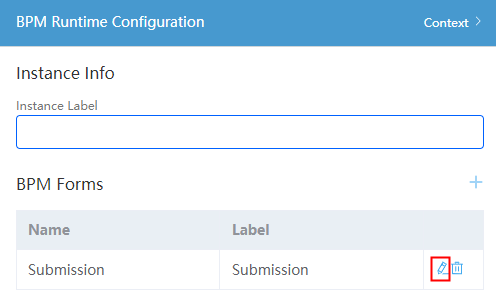
- Drag a form from Basic > Container to the page. Figure 4 Dragging a form

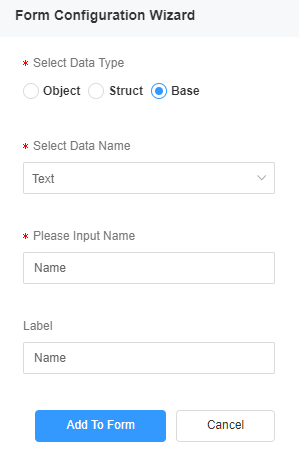
- Set Select Data Type to Base, Select Data Name to Text, and Please Input Name and Label to Name, and click Add to Form. You can also select a form type or object type as required.Figure 5 Adding a form
- Add the following type of data to the form by referring to the previous step.
Select Data Name
Please Input Name
Label
Text (added in 9)
Name
Name
Text
Destination
Destination
Date
Begin_Time
Begin Time
Date
End_Time
End Time
Text
Reason
Reason
- In the Form Configuration Wizard pane, click Cancel.
- Select a row and adjust it to two columns, as shown in the following figure. Figure 6 Setting one row to two columns

- Drag the text box and date selection box to the corresponding columns, properly adjusting the form layout. Right-click unnecessary widgets and choose Delete from the shortcut menu. Figure 7 Adjusting the layout

- Map the text box in the form to the field in the context on the right. The form for submitting a business trip application is created. Figure 8 Mapping the text box to the context

Viewing BPM Details
After a BPM is created, you can view its basic information (such as the name, version, parameters, and associated pages) on its details page.
- Log in to the application designer by referring to Logging In to the Application Designer.
- In the navigation pane, choose BPMs.
- Move the cursor to
 of the corresponding BPM, and choose Detail.
 - On the details page, you can perform the following operations.
- Click
 next to a parameter (such as Visibility or Overridable) to modify the parameter.
 - Click
 . The BPM design page is displayed.
 - Click
 to run the BPM.
- Click
Editing a BPM
After a BPM is created, you can modify the BPM if the service requirements change.
- Log in to the application designer by referring to Logging In to the Application Designer.
- In the navigation pane, choose BPMs.
- Move the cursor to
 of the corresponding BPM, and choose Edit.
 - On the BPM design page, modify the BPM as required.
Moving a BPM
After a BPM is created, you can move the BPM to an application with development permissions. For example, if a BPM created in application A is needed in application B, you can clone it in application A and move the clone to application B.
- Log in to the application designer by referring to Logging In to the Application Designer.
- In the navigation pane, choose BPMs.
- Move the cursor to
 of the corresponding BPM, and choose Move.
 - Select the BPM or other elements to be moved and click Next.
- Select the target application and click Confirm.
The BPM can be moved only to applications with development permissions.
Cloning a BPM
You can clone a BPM to an application. For example, if application A contains BPMs with similar functions, you can clone one BPM to make a new one. This allows you to editing the clone without starting the creation process over.
- Log in to the application designer by referring to Logging In to the Application Designer.
- In the navigation pane, choose BPMs.
- Move the cursor to
 of the corresponding BPM, and choose Clone.
 - Set the BPM name and unique ID and click Confirm.
After the clone is successful, you can view the cloned BPM in the BPM folder.
Deleting a BPM
If a BPM in an application is no longer used, you can delete it from the application to prevent it from occupying the resource quota of the account.
- Log in to the application designer by referring to Logging In to the Application Designer.
- In the navigation pane, choose BPMs.
- Move the cursor to
 of the corresponding BPM, and choose Delete.
 - In the displayed dialog box, select Delete the records in the resource and click Confirm.
If you do not select Delete the records in the resource, only the BPM is deleted. The function modules that use the BPM are not affected.
Feedback
Was this page helpful?
Provide feedbackThank you very much for your feedback. We will continue working to improve the documentation.See the reply and handling status in My Cloud VOC.
For any further questions, feel free to contact us through the chatbot.
Chatbot


