Creating a Work Queue and Defining a Lane
Scenario
A lane represents a user role in a BPM. Each lane in a BPM corresponds to a work queue. After a work queue is configured, diagram elements in different lanes are processed by users in different work queues. A work queue records a set of members with the same permissions and task objects.

Creating a Work Queue and Defining a Lane
- Creating a Work Queue
- Log in to the Astro Zero development page.
- In the upper left corner of the page, click
 and choose Environments > Environment Configuration.
 - Choose Maintenance from the main menu.
- In the navigation pane, choose Global Elements > Queues and click New.
- Set basic queue information and add members to the queue.
Table 1 Parameters for creating a queue Parameter
Description
Label
Work queue label, which is displayed on the page and can be modified after being created.
Name
Work queue name, which is the unique identifier of the work queue in the system and cannot be changed after the work queue is created.
The value must start with a letter and can contain only letters, digits, and underscores (_). It cannot end with an underscore (_).
Public Email
Public email address of the work queue. This email address is used to send emails to the queue upon event triggering.
Queue Manager
Select a work queue administrator from the drop-down list. The administrator can assign tasks to other members in the work queue.
Send Email to Members
This parameter indicates whether to send an email to users in the work queue if an event is triggered.
This parameter is deselected by default.
Email Template
If you select Send Email to Members, select an email template.
Queue Objects
Indicates whether to specify objects for the work queue. If Queue Objects is enabled, select the objects to be allocated to the work queue. Then the personal records of these objects belong to the work queue.
This parameter is deselected by default.
Queue Member
Click Add to add members to the work queue. A queue member can be a single user, a public group, a single role, or a portal user. If you add a role to a work queue, all users granted the role also belong to this work queue.
- Add a lane.
- On the BPM development page, click Add Lane.
Figure 2 Clicking Add Lane

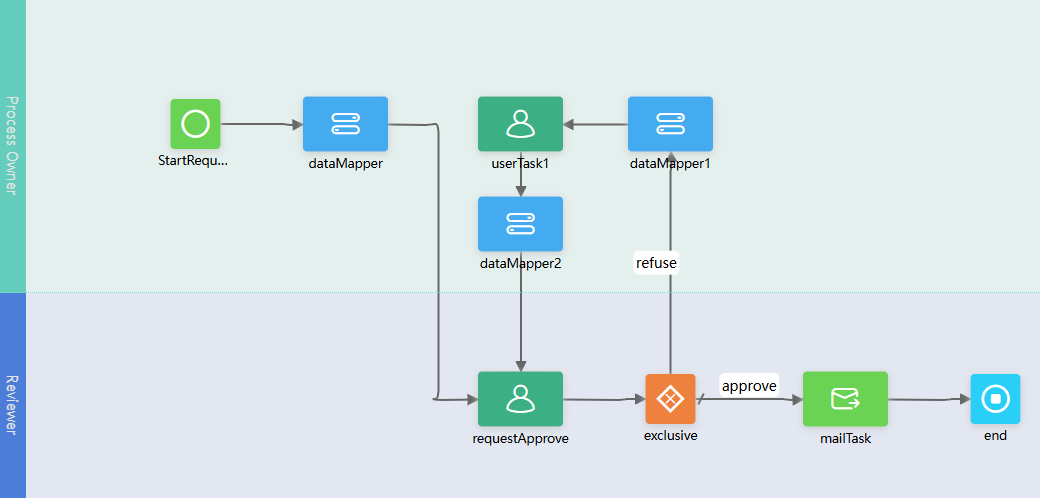
- Drag diagram elements to the corresponding lanes based on the actual service scenario, connect the diagram elements, and specify the logical relationships of the diagram elements.
For details about the diagram elements in the BPM, see Adding Diagram Elements for BPMs.
Figure 3 Dragging diagram elements and specifying logical relationships
- On the BPM development page, click Add Lane.
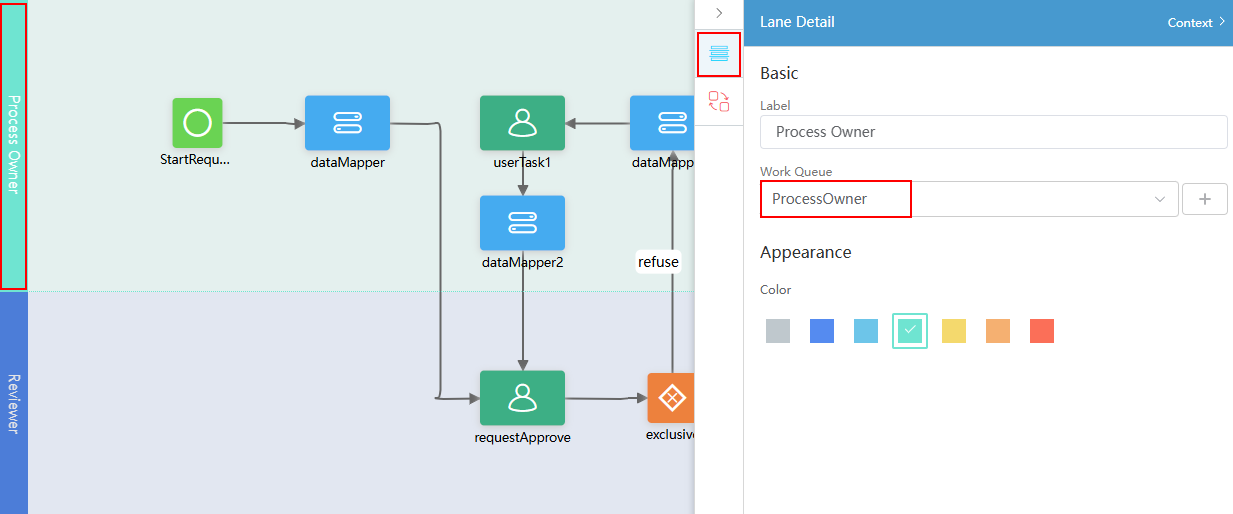
- Associate a work queue with a lane.
- Select a lane and click
 .
. - In Lane Detail > Work Queue, click
 and select the work queue created in 1 to associate the work queue with the lane.
Figure 4 Associating a work queue with a lane
- Select a lane and click
Feedback
Was this page helpful?
Provide feedbackThank you very much for your feedback. We will continue working to improve the documentation.See the reply and handling status in My Cloud VOC.
For any further questions, feel free to contact us through the chatbot.
Chatbot


