
Configuring an ECS
Scenarios
This section describes how to install application software, configure patch updates, and install system patches on an ECS.
Prerequisites
- You have obtained the username and password for logging in to the ECS.
- You have created an ECS. For details, see Creating an ECS.
- You have obtained the files listed in Required Software and decompressed the Workspace_HDP_WindowsDesktop_Installer_x.x.x.iso file to obtain the Workspace_HDP_WindowsDesktop_Installer_x.x.x folder.
Procedure

The operations vary depending on the OS. Follow the instructions on the GUI.
Installing a Windows OS and the VirtIO driver
- Log in to the console.
- Choose Service List > Compute > Elastic Cloud Server.
- Locate the row that contains the ECS created in Creating an ECS, and click Remote Login to log in to the Windows VM.
- For details, see Installing a Windows OS and VirtIO Drivers.
Modifying the group policy
- If you modify the group policy, no confirmation dialog box is displayed when you disable the Windows ECS created using the image.
- If you do not modify the group policy, you can perform this task on a Windows ECS created using the image.
- Remote desktop connection is available only after you configure the group policy of the remote desktop service.
- On the ECS, right-click
 in the lower left corner, enter gpedit.msc in the Run dialog box, and press Enter.
 The Local Group Policy Editor window is displayed.
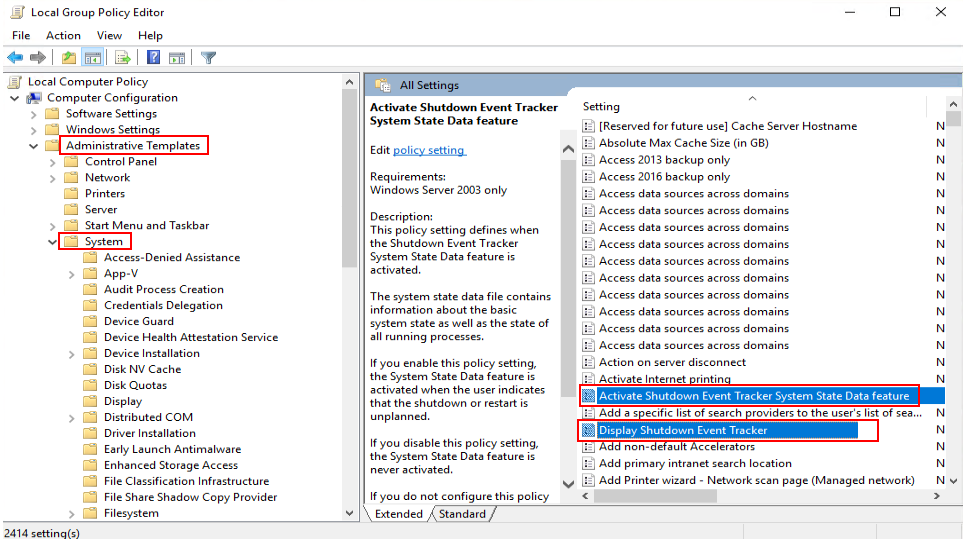
- In the navigation tree of the Local Group Policy Editor window, choose Computer Configuration > Administrative Templates > System.
- Disable Activate Shutdown Event Tracker System State Data feature and Display Shutdown Event Tracker, as shown in Figure 1.
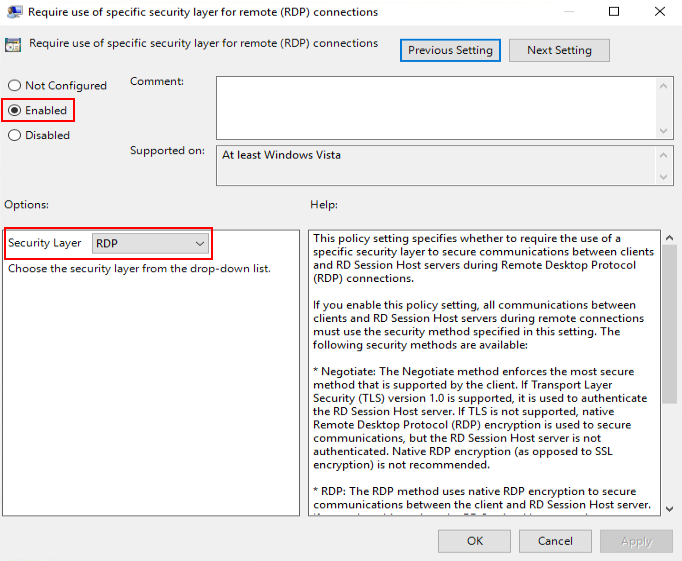
- In the navigation pane, choose Computer Configuration > Policy > Administrative Templates > Windows Components > Remote Desktop Services > Remote Desktop Session Host > Security.
- Set Require use of specific security layer for remote (RDP) connections to Enabled, and set Security Layer to RDP, as shown in Figure 2.
- Set Require user authentication for remote connections by using Network Level Authentication to Disabled, as shown in Figure 3.

Hiding Desktop Icons
- Right-click the blank area on the ECS and deselect Show desktop icons under View, as shown in Figure 4.
This configuration is required only for the VDI single session.

Not displaying Server Manager page upon login
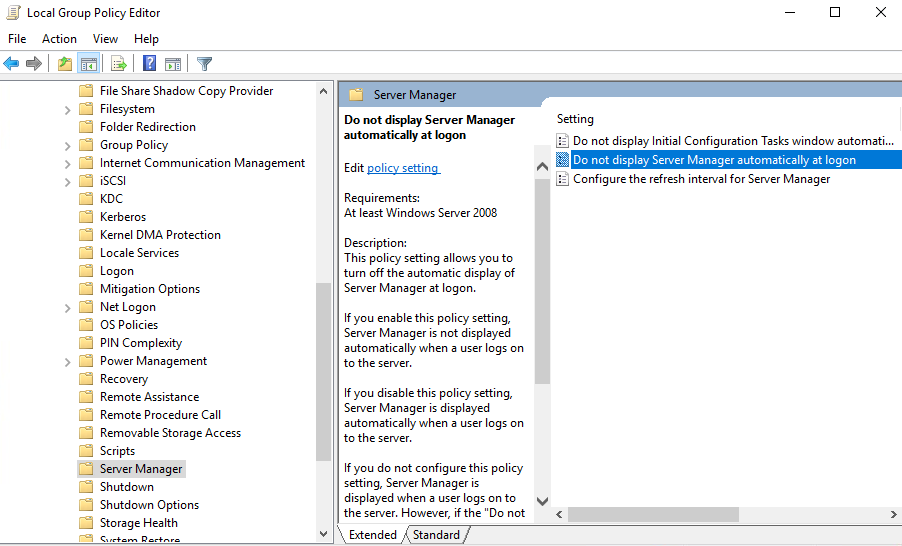
- In the navigation tree, choose Computer Configuration > Administrative Templates > System > Server Manager, as shown in Figure 5.
- In the right pane, double-click Do not display Server Manager automatically at logon.
The Do not display Server Manager automatically at logon dialog box is displayed.
- Select Enabled.
- Click OK.
Enabling the microphone access permission for applications
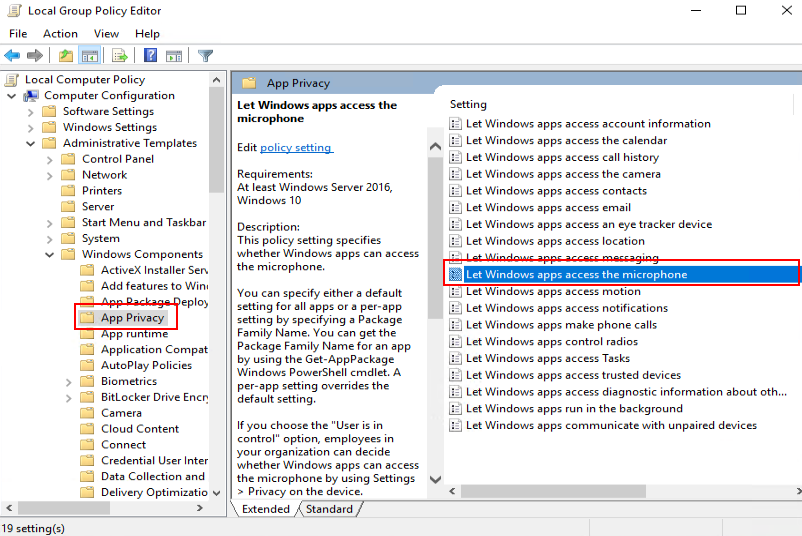
- In the navigation tree of the Local Group Policy Editor window, choose Computer Configuration > Administrative Templates > Windows Components > App Privacy.
Access the app privacy configuration list page and allow Windows applications to access the microphone, as shown in Figure 6.
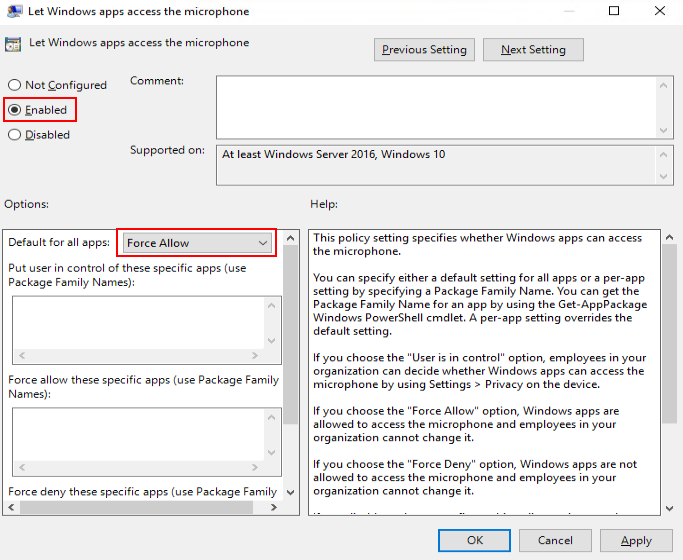
- In the right pane, double-click Let Windows apps access the microphone.
The Let Windows apps access the microphone dialog box is displayed.
- Select Enabled. In the Options list, set Default for all apps to Force Allow, as shown in Figure 7.
- Click OK.
Enabling the camera access permission for applications
This configuration is required only for the VDI single session.
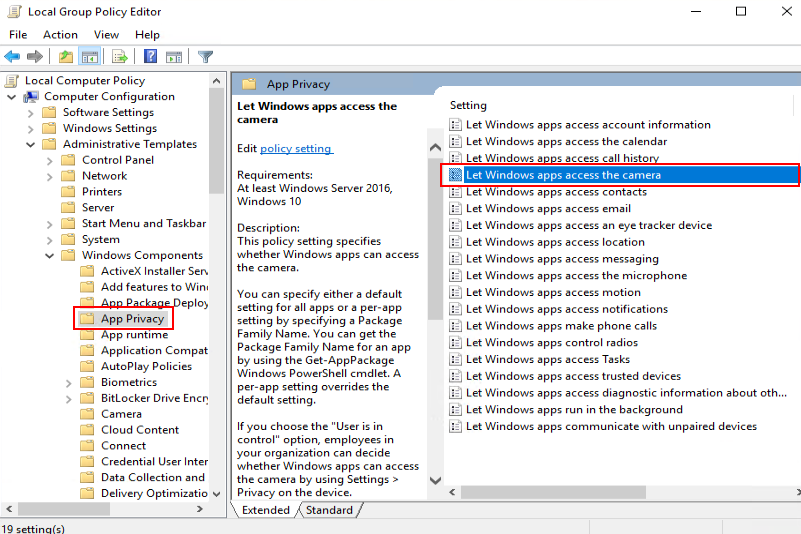
- In the navigation tree of the Local Group Policy Editor window, choose Computer Configuration > Administrative Templates > Windows Components > App Privacy.
Access the app privacy configuration list page and allow Windows applications to access the camera, as shown in Figure 8.
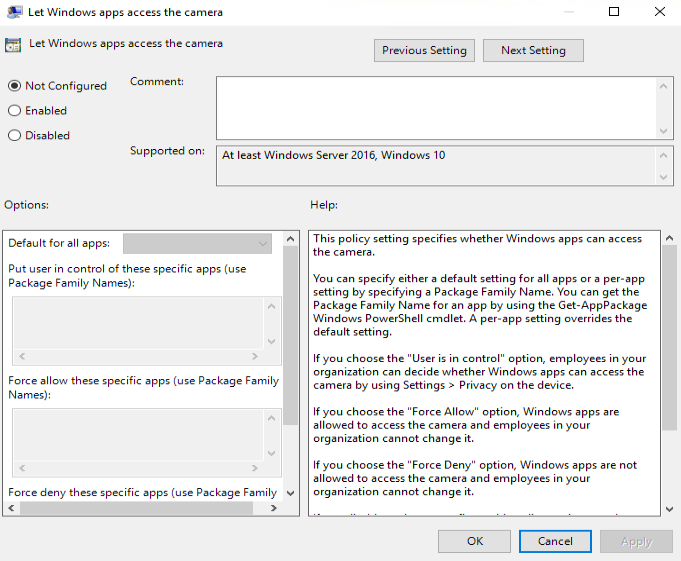
- In the right pane, double-click Let Windows apps access the camera.
The Let Windows apps access the camera dialog box is displayed.
- Select Enabled. In the Options list, set Default for all apps to Force Allow, as shown in Figure 9.
- Click OK.
Enabling the graphics adapter for the GPU remote desktop
This configuration is required only for GPU feature usage.
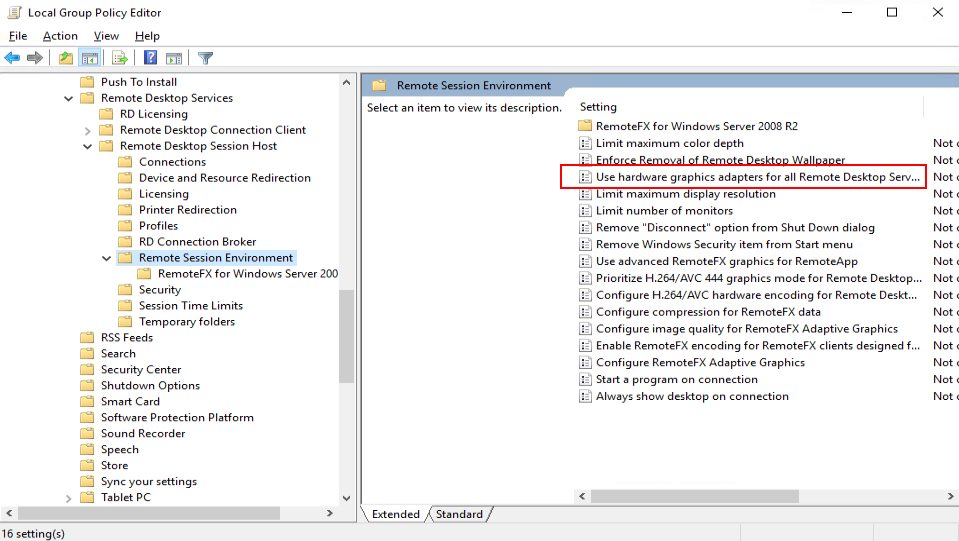
- In the navigation tree of the Local Group Policy Editor window, choose Computer Configuration > Administrative Templates > Windows Components > Remote Desktop Services > Remote Desktop Session Host > Remote Session Environment.
The remote session environment configuration list page is displayed, as shown in Figure 10.
- In the right pane, double-click Use the hardware graphics adapter for all Remote Desktop Services sessions.
The Use the hardware graphics adapter for all Remote Desktop Services sessions dialog box is displayed.
- Select Enabled.
- Click OK.
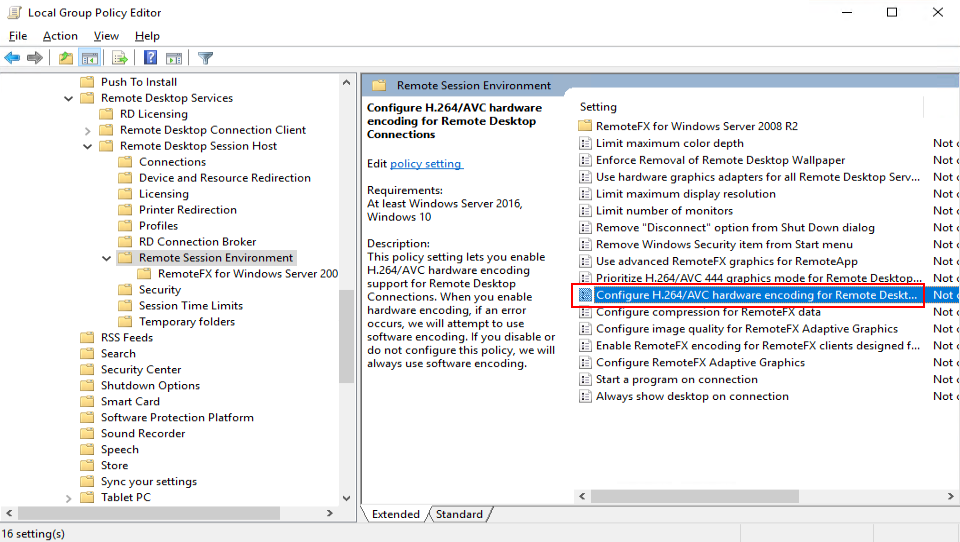
Configuring H.264/AVC hardware encoding for remote desktop connection
- In the navigation tree of the Local Group Policy Editor window, choose Computer Configuration > Administrative Templates > Windows Components > Remote Desktop Services > Remote Desktop Session Host > Remote Session Environment.
The remote hardware encoding configuration page is displayed, as shown in Remote hardware encoding.
- Select Enabled.
- Click OK.
Setting the maximum frame rate
- Click
 and enter Regedit to open the registry editor.
 - In the Computer\HKEY_LOCAL_MACHINE\SYSTEM\CurrentControlSet\Control\Terminal Server\WinStations directory, right-click the blank area and click New > DWORD (32-bit) Value in the right pane, enter a new value for DWMFRAMEINTERVAL, and press Enter, as shown in Figure 12.
- Right-click DWMFRAMEINTERVAL and choose Modify from the shortcut menu.
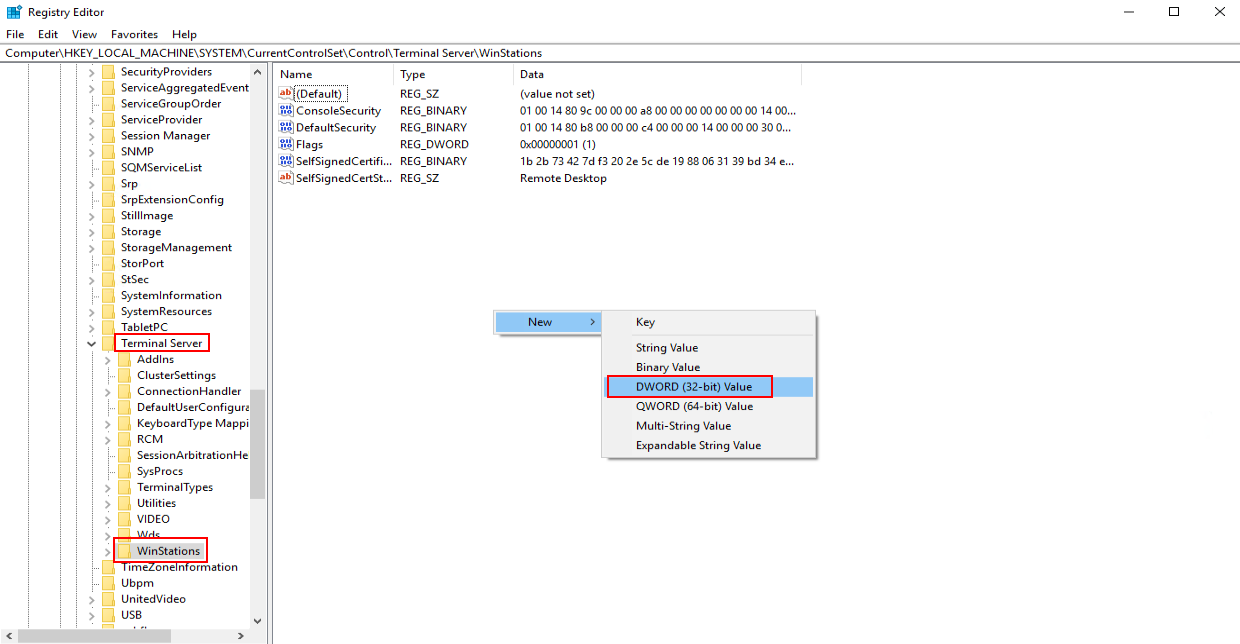
- Select Decimal, enter 15 in the Value data box, and select OK.
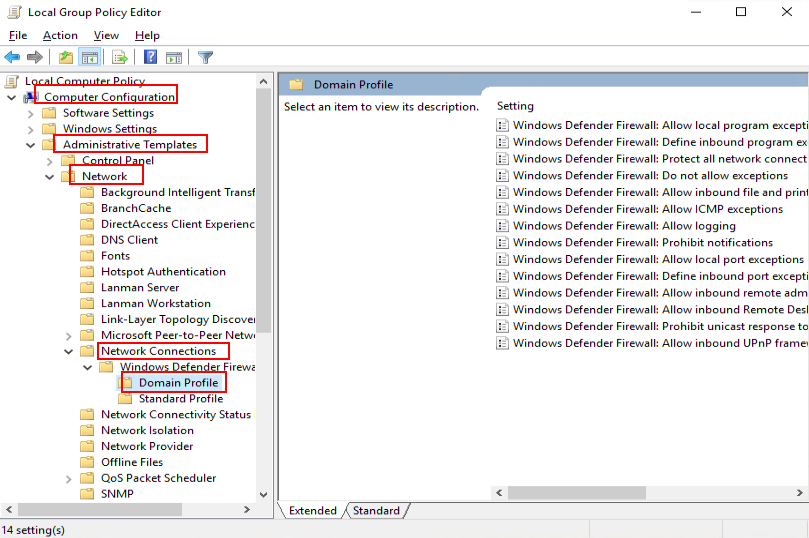
Disabling the firewall
- In the navigation tree of the Local Group Policy Editor window, choose Computer Configuration > Administrative Templates > Network > Network Connections > Windows Defender Firewall > Domain Profile.
The Windows firewall name varies with the OS version. The actual configured name is used.
For example, Windows Firewall is displayed on Windows Server 2016, and Windows Defender Firewall is displayed on Windows Server 2019.
The Domain Profile page is displayed, as shown in Figure 13. - In the right pane, double-click Windows Defender Firewall: Protect all network connections.
The Windows Defender Firewall: Protect all network connections dialog box is displayed.
- Select Disabled.
- Click OK.
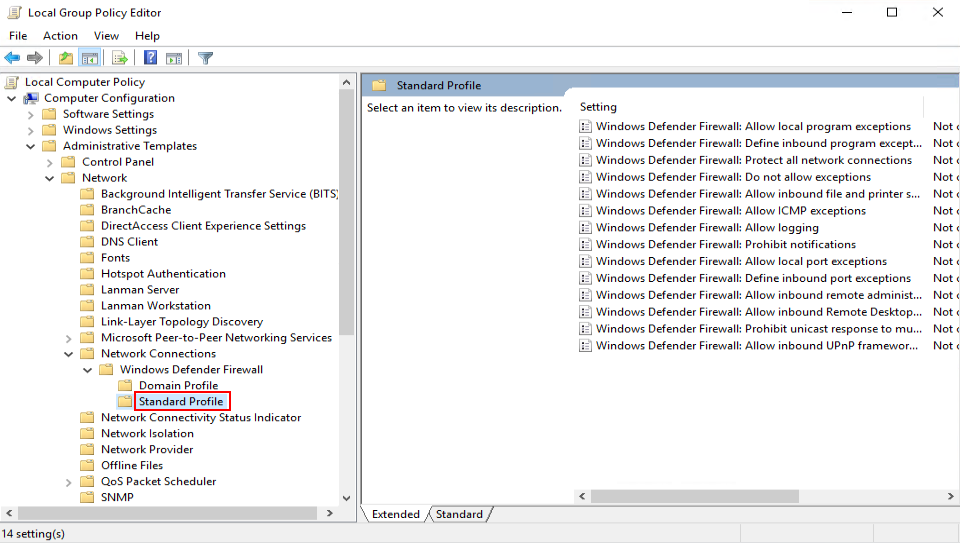
- In the navigation tree of the Local Group Policy Editor window, click Standard Profile.
The Standard Profile page is displayed, as shown in Figure 14.
- In the right pane, double-click Windows Defender Firewall: Protect all network connections.
The Windows Defender Firewall: Protect all network connections dialog box is displayed.
- Select Disabled.
- Click OK.
- Close the Local Group Policy Editor window.
- Click Start > Run.
The Run dialog box is displayed.
- Enter services.msc in the Open text box and press Enter.
The Services window is displayed.
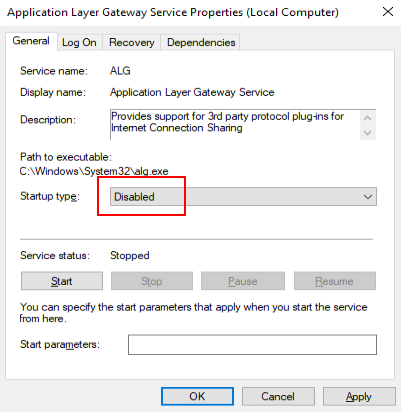
- In the right pane, double-click Application Layer Gateway Service.
The Application Layer Gateway Service Properties (Local Computer) page is displayed.
- On the General tab, set Startup type to Disabled, as shown in Figure 15.
- Click OK.
- Set the Startup Type of Internet Connection Sharing (ICS) and Windows Firewall to Disabled by referring to 36 to 38.
- The Windows firewall name varies with the OS version. The actual configured name is used. For example, Windows Defender Firewall is displayed on Windows Server 2019.
- You do not need to configure Windows Defender Firewall for Windows Server 2019.
Closing the Internet Explorer ESC on the server
- Click
 to open the Server Manager page.
 - Select Local Server. On the Local Server page, click current settings in the Internet Explorer Enhanced Security Configuration to open the property page. Select Off for the required user and click OK, as shown in Figure 16.

Disabling Windows updates
- In the right pane of the Services window, double-click Windows Update.
The Windows Update Properties page is displayed.
- Set Startup type to Disabled.
- Click OK.
Configuring the remote desktop service
- This operation ensures that each Windows ECS created using the image can be logged in to from the remote desktop.
- To use remote desktop connection, you need to modify the group policy of the remote desktop service.
- In the right pane of the Services window, right-click Remote Desktop Services and choose Properties from the shortcut menu.
The Remote Desktop Services Properties (Local Computer) window is displayed.
- On the General tab, set Startup type to Automatic and click OK.
- Close the Services window.
Enabling remote service connection
After remote service connection is enabled, each Windows ECS created using the image can be accessed remotely.
- In the ECS, right-click
 in the lower left corner and choose Run from the shortcut menu.
 - In the Run dialog box, enter sysdm.cpl and press Enter.
The System Properties window is displayed.
- On the Remote tab, select Allow remote connections to this computer.
For some OS types, if you select Allow remote connections to this computer, the remote desktop connection dialog box will be displayed. In this case, click OK to go to the next step.
- Click OK.
Remote desktop connection has been enabled.
Creating a temporary local admin user

- After Cloudbase-Init is installed, it will randomize the password of the Administrator account if application software that takes effect only after a restart is installed. To prevent login failure after randomization, create a temporary account and reset the password of Administrator.
- If your login using the default password of Administrator fails after the restart, log in as the admin user and reset the password of Administrator. Then use the Administrator account to log in again.
- Access the ECS, click
 , enter compmgmt.msc, and press Enter. The Computer Management window is displayed.
 - Choose System Tools > Local Users and Groups > Users.
- Right-click and choose New User from the shortcut menu.
- In the New User dialog box, enter the user name and password, confirm the password, and click Create.
- In the navigation pane, choose Local Users and Groups > Groups.
- Right-click Administrators and choose Add to Group from the shortcut menu.
- In the Administrators Properties dialog box, click Add to add the user to the group and click OK.
- Click OK and close the Administrators Properties dialog box.
- Close Computer Management.
Configuring a private DNS
You can configure a private DNS server address for OBS so that Windows ECSs on Huawei Cloud can directly access OBS through the private network.
- On the ECS, click
 in the lower left corner, enter cmd, and press Enter.
 - Run the ipconfig /all command to check whether the DNS server is at the private DNS address in the region where the ECS resides.
Huawei Cloud provides different private DNS server addresses for different regions. For details, see What Are Huawei Cloud Private DNS Server Addresses?
- Change the DNS server address of the VPC subnet.
Locate the VPC where the ECS resides and change the DNS server address of the VPC subnet to the private DNS address. In this manner, ECSs in the VPC can use the private DNS for resolution and thereby you can access OBS on Huawei Cloud intranet. For details, see Modifying a Subnet.
Select the private DNS server address based on the region where the ECS is located. For details, see What Are Huawei Cloud Private DNS Server Addresses?
Obtaining required installation packages
- Upload the packages obtained in Required Software, except the OS ISO file, to the OBS bucket used in Registering a Private Image Using an ISO File.
Set the object permission to Public Read.
- Record the link of each package in the OBS bucket.
On OBS Browser+, right-click the package, choose Share from the shortcut menu, and click Copy Link to obtain the download link of the package. You need to download the package within the sharing validity period.
- In the root directory of drive C on the ECS, create a folder, for example, software, for storing the package to be installed.
- Open the browser on the ECS, copy the package link recorded in 65 to the address box, and press Enter to download the package.
- Switch the input mode of the ECS to English.
- Download the required packages in sequence.
- Copy the obtained software packages to the C:\software directory.
Installing the 7-Zip
- Go to C:\software to find and decompress the 7-Zip installation package.
Installing Visual Studio 2017 runtime library
- Go to C:\software to find the vc_redist.x64.exe and vc_redist.x86.exe packages, and double-click to install the Visual Studio 2017 runtime library.
- Restart the ECS.
(Optional) Installing the OS patch
- Go to C:\software where the package is stored and install the OS patch.
OS patches are updated by Microsoft on an irregular basis. Pay attention to Microsoft announcements and update the OS in a timely manner.
Installing the GPU driver
This configuration is required only for GPU feature usage.
- Go to C:\software where the driver is stored, start and install the driver as prompted.
(Optional) Installing applications
- Go to C:\software where the package is stored and install the application.
Some security software (antivirus software, safeguards, and firewalls) may conflict with the Microsoft encapsulation tool. As a result, desktop creation may fail, and the blue screen of death (BSOD) or black screen may occur on the created desktop. Therefore, install security software only after desktops are provisioned.
(Optional) Installing peripheral drivers
- Go to C:\software where the package is stored and install the peripheral driver as required.
Installing the Cloudbase-Init software
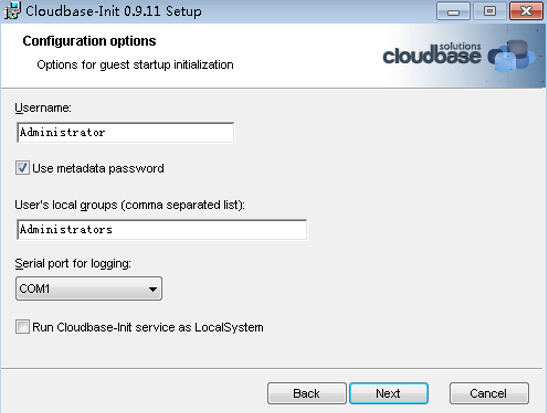
- Go to C:\software where the package is stored, open the Cloudbase-Init installation package, and install Cloudbase-Init as prompted.
- On the Configuration options page, configure parameters by referring to Figure 17.
Set parameters by referring to the following figure.
- After the configuration is complete, deselect the options shown in Figure 18.
- Click Finish.

Configuring Cloudbase-Init
- Edit the configuration file C:\Program Files\Cloudbase Solutions\Cloudbase-Init\conf\cloudbase-init.conf in the Cloudbase-Init installation path.
- Add the configuration item netbios_host_name_compatibility=false to the last line of the configuration file so that the host name of the Windows OS can contain a maximum of 63 characters.
NetBIOS supports up to 15 characters due to the constraint of Windows OS.
- Add the configuration item metadata_services=cloudbaseinit.metadata.services.httpservice.HttpService to enable the agent to access the OpenStack data source.
- Add the following configuration item to disable Cloudbase-Init restart:
plugins=cloudbaseinit.plugins.windows.extendvolumes.ExtendVolumesPlugin,cloudbaseinit.plugins.windows.createuser.CreateUserPlugin,cloudbaseinit.plugins.common.sshpublickeys.SetUserSSHPublicKeysPlugin,cloudbaseinit.plugins.common.setuserpassword.SetUserPasswordPlugin,cloudbaseinit.plugins.common.localscripts.LocalScriptsPlugin,cloudbaseinit.plugins.common.userdata.UserDataPlugin
- Add the configuration item netbios_host_name_compatibility=false to the last line of the configuration file so that the host name of the Windows OS can contain a maximum of 63 characters.
- In C:\Program Files\Cloudbase Solutions\Cloudbase-Init\conf\cloudbase-init-unattend.conf, check whether cloudbaseinit.plugins.common.sethostname.SetHostNamePlugin, exists.
- If yes, delete it and perform subsequent operations.
- If no, perform subsequent operations.
- Add cloudbaseinit.plugins.common.userdata.UserDataPlugin at the end of plugins=. Add a comma (,) in front of the added configuration item.
Installing the password reset plug-in
- Install the ECS password reset plug-in by referring to Installing the One-Click Password Reset Plug-In.
Installing SysAgent and SysPrep
- Copy the HW.SysAgent.Installer_64.msi and HW.SysPrep.Installer_64.msi installation packages to the ECS.
- Double-click the HW.SysAgent.Installer_64.msi and HW.SysPrep.Installer_64.msi files to install them.
Installing WKSRStorageAgent component
- Copy the WKSRStorageAgent_windows-amd64.msi installation package to the ECS.
- Double-click the WKSRStorageAgent_windows-amd64.msi file to install it.
(Optional) Backing up an image
After an image is encapsulated, if the ECS is stopped and restarted, the image is decapsulated and cannot be used directly. You need to configure and encapsulate the ECS again. If necessary, you can back up the ECS before encapsulation.
- On the ECS list page, locate the configured ECS and choose More > Stop to stop it.
- After the ECS is stopped, choose More > Manage Image/Backup > Create Server Backup to create an ECS backup.
- After the ECS backup is created, restart the ECS and perform encapsulation on the ECS.
Encapsulating an image
- On the ECS, find the Windows image creation tool in C:\software and decompress it to obtain the Workspace_HDP_WindowsDesktop_XXX folder.
- Right-click
 in the lower left corner, enter cmd, and press Enter.
 - Run the following command to switch to the directory containing the template tool:
cd C:\software\Workspace_HDP_WindowsDesktop_Installer_x.x.x
- In the displayed CLI, run the following command to encapsulate the image:
To create a multi-session common/GPU image: run_silent.bat --passive --environment_type 2 --hda_type 3 --nocheck -noshutdown
To create a single-session common image: run_silent.bat --passive --environment_type 2 --hda_type 1 --appmode --nocheck -noshutdown
To create a single-session GPU image: run_silent.bat --passive --hda_type 2 --environment_type 2 --appmode --nocheck --noshutdown
During image encapsulation, the ECS automatically restarts. Do not exit or stop the ECS. After the ECS is restarted, enter the ECS password to proceed with image encapsulation.
After the encapsulation tool displays a message indicating that the encapsulation is successful, you can close the tool.
Deleting the temporary admin user
- Click Start > Run.
The Run dialog box is displayed.
- Enter sysdm.cpl in the Open text box and press Enter.
The System Properties dialog box is displayed.
- On the Advanced tab page, click Settings under User Profiles.

- On the User Profiles page, select the profiles of the user to be deleted and click Delete.
- Click OK.
- Close the System Properties window.
- Click Start > Run.
The Run dialog box is displayed.
- Enter compmgmt.msc in the Open text box and press Enter.
The Computer Management window is displayed.
- In the navigation pane on the left, choose System Tools > Local Users and Groups > Users.
- In the right pane, right-click the username to be deleted and choose Delete.
- In the displayed dialog box, click Yes.
- Click OK.
- Close the Computer Management window.
Stopping an ECS
- On the ECS list page of the console, locate the row that contains the ECS created in Creating an ECS, and choose More > Stop to stop the ECS.
Feedback
Was this page helpful?
Provide feedbackThank you very much for your feedback. We will continue working to improve the documentation.See the reply and handling status in My Cloud VOC.
For any further questions, feel free to contact us through the chatbot.
Chatbot


