
Allowing Workspace Application Streaming to Access the Internet
Scenarios
After the administrator publishes an application, the cloud application is in the VPC subnet by default and cannot access the Internet. The administrator needs to configure a shared EIP for the NAT gateway so that users can access the Internet after connecting to applications with the Internet access function. If a cloud application has multiple service subnets, the Internet function must be enabled for each service subnet.

Workspace Application Streaming and Workspace share the same network. If a desktop exists in the same subnet of the same project and the administrator has enabled enhanced Internet access for the desktop in the subnet, end users can directly access the Internet using applications. If only cloud applications exist in the subnet of the current project, the administrator needs to enable the Internet by referring to How Do I Purchase the NAT and EIP Services to Enable Cloud Applications to Be Accessed Through the Internet?.
Prerequisites
- You have obtained the region, project, VPC, and subnet information of the cloud application that needs to access the Internet.
- You have the permission to perform operations on the NAT and EIP services.
- By default, a Huawei Cloud account has the operation permissions on all Huawei Cloud services. If you use such an account, you do not need to confirm it.
- To use NAT and EIP, the IAM account created under the Huawei Cloud account must be added to the admin user group or a user group with NAT and EIP operation permissions. Go to the IAM page to check whether the user belongs to the admin user group. If not, grant the IAM account the permission to use NAT and EIP.
Procedure
- Log in to the Workspace Application Streaming console as an administrator.
- Check whether the Internet access address is enabled.
After the service is enabled, the Internet access address is enabled by default.
- In the navigation pane on the left, choose Tenant Configuration.
- Check the status of Internet Access Address.
- If the IP address is displayed, the Internet access address is enabled. Go to 3.
- If Disabled is displayed, the Internet access address is disabled. Click Enable and go to 3.
After the Internet access address is disabled, you can enable the Internet access address again. After the function is enabled again, the IP address changes. You need to notify the user to use the new IP address for access.
- Enable the Internet by referring to Enabling Internet Access.
- Configure the DNS forwarding function (optional).
If Workspace Application Streaming is interconnected with the Windows AD server, you need to configure DNS domain name resolution on the Windows AD server. For details, see 4.a to 4.j. If not, go to the next step.
- Log in to the DNS server as the administrator.
- On the taskbar in the lower left corner, click
 .
. - Click
 on the right of the Start menu.
 - The Server Manager window is displayed.
- In the left navigation pane, click DNS.
- In the SERVERS area, right-click a Server name and choose DNS Manager from the shortcut menu.
- The DNS Manager dialog box is displayed.
- Expand DNS. Right-click the computer name, and choose Properties from the shortcut menu.
- On the Advanced tab page, deselect Disable recursion (also disable forwarders) and click Apply.
- On the Forwarder tab page, click Edit, enter the default DNS server IP address of the cloud application region in the text box, and click OK.
The default DNS server IP address of the Workspace Application Streaming region can be obtained from Huawei Cloud Private DNS Server Addresses.
- Notify end users to use the Internet access address to access Workspace Application Streaming.
Follow-up Operations
If users do not need to access the Internet, users can disable the Internet to save resources. The process is: Disable the SNAT bound to the EIP, disable the NAT, and release the EIP.
After SNAT is disabled, Workspace Application Streaming cannot access the Internet. Determine whether to disable the NAT and EIP as required.
- Log in to the console.
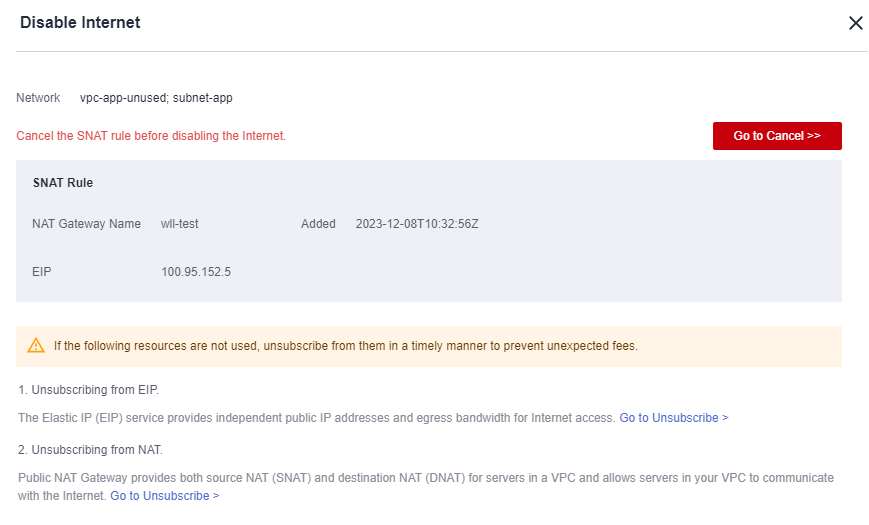
- On the Application Internet Access Management page, click Disable Internet.
The page for disabling the Internet is displayed, as shown in Figure 1.
Record the NAT gateway name and the EIP bound to the SNAT rule. After the SNAT rule is disabled, the EIP is unbound from the SNAT rule. You need to disable the corresponding EIP and NAT gateway on the EIP list and NAT gateway list.
- Click Go to Cancel.
The SNAT rule list is displayed.
Disabling an SNAT rule
- Locate the SNAT rule bound to the EIP used by the cloud application and click Delete in the Operation column.
You can determine which SNAT needs to be disabled based on the EIP recorded in 2.
- In the displayed dialog box, click Yes.
(Optional) Disabling a NAT
Multiple SNAT and DNAT rules can be created for a NAT, and the NAT can be disabled only after all related SNAT and DNAT rules are disabled. Determine whether to disable the NAT as required. If you decide to disable the NAT, disable it when it is used only by the cloud application of the current subnet.
- Click
 in the upper left corner to return to the public NAT gateway list.
 - Locate the public NAT gateway to be disabled and choose Operation > Delete.
All SNAT and DNAT rules created for the public NAT gateway must be disabled.
- In the displayed dialog box, enter DELETE and click OK.
Disabling an EIP
- In the navigation pane on the left, choose Elastic IP and Bandwidth > EIPs.
The EIP list is displayed.
- Select the EIP recorded in 2.
- In the upper part of the list, choose More > Release.
- In the displayed dialog box, click Yes.
Feedback
Was this page helpful?
Provide feedbackThank you very much for your feedback. We will continue working to improve the documentation.See the reply and handling status in My Cloud VOC.
For any further questions, feel free to contact us through the chatbot.
Chatbot


