
Purchasing Yearly/Monthly-billed Desktops
Scenarios
An administrator can select the yearly/monthly billing mode and packages, and assign desktops to end users. After the administrator purchases a desktop, the system automatically sends a notification email to the user's mailbox.
Purchase Page
- Logging In to the Workspace Console
- On the Dashboard or Desktop Management page, click Buy Desktop.
The page for buying desktops is displayed.
Basic Configurations
- Determine whether to connect to an existing Windows AD domain of the enterprise.

After you purchase a desktop for the first time, your selection (connecting to the Windows AD domain or canceling the connection to the Windows AD domain) cannot be changed. Exercise caution when performing this operation.
- If you select No, you can directly configure the desktop infrastructure by referring to 2. After the desktop creation task is submitted, the Workspace service will be deployed.
After subscribing to the service, you can use the account authentication system of Huawei to authenticate users and manage user accounts on the Workspace console.
- Select Yes to configure the Windows AD domain. For details, see Connecting to the Windows AD Domain. After the configuration information is saved, the Workspace service will be deployed.
After the service is subscribed, the existing unified AD of the enterprise is used to authenticate users and manage user accounts.
- If you select No, you can directly configure the desktop infrastructure by referring to 2. After the desktop creation task is submitted, the Workspace service will be deployed.
- Configure desktop information, as described in Table 1 Desktop information.
Table 1 Desktop information Parameter
Description
Example Value
Billing Mode
Select Yearly/Monthly.
Yearly/Monthly
Region
Desktops in different regions cannot communicate with each other over the intranet, and desktops need to be managed by region. You are advised to create desktops in the same region.
NOTE:A region is the location of the physical data center of Workspace. Different regions indicate different physical distances between the physical data center and users, as well as different network latency. To reduce latency and improve access speed, select the region closest to your workloads.
-
Project
Select a project as required.
NOTE:If no project is available, click
 and choose Create Project. On the displayed page, create a subproject by referring to Creating a Subproject.
-
AZ
An AZ is a physical region where resources use independent power supplies and networks. AZs are physically isolated but connected through an intranet. If an AZ becomes faulty, other AZs in the same region will not be affected.
NOTE:To achieve better disaster recovery, you are advised to create desktops in different AZs.
Random
CPU Architecture
Select the x86 architecture.
x86
Package Type
Select specifications as required.
Ultimate
Ultimate | 2 vCPUs | 4 GB
- Configure an image.
- Image Type: Select an image type as required.

- A public image is a widely used standard image provided by Workspace. It contains an OS and pre-installed public applications and is visible to all users. Public images are very stable and their OS and any included software have been officially authorized for use. If a public image does not contain the application environments or software you need, you can use a public image to create an application environment and then deploy required software. Currently, Windows public images are marketplace images.
- A private image is created based on an existing cloud desktop or external image file and is visible only to the user who created it. It contains an OS, preinstalled public applications, and the user's personal applications. Using a private image to create a desktop saves more time.
- Workspace supports public images running Windows, private images converted from desktops generated using Windows images, and private images converted from ECSs created using Windows image files. To use a private image to purchase a desktop, see Converting a Desktop to an Image and Creating a Windows Desktop Private Image.
- OS: Select an OS type in the supported OS list.
- Image Type: Select an image type as required.
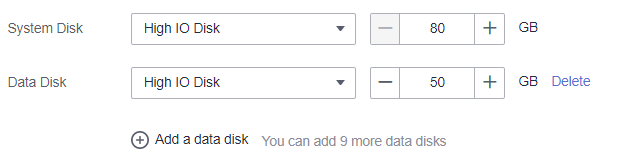
- Configure disks as required, as shown in Figure 1.
- For details about the performance of different disk types, see EVS Overview.
- High I/O disks use serial attached SCSI (SAS) drives to store data.
- Ultra-high I/O disks use solid state disk (SSD) drives to store data.
- General purpose SSD disks use SSD drives to store data.
- After the desktop is created, you will be billed for the disk until the desktop is deleted.
- The disk size must be an integer multiple of 10.
- A maximum of 10 data disks can be configured.
- For details about the performance of different disk types, see EVS Overview.
- Set the required duration and evaluate the fee.
Set the required duration. The fee for one desktop is displayed here. If the selected duration is marked with
 , it indicates that the selected package has a discount within the time range. Click Discount Details to view the discount details.
 - Click Next: Configure advanced settings.
The page for configuring advanced settings is displayed.
Advanced Settings
- (Optional) Configure an enterprise ID.
You are advised to use identifiable fields such as the enterprise name pinyin as the enterprise ID.
- Customize an enterprise ID or use a randomly-generated ID upon the first purchase.
- Enterprise ID is the unique identifier of your tenant environment. End users need to enter the enterprise ID when logging in to the system.
- The enterprise ID can contain a maximum of 32 characters, including digits, letters, underscores (_), and hyphens (-).
- Configure the network.
Figure 2 Configuring the network

The 172 network segment is reserved for running internal services. Therefore, do not select a VPC network starting with 172. Otherwise, desktops cannot be purchased.
The resources required by Workspace will be created in the selected VPC subnet. After the desktop is purchased for the first time, the VPC cannot be modified, and only the service subnet can be managed.
- Configure the existing network.
Click
 and select a service subnet. If you purchase a desktop for the first time, you need to select a VPC and a service subnet. For details about how to create a VPC and a service subnet, see Creating a VPC and a Service Subnet.
 - Configure a new network.
- Click Click here to manage subnets. In the displayed Modify the service subnet dialog box, click Create on Console to create a service subnet. For details, see Creating a Service Subnet for the VPC.
- If you purchase a desktop for the first time, click Create on Console to create a VPC and a service subnet. For details, see Creating a VPC and a Service Subnet.
- Click
 and configure the IP address type as required.
- Automatically assign an IP address.
- Manually assign an IP address.
- Use an existing elastic network interface.
- Configure the existing network.
- Configure the network access mode, as shown in Figure 3. By default, Internet is selected. You can select multiple options.
- Internet access is sufficient for most networking requirements, but if you need a faster, more secure connection, purchase Direct Connect in advance and implement networking. Learn more about Direct Connect. Load balancers will be automatically created when Direct Connect access is enabled. (Do not modify the load balancers.)
- Direct Connect network segment configuration: Enter the network segment where the desktop client (such as TC) is located. You can enter multiple network segments and separate them with semicolons (;).
- Configure an EIP for network access.
- Buy now
- By Bandwidth: applicable when the traffic is heavy or stable and the bandwidth ranges from 1 Mbit/s to 200 Mbit/s. You can customize the bandwidth as prompted.
Specify the bandwidth upper limit. You are charged based on the actual outbound traffic, regardless of the usage duration.
- By Traffic: applicable when the traffic is small or fluctuates greatly and the bandwidth size ranges from 5 Mbit/s to 200 Mbit/s. You can customize the bandwidth as prompted.
You are charged based on the purchased duration and bandwidth size.
- By Bandwidth: applicable when the traffic is heavy or stable and the bandwidth ranges from 1 Mbit/s to 200 Mbit/s. You can customize the bandwidth as prompted.
- Use existing: Bind an existing EIP to the desktop.
- Not required: To enable desktop Internet access, go to Internet Access Management on the Workspace console.
- Buy now
- Click Next:Assign desktops.
The page for assigning desktops is displayed.

Assigning Desktops
- Select the user import mode and configure information of the user to whom a desktop is to be assigned.
If an existing AD domain is used, you need to create users on the AD server before assigning desktops.
Select Manual or Batch as required, as shown in Table 2.
- Click Next: Confirm the settings.
The confirmation page is displayed.
Confirming the Settings
- Select Enterprise Project as needed.
You can use an enterprise project to centrally manage your cloud resources and members by project.
- Set the duration as required.
- (Optional) Select Auto renewal if needed.
- Note the auto-renewal rules when enabling auto-renewal.
- Auto-renewal duration:
- Monthly: You can renew the subscription for one month each time. The number of renewal times is not limited.
- Yearly: You can renew the subscription for one year each time. The number of renewal times is not limited.
- Read the disclaimer and select I have read and agree to the Image Disclaimer.
- Click Buy Now.
The page for purchasing desktops is displayed.
- Check the cloud order service and the fee to be paid.
- After you select a payment method and pay for your order, the desktop has been purchased.
After the desktop is provisioned, administrators can view the purchased desktop in the desktop list.
Follow-up Operations
- The login details for the newly created desktop will be emailed to the end user. The end user can activate the account, download the client, and configure and use the desktop as instructed. Administrators can restrict desktop network interaction as required. For details, see Configuring Workspace to Access the Public Network and Configuring Workspace to Access the Intranet.
- If a Windows AD domain has been connected and an OU has been created on the Windows AD server, create the OU on the console by referring to OU Management.
- For details about performing auto-renewal on the console, see Auto-renewal.
Feedback
Was this page helpful?
Provide feedbackThank you very much for your feedback. We will continue working to improve the documentation.See the reply and handling status in My Cloud VOC.
For any further questions, feel free to contact us through the chatbot.
Chatbot


