
Using a Soft Client
Scenarios
Log in to a user's computer from a cloud client on an SC.

The initial configuration described in this section needs to be performed only once on each terminal.
Prerequisites
Table 1 lists the file needed.
|
Software Package |
Description |
How to Obtain |
|---|---|---|
|
Workspace_mac.dmg |
Used to install the PC client for macOS. |
|
|
Workspace_Win.msi |
Used to install the PC client for Windows. |
|
|
Workspace_amd64.deb |
Used to install the client for AMD64.
NOTE:
The Kylin OS and UOS are supported. |
|
|
Workspace_arm64.deb |
Used to install the client for ARM64.
NOTE:
The Kylin OS and UOS are supported. |
|
Procedure
- The PC supports the following OSs:
- 64-bit Windows 10
- 64-bit macOS 10.14–12.4
- ARM64 (Kylin OS and UOS, 64-bit)
- AMD64 (Kylin OS and UOS, 64-bit)
- When security software displays a dialog box, allow the installation to continue.
- Obtain the desktop login information email sent by the system.
- The notification email for AD connection is slightly different from that when the AD is not connected. Refer to the actual notification email.
- If you set User Activation to By administrators and do not enter the email address and mobile number, choose Users > Users in the navigation pane of the console after the purchase, locate the row that contains the user, and click
 in the Desktop Count column to obtain desktop login information.

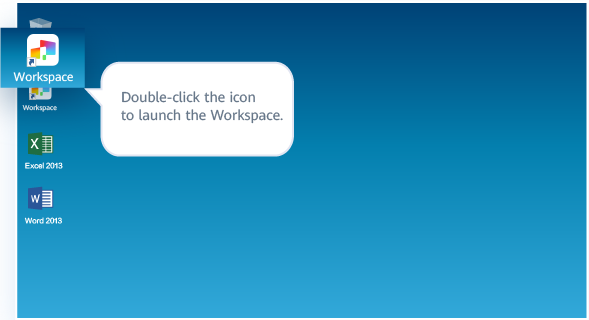
- Install the Workspace client.
- If a macOS PC is used, you need to install a macOS client.
- Copy the obtained Workspace_mac.dmg to a folder on the macOS PC, for example, Desktop.
- Double-click the installation package.
- Double-click the install icon.
- Click Continue.
- Click Install.
If you do not want to install the SC in the default location, click Change Install Location.
- In the displayed window, enter the username and password, and click Install Software.
The installation takes about one minute.
- Click Close.
The macOS SC has been installed.
- If a Windows PC is used, you need to install a Windows client.
Double-click the obtained Workspace_Win.msi client software package and install it as prompted.
- If a macOS PC is used, you need to install a macOS client.
- Start the client.
If a macOS PC is used, you need to set the system preference before starting the client for the first time. Otherwise, you cannot enter characters on the cloud desktop.
Choose System Preferences > Security & Privacy > Input Monitoring, select HDPViewer, and switch the input mode to English.
- Configure the server IP address and enterprise ID.
-
Figure 1 Configuring the server IP address and enterprise ID

-
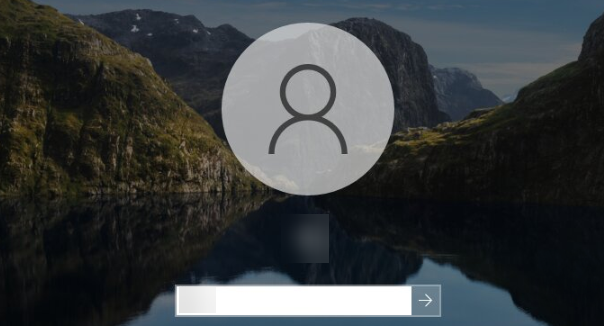
- Log in to the desktop, as shown in Figure 2.
- If the account has multiple desktops, enter the username and password and click Log In. The desktop list page is displayed. You need to click the target desktop to access it.
- If multi-factor authentication has been enabled, you need to pass the multi-factor authentication again before accessing the cloud desktop.
- (Optional) Perform third-party SSO.
The administrator configures the OAuth 2.0 authentication mode for logging in to the cloud desktop. For details, see the OAuth 2.0 procedure in Third-Party SSO.
- After third-party authentication is enabled, the OAuth 2.0 login mode is used.
The username on the third-party platform must be the same as that on the cloud desktop. Otherwise, the verification fails.

- Enter the username and password of the third-party application platform to log in to the cloud desktop.
- If the third-party platform authentication mode is used, the system prompts you to reset the password when you log in to the cloud desktop for the first time.


- In the AD scenario, when you log in to the cloud desktop, the page for resetting the password is not displayed.
- The reset password is the password for unlocking the cloud desktop.
- In the AD scenario, after you go to the desktop list page and click the target desktop, you need to enter the password of the cloud desktop again for login.
The administrator configures the LDAP authentication mode for logging in to the cloud desktop. For details, see Third-Party SSO.
- After third-party authentication is enabled, the LDAP login mode is used.
- Enter the username and password of the LDAP platform for login.
The entered LDAP user must be the same as the cloud desktop user. Otherwise, the verification fails.

- Click the target desktop. When the AD is connected, you need to enter the password again for login.
- When the AD is connected:
- The Windows cloud desktop uses the username and password of the AD.
- The Linux cloud desktop uses the username and password of LDAP.
- When the AD is not connected:
- The Windows and Linux cloud desktops use the username and password of LDAP.
- After third-party authentication is enabled, the OAuth 2.0 login mode is used.
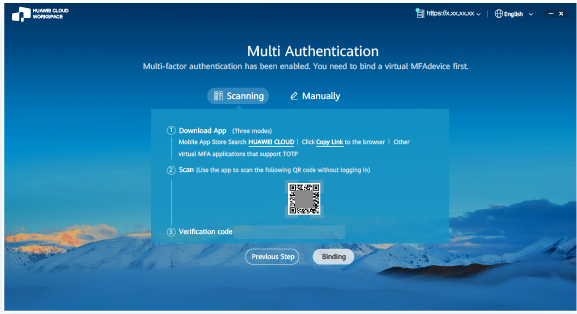
- (Optional) Perform multi-factor authentication.
You need to perform authentication again only when the administrator has enabled multi-factor authentication.
- After multi-factor authentication is enabled, you need to bind a virtual MFA device to the desktop upon the first login.
- Download and install an application that supports TOTP on a smart device, such as a mobile phone.
- On the MFA tool page of the smart device, select the QR code scanning mode or manual input mode to bind the device.
Your operation is subject to the application you use.
- If you choose to scan the QR code, scan the QR code in the Scanning area of the multi-factor authorization page of the Workspace client.
- If you choose to manually input, on the MFA tool page of the smart device, enter the account and key in the Manually area of the multi-factor authorization page of the Workspace client.
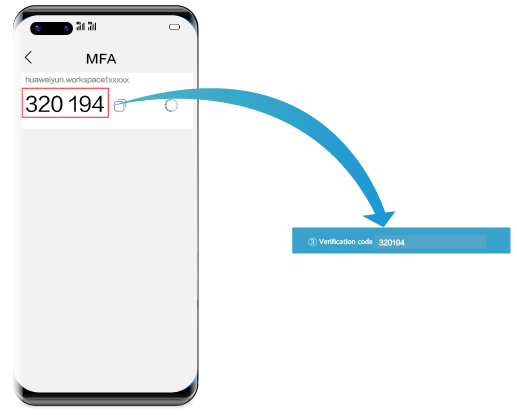
- Enter the dynamic verification code generated by the virtual MFA device bound to the smart device in the verification code text box on the Workspace client.
The preceding verification code page is only an example. The actual page varies depending on the application in use.
- On the multi-factor authorization page of the Workspace client, click Binding.
If the account has multiple desktops, the desktop list page will be displayed after you click Binding. You need to click the target desktop to access it.
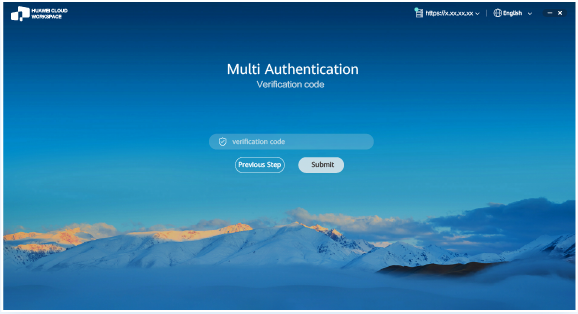
- After multi-factor authentication is enabled, use the proprietary authentication system of Huawei Cloud. If this is not the first time of login to the desktop, use the proprietary authentication system of the enterprise and directly enter the verification code for authentication.
- Open an application that supports TOTP on a smart device, such as a mobile phone, and access the MFA tool page.
- Enter the dynamic verification code generated by the virtual MFA device bound to the smart device in the verification code text box on the Workspace client.
The preceding verification code page is only an example. The actual page varies depending on the application in use.
- On the multi-factor authorization page of the Workspace client, click Submit.
If the account has multiple desktops, the desktop list page will be displayed after you click Submit. You need to click the target desktop to access it.
- After multi-factor authentication is enabled, you need to bind a virtual MFA device to the desktop upon the first login.


Feedback
Was this page helpful?
Provide feedbackThank you very much for your feedback. We will continue working to improve the documentation.See the reply and handling status in My Cloud VOC.
For any further questions, feel free to contact us through the chatbot.
Chatbot


