
Using a Mobile Terminal
Scenarios
This section provides instructions for end users to log in to their computers using mobile terminals.
Mobile terminals running Android 6.0 or later are supported. You can use the stylus to perform operations.

The operations on different mobile terminals are similar. The following uses the operations on a mobile phone as an example.
Procedure
- Obtain the desktop login information email sent by the system.
The notification email for AD connection is slightly different from that when the AD is not connected. Refer to the actual notification email.
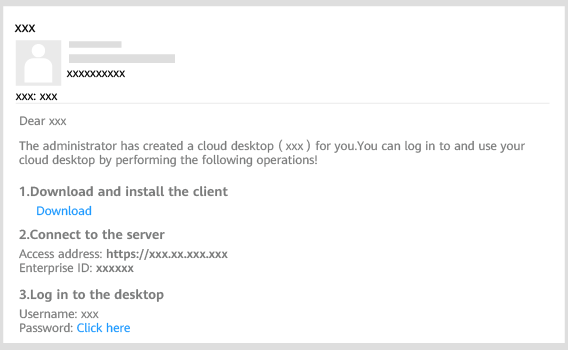
- Obtain the client as prompted in the system email.
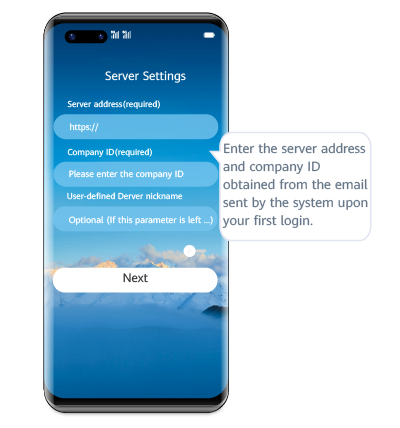
- Enable the client and configure the server address and enterprise ID as prompted.
- Configure the server address and enterprise ID on the server setting page.
- Enter the username and password to log in to the desktop. Upon the first login, you can use gestures to adapt to the desktop.
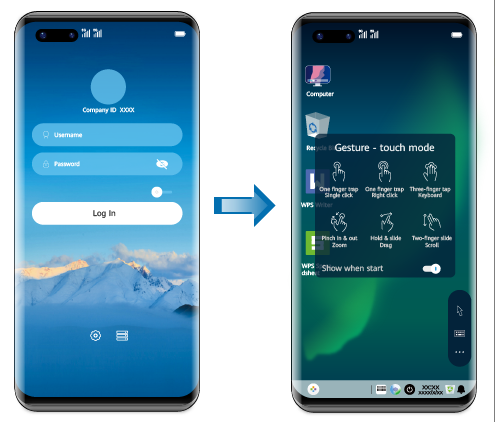
- If the account has multiple desktops, enter the username and password and click Log In. The desktop list page is displayed. You need to click the target desktop to access it.
- If multi-factor authentication has been enabled, you need to pass the multi-factor authentication again before accessing the cloud desktop.
- (Optional) Perform multi-factor authentication.
You need to perform authentication again only when the administrator has enabled multi-factor authentication.
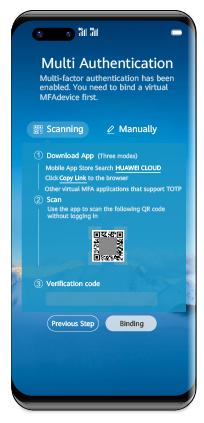
- After multi-factor authentication is enabled, you need to bind a virtual MFA device to the desktop upon the first login.
- Download and install an application that supports TOTP on a smart device, such as a mobile phone, and access the MFA tool page.
- On the MFA tool page of the smart device, select the QR code scanning mode or manual input mode to bind the device.
Your operation is subject to the application you use.
- If you choose to scan the QR code, scan the QR code in the Scanning area of the multi-factor authorization page of the Workspace client.
- If you choose to manually input, on the MFA tool page, enter the account and key in the Manually area of the multi-factor authorization page of the Workspace client.
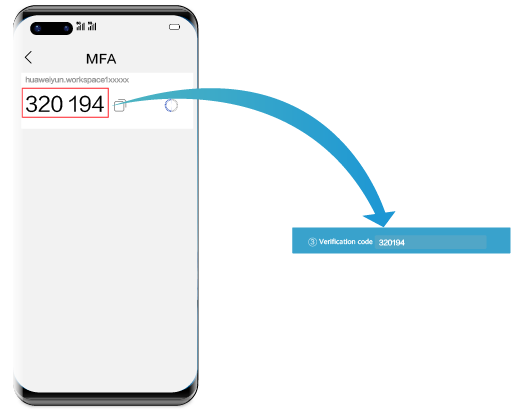
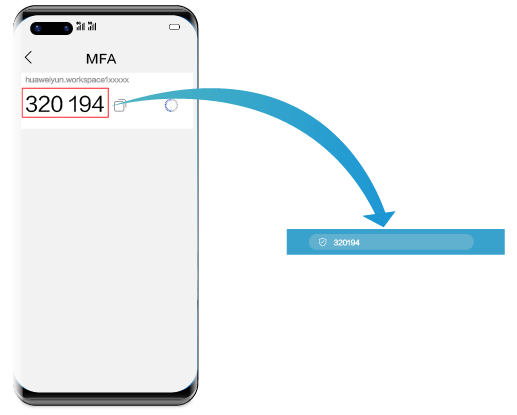
- Enter the dynamic verification code generated by the virtual MFA device bound to the smart device in the verification code text box on the Workspace client.
The preceding verification code page is only an example. The actual page varies depending on the application in use.
- On the multi-factor authorization page of the Workspace client, click Binding.
If the account has multiple desktops, the desktop list page will be displayed after you click Binding. You need to click the target desktop to access it.
- After multi-factor authentication is enabled, use the proprietary authentication system of Huawei Cloud. If this is not the first time of login to the desktop, use the proprietary authentication system of the enterprise and directly enter the verification code for authentication.
- Open the installed application that supports TOTP on the smart device, such as a mobile phone, and access the MFA tool page.
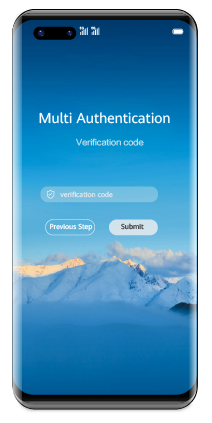
- Enter the dynamic verification code generated by the virtual MFA device in the verification code text box on the Workspace client.
The preceding verification code page is only an example. The actual page varies depending on the application in use.
- On the multi-factor authorization page of the Workspace client, click Submit.
If the account has multiple desktops, the desktop list page will be displayed after you click Submit. You need to click the target desktop to access it.
- After multi-factor authentication is enabled, you need to bind a virtual MFA device to the desktop upon the first login.
Feedback
Was this page helpful?
Provide feedbackThank you very much for your feedback. We will continue working to improve the documentation.See the reply and handling status in My Cloud VOC.
For any further questions, feel free to contact us through the chatbot.
Chatbot


