Quickly Creating a DWS Cluster and Importing Data for Query
Scenario
DWS is a fully-managed and enterprise-level cloud data warehouse service. It is O&M-free, compatible with the PostgreSQL ecosystem, and supports online cluster scale-out and efficient loading of multiple data sources. It helps enterprises efficiently analyze and monetize massive amounts of data online.
This section describes how to create a DWS cluster with three nodes and import CSV data from an OBS bucket to perform simple data analysis and query.

The DWS cluster does not support cross-region access to OBS bucket data. Before creating a DWS cluster, ensure that the cluster and OBS bucket are in the same region. Use EU-Dublin as an example.
- Billing Mode: Pay-per-use
- Version: Coupled storage and compute
- Nodes: 3 nodes
- Cluster connection mode: SQL editor
- Storage capacity: 20 GB/node
- Data source: CSV data in the OBS bucket
- Cluster version: 8.1.3.x
Procedure
|
Step |
Description |
|---|---|
|
Register a Huawei account, subscribe to Huawei Cloud, complete real-name authentication, top up the account, and plan and create VPC and subnet resources. |
|
|
Create a three-node DWS cluster and configure information such as the cluster node quantity, storage capacity, and cluster version. |
|
|
Create an OBS bucket and upload the local CSV data to the bucket. |
|
|
Step 3: Connecting to the DWS Cluster and Importing Data for Analysis |
Use the SQL editor to connect to the DWS database, create an OBS foreign table, import OBS bucket data to the DWS cluster through the OBS foreign table, and perform simple SQL queries. |
Preparations
- Sign up a DWS account, complete the real-name authentication, and check the account status before using DWS. The account cannot be in arrears or frozen.
- Obtain the AK/SK of the account. For details, see Access Keys.
- Create a VPC and subnet resources.
Step 1: Creating a DWS Cluster
- Log in to the DWS console and go to the Create GaussDB(DWS) Cluster page.
- Configure the parameters according to Table 2.
Table 2 Parameter configurations Parameter
Example Value
Description
Region
Select the EU-Dublin region.
NOTE:This guide uses EU-Dublin as an example. If you want to select another region, ensure that other cloud services are in the same region.
For lower network latency and quicker resource access, select the nearest region. After a DWS cluster is created, the region cannot be changed. Exercise caution when selecting a region.
For more information, see Regions and AZs.
Billing Mode
Pay-per-use
Yearly/Monthly and pay-per-use billing modes are supported. For long-term usage, it is recommended to opt for the yearly or monthly billing mode to avail of a greater discount.
For more information, see Billing Overview.
AZ
Choose AZ1 to create a single-AZ cluster. (If the flavor is sold out, select another AZ.)
- Single AZ: All nodes in a cluster are deployed in the same AZ.
- Multiple AZs: To achieve HA across multiple AZs, deploy cluster nodes in different AZs. For services requiring even higher HA, a multi-AZ setup is recommended.
Figure 1 Basic configurations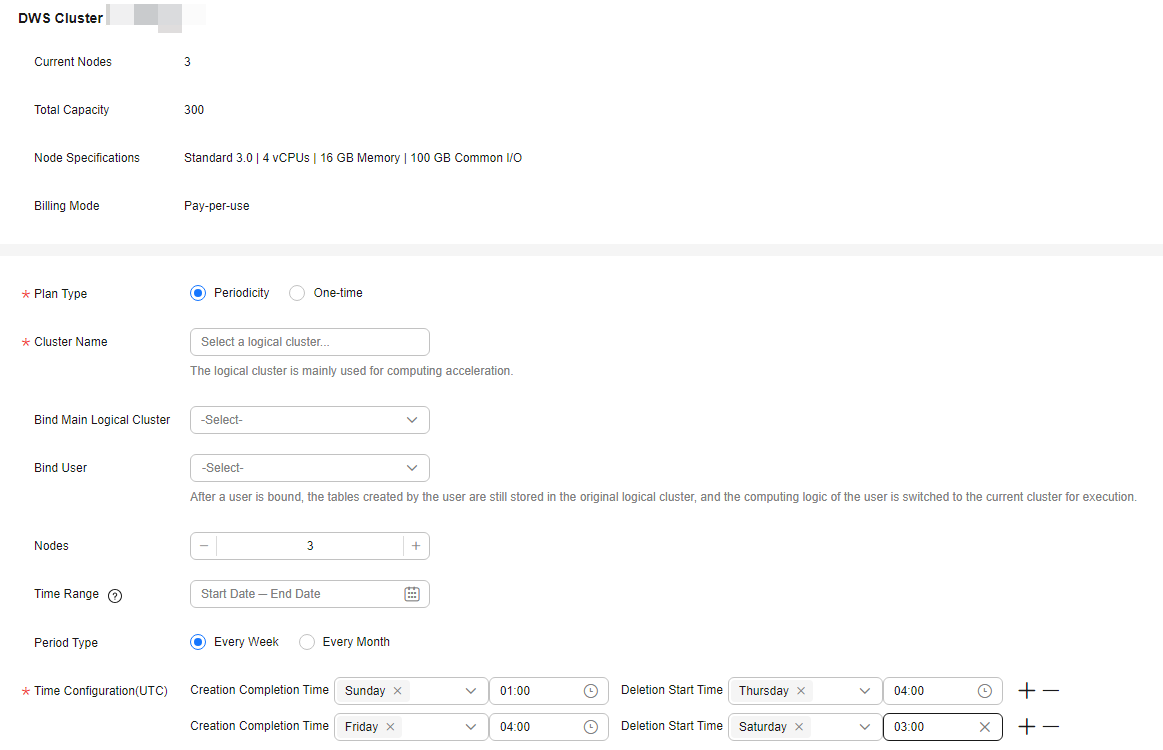
- Table 3 lists the required data warehouse parameters.
Table 3 Data warehouse parameters Parameter
Example Value
Description
Version
Coupled storage and compute
- Coupled storage and compute: Data is stored on local disks of compute nodes.
- Decoupled Storage and Compute: Local DN disks are used only for data cache and metadata storage, and user data is stored on OBS.
Storage Type
Cloud SSD
- Cloud SSD: SSD EVS disks serve as data storage media, offering flexible storage capacity and supporting disk scale-out.
- Local SSD: Local disks in ECS flavors serve as data storage media, offering fixed capacity and superior performance. However, disk scale-out is not supported.
For more information, see What Are the Differences Between Cloud SSDs and Local SSDs?
Node Flavor
dwsx2.xlarge
NOTE:If this flavor is sold out, select other AZs or flavors.
Node flavors measure the compute power of DWS, including CPU architecture, vCPUs, memory, compute type, and deployment type. You need to select node flavors as needed. Typically, higher query performance requires larger node flavors.
For more information, see Data Warehouse Flavors.
Hot Storage
20 GB per node
Available storage capacity of each node. The page displays the actual storage capacity for the service, such as 20 GB per node with a total of 3 nodes resulting in a total service data capacity of 60 GB. Customers with a large amount of service data should plan their storage capacity accordingly.
Nodes
3
Number of cluster nodes. The number of nodes ranges from 3 to 256.
Figure 2 Data warehouse configuration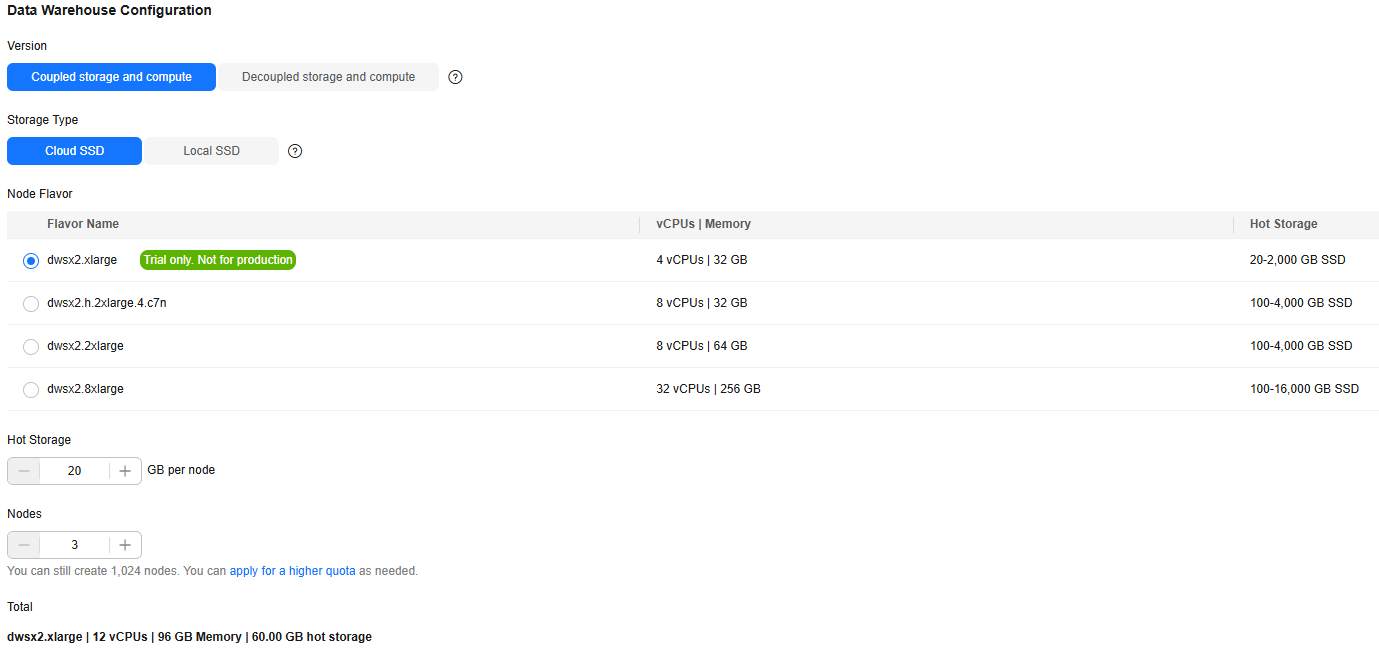
- Configure the parameters according to Table 4.
Table 4 Network configuration parameters Parameter
Example Value
Description
VPC
vpc-default
VPC where DWS is located.
Subnet
subnet-default(192.168.0.0/24)
VPC subnet.
Security Group
Automatic creation
You can select Automatic creation or choose a created security group.
The default option is Automatic creation, which means the system will create a security group automatically if you do not change the setting.
The rule of the default security group is as follows: The outbound allows all access requests, while the inbound is open only to the database port 8000 that you set to connect to the DWS cluster.
EIP
Deselect it
If the client connected to DWS and the DWS cluster are not in the same VPC, use an EIP.
ELB
Deselect it
If the private IP address or EIP of a CN is used to connect to a cluster, the failure of this CN will lead to cluster connection failure.
ELB health checks enable quick forwarding of CN requests to healthy nodes in a cluster, minimizing access faults in case of a faulty CN. This ensures that workload is immediately shifted to a healthy node.
For more information, see Associating and Disassociating ELB.
Figure 3 Network configuration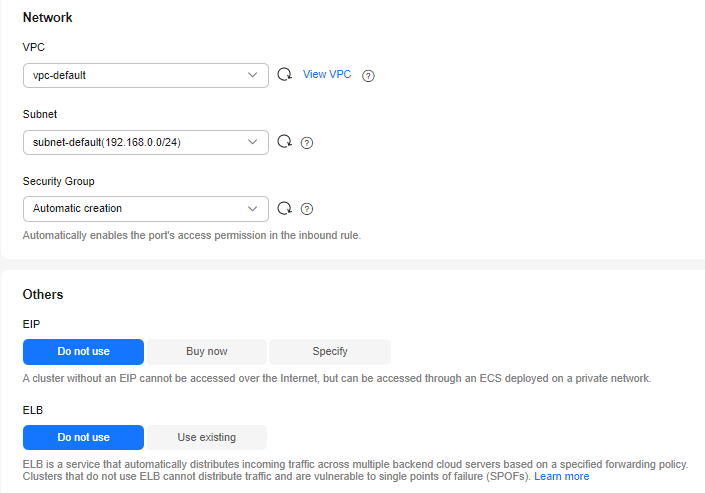
- Configure the cluster by referring to Table 5.
Table 5 Cluster management configuration Parameter
Example Value
Description
Cluster Name
dws-demo
Cluster name, which is user-defined and can be modified later.
Cluster Version
Use the recommended version
Each version supports different database functions. By default, the recommended version is selected. To use the functions of a later version, select a later version.
NOTE:On the whitelist customer page, other cluster versions are displayed. Select a cluster version based on the site requirements.
For details about the functions supported by each cluster version, see Product Notice.
Time Zone
Use default time zone
Default time zone of the cluster.
Enterprise Project
default
This parameter is displayed only when an enterprise account is used to create a DWS cluster.
It enables unified management of cloud resources by project.
Tags
-
On DWS, after creating a cluster, you can add identifiers to items such as the project name, service type, and background information using tags. If you use tags in other cloud services, you are advised to create the same tag key-value pairs for cloud resources used by the same workload to keep consistency.
Figure 4 Advanced settings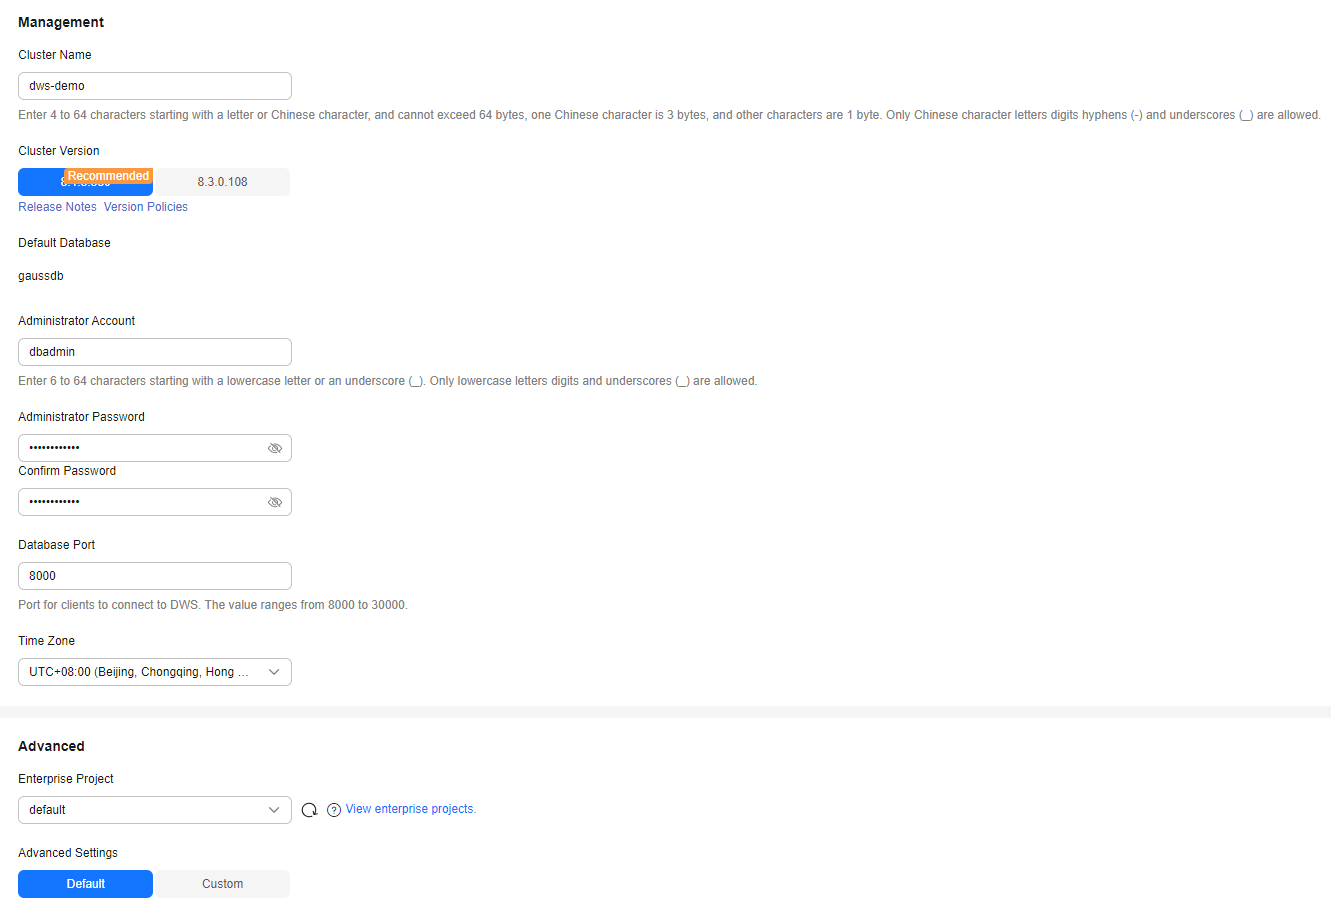
- Configure the database by referring to Table 6.
Table 6 Database management, database encryption, and more configurations Parameter
Example Value
Description
Administrator Account
dbadmin
Username of the database system administrator. Retain the default value.
The database system administrator is assigned the SYSADMIN attribute by default. If the separation of permissions feature is not enabled, the administrator has the highest database permissions. This allows them to plan database objects, create databases and users, and authorize user roles.
For more information, see Database Users.
Administrator Password
-
Password of the database system administrator.
Confirm Password
-
Enter the password again for confirmation.
Database Port
8000
Port for the client to connect to the DWS database. Retain the default value 8000.
Encrypt DataStore
-
If this function is enabled, Key Management Service (KMS) encrypts the cluster and the cluster's snapshot data.
More Configurations
-
- CNs:In a large-scale cluster, you are advised to deploy multiple CNs.
- IPv6 CIDR Block: Specify whether to enable the IPv6 dual stack for the cluster. If IPv6 is selected, a client or application can connect to the database using an IPv6 address.
- In the Configuration Summary area on the right of the page, confirm the configurations and select I have confirmed the current configuration.
- Confirm the information and click Buy Now.
Cluster creation takes about 10 minutes. Clusters in the Available state are ready for use.
Step 2: Uploading Data to OBS
- Create an OBS bucket. For details, see Creating a Bucket.
Set key parameters as follows and retain the default values for other parameters.

Cross-region access to OBS bucket data is not supported. The OBS bucket must be created in the same region as the DWS cluster. Select EU-Dublin.
- Region: Select the EU-Dublin region.
- Bucket Name: dws-obs01 (If a conflict occurs, modify the number in the name to 02, 03, or a higher number)
- Bucket Policy: Private.
- After the OBS bucket is created, click the name of the newly created dws-obs01 bucket on the bucket list. In the navigation pane, choose Objects and click Create Folder. Set the folder name to input_data and click OK.
Figure 5 Creating a folder

- Create three CSV data files on the local PC. The file names (including the file name extension) are product_info0.csv, product_info1.csv, and product_info2.csv.
Figure 6 Creating a test.csv file

- Use a text editor to open the three CSV files and copy the following content to each CSV file.
- product_info0.csv:
1
2
3
4
5
100,XHDK-A,2017-09-01,A,2017 Shirt Women,red,M,328,2017-09-04,715,good!
205,KDKE-B,2017-09-01,A,2017 T-shirt Women,pink,L,584,2017-09-05,40,very good!
300,JODL-X,2017-09-01,A,2017 T-shirt men,red,XL,15,2017-09-03,502,Bad.
310,QQPX-R,2017-09-02,B,2017 jacket women,red,L,411,2017-09-05,436,It's nice.
150,ABEF-C,2017-09-03,B,2017 Jeans Women,blue,M,123,2017-09-06,120,good.
- product_info1.csv:
1
2
3
4
5
200,BCQP-E,2017-09-04,B,2017 casual pants men,black,L,997,2017-09-10,301,good quality.
250,EABE-D,2017-09-10,A,2017 dress women,black,S,841,2017-09-15,299,This dress fits well.
108,CDXK-F,2017-09-11,A,2017 dress women,red,M,85,2017-09-14,22,It's really amazing to buy.
450,MMCE-H,2017-09-11,A,2017 jacket women,white,M,114,2017-09-14,22,very good.
260,OCDA-G,2017-09-12,B,2017 woolen coat women,red,L,2004,2017-09-15,826,Very comfortable.
- product_info2.csv:
 1
 2
 3
 4
 5
 6
 7
 8
 9
10
980,"ZKDS-J",2017-09-13,"B","2017 Women's Cotton Clothing","red","M",112,,,
98,"FKQB-I",2017-09-15,"B","2017 new shoes men","red","M",4345,2017-09-18,5473
50,"DMQY-K",2017-09-21,"A","2017 pants men","red","37",28,2017-09-25,58,"good","good","good"
80,"GKLW-l",2017-09-22,"A","2017 Jeans Men","red","39",58,2017-09-25,72,"Very comfortable."
30,"HWEC-L",2017-09-23,"A","2017 shoes women","red","M",403,2017-09-26,607,"good!"
40,"IQPD-M",2017-09-24,"B","2017 new pants Women","red","M",35,2017-09-27,52,"very good."
50,"LPEC-N",2017-09-25,"B","2017 dress Women","red","M",29,2017-09-28,47,"not good at all."
60,"NQAB-O",2017-09-26,"B","2017 jacket women","red","S",69,2017-09-29,70,"It's beautiful."
70,"HWNB-P",2017-09-27,"B","2017 jacket women","red","L",30,2017-09-30,55,"I like it so much"
80,"JKHU-Q",2017-09-29,"C","2017 T-shirt","red","M",90,2017-10-02,82,"very good."
- product_info0.csv:
- Use a text editor to convert the encoding format to UTF-8 and save the file.
- Return to the OBS console and click the name of the newly created dws-obs01 bucket in the bucket list.
- In the navigation pane, choose Objects and click the input_data folder.
- Click Upload Object, and then click Add File.
- Upload the product_info0.csv, product_info1.csv, and product_info2.csv files to the OBS bucket.
Step 3: Connecting to the DWS Cluster and Importing Data for Analysis
- Go to the DWS console.
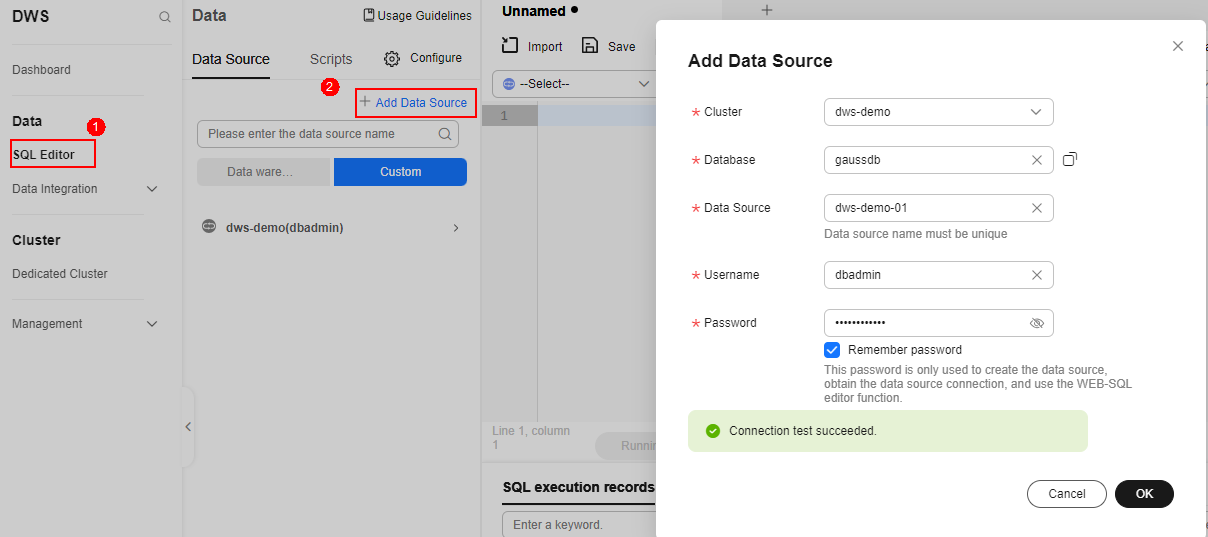
- In the navigation tree on the left, choose Data > SQL Editor and click Add Data Source.
- Enter the database connection information.
- Cluster: Select the created dws-demo cluster.
- Database: Retain the default value gaussdb.
- Data Source: Enter dws-demo-01.
- Username: Enter dbadmin.
- Password: Enter the password set during DWS creation in Step 1: Creating a DWS Cluster.
- Select Remember password and click Test Connection.
Figure 7 Database connection information
- Click OK.
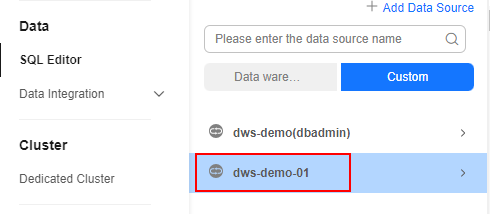
The green icon
 before the data source name in the following figure indicates that the database is connected. The right pane is the SQL editor window, where you can write and execute SQL statements.Figure 8 Successful database connection

If the connection session times out or the browser is refreshed,
 will appear grayed out, indicating that the connection has been disconnected. To reconnect to the database, double-click the data source name.
- Copy the following SQL statement to the SQL editor window and replace the OBS bucket name, AK value, and SK value with the actual values.
In this document, the OBS bucket name is dws-obs01. Obtain the AK and SK from Access Keys.
 1
 2
 3
 4
 5
 6
 7
 8
 9
10
11
12
13
14
15
16
17
18
19
20
21
22
23
24
25
26
27
28
29
30
CREATE FOREIGN TABLE product_info_ext
(
product_price integer not null,
product_id char(30) not null,
product_time date,
product_level char(10),
product_name varchar(200),
product_type1 varchar(20),
product_type2 char(10),
product_monthly_sales_cnt integer,
product_comment_time date,
product_comment_num integer,
product_comment_content varchar(200)
  )
SERVER gsmpp_server
OPTIONS
(
LOCATION'obs://OBS bucket name/input_data/',
FORMAT 'CSV' ,
DELIMITER ',',
ENCODING 'utf8',
HEADER 'false',
ACCESS_KEY 'AK value',
SECRET_ACCESS_KEY 'SK value',
FILL_MISSING_FIELDS 'true',
IGNORE_EXTRA_DATA 'true'
 )
READ ONLY
LOG INTO product_info_err
PER NODE REJECT LIMIT 'unlimited';
Figure 9 Creating an OBS foreign table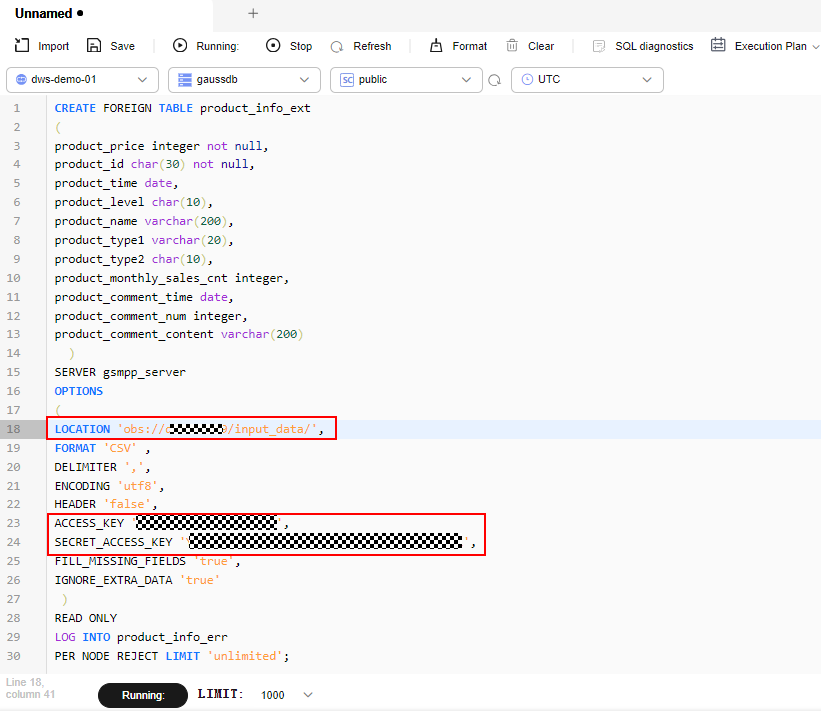
- Verify that the SQL statement is correct and click Running:. The OBS foreign table is created.
Figure 10 Successful creation

- Copy the following SQL statement and run it in the SQL window to create an ordinary table.
 1
 2
 3
 4
 5
 6
 7
 8
 9
10
11
12
13
14
15
16
17
18
19
20
CREATE TABLE product_info
(
product_price integer not null,
product_id char(30) not null,
product_time date ,
product_level char(10) ,
product_name varchar(200) ,
product_type1 varchar(20) ,
product_type2 char(10) ,
product_monthly_sales_cnt integer ,
product_comment_time date ,
product_comment_num integer ,
product_comment_content varchar(200)
 )
WITH
(
orientation = column,
compression=middle
)
DISTRIBUTE BY hash (product_id);
- Copy the following SQL statement and execute it in the SQL window. Run the INSERT statement to import the OBS foreign table data to the DWS database.
1INSERT INTO product_info SELECT * FROM product_info_ext;
- Copy the following SQL statements and run them in the SQL window to perform the VACUUM and ANALYZE operations.
For details about the syntax, see the related SQL syntax section.
1
2
VACUUM FULL product_info;
ANALYZE product_info;
- Copy the following SQL statement and run it in the SQL window. The data details are successfully queried.
1SELECT * FROM product_info;
Figure 11 Successful query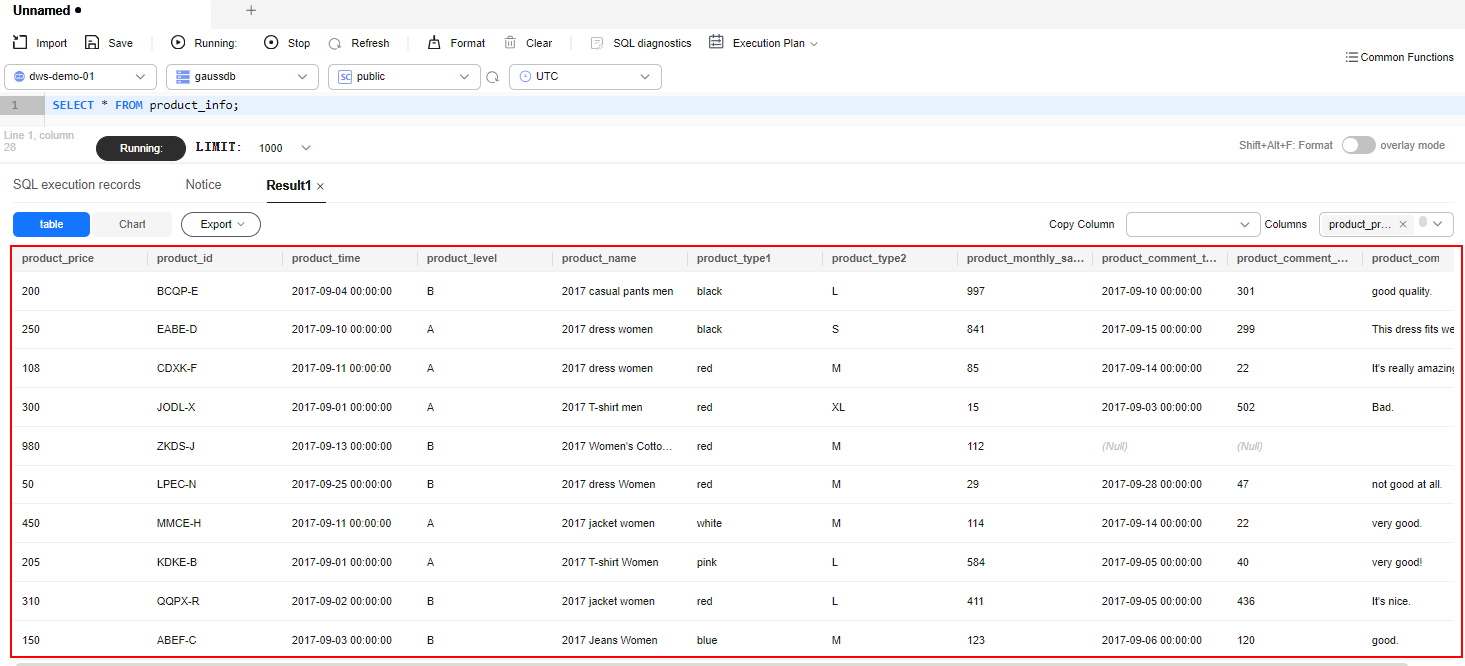
Feedback
Was this page helpful?
Provide feedbackThank you very much for your feedback. We will continue working to improve the documentation.


