
Using a Flink Job of DLI to Synchronize MySQL Data to a DWS Cluster in Real Time
This practice demonstrates how to use a Flink job of DLI (Flink 1.15 is used as an example) to synchronize MySQL data to DWS in real time.
For details, see What Is Data Lake Insight?
This practice lasts for approximately 90 minutes and involves utilizing various cloud services such as Virtual Private Cloud (VPC) and Subnet, Relational Database Service (RDS), Data Lake Insight (DLI), Object Storage Service (OBS), and DWS. The following is an outline of the practice.
- Preparations: Create an account and prepare the network.
- Step 1: Prepare MySQL Data: Purchase an RDS instance and then create a source table and insert data in the table.
- Step 2: Create a DWS Cluster: Purchase a DWS cluster and create a target table.
- Step 3: Create a DLI Elastic Resource Pool and Queue: Create a DLI elastic resource pool and add queues to the resource pool.
- Step 4: Create an Enhanced Datasource Connection: Connect the RDS instance and the DWS cluster.
- Step 5: Prepare the dws-connector-flink Tool for Interconnecting DWS with Flink: Use this plugin to import data from MySQL to DWS efficiently.
- Step 6: Create a DLI Flink Job: Create a Flink SQL job and configure SQL code.
- Step 7: Verify Data Synchronization: Verify that data is consistent.
- More Information: In the Flink cross-source development, if the data source authentication information is directly configured in job scripts, the password may be disclosed. To enhance security, you are advised to use DLI's datasource authentication instead of specifying MySQL and DWS usernames and passwords directly in job scripts.
Preparations
- You have sign up for a Huawei ID and enabled Huawei Cloud services. The account cannot be in arrears or frozen.
- You have created a VPC and subnet. For details, see Creating a VPC.
Step 1: Prepare MySQL Data
- Log in to the RDS console and purchase an RDS DB instance. Configure key parameters listed in Table 1 and retain the default values for other parameters. For details, see RDS Documentation.
- Connect to the RDS instance and create an instance named mys_data.
1CREATE DATABASE mys_data;
- Switch to the new database mys_data and run the following command to create the mys_orders table:
1
2
3
4
5
6
7
8
CREATE TABLE mys_data.mys_order
     ( order_id      VARCHAR(12),
       order_channel VARCHAR(32),
       order_time    DATETIME,
       cust_code     VARCHAR(6),
       pay_amount    DOUBLE,
       real_pay      DOUBLE,
       PRIMARY KEY (order_id) );
- insert data to the table.
1
2
INSERT INTO mys_data.mys_order VALUES ('202306270001', 'webShop', TIMESTAMP('2023-06-27 10:00:00'), 'CUST1', 1000, 1000);
INSERT INTO mys_data.mys_order VALUES ('202306270002', 'webShop', TIMESTAMP('2023-06-27 11:00:00'), 'CUST2', 5000, 5000);
- Check whether the data is inserted.
1SELECT * FROM mys_data.mys_order;
Step 2: Create a DWS Cluster
- Creating a Cluster. To ensure network connectivity, select the same region and VPC as those of the RDS instance. In this practice, select Europe-Dublin. The VPC must be the same as that created for RDS.
- Log in to the DWS console. Choose Dedicated Clusters > Clusters. Locate the target cluster and click Log In in the Operation column. The login information is as follows:
- Data source name: dws-demo
- Cluster: the created DWS cluster.
- Database: gaussdb
- Username: dbadmin
- Password: password set when the DWS cluster is created
- Select Remember Password, click Test Connection, and wait until the connection is successful.
- Copy the following SQL statements. In the SQL window, click Execute SQL to create a schema named dws_data.
1CREATE SCHEMA dws_data;
- Create the dws_order table in the new schema.
1
2
3
4
5
6
7
CREATE TABLE dws_data.dws_order
        ( order_id      VARCHAR(12),
          order_channel VARCHAR(32),
          order_time    TIMESTAMP,
          cust_code     VARCHAR(6),
          pay_amount    DOUBLE PRECISION,
          real_pay      DOUBLE PRECISION );
- Query data. The current table is empty.
1SELECT * FROM dws_data.dws_order;
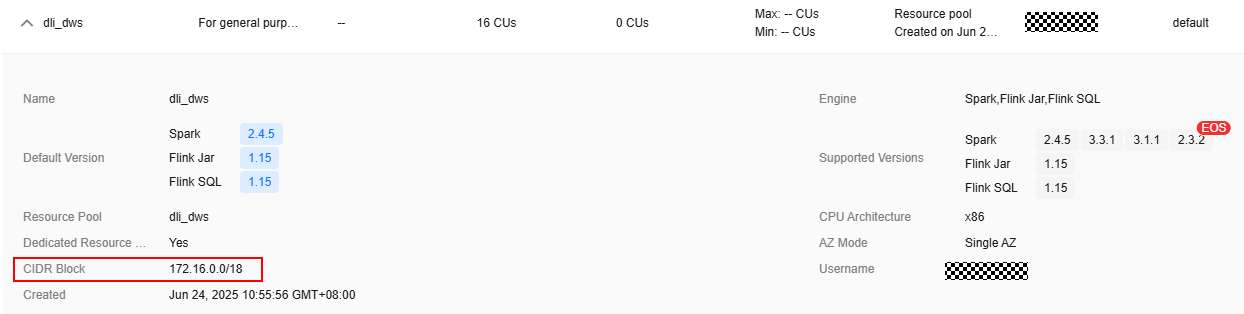
Step 3: Create a DLI Elastic Resource Pool and Queue
- Log in to the Huawei Cloud DLI console.
- In the navigation pane on the left, choose Resources > Resource Pool.
- Click Buy Resource Pool in the upper right corner, set the following parameters, and retain the default values for other parameters that are not described in the table.
Table 2 Parameters Parameter
Value
Billing Mode
Pay-per-use
Region
Europe-Dublin
Name
dli_dws
Specifications
Standard
CIDR Block
172.16.0.0/18, which must be in a different network segment from MySQL and DWS. For example, if MySQL and DWS are in the 192.168.x.x network segment, select 172.16.x.x for DLI.
- Click Buy and click Submit.
After the resource pool is created, go to the next step.
- On the elastic resource pool page, locate the row that contains the created resource pool, click Add Queue in the Operation column, and set the following parameters. Retain the default values for other parameters that are not described in the table.
Table 3 Adding a queue Parameter
Value
Name
dli_dws
Type
General purpose queue
- Click Next and click OK. The queue is created.
Step 4: Create an Enhanced Datasource Connection
- Update the DLI agency permissions.
- Return to the DLI console and choose Global Configuration > Service Authorization on the left.
- Select DLI UserInfo Agency Access, DLI Datasource Connections Agency Access, and DLI Notification Agency Access.
- Click Update. Click OK.
Figure 1 Updating DLI agency permissions
- In the security group of RDS, allow the network segment where the DLI queue is located.
- In the navigation pane on the left, choose Resources > Queue Management and record the CIDR block of dli_dws. Figure 2 CIDR block of a DLI queue
- Go to the RDS console, choose Instances in the navigation pane, and click the name of the created RDS instance.
- Record the value of Floating IP Address in the Connectivity area, which will be used in the subsequent connectivity test.
- Click Manage next to the security group in Connectivity. Figure 3 RDS security group

- In the security group list that is displayed, click the security group name to go to the security group configuration page.
- Choose Inbound Rules > Add Rule, as shown in the following figure. Add the network segment of the DLI queue. In this example, the network segment is 172.16.0.0/18. Ensure that the network segment is the same as that entered in Step 3: Create a DLI Elastic Resource Pool and Queue. Figure 4 Adding a rule to the RDS security group

- Click OK.
- In the navigation pane on the left, choose Resources > Queue Management and record the CIDR block of dli_dws.
- Return to the DLI console, click Datasource Connections on the left, select Enhanced, and click Create.
- Set the following parameters. Retain the default values for other parameters that are not described in the table.
Table 4 Connection from DLI to RDS Parameter
Value
Connection Name
dli_rds
Resource Pool
Select the created DLI elastic resource pool.
VPC
Select the VPC where RDS is located.
Subnet
Select the subnet where RDS is located.
Other parameters
Retain the default values.
Figure 5 Creating a datasource connection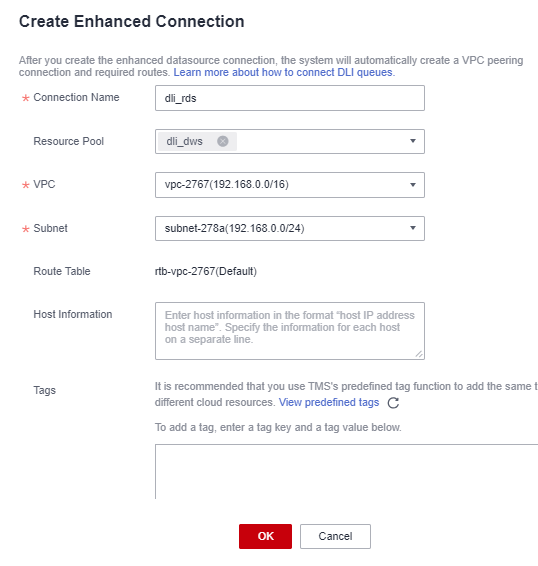
- Click OK. Wait until the RDS connection is created.
- Test the connectivity between DLI and RDS.
- Choose Resources > Queue Management on the left, and choose More > Test Address Connectivity on the right of dli_dws.
- Enter the private IP address of RDS recorded in 2.c and port 3306 in the address box.
- Click Test to verify that DLI is successfully connected to RDS. Figure 6 Testing the connection between RDS and DLI

- If the connection fails, perform the following operations:
- Test the connectivity between DLI and DWS.
- Log in to the DWS console. In the navigation pane, choose Dedicated Clusters > Clusters. Click the cluster name to view the cluster details.
- As shown in the following figure, record the private IP address and port number of the DWS cluster for future use. Figure 7 DWS internal IP address

- Click the security group name. Figure 8 DWS security group

-
Choose Inbound Rules > Add Rule, as shown in the following figure. Add the network segment of the DLI queue. In this example, the network segment is 172.16.0.0/18. Ensure that the network segment is the same as that entered in 4.
Figure 9 Adding a rule to the DWS security group
- Click OK.
- Switch to the DLI console, choose Resources > Queue Management on the left, and click More > Test Address Connectivity on the right of dli_dws.
- In the address box, enter the private IP address and port number of the DWS cluster.
- Click Test to verify that DLI is successfully connected to DWS. Figure 10 Testing DWS connectivity

Step 5: Prepare the dws-connector-flink Tool for Interconnecting DWS with Flink
dws-connector-flink is a tool for interconnecting with Flink based on DWS JDBC APIs. During DLI job configuration, this tool and its dependencies are stored in the Flink class loading directory to better import Flink jobs to DWS.
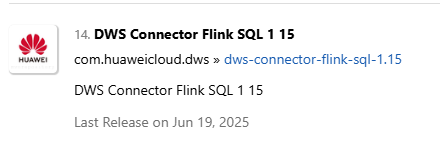
- Go to https://mvnrepository.com/artifact/com.huaweicloud.dws using a browser.
- In the software list, select Flink 1.15. In this practice, DWS Connector Flink SQL 1 15 is selected.
- Select the latest branch. The actual branch is subject to the new branch released on the official website.
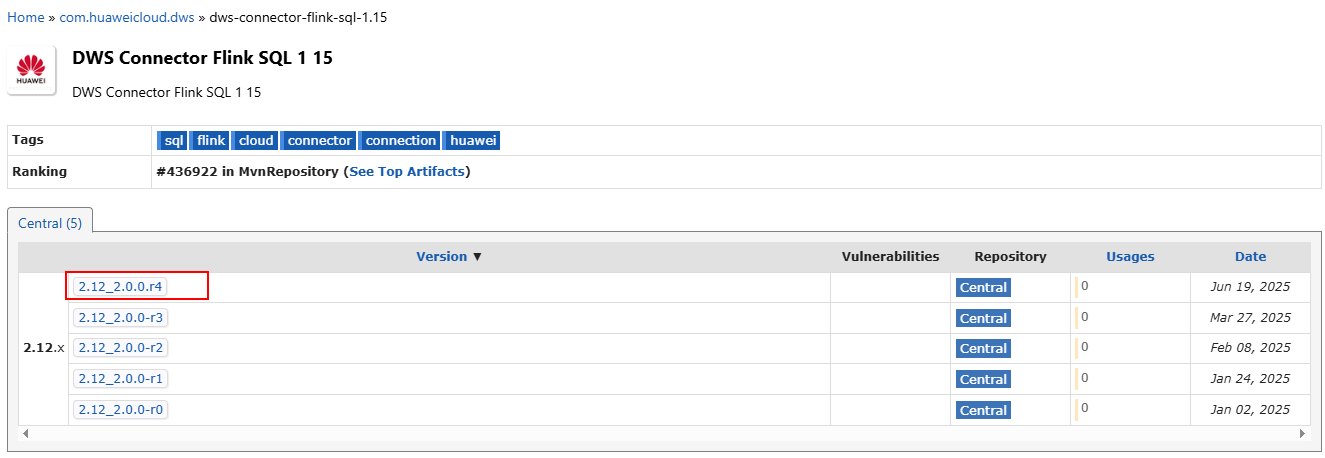
- Click the jar icon to download the file.
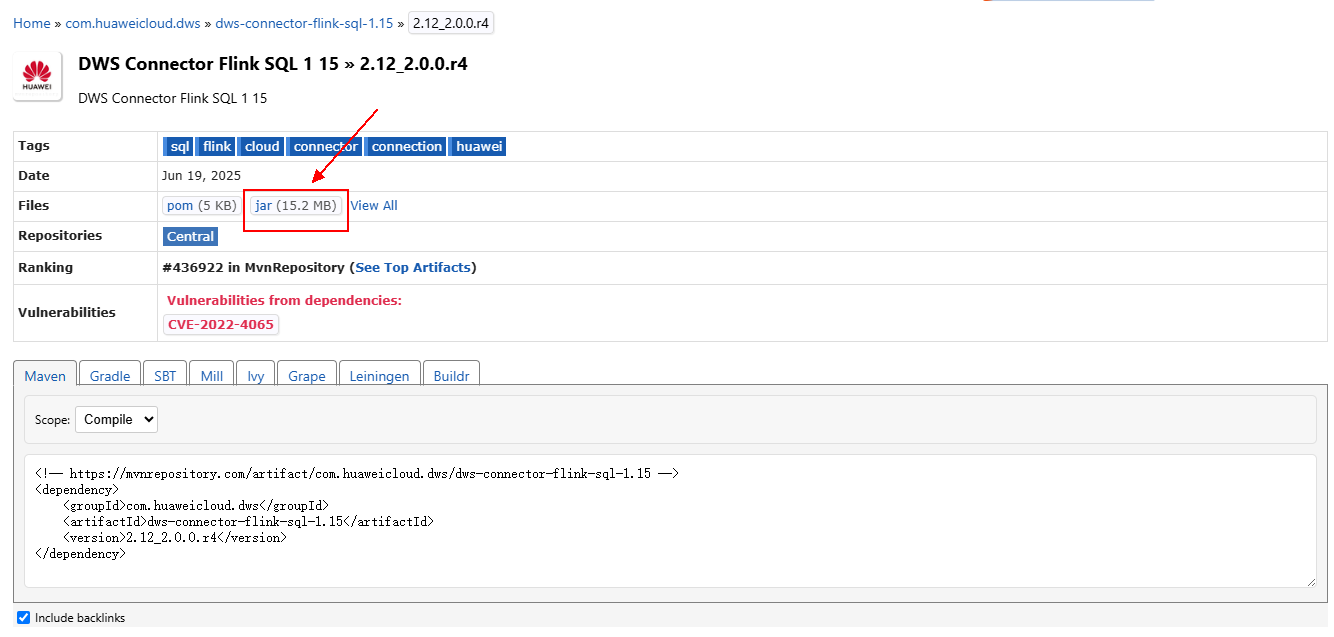
- Create an OBS bucket. In this practice, set the bucket name to obs-flink-dws and upload the file dws-connector-flink-sql-1.15-2.12_2.0.0.r4.jar to the OBS bucket. Ensure that the bucket is in the same region as DLI. In this practice, the Europe-Dublin region is used.
Step 6: Create a DLI Flink Job
- Create an OBS agency policy.
- Hover over the account name in the upper right corner of the console, and click Identity and Access Management.
- In the navigation pane on the left, choose Agencies and then click Create Agency in the upper right corner.
- Agency Name: dli_ac_obs
- Agency Type: Cloud service
- Cloud Service: Data Lake Insight (DLI)
- Validity Period: Unlimited
Figure 11 Creating an OBS agency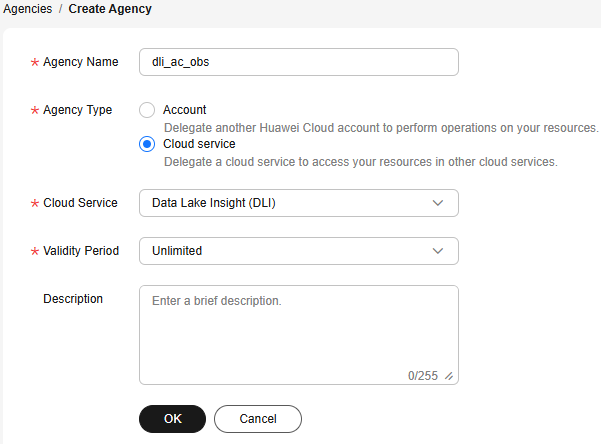
- Click OK and then click Authorize.
- On the displayed page, click Create Policy.
- Configure policy information. Enter a policy name, for example, dli_ac_obs, and select JSON.
- In the Policy Content area, paste a custom policy. Replace OBS bucket name with the actual bucket name created in 5.
{ "Version": "1.1", "Statement": [ { "Effect": "Allow", "Action": [ "obs:object:GetObject", "obs:object:DeleteObjectVersion", "obs:bucket:GetBucketLocation", "obs:bucket:GetLifecycleConfiguration", "obs:object:AbortMultipartUpload", "obs:object:DeleteObject", "obs:bucket:GetBucketLogging", "obs:bucket:HeadBucket", "obs:object:PutObject", "obs:object:GetObjectVersionAcl", "obs:bucket:GetBucketAcl", "obs:bucket:GetBucketVersioning", "obs:bucket:GetBucketStoragePolicy", "obs:bucket:ListBucketMultipartUploads", "obs:object:ListMultipartUploadParts", "obs:bucket:ListBucketVersions", "obs:bucket:ListBucket", "obs:object:GetObjectVersion", "obs:object:GetObjectAcl", "obs:bucket:GetBucketPolicy", "obs:bucket:GetBucketStorage" ], "Resource": [ "OBS:*:*:object:*", "OBS:*:*:bucket:OBS bucket name" ] }, { "Effect": "Allow", "Action": [ "obs:bucket:ListAllMyBuckets" ] } ] } - Click Next.
- Select the created custom policy.
- Click Next. Select All resources.
- Click OK.
It takes 15 to 30 minutes for the authorization to take effect.
- Return to the DLI console, choose Job Management > Flink Jobs on the left, and click Create Job in the upper right corner.
- Set Type to Flink OpenSource SQL and Name to rds-dws. Figure 12 Creating a job
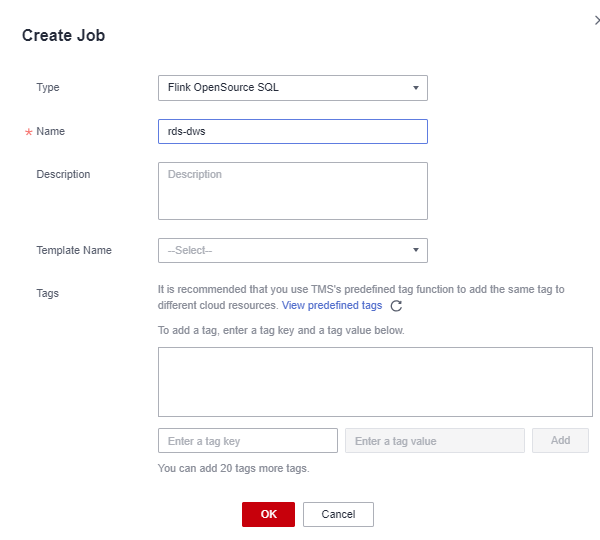
- Click OK. The page for editing the job is displayed.
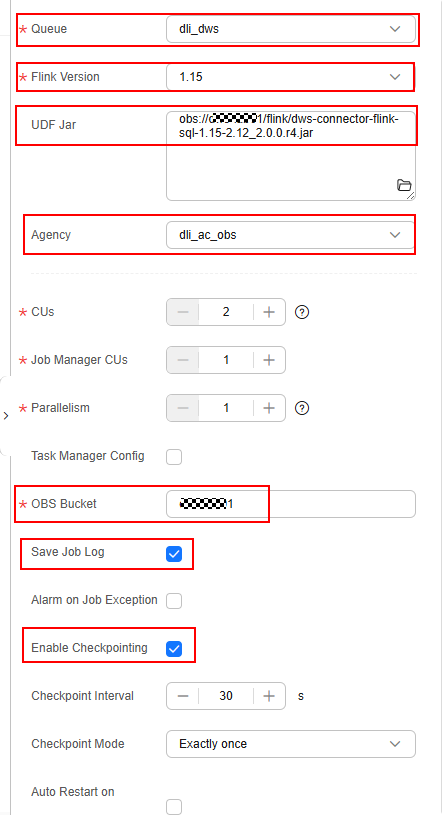
- Set the following parameters on the right of the page. Retain the default values for other parameters that are not described in the table.
Table 5 Flink job parameters Parameter
Value
Queue
dli_dws created in 4.
Flink Version
1.15 or later. (The actual version is subject to the GUI.)
UDF Jar
JAR file in the OBS bucket created in 5.
Agency
Agency created in 1.
OBS Bucket
Bucket created in 5.
Save Job Log
Check the box.
Enable Checkpointing
Check the box.
Other parameters
Retain the default value.
- Copy the following SQL code to the SQL code window on the left.
For how to obtain the internal IP address of the RDS database, see 2.c. For details about how to obtain the internal IP address of the DWS cluster, see 8.b. Change the password of user root of the RDS database and the password of user dbadmin of DWS.
The following describes the common parameters in the Flink SQL job code:
- connector: connector type of the data source. For MySQL, set this parameter to mysql-cdc. For DWS, set this parameter to gaussdb. For more information, see Connectors.
- driver: JDBC driver name of the DWS. The value can be fixed to com.huawei.gauss200.jdbc.Driver.
- write.mode: data import mode. The value can be copy, insert, or upsert.
 1
 2
 3
 4
 5
 6
 7
 8
 9
10
11
12
13
14
15
16
17
18
19
20
21
22
23
24
25
26
27
28
29
30
31
32
33
34
35
36
37
38
39
40
41
42
43
44
45
46
47
48
CREATE TABLE
  mys_order (
    order_id STRING,
    order_channel STRING,
    order_time TIMESTAMP,
    cust_code STRING,
    pay_amount DOUBLE,
    real_pay DOUBLE,
    PRIMARY KEY (order_id) NOT ENFORCED
  )
WITH
  (
    'connector' = 'mysql-cdc',
    'hostname' = 'Private IP address of the RDS DB instance',
    'port' = '3306',
    'username' = 'root',
    'password' = 'Password of user root of the RDS DB instance',
    'database-name' = 'mys_data',
    'table-name' = 'mys_order'
  );

CREATE TABLE
  dws_order (
    order_id STRING,
    order_channel STRING,
    order_time TIMESTAMP,
    cust_code STRING,
    pay_amount DOUBLE,
    real_pay DOUBLE,
    PRIMARY KEY (order_id) NOT ENFORCED
  )
WITH
  (
    'connector' = 'gaussdb',
    'driver' = 'com.huawei.gauss200.jdbc.Driver',
    'url' = 'jdbc:gaussdb://DWS cluster private IP address:8000/gaussdb',
    'table-name' = 'dws_data.dws_order',
    'username' = 'dbadmin',
    'password' = 'Password of DWS user dbadmin',
    'write.mode' = 'insert'
  );

INSERT INTO
  dws_order
SELECT
  *
FROM
  mys_order;
- Click Format and click Save.

Click Format to format the SQL code. Otherwise, new null characters may be introduced during code copy and paste, causing job execution failures.
Figure 13 Flink job parameters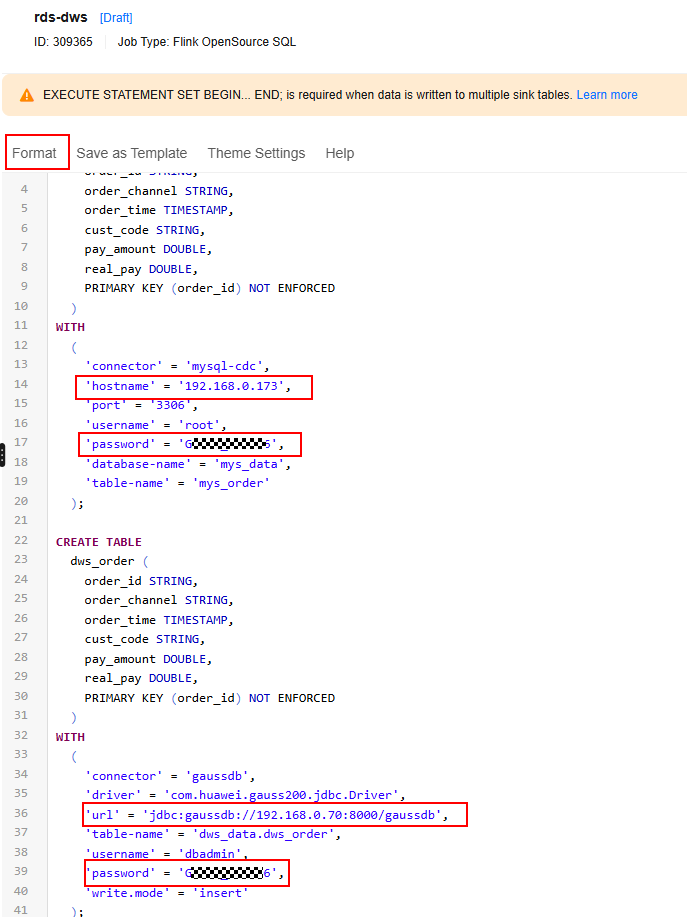
- Return to the DLI console home page and choose Job Management > Flink Jobs on the left.
- Click Start on the right of the job name rds-dws and click Start Now.
Wait for about 1 minute and refresh the page. If the status is Running, the job is executed.
Figure 14 Running succeeded
Step 7: Verify Data Synchronization
- Go back to the SQL window of the DWS database. If the connection times out, perform the following operations to log in again:
- Go to the DWS console.
- In the navigation pane on the left, choose Dedicated Clusters > Clusters, and click Log In on the right of dws-demo.
- Check whether two rows of data in the MySQL table have been synchronized to DWS.
1SELECT * FROM dws_data.dws_order;
Figure 15 Query result
- Switch to the RDS for MySQL page and run the following statements to insert three new data records:
1
2
3
INSERT INTO mys_data.mys_order VALUES ('202403090003', 'webShop', TIMESTAMP('2024-03-09 13:00:00'), 'CUST1', 2000, 2000);
INSERT INTO mys_data.mys_order VALUES ('202403090004', 'webShop', TIMESTAMP('2024-03-09 14:00:00'), 'CUST2', 3000, 3000);
INSERT INTO mys_data.mys_order VALUES ('202403100004', 'webShop', TIMESTAMP('2024-03-10 10:00:00'), 'CUST3', 6000, 6000);
Figure 16 New MySQL data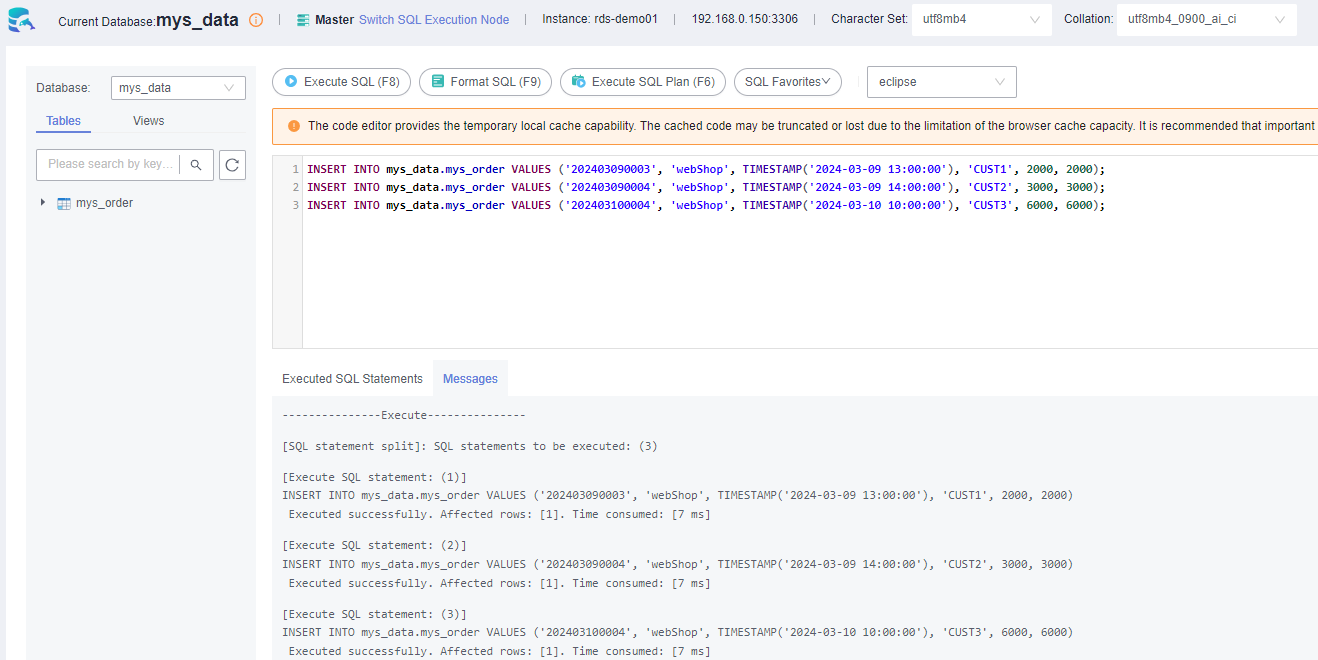
- Go back to the SQL window of DWS and run the following SQL statement again. The returned result shows that the MySQL data has been synchronized to DWS in real time.
1SELECT * FROM dws_data.dws_order;
Figure 17 Real-time data synchronization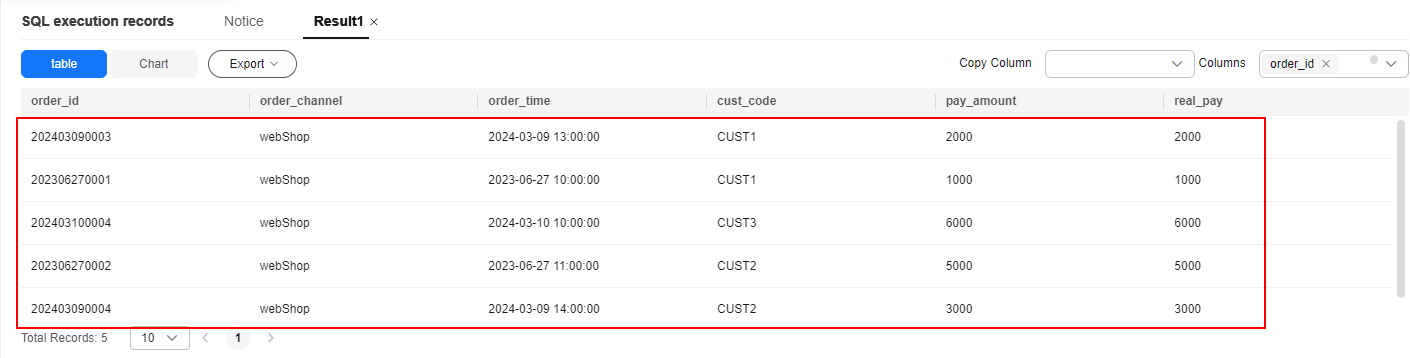
More Information
Storing authentication information for a data source directly in the job script for Flink cross-source development can result in password exposure. To enhance security, use DLI's datasource authentication function instead of specifying MySQL and DWS usernames and passwords directly in job scripts.
- Log in to the DLI console and choose Datasource Connections > Datasource Authentication.
- Click Create.
- Create the password authentication for the root user of the MySQL database.
- Set the following parameters:
- Type: Password
- Authentication Certificate: mysql_pwd_auth
- Username: root
- Password: password of user root
Figure 18 MySQL password authentication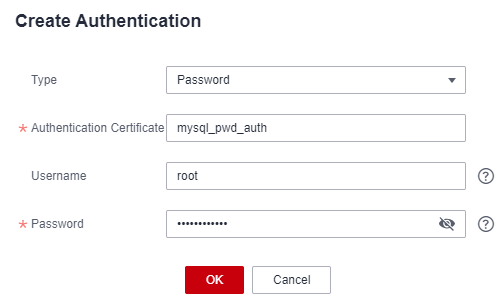
- Click OK.
- Set the following parameters:
- Create password authentication for the dbadmin user of DWS.
- Set the following parameters:
- Type: Password
- Authentication Certificate: dws_pwd_auth
- Username: dbadmin
- Password: password of user dbadmin
Figure 19 DWS password authentication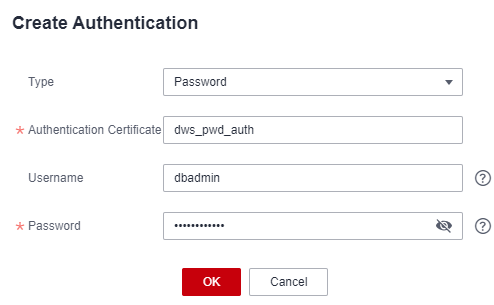
- Click OK.
- Set the following parameters:
- On the DLI console, choose Job Management > Flink Jobs. Locate the row that contains the job created in Step 6: Create a DLI Flink Job, and choose More > Stop to stop the job.
- After the job is stopped, you can edit the job name.
- Replace the SQL script with the latest one. Replace the private IP addresses of RDS and DWS.
 1
 2
 3
 4
 5
 6
 7
 8
 9
10
11
12
13
14
15
16
17
18
19
20
21
22
23
24
25
26
27
28
29
30
31
32
33
CREATE TABLE mys_order (
  order_id STRING,
  order_channel STRING,
  order_time TIMESTAMP,
  cust_code STRING,
  pay_amount DOUBLE,
  real_pay DOUBLE,
  PRIMARY KEY (order_id) NOT ENFORCED )
WITH (
  'connector' = 'mysql-cdc',
  'hostname' = 'Private IP address of RDS',
  'port' = '3306',
  'pwd_auth_name' = 'mysql_pwd_auth',
  'database-name' = 'mys_data',
  'table-name' = 'mys_order' );

CREATE TABLE dws_order (
    order_id STRING,
    order_channel STRING,
    order_time TIMESTAMP,
    cust_code STRING,
    pay_amount DOUBLE,
    real_pay DOUBLE,
    PRIMARY KEY (order_id) NOT ENFORCED )
WITH (
    'connector' = 'gaussdb',
    'driver' = 'com.huawei.gauss200.jdbc.Driver',
    'url' = 'jdbc:gaussdb://DWS private IP address:8000/gaussdb',
    'table-name' = 'dws_data.dws_order',
    'pwd_auth_name' = 'dws_pwd_auth',
    'write.mode' = 'insert' );

INSERT INTO dws_order SELECT * FROM mys_order;
- Click Format and click Save.
- Restart the job and verify data synchronization by referring to Step 7: Verify Data Synchronization.
Feedback
Was this page helpful?
Provide feedbackThank you very much for your feedback. We will continue working to improve the documentation.


