SDXL&SD1.5 WebUI基于Lite Cluster适配NPU推理指导(6.3.906)
本文档主要介绍如何在ModelArts Lite的Cluster环境中部署Stable Diffusion的WebUI套件,使用NPU卡进行推理。
方案概览
本方案介绍了在ModelArts的Lite Cluster上使用昇腾计算资源部署Stable Diffusion WebUI套件用于推理的详细过程。完成本方案的部署,需要先联系您所在企业的华为方技术支持购买Cluster资源。
本方案目前仅适用于企业客户,并且需要用户具备k8s集群相关技能。
资源规格要求
推理部署推荐使用“西南-贵阳一”Region上的Cluster资源。
获取软件
获取插件代码包AscendCloud-6.3.906-xxx.zip中的AscendCloud-AIGC-6.3.906-xxx.zip文件。获取路径:Support-E。

如果没有软件下载权限,请联系您所在企业的华为方技术支持下载获取。
代码包文件名中的xxx表示具体的时间戳,以包名的实际时间为准。
Step1 准备环境
- 请参考Cluster资源开通,购买Cluster资源,并确保机器已开通,密码已获取,能通过SSH登录,不同机器之间网络互通。

购买Cluster资源时如果无可选资源规格,需要联系华为云技术支持申请开通。
当容器需要提供服务给多个用户,或者多个用户共享使用该容器时,应限制容器访问Openstack的管理地址(169.254.169.254),以防止容器获取宿主机的元数据。具体操作请参见禁止容器获取宿主机元数据。
- 配置Cluster资源,确保可以通过公网访问Cluster机器,具体配置请参见配置Lite Cluster网络。
- SSH登录机器后,检查NPU设备检查。运行如下命令,返回NPU设备信息。
npu-smi info                    # 在每个实例节点上运行此命令可以看到NPU卡状态
npu-smi info -l | grep Total    # 在每个实例节点上运行此命令可以看到总卡数
如出现错误,可能是机器上的NPU设备没有正常安装,或者NPU镜像被其他容器挂载。请先正常安装固件和驱动,或释放被挂载的NPU。
- 检查docker是否安装。
docker -v #检查docker是否安装
如尚未安装,运行以下命令安装docker。
yum install -y docker-engine.aarch64 docker-engine-selinux.noarch docker-runc.aarch64
- 获取基础镜像。建议使用官方提供的镜像部署推理服务。
西南-贵阳一:swr.cn-southwest-2.myhuaweicloud.com/atelier/pytorch_2_1_ascend:pytorch_2.1.0-cann_8.0.rc2-py_3.9-hce_2.0.2312-aarch64-snt9b-20240606190017-b881580
docker pull {image_url}
Step2 下载软件包
- 在宿主机上创建目录/root/webui,将下面步骤中所有的文件放到/root/webui目录下。
- 下载SD基础模型,SD基础模型的官网下载地址。
https://huggingface.co/stabilityai/stable-diffusion-xl-base-1.0/resolve/main/sd_xl_base_1.0.safetensors
https://huggingface.co/runwayml/stable-diffusion-v1-5/resolve/main/v1-5-pruned-emaonly.safetensors
- 根据需要下载controlnet模型。
https://huggingface.co/lllyasviel/ControlNet-v1-1/tree/main
https://huggingface.co/lllyasviel/sd_control_collection/tree/main
例:选择下载sd1.5 canny:
https://huggingface.co/lllyasviel/ControlNet-v1-1/blob/main/control_v11p_sd15_canny.pth
https://huggingface.co/lllyasviel/ControlNet-v1-1/blob/main/control_v11p_sd15_canny.yaml
例:选择下载sdxl canny:
https://huggingface.co/lllyasviel/sd_control_collection/blob/main/diffusers_xl_canny_mid.safetensors
- 下载safety-checker模型包。
safety-checker的官网下载地址:https://huggingface.co/CompVis/stable-diffusion-safety-checker/tree/main
在/root/webui目录下创建CompVis目录,然后下载所有文件
- 下载vaeapprox-sdxl.pt。
vaeapprox-sdxl.pt的官网下载地址:https://github.com/AUTOMATIC1111/stable-diffusion-webui/releases/tag/v1.0.0-pre。
- 下载clip-vit-large-patch14。
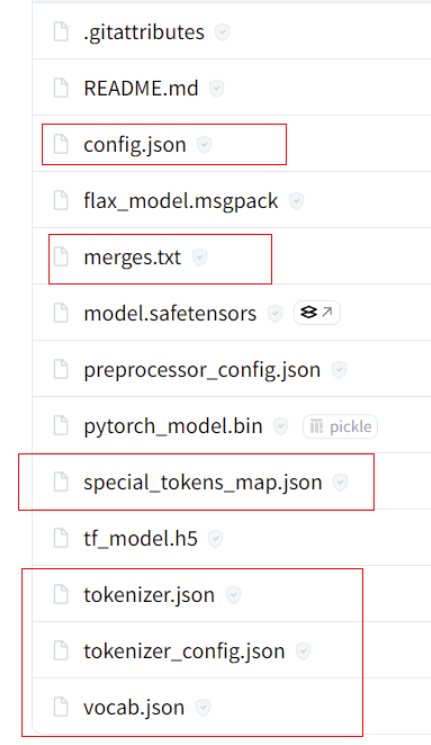
在/root/webui目录下创建clip-vit-large-patch14目录,然后下载下图红框中的文件。clip-vit-large-patch14官网下载地址:openai/clip-vit-large-patch14 at main (huggingface.co)。
图1 下载clip-vit-large-patch14文件
- 将获取到的WebUI插件AscendCloud-AIGC-6.3.906-xxx.zip文件上传到/root/webui,并解压。获取路径参见获取软件。
unzip AscendCloud-AIGC-*.zip -d ./AscendCloud
mv AscendCloud/aigc_inference/torch_npu/webui/v1_9_0_RC/ascend_extension ./
rm -rf AscendCloud*
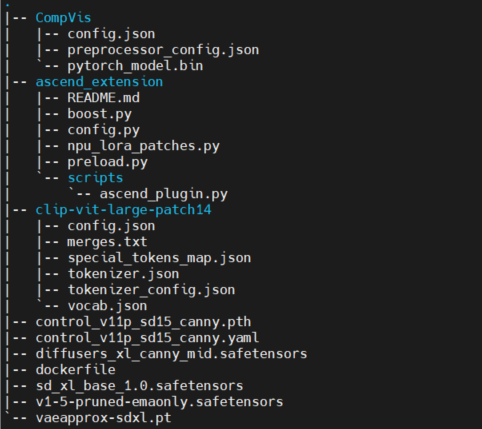
- 最终/root/webui下的目录应该如下。
图2 /root/webui下的目录文件

Step3 构建dockerfile
- 编写dockerfile。
FROM swr.cn-southwest-2.myhuaweicloud.com/atelier/pytorch_2_1_ascend:pytorch_2.1.0-cann_8.0.rc2-py_3.9-hce_2.0.2312-aarch64-snt9b-20240606190017-b881580
RUN git clone https://github.com/AUTOMATIC1111/stable-diffusion-webui.git -c http.sslVerify=false \
  && cd stable-diffusion-webui && git checkout -b v1.9.0-RC \
  && cd /home/ma-user/stable-diffusion-webui/extensions/ && git clone https://github.com/Mikubill/sd-webui-controlnet.git -c http.sslVerify=false \
  && cd /home/ma-user/stable-diffusion-webui/extensions/sd-webui-controlnet/ && git reset --hard 3b4eedd90fe8ebcac5363f586157d36dcd9a513f \
  && mkdir -p /home/ma-user/.cache/huggingface/hub/models--openai--clip-vit-large-patch14/refs \
  && mkdir -p /home/ma-user/.cache/huggingface/hub/models--openai--clip-vit-large-patch14/snapshots \
  && printf "%s" "32bd64288804d66eefd0ccbe215aa642df71cc41" > /home/ma-user/.cache/huggingface/hub/models--openai--clip-vit-large-patch14/refs/main
COPY --chown=ma-user:ma-group v1-5-pruned-emaonly.safetensors /home/ma-user/stable-diffusion-webui/models/Stable-diffusion/v1-5-pruned-emaonly.safetensors
COPY --chown=ma-user:ma-group sd_xl_base_1.0.safetensors /home/ma-user/stable-diffusion-webui/models/Stable-diffusion/sd_xl_base_1.0.safetensors
COPY --chown=ma-user:ma-group control_v11p_sd15_canny.pth /home/ma-user/stable-diffusion-webui/extensions/sd-webui-controlnet/models/control_v11p_sd15_canny.pth
COPY --chown=ma-user:ma-group control_v11p_sd15_canny.yaml /home/ma-user/stable-diffusion-webui/extensions/sd-webui-controlnet/models/control_v11p_sd15_canny.yaml
COPY --chown=ma-user:ma-group diffusers_xl_canny_mid.safetensors /home/ma-user/stable-diffusion-webui/extensions/sd-webui-controlnet/models/diffusers_xl_canny_mid.safetensors
COPY --chown=ma-user:ma-group ascend_extension  /home/ma-user/stable-diffusion-webui/extensions/ascend_extension
COPY --chown=ma-user:ma-group vaeapprox-sdxl.pt /home/ma-user/stable-diffusion-webui/models/VAE-approx/vaeapprox-sdxl.pt
COPY --chown=ma-user:ma-group CompVis /home/ma-user/stable-diffusion-webui/CompVis
COPY --chown=ma-user:ma-group clip-vit-large-patch14 /home/ma-user/.cache/huggingface/hub/models--openai--clip-vit-large-patch14/snapshots/32bd64288804d66eefd0ccbe215aa642df71cc41
RUN cd /home/ma-user/stable-diffusion-webui && pip install --upgrade pip && pip install -r requirements.txt --no-deps \
  && pip install lightning_utilities torchmetrics gradio_client matplotlib pydantic aiofiles starlette ffmpy pydub uvicorn orjson semantic_version pydantic aiofiles starlette ffmpy pydub uvicorn orjson semantic_version gitdb trampoline clip aenum facexlib torch==2.1.0 python-multipart gdown \
  && pip install -r requirements_versions.txt && pip install httpx==0.24.1 && pip install diffusers \
  && mkdir repositories && cd /home/ma-user/stable-diffusion-webui/repositories/ \
  && git clone https://github.com/Stability-AI/stablediffusion.git -c http.sslVerify=false && mv stablediffusion/ stable-diffusion-stability-ai \
  && git clone https://github.com/Stability-AI/generative-models.git -c http.sslVerify=false \
  && git clone https://github.com/Stability-AI/k-diffusion.git -c http.sslVerify=false \
  && git clone https://github.com/AUTOMATIC1111/stable-diffusion-webui-assets.git -c http.sslVerify=false
ENTRYPOINT cd /home/ma-user/stable-diffusion-webui && python3 launch.py --skip-torch-cuda-test --port 30028 --enable-insecure-extension-access --listen --log-startup --disable-safe-unpickle --skip-prepare-environment --api
- 基于dockerfile进行build
docker build -t webui:v1 .
Step4 上传镜像到容器镜像服务
参考pull/push 镜像体验章节,将上一步build的镜像上传到容器镜像服务上。


