Using SCPs to Control Permission Boundaries of IAM Identities in Member Accounts
Scenarios
Service control policies (SCPs) are a type of organization policy that you can use to manage permissions in your organization. The organization management account can use SCPs to limit which permissions can be assigned to member accounts to ensure that they stay within your organization's access control guidelines. SCPs can be attached to an organization, OUs, and member accounts. Any SCP attached to an organization or OU affects all the accounts within the organization or under the OU.
The following describes how to create a service control policy (SCP) and attach it to a member account.
Procedure
|
Step |
Description |
|---|---|
|
|
|
Enable the SCP type and create a custom SCP. |
|
|
Attach the SCP to the member account. |
|
|
Use the member account to test the SCP effect. |
Preparations
- Create an organization and add one or more member accounts to the organization. For details, see Using Organizations to Manage Multiple Accounts.
- Top up your account.
Organizations is a free service. You will not be billed for using Organizations-related functions.
Ensure that your account balance is sufficient. If your account is frozen due to arrears, you cannot perform any write operations on the Organizations console. For details about how to top up your account, see Topping Up an Account.
Step 1: Enable the SCP Type and Create an SCP
If you want to prevent a member account in your organization from deleting RAM resource shares, you can create an SCP similar to the example SCP provided below.
The following example only focuses on key parameter settings. You can retain the default values of other parameters. For more information about SCPs, see Creating an SCP.
- Log in to the Organizations console as an organization administrator or using the management account.
- In the navigation pane, choose Policies. On the displayed page, locate Service control policies and click Enable in the Operation column.
- In the displayed dialog box, select the check box and click OK.

- Click Service control policies. The Service control policies page is displayed.

- Click Create. The Create Policy page is displayed.
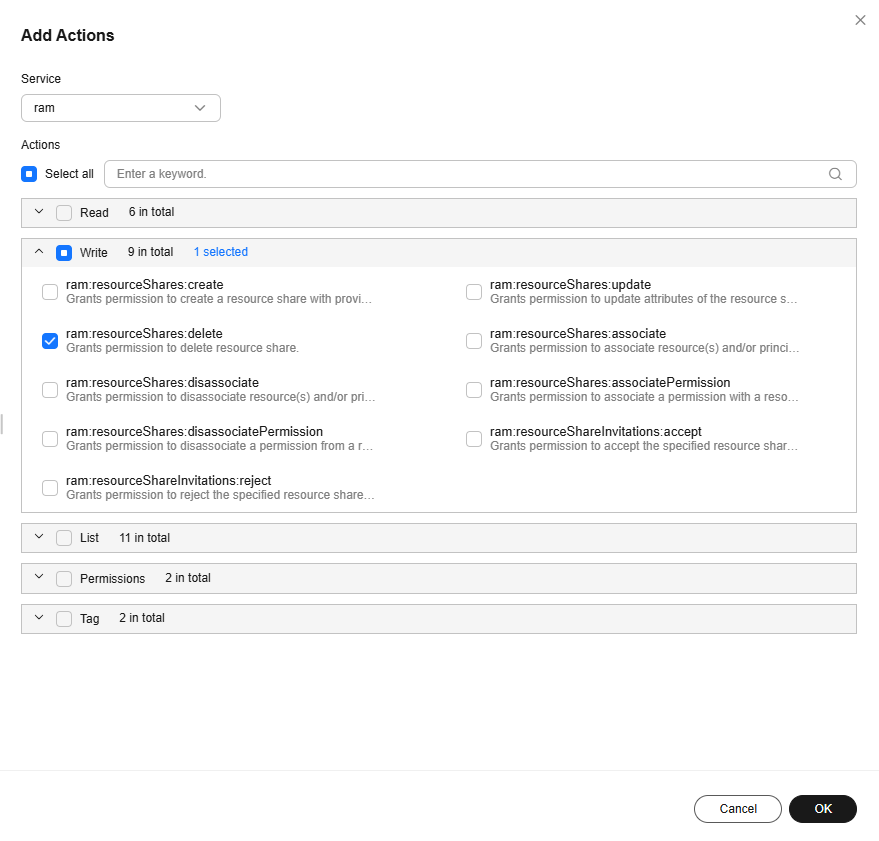
- Under Policy Syntax, click "Effect" or "Action" in the policy statement, and then click the plus sign (+) next to Add actions in the policy editor on the right pane.

- In the displayed dialog box, select the action ram:resourceShares:delete. Then, click OK.

- Click the plus sign (+) next to Add resources. In the displayed dialog box, set Service to ram and Resource Type to All resources, and click OK.

The final policy content is as follows:
{ "Version": "5.0", "Statement": [ { "Effect": "Deny", "Action": [ "ram:resourceShares:delete" ], "Resource": [ "*" ] } ] } - Click Save in the lower right corner of the page.
Step 2: Attach the SCP
If you attach the SCP to a member account, the member account cannot delete any resource shares.
- In the SCP list, locate the SCP you created and click Attach in the Operation column.
- Select the member account you want to attach the SCP to and enter "Confirm" in the text box. Then, click OK.

The SCP will be applied within 30 minutes.

Step 3: Test the SCP Effect
Perform the following steps to test the SCP Effect:
- Log in to the RAM console using the member account to which the SCP is attached.
- Try to delete a resource share. If an error message is displayed, the SCP has been applied.
Follow-up Operations
If you want to use SCPs to impose more complex permission control, see the following references:
- For details about SCPs, see SCP Principles and SCP Syntax, where there are also descriptions and examples of global condition keys and operators available for policy statements.
- For details about the services that support SCPs, see Cloud Services for Using SCPs. For details about the actions, resource types, and service-level condition keys supported by cloud services, see Actions Supported by SCP-based Authorization.
- For details about SCP examples, see Example SCPs.
Feedback
Was this page helpful?
Provide feedbackThank you very much for your feedback. We will continue working to improve the documentation.See the reply and handling status in My Cloud VOC.
For any further questions, feel free to contact us through the chatbot.
Chatbot


