
Help Center/ Relational Database Service_RDS for PostgreSQL/ Best Practices/ Creating a Cross-Region DR Relationship for an RDS for PostgreSQL Instance/ Creating a DR Relationship
Updated on 2026-03-23 GMT+08:00
Creating a DR Relationship
Scenarios
After a cross-region DR relationship is created, if the region where the primary instance is located encounters a natural disaster and the primary instance cannot be connected, you can promote the DR instance in another region to primary. To connect to the new primary instance, you only need to change the connection address on the application side.
Precautions
- Before using this function, ensure that the network between the DB instances in two different regions is connected. You can use Cloud Connect or Virtual Private Network (VPN) to connect the VPCs in different regions.
- Before using this function, ensure that the primary instance and DR instance are available and are deployed in different regions. The primary instance uses a primary/standby deployment and the DR instance uses a standalone deployment.
- The vCPUs, memory, and storage space of the DR instance must be greater than or equal to those of the primary instance.
- The underlying architecture and major version of the DR instance must be the same as those of the primary DB instance.
- Cross-cloud or cross-region DR relationships cannot be established across major versions.
- After the API for configuring DR for the primary instance is called, you cannot change the instance class or perform a primary/standby switchover until the DR relationship is set up.
- After a DR relationship is set up, you can change the instance class of the DR instance. To use this function, submit a service ticket.
- After changing the database port or floating IP address of the primary instance, you need to re-establish the DR relationship.
- After a DR instance is set up, a minor version upgrade cannot be performed.
- RDS for PostgreSQL 12 and later versions support cross-region DR.
- Modifying a parameter of the primary instance does not modify that of the DR instance. You need to modify the parameter of the DR instance separately.
- RDS for PostgreSQL DR instances do not support point-in-time recovery (PITR) or CBR snapshot-based backups. If you need to use this function, perform it on primary instances.
Procedure
- Paste the configuration information of the DR instance to the production instance and configure DR for the production instance.
- Log in to the management console.
- Click
 in the upper left corner and select the region where the DR instance is located, for example, AP-Singapore.
 - Click
 in the upper left corner of the page and choose Databases > Relational Database Service.
 - On the Instances page, click the DR instance name to go to the Summary page.
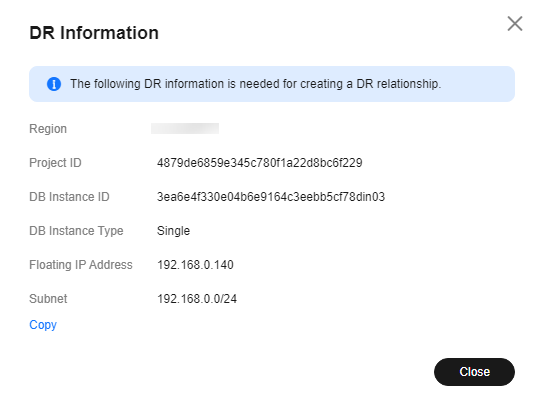
- Click DR Information.
- In the displayed dialog box, click Copy. Figure 1 Copying DR instance configuration information
- Click
 in the upper left corner of the management console and select the region where the production instance is located, for example, CN-Hong Kong.
 - On the Instances page, locate the production instance and choose More > View DR Details in the Operation column.
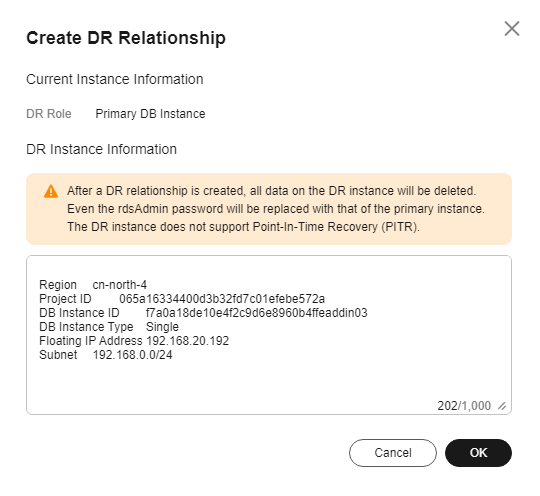
- Click Create DR Relationship. In the displayed dialog box, paste the DR information copied from 1.f to the text box and click OK to configure DR for the production instance. Figure 2 Pasting DR instance information
- On the DR Management page of the production instance, check whether the DR is configured. If the value of DR Relationship Creation is Successful, the DR is successfully configured for the production instance. Perform subsequent operations only after this task is successfully executed. Figure 3 Checking whether the DR is configured

- Paste the information of the production instance to the DR instance and configure DR for the DR instance.
- On the Instances page, click the name of the production instance to go to the Summary page.
- Click DR Information.
- In the displayed dialog box, click Copy.
- Click
 in the upper left corner and select the region where the DR instance is located, for example, AP-Singapore.
 - On the Instances page, locate the DR instance and choose More > View DR Details in the Operation column.
- Click Create DR Relationship. In the displayed dialog box, paste the DR information copied from 2.c to the text box and click OK to configure DR for the DR instance.
- On the DR Management page, check whether the DR is configured. If the value of DR Relationship Creation is Successful, the DR is successfully configured for the DR instance.
- On the DR Management page, you can view the DR replication status, sending delay, end-to-end delay, and replay delay.
Feedback
Was this page helpful?
Provide feedbackThank you very much for your feedback. We will continue working to improve the documentation.See the reply and handling status in My Cloud VOC.
The system is busy. Please try again later.
For any further questions, feel free to contact us through the chatbot.
Chatbot


