
Creating a DRS Migration Task
Creating a Migration Task
- Go to the Create Migration Task page.
- Configure parameters as needed.
- Enter a migration task name. Select the region hosting the destination DB instance for Region.
Figure 1 Migration task
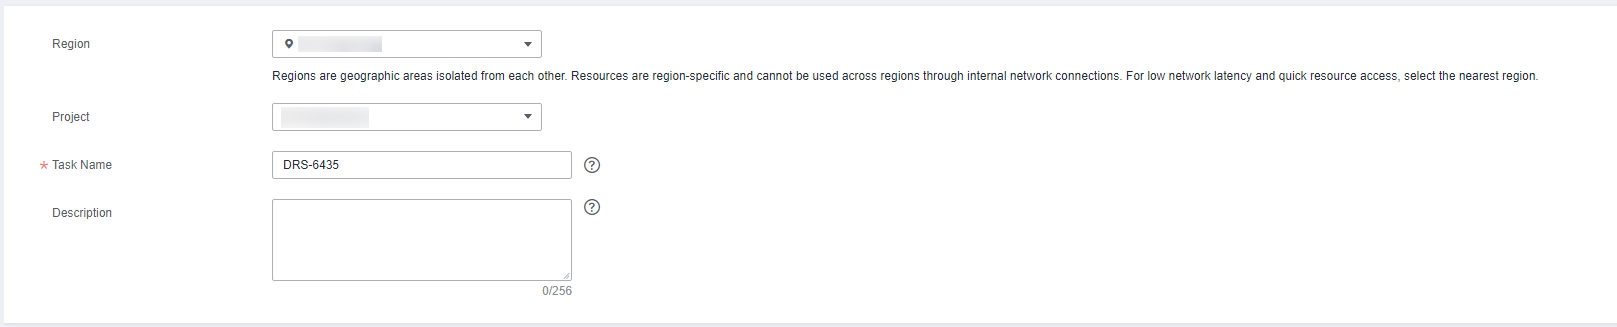
Table 1 Task information Parameter
Description
Region
The region where the replication instance is deployed. You can change the region. To reduce latency and improve access speed, select the region closest to your services.
Project
The project corresponds to the current region and can be changed.
Task Name
The task name must start with a letter and consist of 4 to 50 characters. It can contain only letters, digits, hyphens (-), and underscores (_).
Description
The description can contain up to 256 characters and cannot contain special characters !=<>&'\"
- Configure replication instance details as needed.
Figure 2 Replication instance details
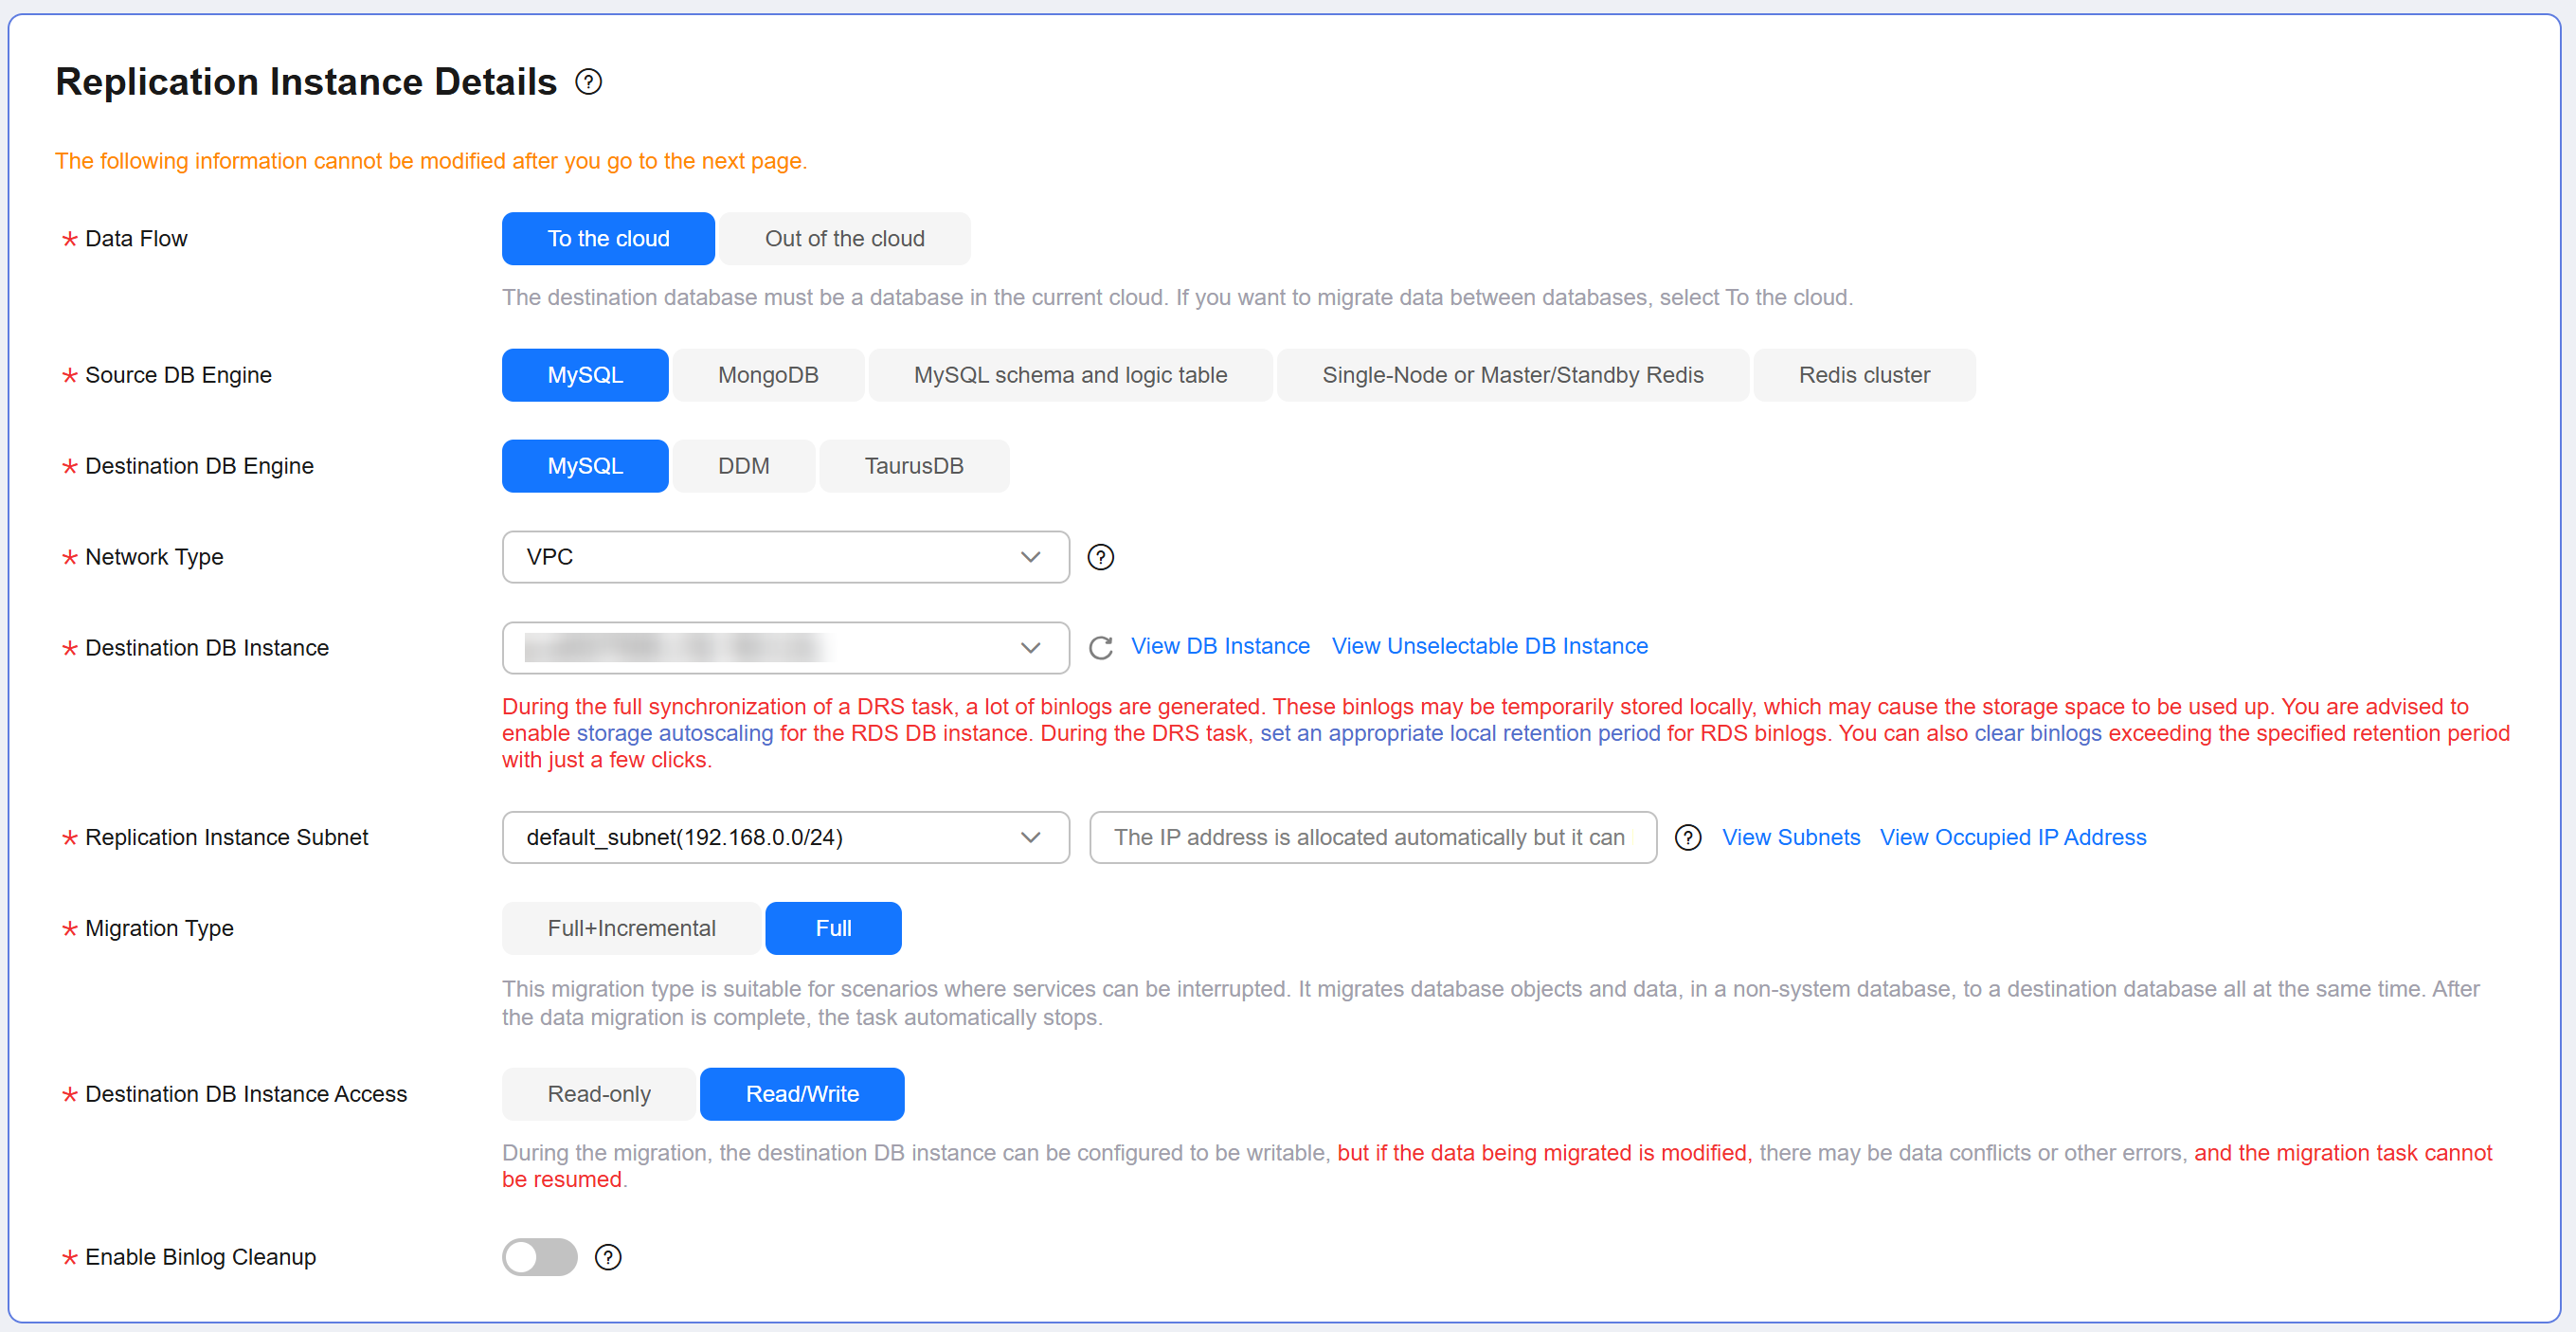
Table 2 Replication instance details Parameter
Description
Data Flow
Select To the cloud.
The destination DB is on the current cloud.
Source DB Engine
Select MySQL.
Destination DB Engine
Select MySQL.
Network Type
Select VPC.
Available options: VPC, VPN or Direct Connect, and Public network. By default, the value is Public network.
- VPC is suitable for migrations between cloud databases of the same account in the same region and VPC.
- Public network is suitable for migrations from on-premises databases or external cloud databases to destination databases.
- VPN or Direct Connect is suitable for migrations from on-premises databases to cloud databases or between databases across regions on the cloud using a VPN, Direct Connect, Cloud Connect, VPCEP, or a VPC peering connection.
Destination DB Instance
Select the RDS DB instance created in Creating an RDS for MySQL Instance.
Replication Instance Subnet
Select a subnet for the replication instance. You can also click View Subnets to go to the network console to check available subnets.
By default, the replication instance and the destination DB instance are in the same subnet. Ensure that the subnet you select has available IP addresses. To ensure that the replication instance is successfully created, only subnets with DHCP enabled are displayed.
Destination DB Instance Access
- Read-only: During migration, the destination database is read-only. After the migration is complete, it restores to the read/write status. This option ensures the integrity and improves the success rate of data migration.
- Read/Write: During migration, the destination database can be queried or modified. Data being migrated may be modified when operations are performed or applications are connected. It should be noted that background processes can often generate or modify data, which may result in data conflicts, task faults, and upload failures. Do not select this option if you do not fully understand the risks. Set the destination database to Read/Write only when you need to modify other data in the database during the migration. The task cannot be modified after being created.
Migration Type
- Full: This migration type is suitable for scenarios where service interruption is acceptable. All objects and data in non-system databases are migrated to the destination database at one time. The objects include tables, views, and stored procedures.
NOTE:
If you are performing a full migration, do not perform operations on the source database. Otherwise, data generated in the source database during the migration will not be synchronized to the destination database.
- Full+Incremental: This migration type allows you to migrate data without interrupting services. After a full migration initializes the destination database, an incremental migration initiates and parses logs to ensure data consistency between the source and destination databases.
NOTE:
If you select Full+Incremental, data generated during the full migration will be continuously synchronized to the destination database, and the source remains accessible.
Enable Binlog Cleanup
Determine whether to enable the function of quickly clearing binlogs of the destination database. After this function is enabled, binlog clearing is enabled for the destination database during the full migration and disabled during the incremental migration.
Specify EIP
This parameter is available when you select Public network for Network Type. Select an EIP to be bound to the DRS instance. DRS will automatically bind the specified EIP to the DRS instance and unbind the EIP after the task is complete.
For details about the data transfer fee generated using a public network, see EIP Price Calculator.
AZ
Select the AZ where you want to create the DRS task. Selecting the one housing the source or destination database can provide better performance.
Enterprise Project
An enterprise project you would like to use to centrally manage your cloud resources and members. Select an enterprise project from the drop-down list. The default project is default.
Tags
(Optional) Tags a task.
- Enter a migration task name. Select the region hosting the destination DB instance for Region.
- Click Create Now.
It takes about 5 to 10 minutes to create a replication instance. After the replication instance is created, you can obtain its EIP.

- On the Configure Source and Destination Databases page, wait until the replication instance is created. Then, specify source and destination database information and click Test Connection for both the source and destination databases to check whether they have been connected to the replication instance. After the connection tests are successful, select the check box before the agreement and click Next.
Figure 3 Configuring the source and destination databases
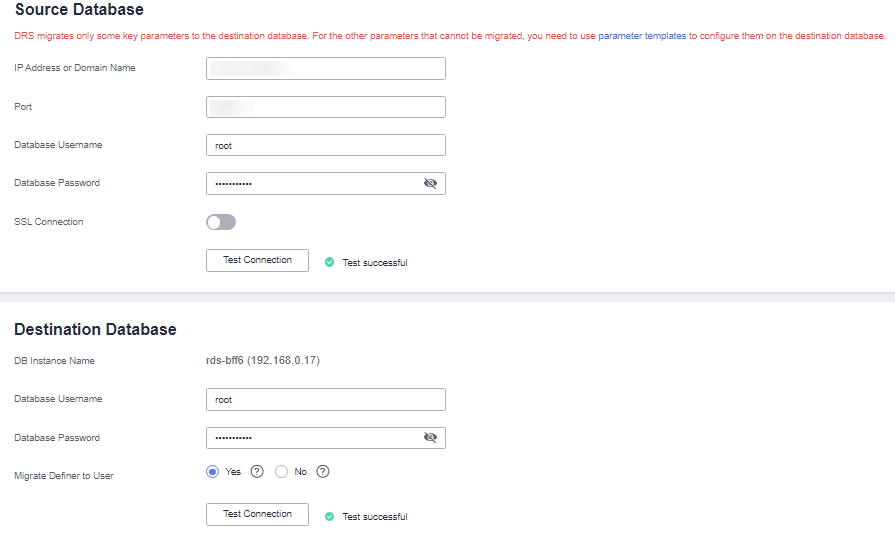
Table 3 Source database information Parameter
Description
IP Address or Domain Name
The IP address or domain name of the source database.
Port
The port of the source database. Range: 1–65535
Database Username
The username for accessing the source database.
Database Password
The password for the database username.
SSL Connection
If SSL connection is required, enable SSL on the source database, ensure that related parameters have been correctly configured, and upload an SSL certificate.
Table 4 Destination database information Parameter
Description
DB Instance Name
The RDS DB instance selected during migration task creation. This parameter cannot be changed.
Database Username
The username for accessing the destination database.
Database Password
The password for the database username.
Migrate Definer to User
Indicates whether to migrate the Definers of all source database objects to the destination database user entered during the connection test.
- Yes
The Definers of all source database objects will be migrated to the user. Other users do not have permissions for database objects unless they are authorized. For details about authorization, see How Do I Maintain the Original Service User Permission System After Definer Is Forcibly Converted During MySQL Migration?
- No
The Definers of all source database objects will not be changed. You need to migrate all accounts and permissions of the source database in the next step. Note that if the Definer account is not found in the destination database, unavailable objects will be created.
- Yes
- On the Set Task page, set the flow control mode, select the accounts and objects to be migrated, and click Next.
For more information, see From MySQL to MySQL.
Table 5 Migration types and objects Parameter
Description
Flow Control
- Yes: You can set a maximum migration speed, which varies depending on network conditions. During the migration, the migration speed of each task (or each subtask in multi-task mode) will not exceed the threshold you configure. Flow Control takes effect in the full phase only.
- No: If the migration speed is not limited, the outbound bandwidth of the source database is maximally used, which causes read consumption on the source database accordingly.
Migrate Incremental Accounts and Permissions
- Yes: All incremental accounts and permissions will be migrated. The migration of incremental accounts and permissions may fail because the source and destination database versions and account encryption modes may be different.
- No: All incremental accounts and permissions will be filtered out during the migration.
Migrate Account
There are accounts that can be migrated completely, accounts whose permissions need to be reduced, and accounts that cannot be migrated. You can choose whether to migrate the accounts based on service requirements. If you select Yes, you can select the accounts to be migrated as required.
Create Indexes Along With Table Structure
- Yes: Indexes are migrated when the table structure is migrated in the full migration phase.
- No: Indexes are migrated separately after data migration.
Filter DROP DATABASE
- If you select Yes, any database deletion operations performed on the source database are not migrated during data migration.
- If you select No, related operations are migrated to the destination database during data migration.
Migration Object
- All: All objects in the source database are migrated to the destination database. After the migration, the object names will remain the same as those in the source database and cannot be modified.
- Tables: The selected table-level objects will be migrated.
- Databases: The selected database-level objects will be migrated.
- On the Check Task page, check the migration task.
- If any check fails, review the cause and rectify the fault. After the fault is rectified, click Check Again.
For details about how to handle check failures, see Solutions to Failed Check Items in Data Replication Service User Guide.
- If the check is complete and the check success rate is 100%, click Next.

You can proceed to the next step only when all checks are successful. If there are any items that require confirmation, view and confirm the details first before proceeding to the next step.
- If any check fails, review the cause and rectify the fault. After the fault is rectified, click Check Again.
- Compare source and destination parameters.
By comparing common and performance parameters for the source databases against those of the destination databases, you can help ensure that services will not change after a migration is completed. You can determine whether to use this function based on service requirements. It mainly ensures that services are not affected after a migration is completed.
- This process is optional, so you can click Next to skip the comparison.
- Compare common parameters:
If the common parameter values in the comparison results are inconsistent, click Save Change to change the destination database values to be the same as those of the source database.
Performance parameter values in both the source and destination databases can be the same or different.
- If you need to change the performance parameter values that are consistent in the comparison results to different values, locate the target parameter, enter values in the Change To column, and click Save Change in the upper left corner.
- If you want to make the performance parameter values of the source and destination databases the same:
- Click Use Source Database Value.
DRS automatically makes the destination database values the same as those of the source database.
- Click Save Change to save your changes.
The system changes the parameter values based on your settings for the destination database values. After the modification, the list is updated automatically.
- Click Next.
- Click Use Source Database Value.
- On the Confirm Task page, specify Start Time, Send Notifications, SMN Topic, Delay Threshold (s), and Stop Abnormal Tasks After, confirm that the configured information is correct, and click Submit to submit the task.
Table 6 Task startup settings Parameter
Description
Start Time
Set Start Time to Start upon task creation or Start at a specified time based on site requirements. The Start at a specified time option is recommended.
Send Notifications
This parameter is optional. After enabled, select an SMN topic. If the task billing is about to start, the status, latency metric, or data of the migration task is abnormal, DRS will send you a notification.
SMN Topic
This parameter is available only after you enable Send Notifications and create a topic on the SMN console and add a subscriber.
For details, see Simple Message Notification User Guide.
Delay Threshold (s)
During an incremental migration, a synchronization delay indicates a time difference (in seconds) of synchronization between the source and destination database.
If the synchronization delay exceeds the threshold you specify, DRS will send alarms to the specified recipients. The value ranges from 0 to 3,600. To avoid repeated alarms caused by the fluctuation of delay, an alarm is sent only after the delay has exceeded the threshold for six minutes.
Data Exception Notification
This parameter is optional. After enabled, DRS will send a notification if the task data is abnormal.
Stop Abnormal Tasks After
Number of days after which an abnormal task is automatically stopped. The value must range from 14 to 100. The default value is 14.
- After the task is submitted, view and manage it on the Online Migration Management page.
- After the full migration is complete, you can use data comparison to check whether the data is consistent before and after the migration.
- By default, DRS retains a task in the Configuration state for three days. After three days, DRS automatically deletes background resources, but the task status remains unchanged. When you reconfigure the task, DRS applies for resources again.
- For a public network task, DRS needs to delete background resources after you stop the task. The EIP bound to the task cannot be restored to the Unbound state until background resources are deleted.
Feedback
Was this page helpful?
Provide feedbackThank you very much for your feedback. We will continue working to improve the documentation.See the reply and handling status in My Cloud VOC.
For any further questions, feel free to contact us through the chatbot.
Chatbot


