

Deploying and Using SVN
Overview
Subversion (SVN) is an open-source version control system. It manages data that changes over time. The data is stored in a central repository. This repository is like a common file server and records all file changes whenever they happen. In this way, you can restore the archive to an earlier version or browse the change history of a file.
This section describes how to deploy and use SVN on an ECS running CentOS 7.2 64-bit.
Prerequisites
- You have purchased an ECS and bound an EIP to it.
- The rules listed in the following table have been added to the security groups that the target ECS belongs to. For details, see Adding a Security Group Rule.
Table 1 Security group rules Direction
Priority
Action
Type
Protocol & Port
Source
Inbound
1
Allow
IPv4
TCP: 22
0.0.0.0/0
Inbound
1
Allow
IPv4
TCP: 80
0.0.0.0/0
Inbound
1
Allow
IPv4
TCP: 443
0.0.0.0/0
Inbound
1
Allow
IPv4
TCP: 3690
0.0.0.0/0
Deploying SVN
SVN supports two access modes: HTTP and svnserve. The main differences between these modes are outlined below. You can choose the access mode that best fits your business needs.
| Item | HTTP | svnserve |
|---|---|---|
| Protocol | HTTP | Custom SVN protocol |
| Access method | Web browser or SVN client | SVN client |
| Port | Port 80 | Port 3690 |
| Security | HTTPS is used for encrypted communication. | By default, plaintext communication is used. You can enable the encryption option to encrypt the communication. |
| Configuration | On the web server | On the SVN server |
| Functions | A variety of functions, such as permission management and log viewing | Relatively few functions |
Deploying SVN with HTTP Access
- Log in to the ECS.
For details, see Login Overview (Linux).
- Install SVN.
- Run the following command to install SVN:
yum install subversion
- Run the following command to check the SVN version:
svnserve --version
Information similar to the following is displayed.

- Run the following command to install SVN:
- Install Apache.
- Run the following command to install httpd:
yum install httpd -y
- Run the following command to check the httpd version:
httpd -version
Information similar to the following is displayed.

- Run the following command to install httpd:
- Run the following command to install mod_dav_svn:
mod_dav_svn is an Apache HTTP server module that provides web access for the SVN version control system.
yum install mod_dav_svn -y
- Create an SVN repository.
- Run the following command to create a directory:
mkdir /var/svn
- Run the following commands in sequence to create a repository:
cd /var/svn
svnadmin create /var/svn/svnrepos
- Run the following command to change the user group of the SVN repository to apache:
chown -R apache:apache /var/svn/svnrepos
- Run the following commands in sequence to view the repository files automatically generated:
cd svnrepos
ls
Information similar to the following is displayed.

The SVN directories are described as follows:
- conf: stores the configuration files of the SVN repository, including the access account and permissions of the repository.
- db: stores all version control data files.
- format file: a text file that contains only one integer, indicating the version number of the current file repository.
- hooks: stores hook script files.
- locks: traces the clients that access the file repository.
- Run the following command to create a directory:
- Add a user and password for the SVN repository.
By default, SVN uses plaintext passwords, but HTTP does not support plaintext passwords. Therefore, you need to generate a passwd file. In this example, we add the user userTest and set the password to passWDTest.
Run the following commands as required:
- If you are adding a user for the first time, include the -c parameter in the command to generate a file.
sudo htpasswd -c /var/svn/svnrepos/conf/passwd userTest
- If you have already added a user and need to add more users, run the following command:
sudo htpasswd /var/svn/svnrepos/conf/passwd userTest
Set a password for the user as prompted.
- If you are adding a user for the first time, include the -c parameter in the command to generate a file.
- Run the following command to go to the conf directory:
cd /var/svn/svnrepos/conf/
- Set permissions for the account.
- Run the following command to open the permissions control file:
vim authz
- Press i to enter insert mode.
- Add the following content to the end of the file (userTest indicates the user added in 6, r indicates the read permissions, and w indicates the write permissions):
[/]
userTest=rw

- Press Esc to exit insert mode. Then, enter :wq to save the settings and exit.
- Run the following command to open the permissions control file:
- Modify the SVN service configuration file.
- Run the following command to open the SVN configuration file:
vim svnserve.conf
- Press i to enter insert mode.
- Locate the following configuration lines and delete the comment tags (#) and spaces before the lines. Note: Each line cannot start with a space. There must be a space before and after an equal sign (=).
anon-access = read # Read permissions authorized to anonymous users. If anon-access is set to none, anonymous users are not allowed to access the file. If the value is set to none, the log date can be displayed normally.
auth-access = write # Write permissions authorized to users.
password-db = passwd # File to be used as the account file.
authz-db = authz # File to be used as the permissions file.
realm = /var/svn/svnrepos # Authentication realm name, which is the directory where the repository is located.

- Press Esc to exit insert mode. Then, enter :wq to save the settings and exit.
- Run the following command to open the SVN configuration file:
- Run the following command to start the SVN repository:
svnserve -d -r /var/svn/svnrepos
- Run the following command to check whether the SVN service is enabled:
ps -ef |grep svn
If information similar to the following is displayed, the SVN service is enabled.


Run the killall svnserve command to stop the SVN service.
- Configure Apache.
- Run the following command to add and edit the httpd configuration file:
vim /etc/httpd/conf.d/subversion.conf
- Press i to enter insert mode.
- Enter the following information in the subversion.conf file:
<Location /svn>
DAV svn
SVNParentPath /var/svn
AuthType Basic
AuthName "Authorization SVN"
AuthzSVNAccessFile /var/svn/svnrepos/conf/authz
AuthUserFile /var/svn/svnrepos/conf/passwd
Require valid-user
</Location>
- Press Esc to exit insert mode. Then, enter :wq to save the settings and exit.
- Run the following command to start the Apache service:
systemctl start httpd.service
- Run the following command to add and edit the httpd configuration file:
Deploying SVN with svnserve Access
- Log in to the ECS.
For details, see Login Overview (Linux).
- Install SVN.
- Run the following command to install SVN:
yum install subversion
- Run the following command to check the SVN version:
svnserve --version
Information similar to the following is displayed.

- Run the following command to install SVN:
- Create an SVN repository.
- Run the following command to create a directory:
mkdir /var/svn
- Run the following commands in sequence to create a repository:
cd /var/svn
svnadmin create /var/svn/svnrepos
- Run the following commands in sequence to view the repository files automatically generated:
cd svnrepos
ls
Information similar to the following is displayed.

The SVN directories are described as follows:
- conf: stores the configuration files of the SVN repository, including the access account and permissions of the repository.
- db: stores all version control data files.
- format file: a text file that contains only one integer, indicating the version number of the current file repository.
- hooks: stores hook script files.
- locks: traces the clients that access the file repository.
- Run the following command to create a directory:
- Set the username and password of the SVN repository.
- Run the following commands to open the user configuration file:
cd conf/
vim passwd
- Press i to enter insert mode.
- Add the username and password to the [users] field.
The format of the username and password is Username = Password. As shown in the following figure, in user1 (username) = passwd1 (password), there must be a space before and after the equal sign (=).

- Press Esc to exit insert mode. Then, enter :wq to save the settings and exit.
- Run the following commands to open the user configuration file:
- Set permissions for the account.
- Run the following command to open the permissions control file:
vim authz
- Press i to enter insert mode.
- Add the following content to the end of the file (user1 indicates the user added in 4, r indicates the read permissions, and w indicates the write permissions):
[/]
user1=rw

- Press Esc to exit insert mode. Then, enter :wq to save the settings and exit.
- Run the following command to open the permissions control file:
- Modify the SVN service configuration file.
- Run the following command to open the SVN configuration file:
vim svnserve.conf
- Press i to enter insert mode.
- Locate the following configuration lines and delete the comment tags (#) and spaces before the lines. Note: Each line cannot start with a space. There must be a space before and after an equal sign (=).
anon-access = read # Read permissions authorized to anonymous users. If anon-access is set to none, anonymous users are not allowed to access the file. If the value is set to none, the log date can be displayed normally.
auth-access = write # Write permissions authorized to users.
password-db = passwd # File to be used as the account file.
authz-db = authz # File to be used as the permissions file.
realm = /var/svn/svnrepos # Authentication realm name, which is the directory where the repository is located.

- Press Esc to exit insert mode. Then, enter :wq to save the settings and exit.
- Run the following command to open the SVN configuration file:
- Run the following command to start the SVN repository:
svnserve -d -r /var/svn/svnrepos
- Run the following command to check whether the SVN service is enabled:
ps -ef |grep svn
If information similar to the following is displayed, the SVN service is enabled.

Run the killall svnserve command to stop the SVN service.
Using SVN
The process of using SVN to manage code is as follows:
- Extract the source code to a local directory (Checkout).
- Other personnel modify and submit the source code to the repository.
- Obtain the latest code (Update).
- Modify and commission the source code.
- Submit the modified code to the repository so that others can view the modifications (Commit).
The procedure is as follows:
Extracting the source code to a local directory (Checkout)
- Download and install the TortoiseSVN client in the local Windows environment.
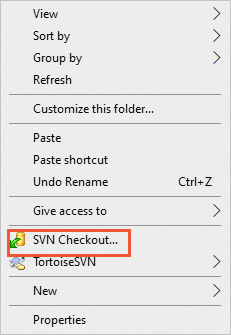
- Right-click the blank area in the local project folder.
- In the displayed menu, choose SVN Checkout...
- Set the following parameters and click OK:
- URL of repository: repository URL, which is the address for storing source code. The format is svn://Public IP address of the instance/.
- Checkout directory: local directory to which the source code is checked out. In this example, the directory is C:\work01.
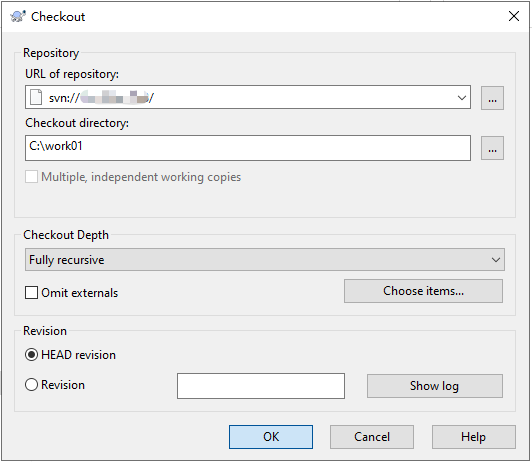
When you log in to the system for the first time, you need to enter the username and password set in the passwd file in 4.
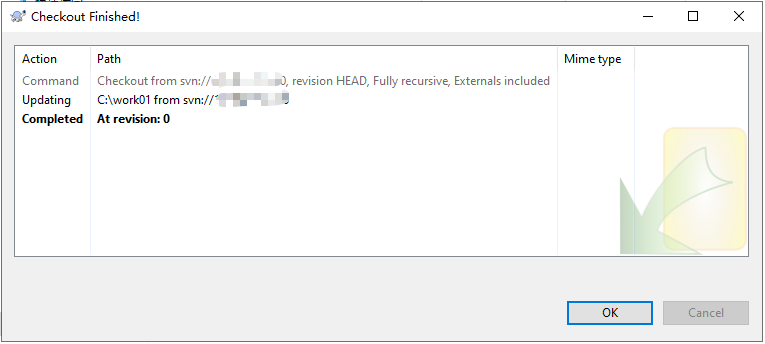
The checkout result is as follows.
Obtaining updates (Update)
After a project in the system repository on the SVN server is updated, you can right-click the blank area in the local project file and choose SVN Update from the shortcut menu. The latest project is automatically downloaded and all updated content is displayed.
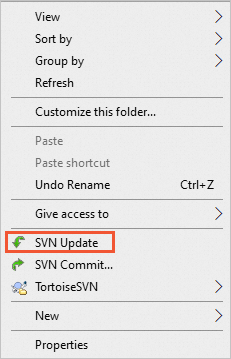
Right-click the original project folder to select SVN Update. The original content will be automatically overwritten. It is recommended that you back up the project before updating it to prevent data loss of your project.
Submitting the modification (Commit)
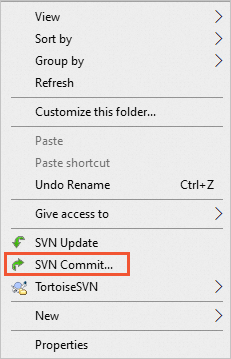
- Right-click the blank area of the project file and choose SVN Commit... from the shortcut menu.
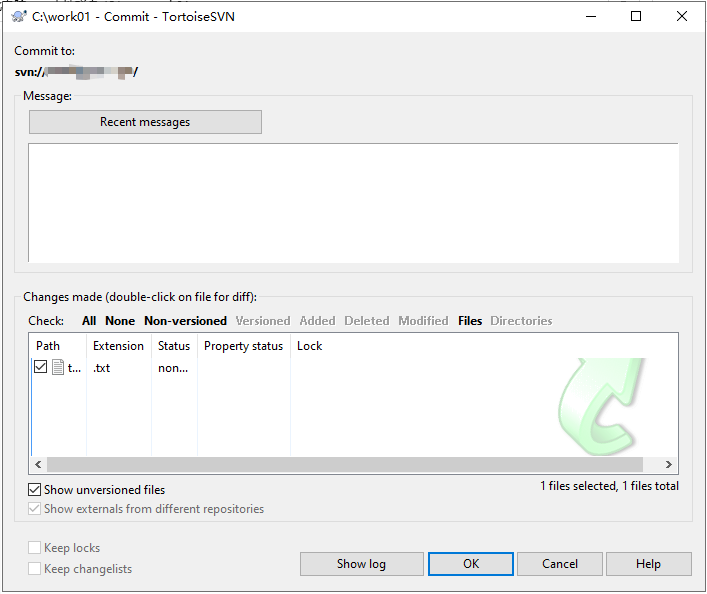
- Enter the updated version information (commit comments), select the content to be committed, and click OK.
The local project will then be committed to the SVN server resource repository, updating the repository project accordingly.
There may be conflicts if multiple users submit changes at the same time. In this case, you can back up your own project, download the latest project from the server, overwrite it with your own project, and then click SVN Commit.
FAQs
Symptom
Why is a message displayed indicating that the host is not responding when I use TortoiseSVN to access the SVN server?

Possible Causes
- The SVN server is not started.
- The port required by the SVN server is not enabled in the security group.
- The firewalld firewall is enabled on the ECS, but the port required by the SVN server is not enabled.
- Run the following command to check the SVN service status:
ps -ef |grep svn
If the following information is displayed, the SVN service has been started. If the following information is not displayed, run svnserve -d -r /var/svn/svnrepos/ to start the SVN service.

- Check whether the security group rules of the ECS meet the SVN server requirements.
- HTTP mode: Ports 22, 80, and 443 must be enabled.
- svnserve mode: Ports 22, 80, 443, and 3690 must be enabled.
- Check the firewalld firewall.
- Run the following command to check the status of the firewalld firewall:
firewall-cmd --state
- If the command output is "not running", the firewalld firewall is disabled, which does not affect the SVN server.
- If the command output is "running", the firewalld firewall is enabled. Go to the next step.
- Enable the ports (such as port 3690) required by the SVN server in the firewalld rules.
firewall-cmd --add-port=3690/tcp --permanent
- Reload the firewalld service configuration to make it take effect.
systemctl reload firewalld
- Run the following command to check the status of the firewalld firewall:
What is your overall rating for this page?
Thank you very much for your feedback. We will continue working to improve the documentation.See the reply and handling status in My Cloud VOC.
For any further questions, feel free to contact us through the chatbot.
Chatbot


