Managing Work Item Statuses and Transitions
Customize the statuses of different work item types, adjust their sequence, configure transitions, and set automated transition rules.
Prerequisites
- You have created a Scrum project. For details, see Creating a CodeArts Project.
- An IAM user has been added to the project. For details about how to add members, see Adding Members to a CodeArts Project.
- You have permissions to custom work items. For details about how to set permissions, see Managing Project Permissions.
Managing Work Item Statuses and Transitions
You can customize fields and templates for epics, features, stories, tasks, and bugs. The following uses epics as an example.
- Configuring work item statuses
- Access the CodeArts Req homepage.
- Go to a Scrum project and choose .
- In the navigation pane, choose . The Statuses tab page is displayed by default.
- Add, create, or delete statuses.
- Click Add Existing Status, select a status from the drop-down list, and click OK.
- Click Create Status. In the dialog box that is displayed, set the status name (for example, CustomStatus1), category (for example, Doing), and description, and click Add.
The new status is displayed in the current work item status list and on the Transitions tab page.
You can delete the added status as required.
- Press and hold
 on the left of a status name to rearrange the work item status by drag-and-drop.
- Configuring work item transitions
You can customize the statuses that work items can be transitioned to. Then click the status of a work item on the work item list page to check the transition.
- Access the CodeArts Req homepage.
- Go to a Scrum project and choose .
- In the navigation pane, choose . Then click the Transitions tab.
Figure 1 Epic status transitions

- Select the allowed statuses and click Save.
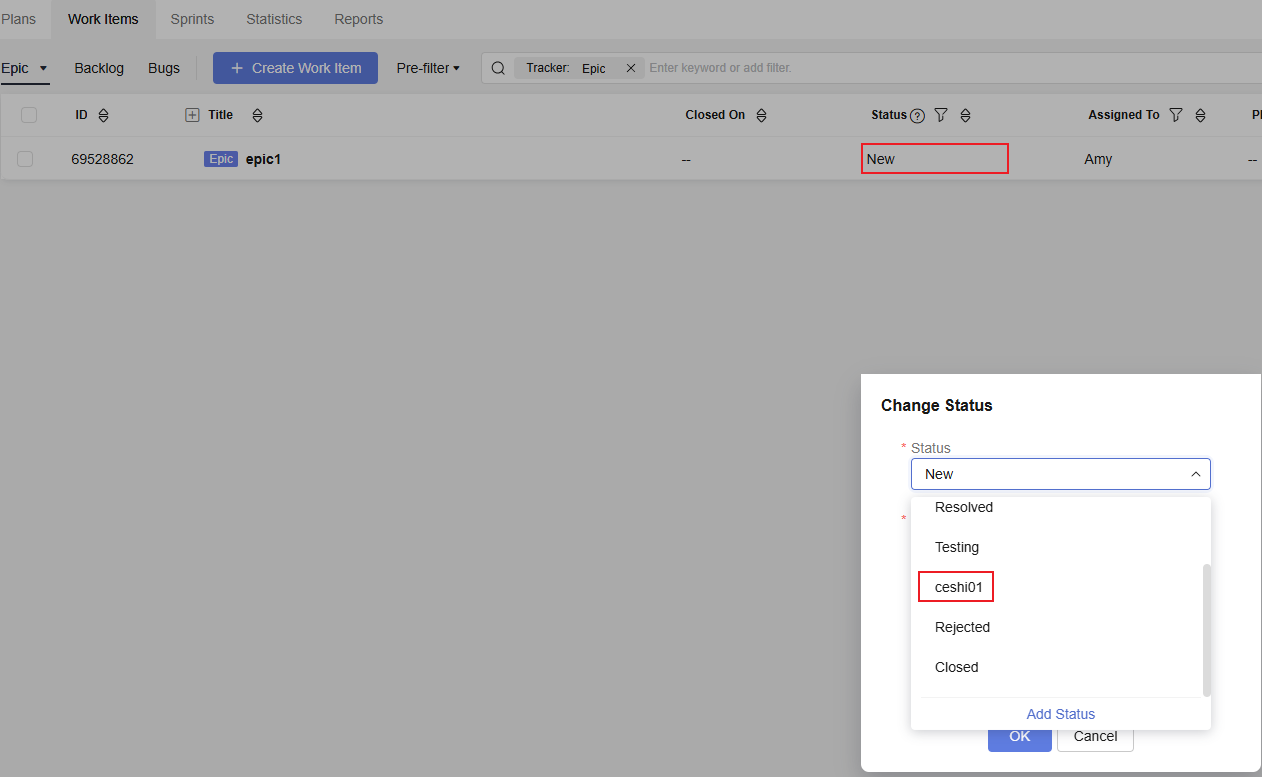
- (Optional) After the configuration is complete, check the status of ceshi01 in the work item list.
Figure 2 Epic status transition

- Configuring automated status transition rules
Configure the handler options, default handler option, default comments, and whether comments are mandatory for work items transitioning to a specific status. In addition, specify the target status work items will transition to when a specific code message is committed. This configuration can improve your project efficiency.
- Specify a handler for work items in a specified status.
- Access the CodeArts Req homepage.
- Go to a Scrum project and choose .
- In the navigation pane, choose . Click the Automation tab. By default, Change Handler is selected.
Figure 3 Specifying handlers for epic statuses

- Click
 in the row of a target status (for example, ceshi01). Then configure the handler options, default handler option, default comments, and whether comments are mandatory for work items that transition to the cehsi01 status.
 - Click OK. The rule applies when work items transition to this status.
- Specify a transition status for a code commit message.
After code is committed, the work item automatically transitions to a specified status based on the code information.
- Access the CodeArts Req homepage.
- Go to a Scrum project and choose .
- In the navigation pane, choose . Click the Automation tab, and select Change Status.
Figure 4 Specifying transition statuses for different code commit messages

- Toggle on or off the switch in the Apply column. Once the switch is toggled on, work items whose associated code commits contain the corresponding keyword in the commit message will automatically transition to the target status.
- Specify a handler for work items in a specified status.
Feedback
Was this page helpful?
Provide feedbackThank you very much for your feedback. We will continue working to improve the documentation.See the reply and handling status in My Cloud VOC.
For any further questions, feel free to contact us through the chatbot.
Chatbot


