Forwarding Data to GeminiDB Influx
Scenarios
Forward data to GeminiDB Influx and cloud-native time series database with full compatibility with the service. GeminiDB Influx reads and writes time series data with high performance and compression ratio in high concurrency scenarios, provides cold and hot tiered storage, elastic scale-out, and monitoring and alarm reporting. It stores the data with compression algorithms, allows you to query data using SQL-like statements, and supports multi-dimensional aggregation computing and visual analysis. It is widely used to monitor resources, services, IoT devices, and industrial production processes, evaluate production quality, and trace faults. With high throughput and concurrency, it can handle a large number of connections in a very short period of time, making it an excellent choice for IoT applications.
Buying GeminiDB Influx Instances
- Log in to GeminiDB Influx and click Buy Now.
- Select either of the Pay-per-use or Yearly/Monthly as the Billing Mode, configure specifications and storage space as required, and set Compatible API to InfluxDB. For details, see Buying a Cluster Instance.
Figure 1 Buying an InfluxDB Instance

- Download the InfluxDB client and connect to an instance through the client by referring to Connecting to an Instance over a Public Network.
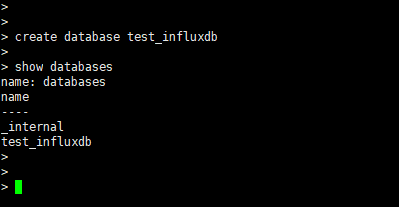
- After connecting to the instance through the client, run the following command to create a database. ${databaseName} can be customized.
create database ${databaseName}Figure 2 Creating a database
Configuring IoTDA
You can configure data forwarding rules in IoTDA to forward data reported by devices to InfluxDB.
- Go to the IoTDA service page and click Access Console.
- In the navigation pane, choose , and click Create Rule in the upper left corner.
- Set the parameters based on the table below. The following parameter values are only examples. You can create a rule by referring to Data Forwarding Overview and click Create Rule.
Table 1 Rule parameters Parameter
Description
Rule Name
Customize a name, for example, iotda-InfluxDB.
Description
Enter a rule description, for example, forwarding data to InfluxDB.
Data Source
Select Device.
Trigger
Device added is automatically configured.
Resource Space
Select All resource spaces.
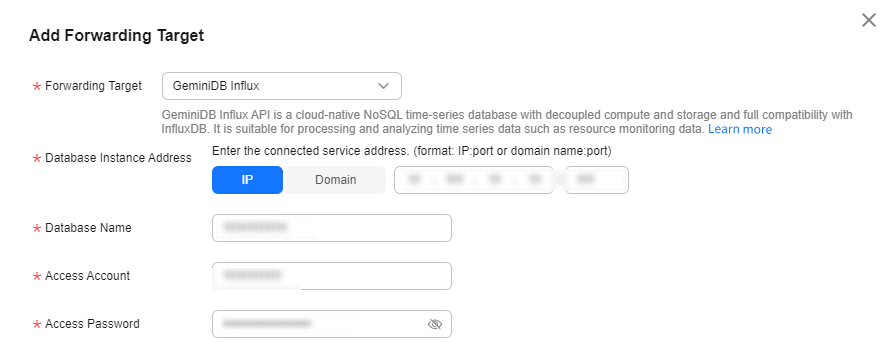
- Click the Set Forwarding Target tab, click Add to set a forwarding target, and click Next.
Table 2 Forwarding target parameters Parameter
Description
Forwarding Target
Select GeminiDB Influx.
Database Instance Address
Enter the connection address of the Influx instance you purchased. IoTDA enterprise edition instances support private network access of Influx instances in the same VPC and subnet.
Database Name
Enter the name of the database created in InfluxDB.
Access Account
Enter the InfluxDB account name.
Access Password
Password of the InfluxDB.
Certificate ID
Truststore certificate, which is used by the client to verify the server certificate. If this parameter is left blank, the default certificate provided by GeminiDB Influx is used. For GeminiDB Influx instances using private certificates, upload a custom CA on the Rules > Server Certificates page and complete binding.
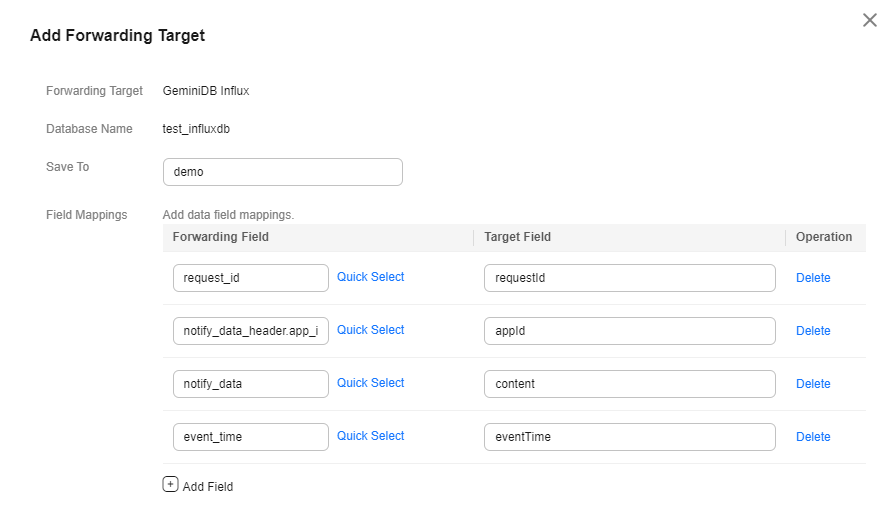
- Set the target fields and click OK to complete configuration.
Table 3 Field mapping parameters Parameter
Description
Save To
Enter the table name, which is user-defined.
Field Mappings
Configure the field mappings. You can customize the target field and configure the forwarding field by referring to Push a Device Addition Notification.
Figure 3 Creating a forwarding target - to InfluxDB Figure 4 Setting InfluxDB field mapping
- Click Enable Rule to activate the configured data forwarding rule.
Verifying Configurations
Log in to the IoTDA console and create a device.
Expected result:
Log in to InfluxDB through the client. Access the database and query data.
show databases //Query the database.
use test_influxdb //Switch the database.
select * from demo //Query data.

Feedback
Was this page helpful?
Provide feedbackThank you very much for your feedback. We will continue working to improve the documentation.See the reply and handling status in My Cloud VOC.
For any further questions, feel free to contact us through the chatbot.
Chatbot


